Embroidered Floral Gown of Dreams

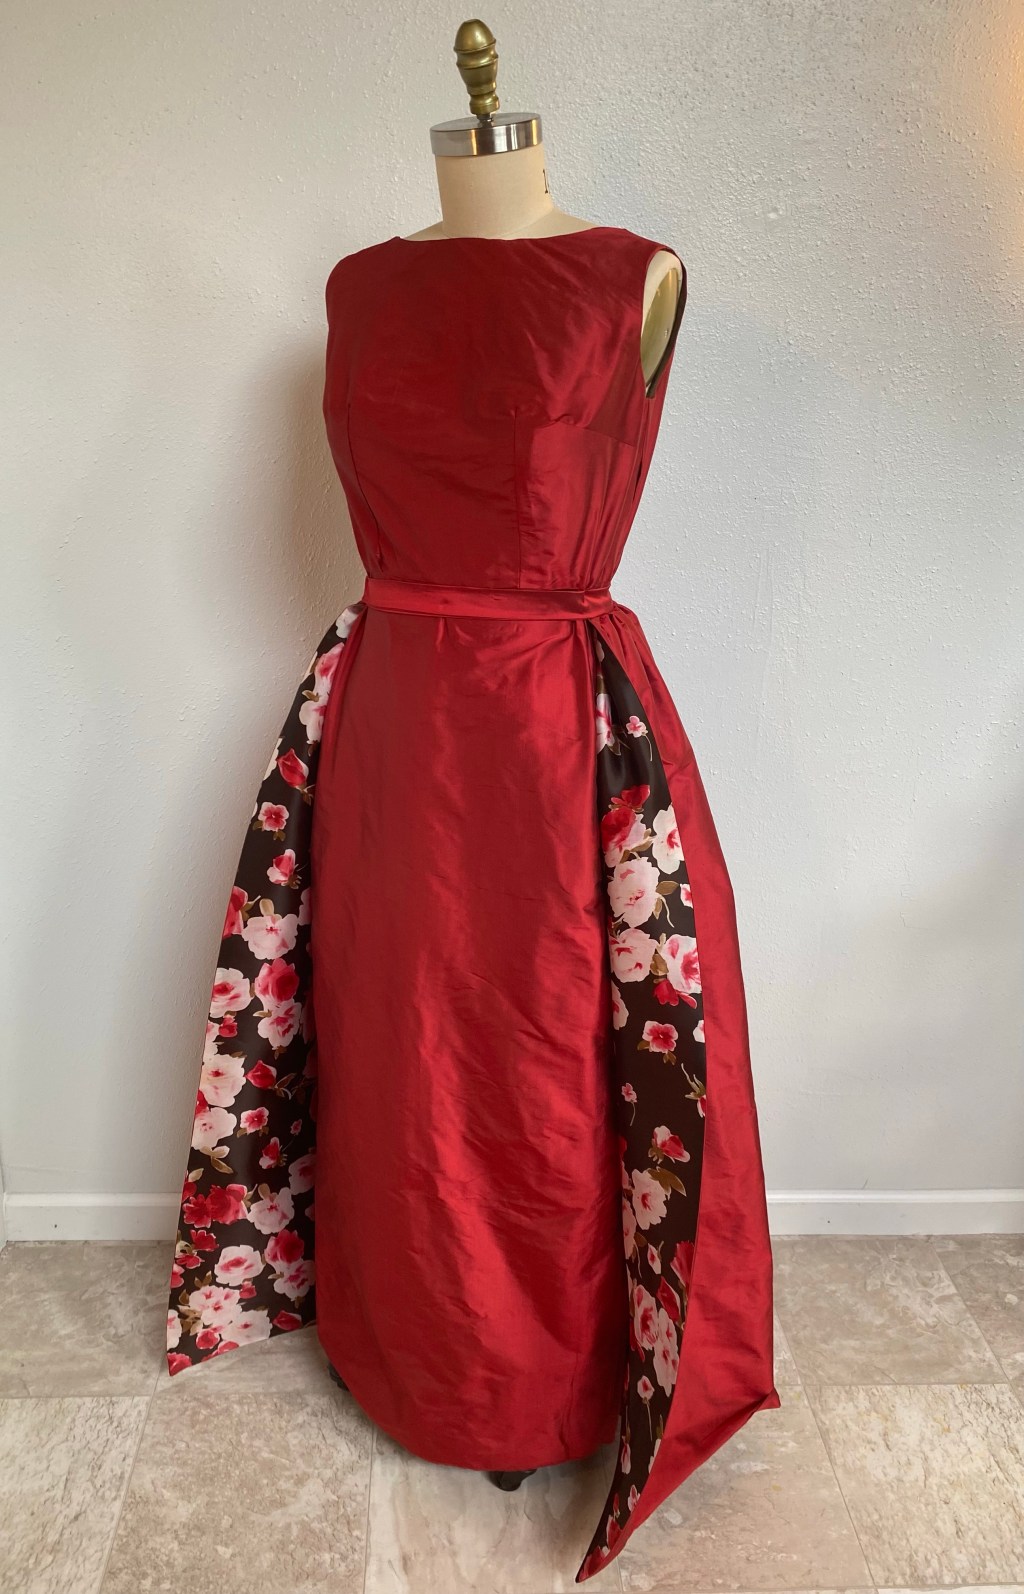
I dream of creating beautiful and elegant evening gowns, but rarely find an occasion for them, so the visions just sit in my head and sometimes make it to a sketch, but rarely go further than that.

I dream of making beautiful bridal gowns, ones that are interesting and unique, perhaps made in colors or prints other than the traditional white. Bringing in texture, color, design details that bring excitement, joy and romance to the occasion.

One occasion that came to mind that I could create a gorgeous dress for an actual wearer was senior prom in May 2023 for my friend’s daughter Payton! I’ve known Payton since she was about 9 or 10, meeting her when my good friend Kristin was dating Payton’s dad Scott. Kristin and Scott got married at a beautiful destination wedding in Tulum, Mexico which I attended, and had the honor of making little fascinators for both Kristin and Payton to wear at the wedding! So fun!

A feather and rhinestone fascinator I made for young Payton.

The feather and tulle fascinator I made for Kristin

Kiss the bride and jump for joy!

Fast forward 8 years, Payton has grown into a lovely young lady, quiet, intelligent and thoughtful, tall and slim, and just beautiful! She was perfect for my vision, and could use a new dress for her upcoming prom. I had a muse that was willing to put up with the process for months, come to my house for fittings, and model my creation to help spread the word. A perfect trade!

Pinterest has been a great resource to find inspiration and store ideas. I visit the website a few times a week to recall what I have saved and see what might be new for ideas, mostly for sewing, but also for cooking, organizing, exercise and more. I have boards for these topics, and my sewing wish lists are broken down by type of garment. I also create and share boards with my dressmaking clients to keep together what direction we are going for the project together for reference.

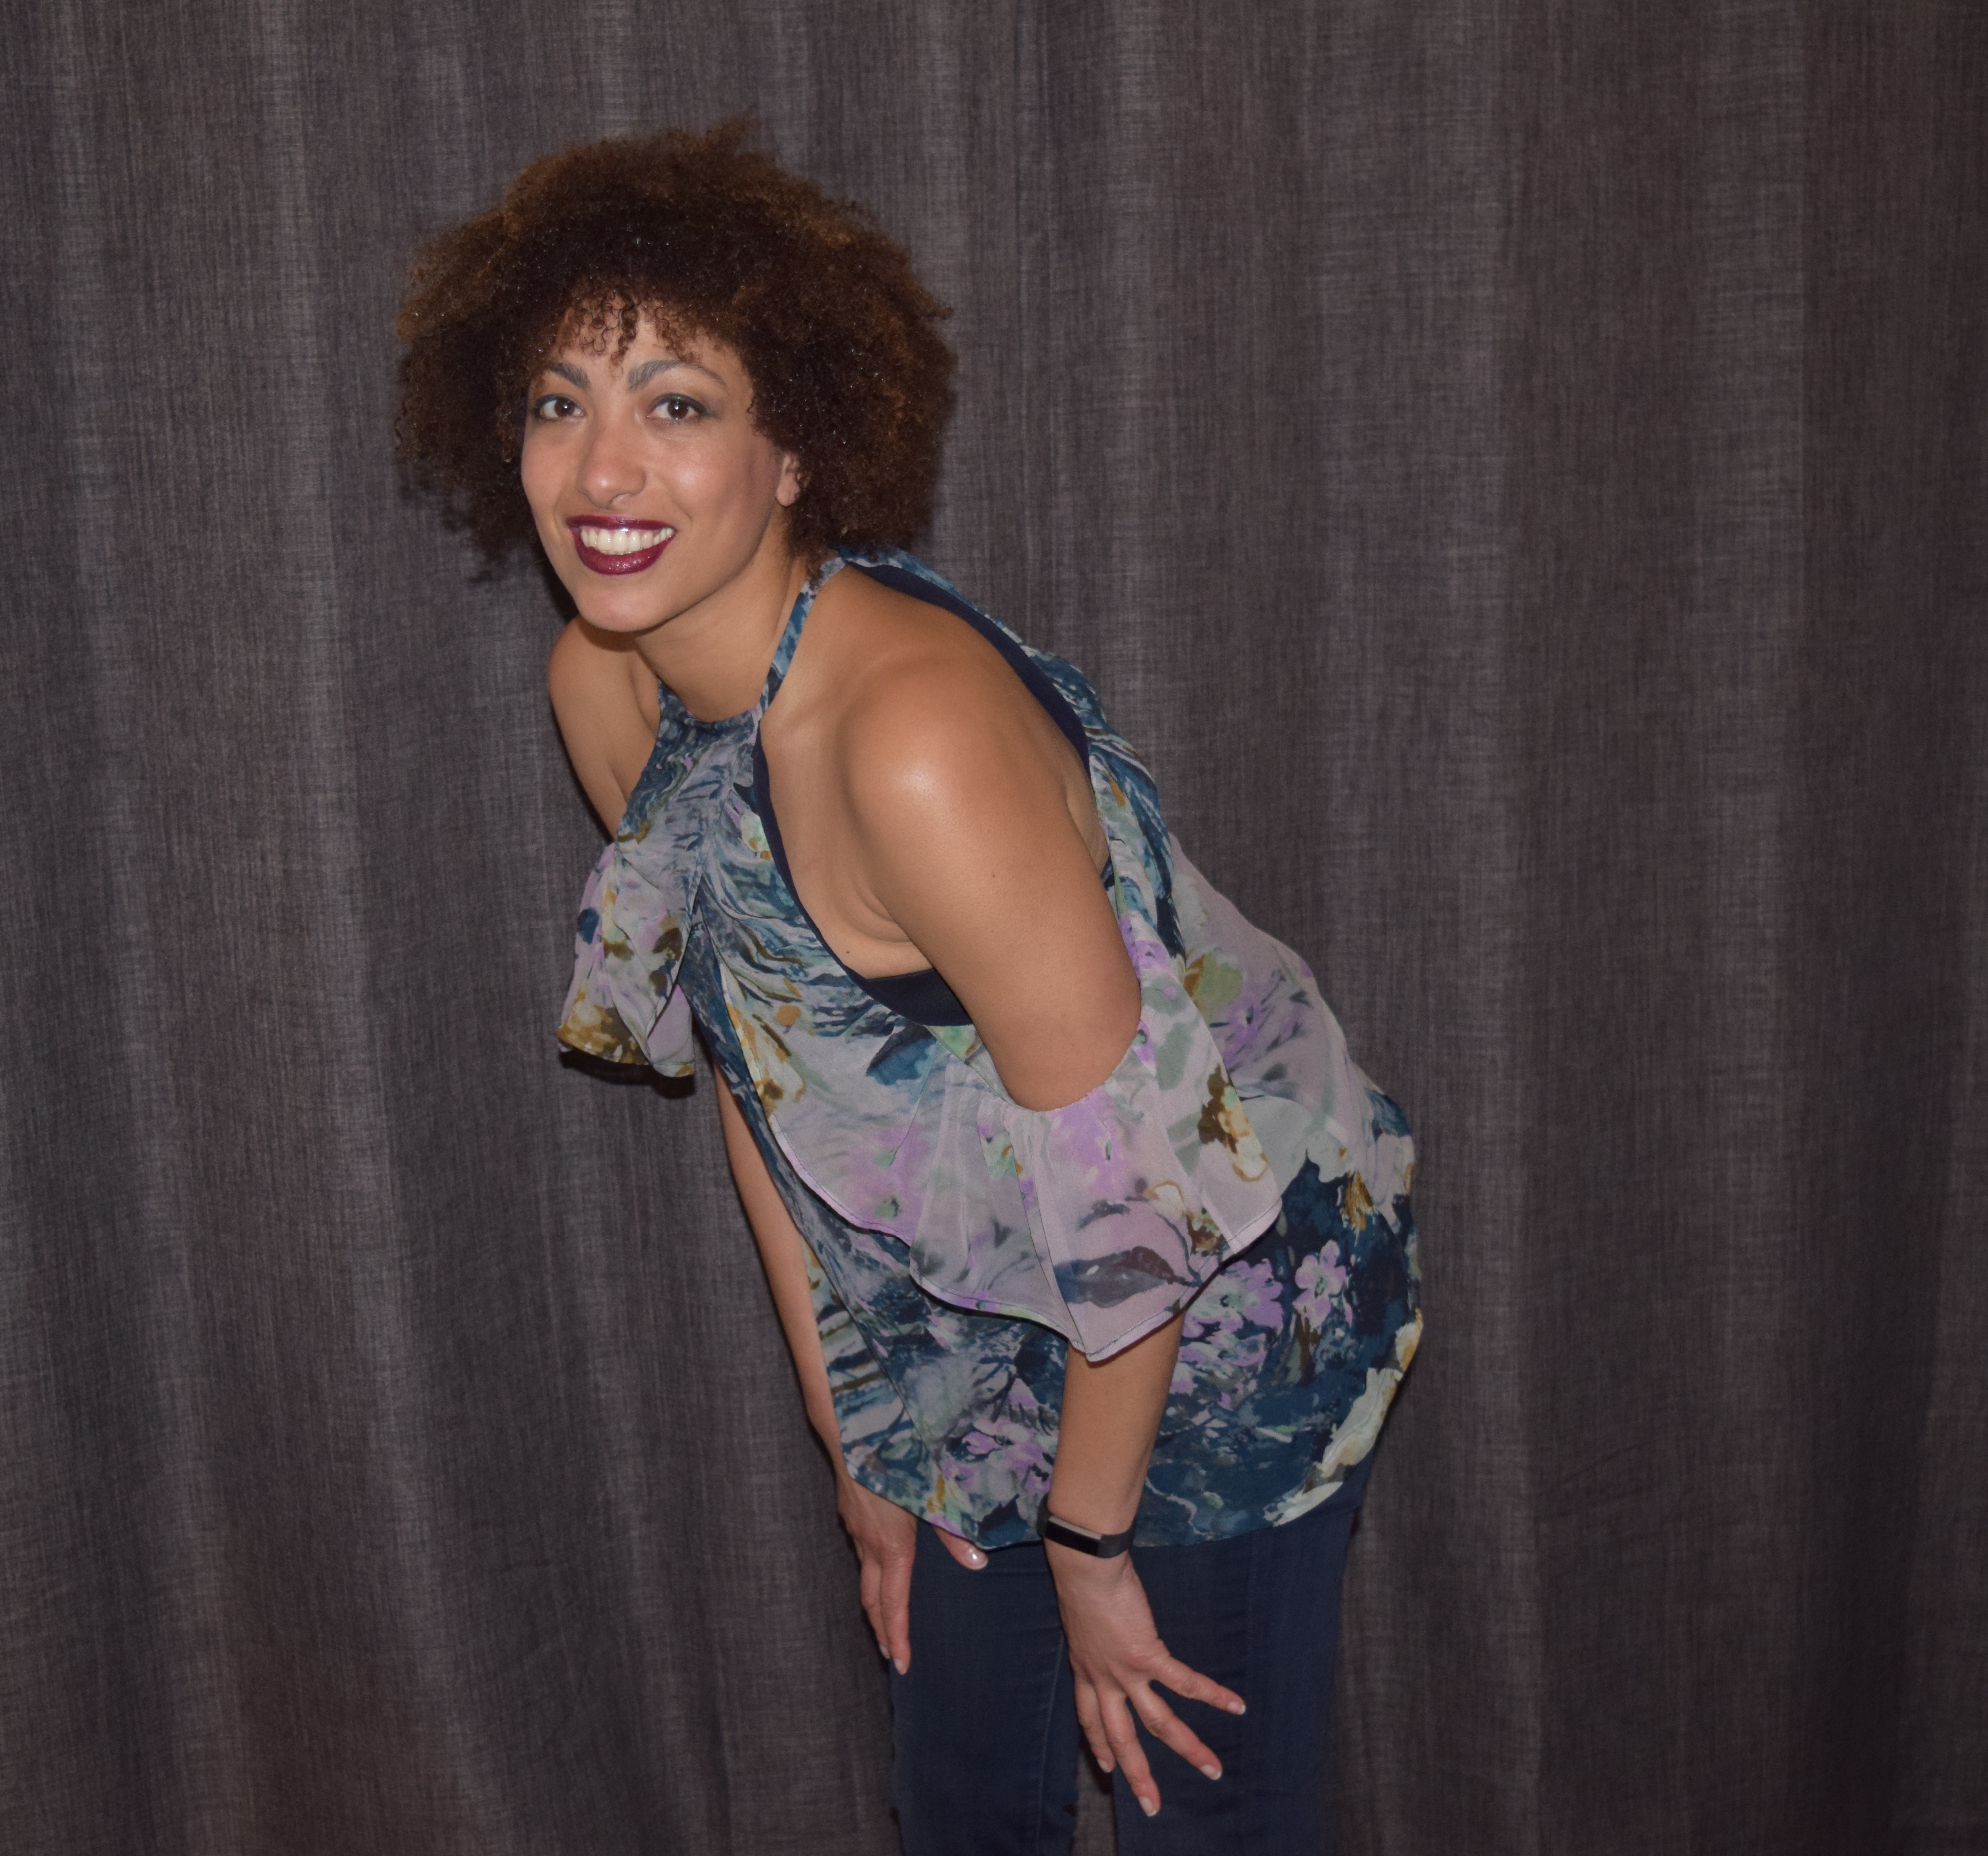
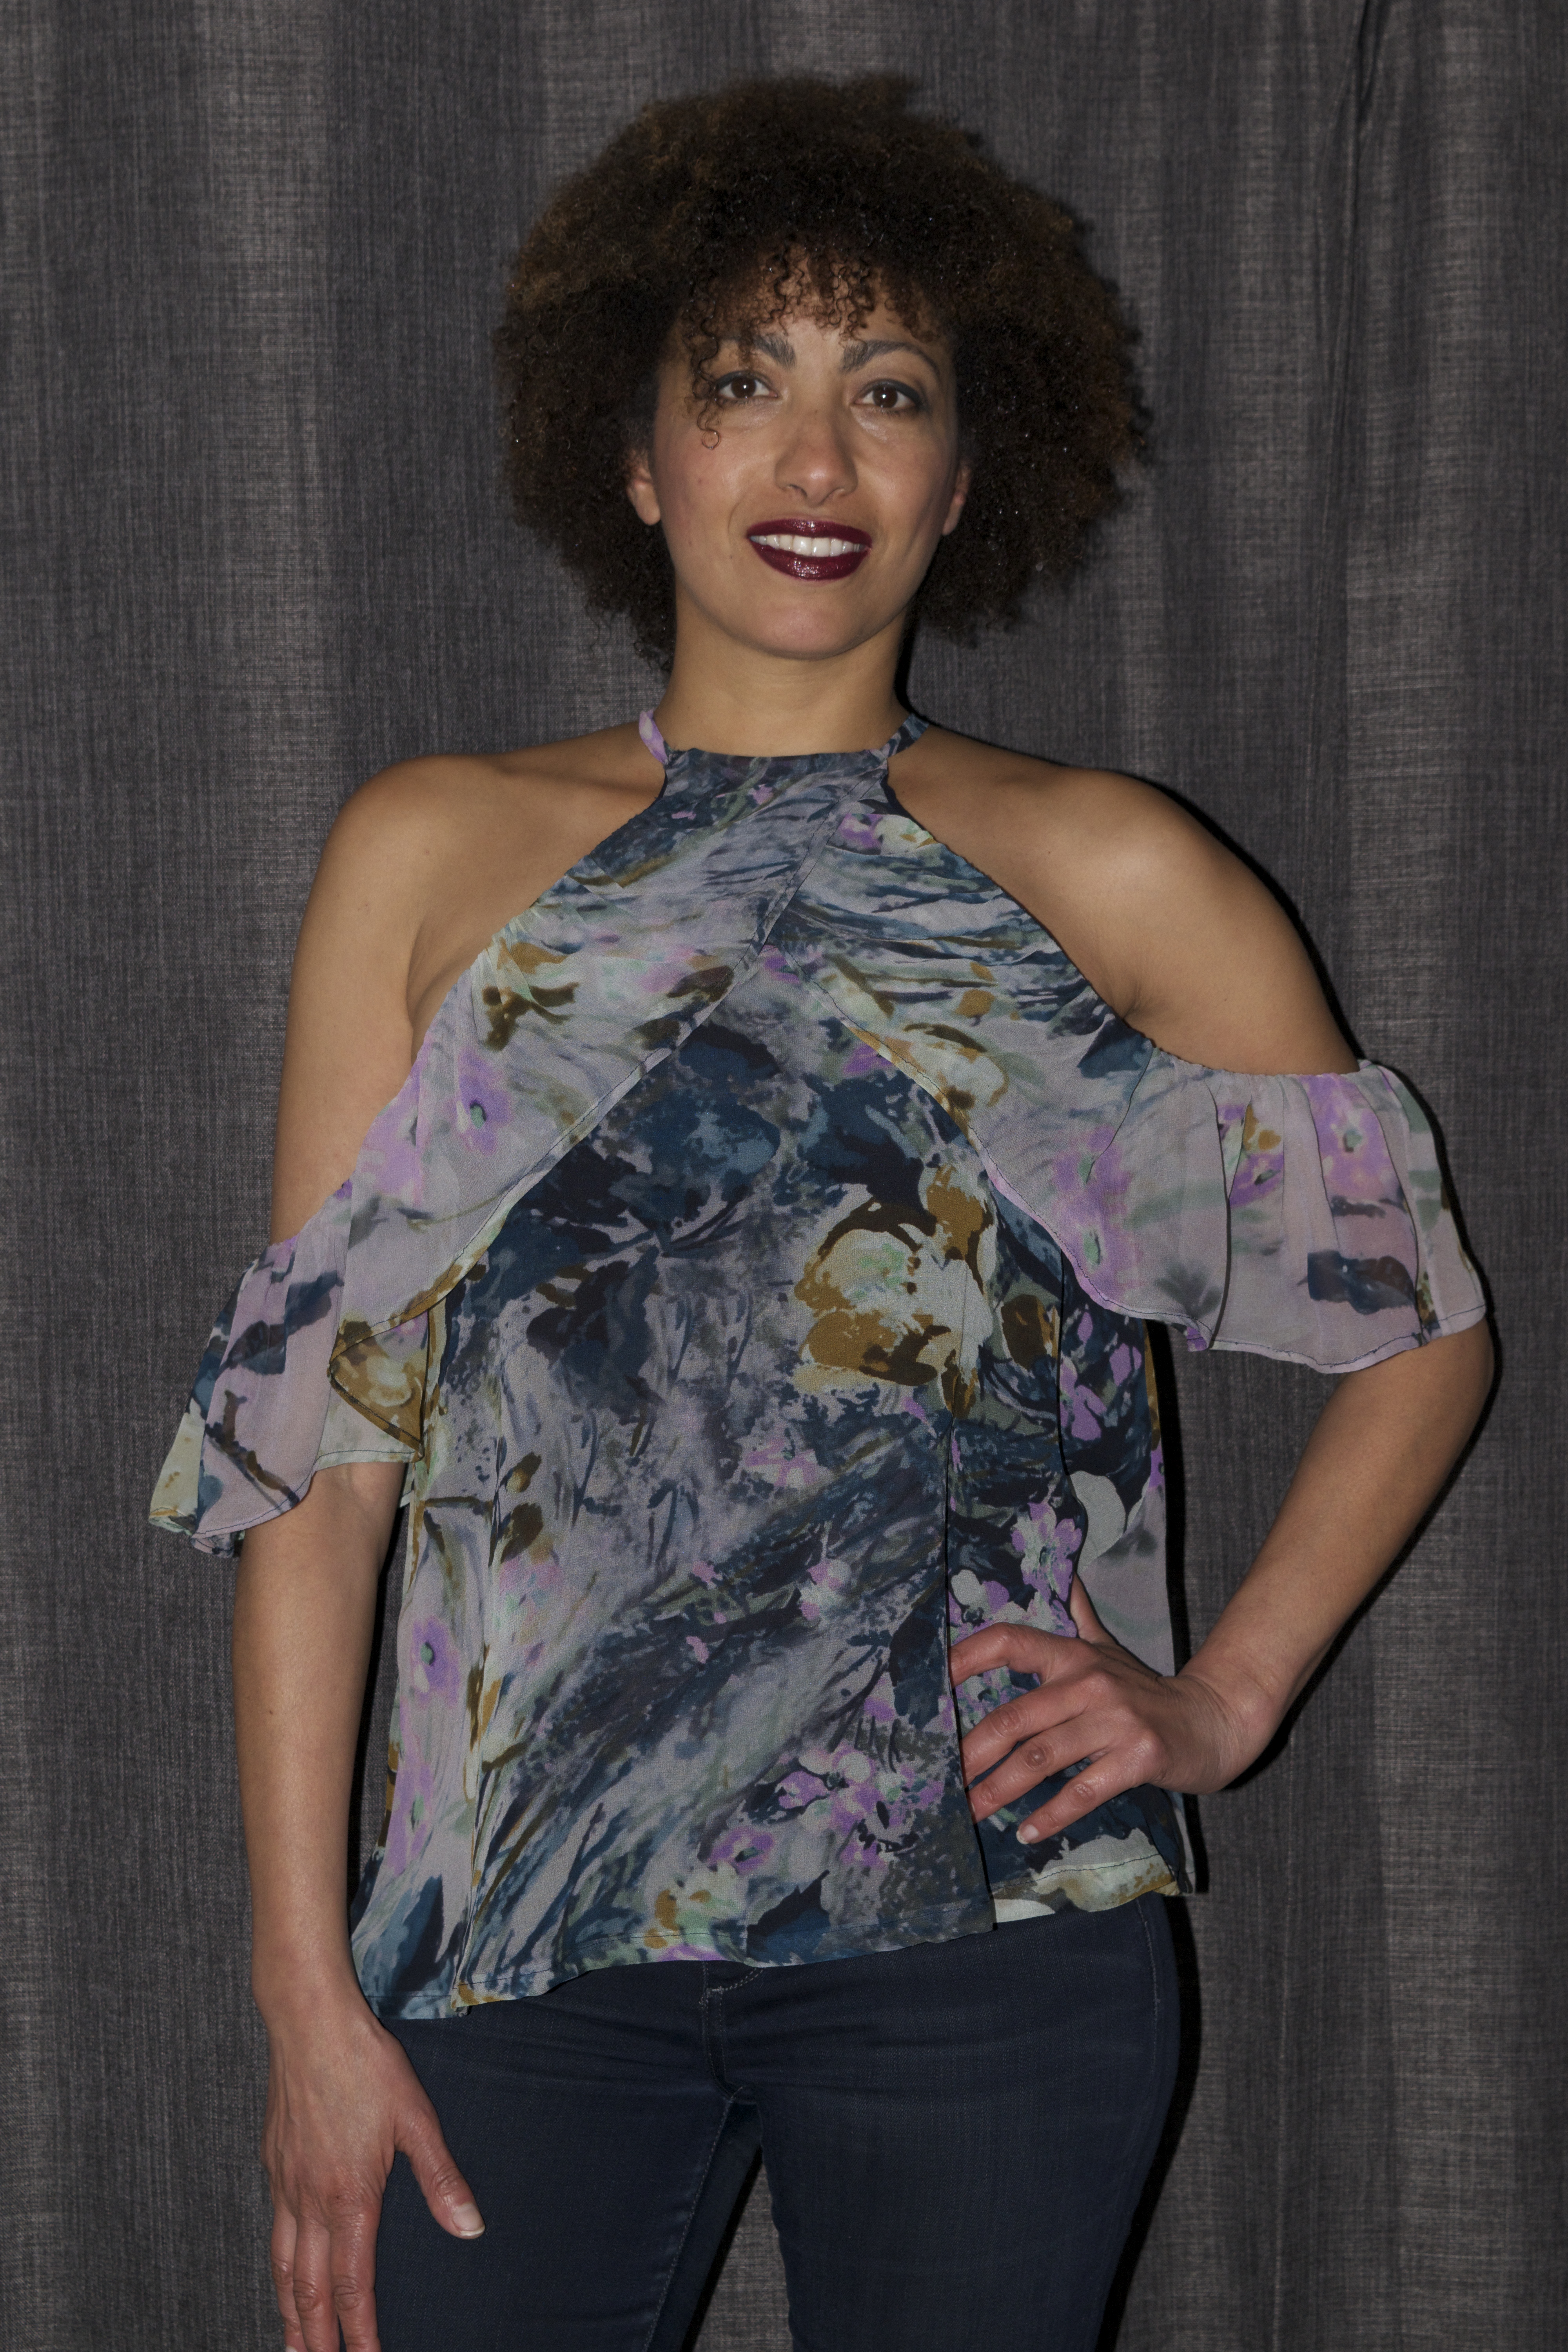
This recent dressmaking project has been in the works for months. I created a Pinterest board to house my ideas and visions of the outcome for an embroidered mesh gown for Payton who was willing to be my model and muse for this dress. The entire goal was to make it in time for her to wear to her senior prom in May with the intention of showcasing my work and doing some free marketing for my dressmaking business, Love, Stephanie.

Here are some of my ideas for this gown that I have pinned on Pinterest :

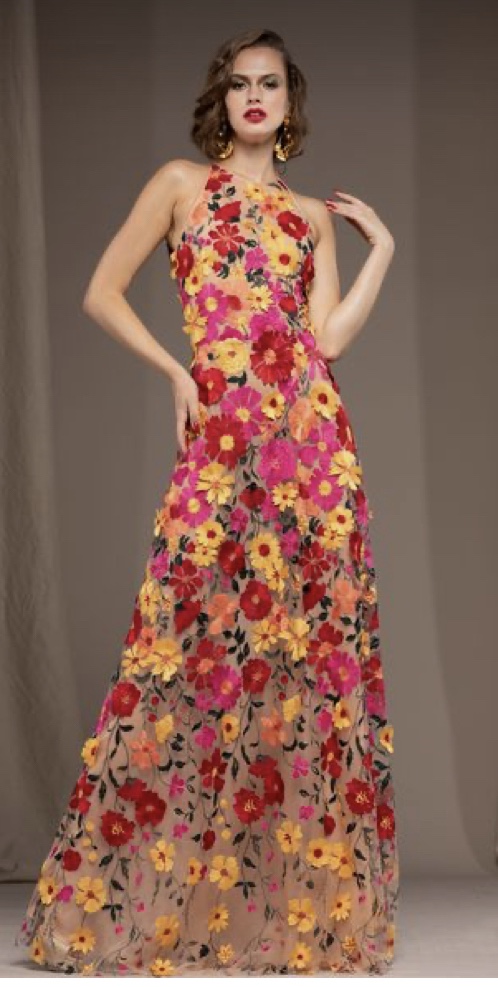
I love the all over 3-D floral effect of this gown.

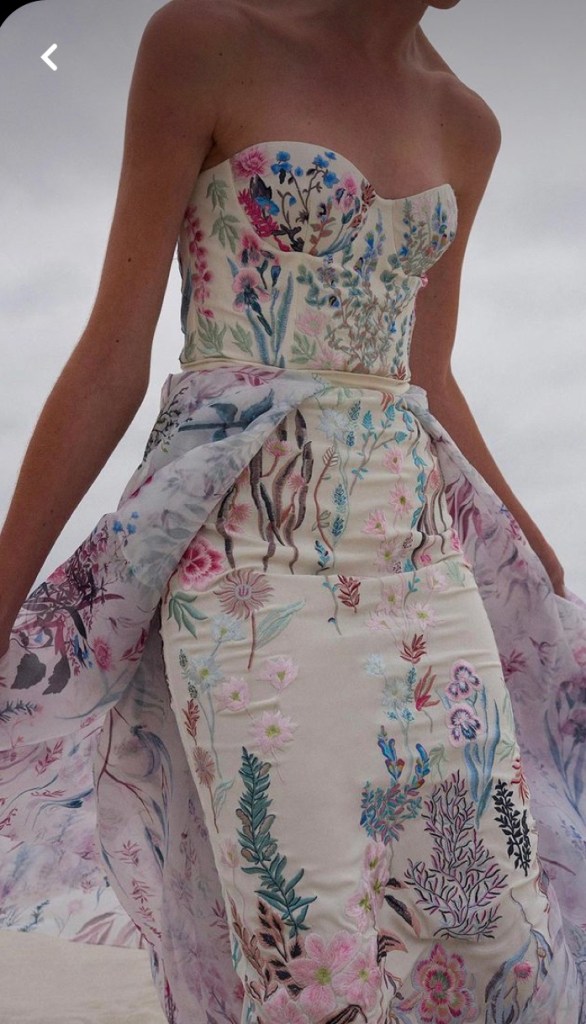
I really like the embroidery on this gown.

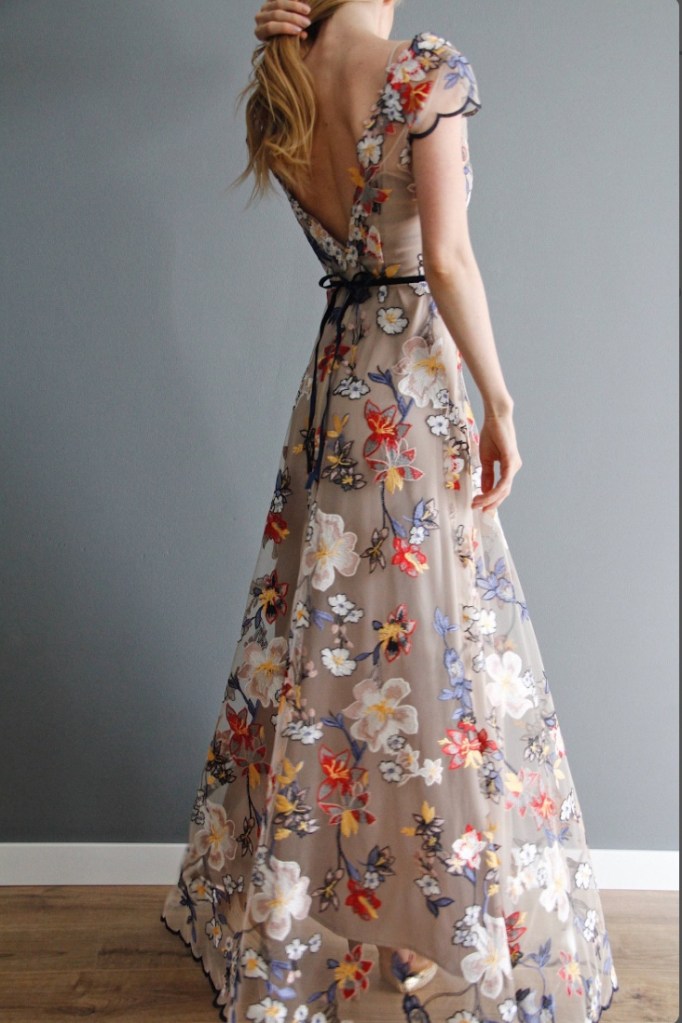
The floral mesh and shape of this gown is gorgeous.

I began looking for fabrics that would aid in this vision. Knowing that this embroidered mesh look is very much in fashion nowadays, I started searching at my local fabric stores, but didn’t find anything that was of decent quality or not extremely expensive. I searched online and found this embroidered floral appliqué mesh fabric in two color ways on the app AliExpress for $14.37 a yard and it was perfect!

I liked them both so much and ordered 7 yards of each. I figured I could give Payton a choice of which color she liked best, plus use the one she didn’t choose for another dress and create a mini collection using the same fabric in two ways:

The floral on a white mesh
The same floral on black mesh

As soon as it arrived all the way from China, I contacted Payton and her step mom, my good friend Kristin, to show them the fabric, let her choose her favorite and start looking for a lining.

The fabric looks amazing and attention grabbing just draped on my dress form over some white muslin!

We went off to my local favorite fabric store and found a nice lining material to go under the sheer fabric. We looked for a color that would match her skin tone and had a lot of fun while we shopped.

Approved! We found a perfect skin tone match!
Daisy approves!

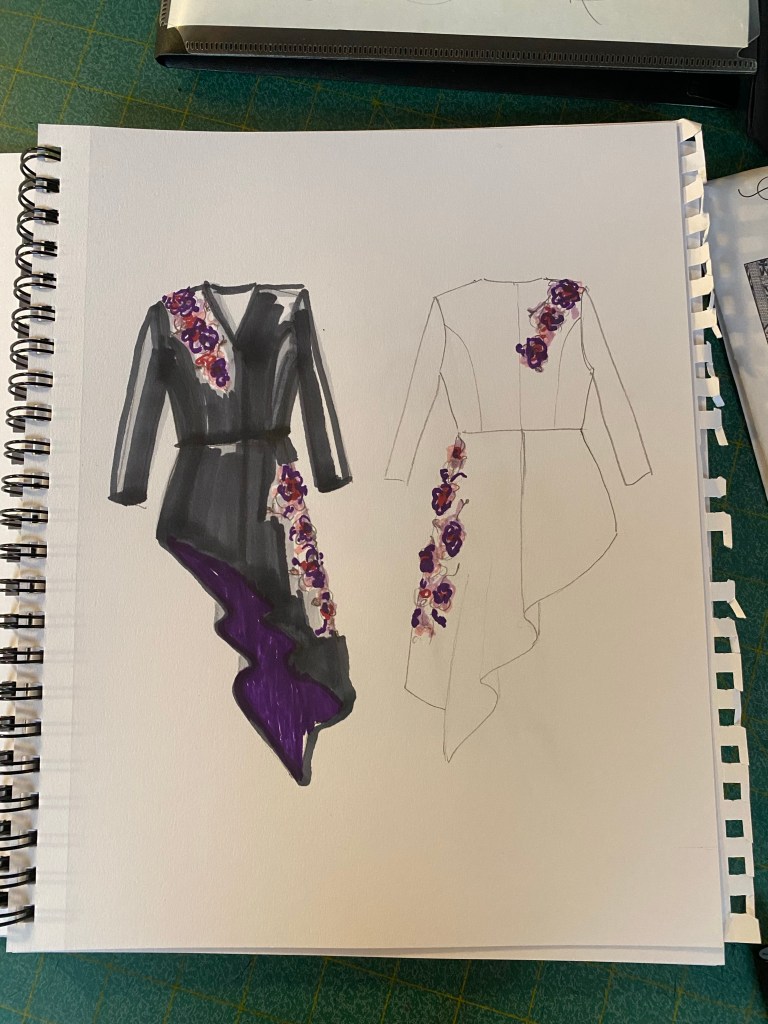
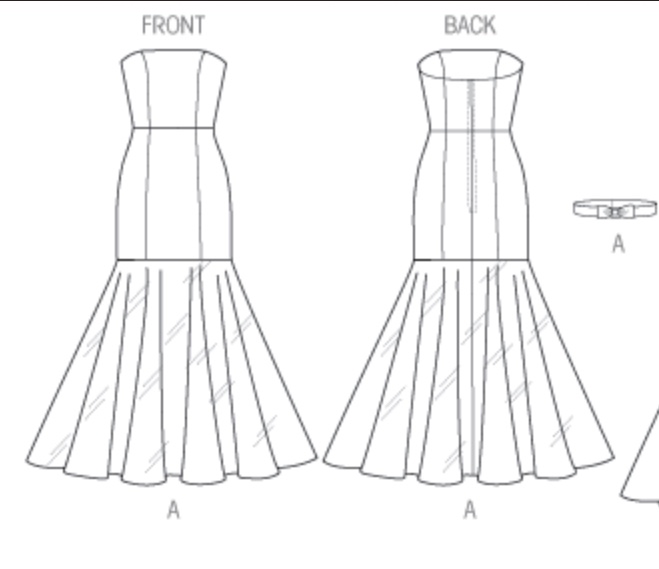
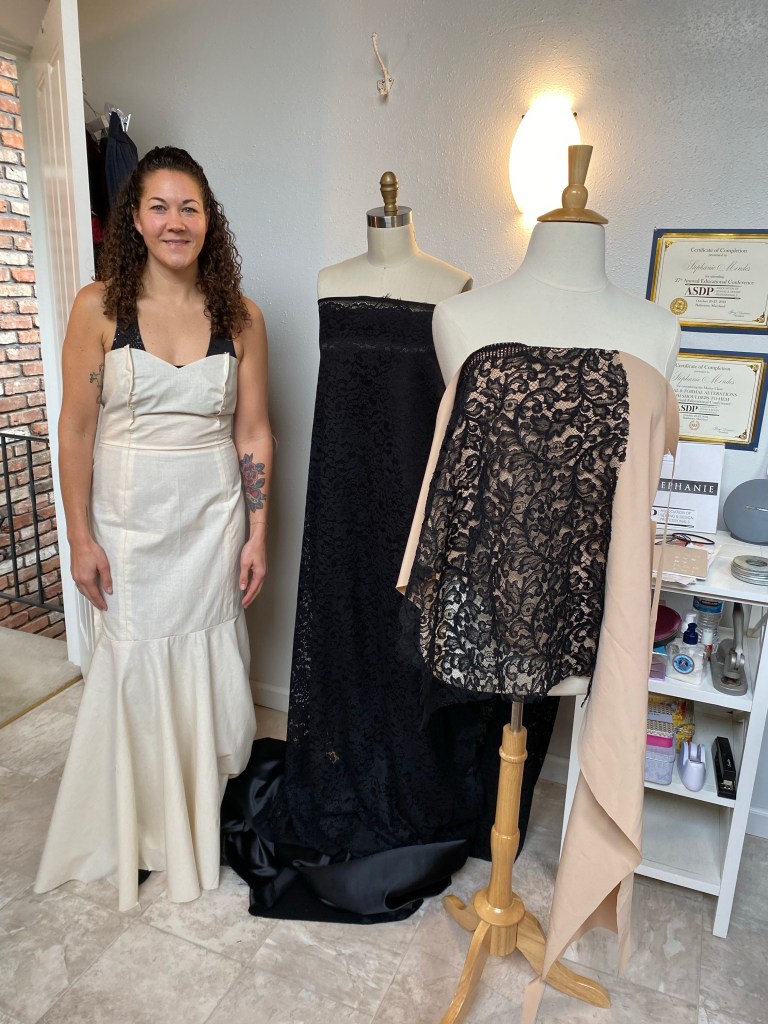
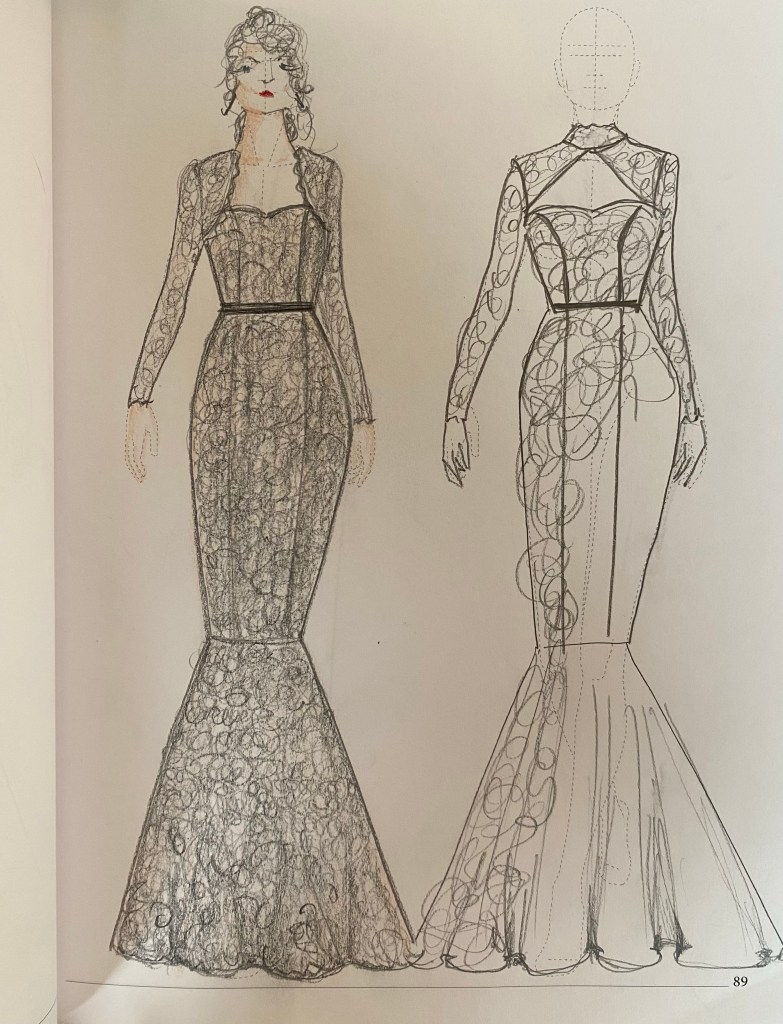
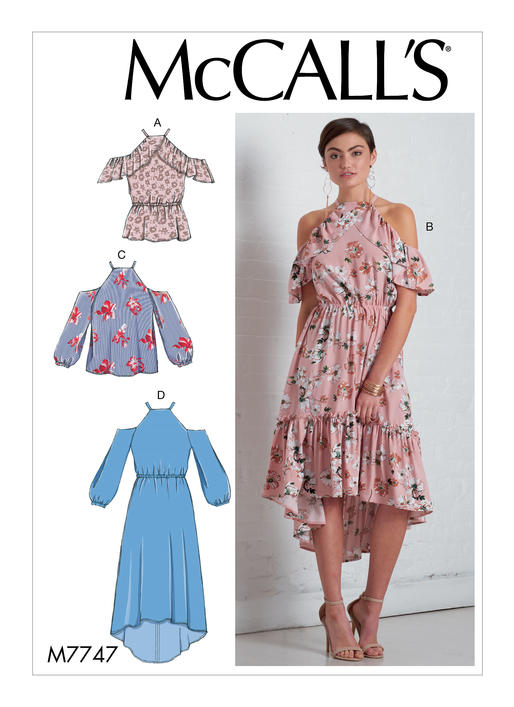
With the fabric choices checked off the list, I then got to work making a mock up of the dress in muslin. I should of course mention what pattern I chose to use. I had this McCalls M7927 pattern designed by David Tutera in my pattern stash of special occasion dress that I had been wanting to make.

McCalls 7927 by David Tutera
McCalls 7927 back view.

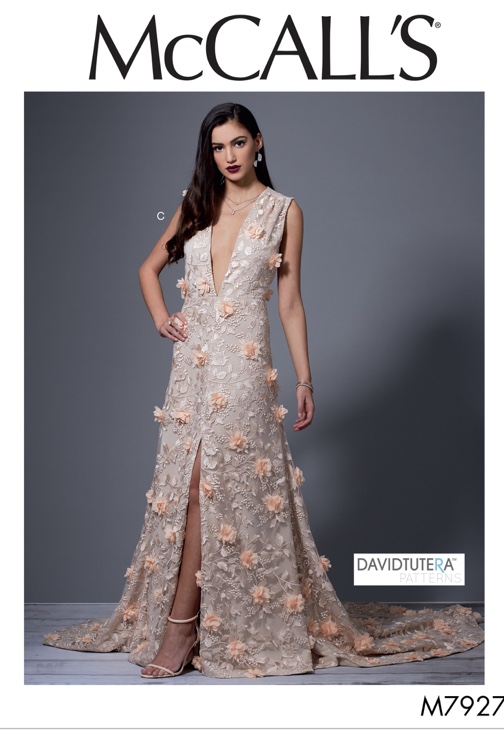
The line drawings of the pattern shows the simple shape of the dress and of course, the train which is amazing!

I chose this pattern for the lovely low V neckline, the fitted skirt with the slit and the train. I have been wanting to design more bridal gowns and thought this pattern would be good practice for construction and working with overlays and layers of fabric.

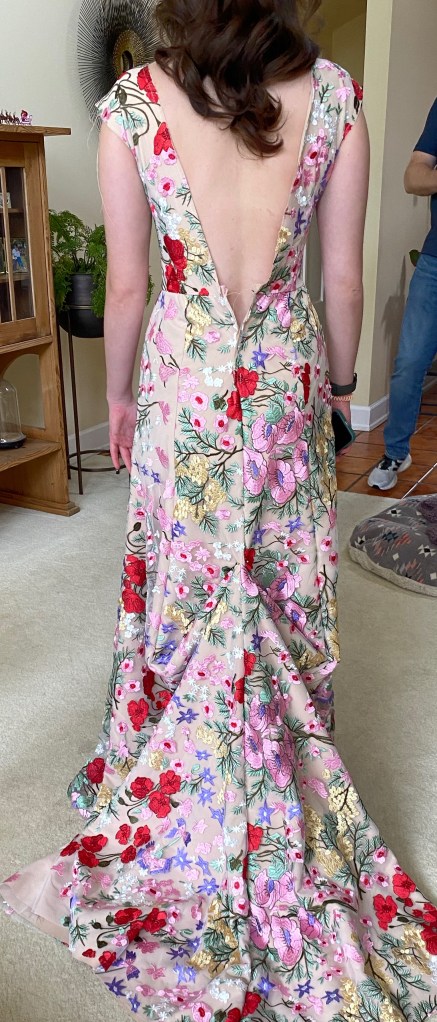
As I didn’t want an exact match to the pattern, I made a few little changes to the design. I raised the front V so that it didn’t go all the way down to the navel, and I chose not to have the little panel inset that was an option on the bodice, although considered it as maybe a sheer mesh insert there and tabled the idea. I also lowered the back neckline to a low V for more drama from the backside.

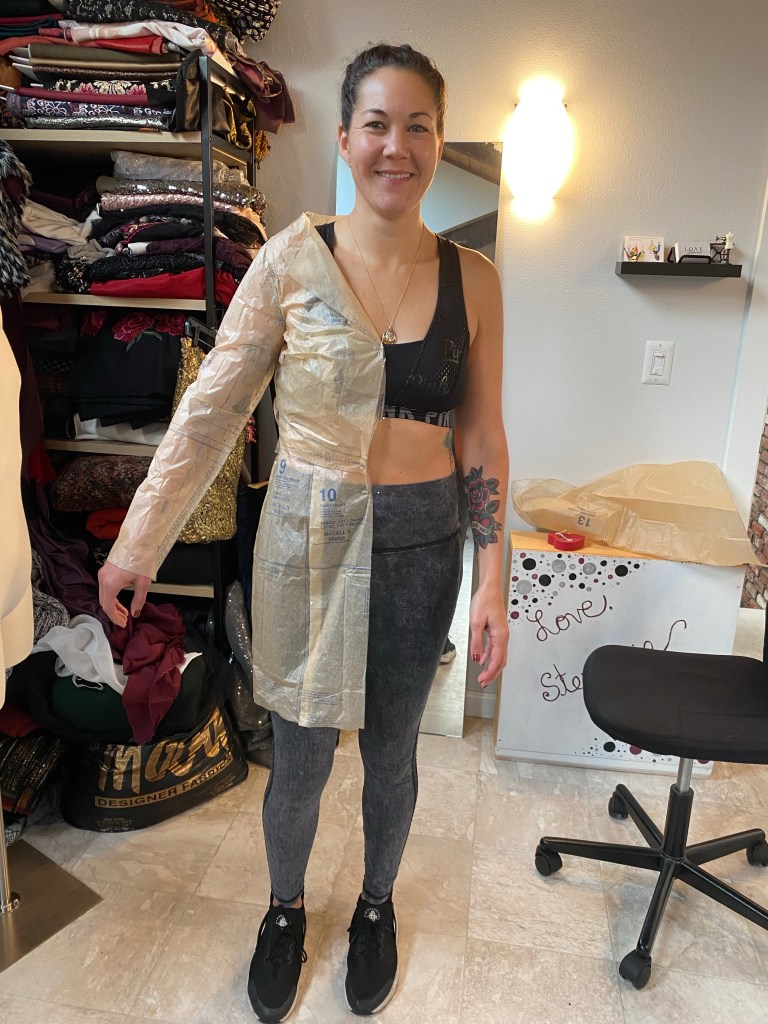
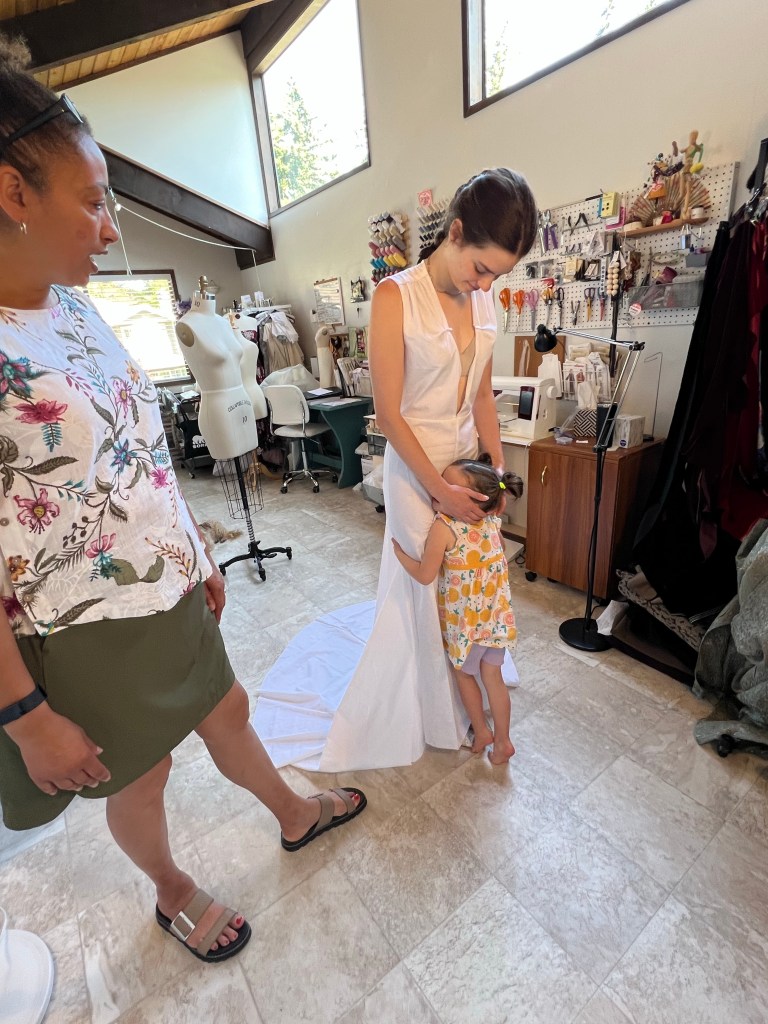
Payton came back to my studio for her muslin fitting which was quite successful. She slipped into the gown easily and it looked great on her, just in muslin! I only needed to make a few tweaks to the fit of the bodice, and lengthen the skirt to accommodate the shoes she’d probably be wearing with the gown.

Payton at her muslin fitting
I needed to adjust the neckline a bit, and raise it for a little modesty
The low back and the train was going to be SO pretty!
Little Sis Daisy approves again!
Just the muslin mockup, sewn up and placed on my dress form, looks beautiful!

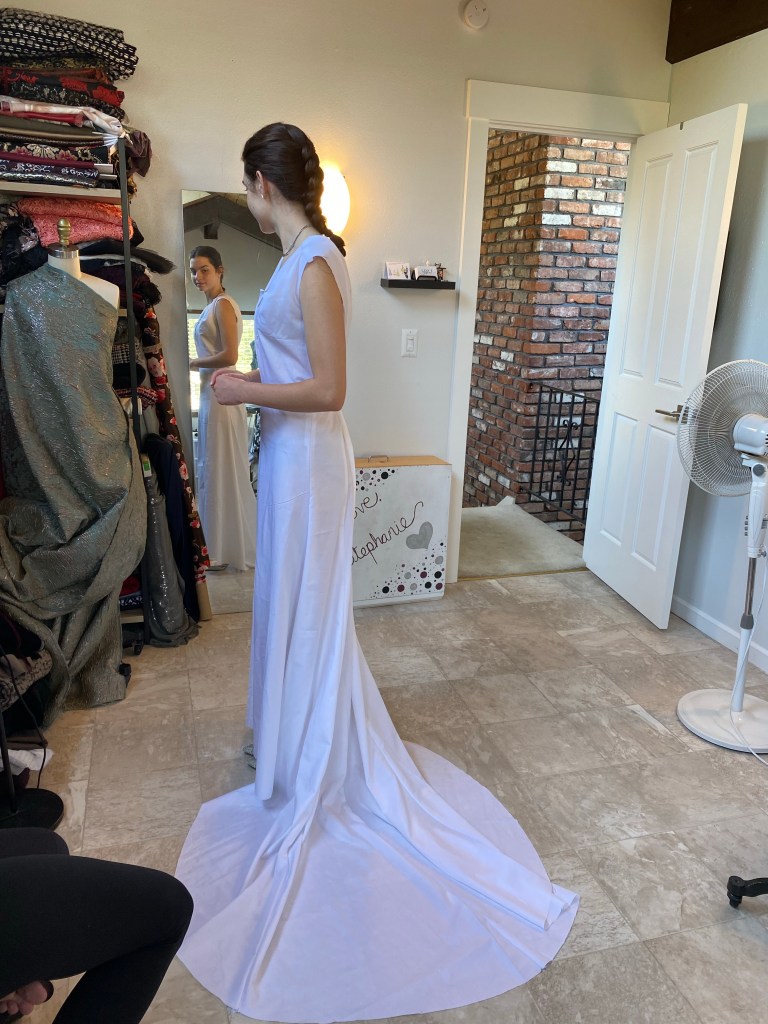
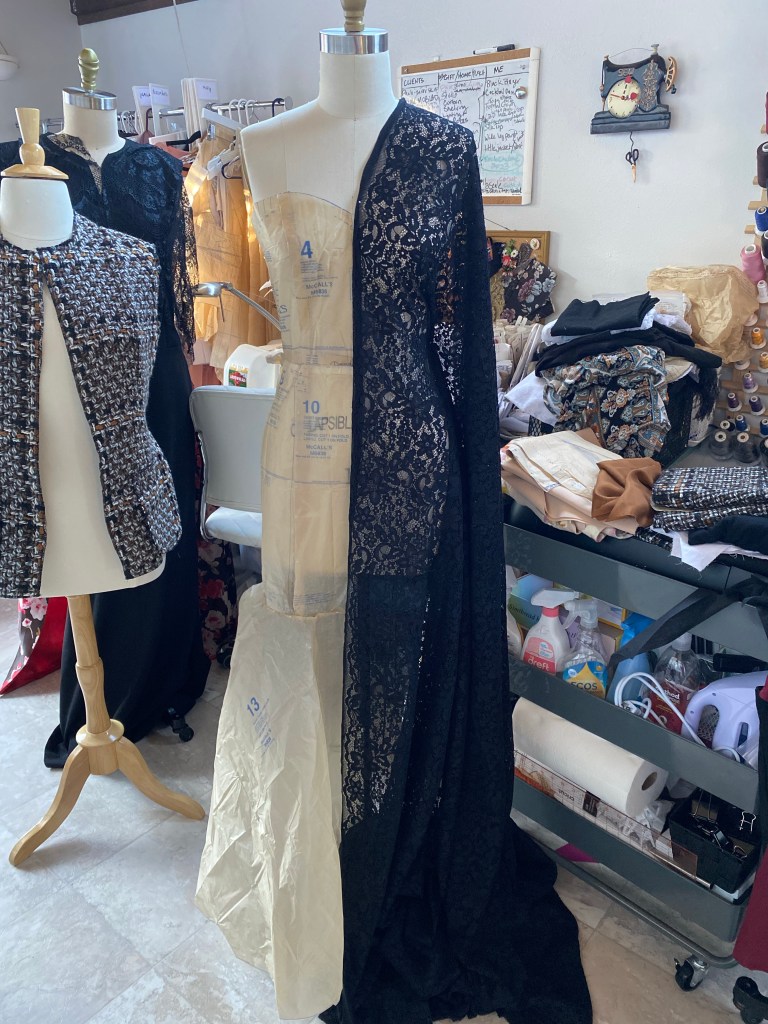
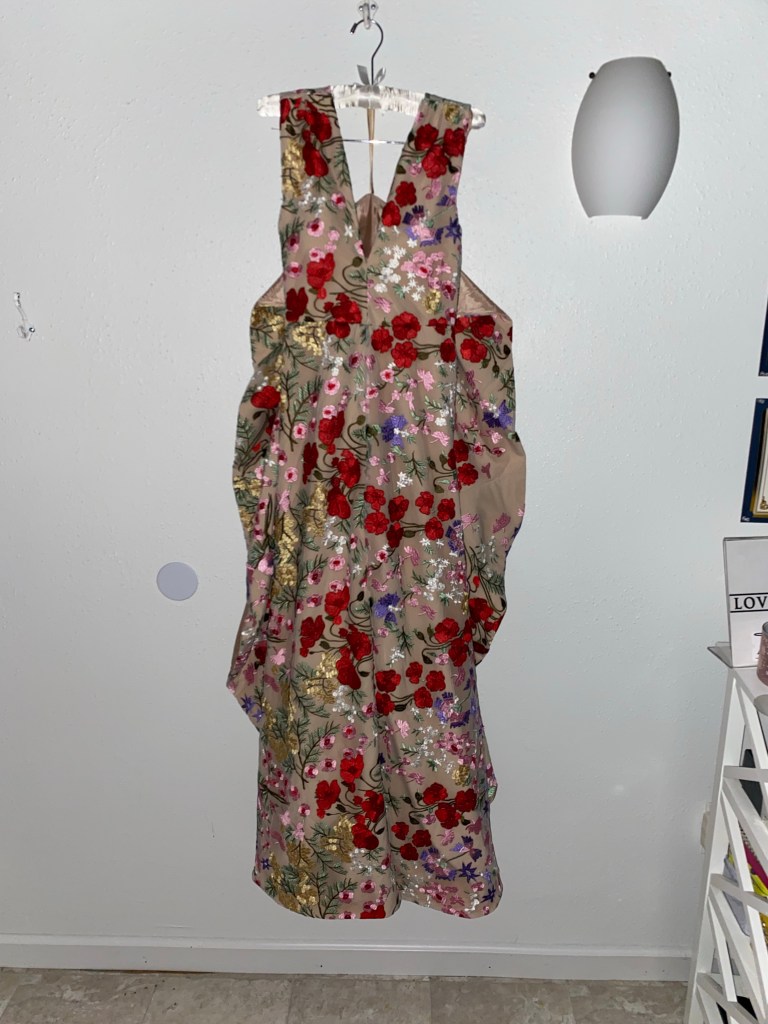
OK with the fitting out of the way, it was time to get started cutting out this GIANT dress!

Thank goodness I have the floor space to lay out and cut this monster!

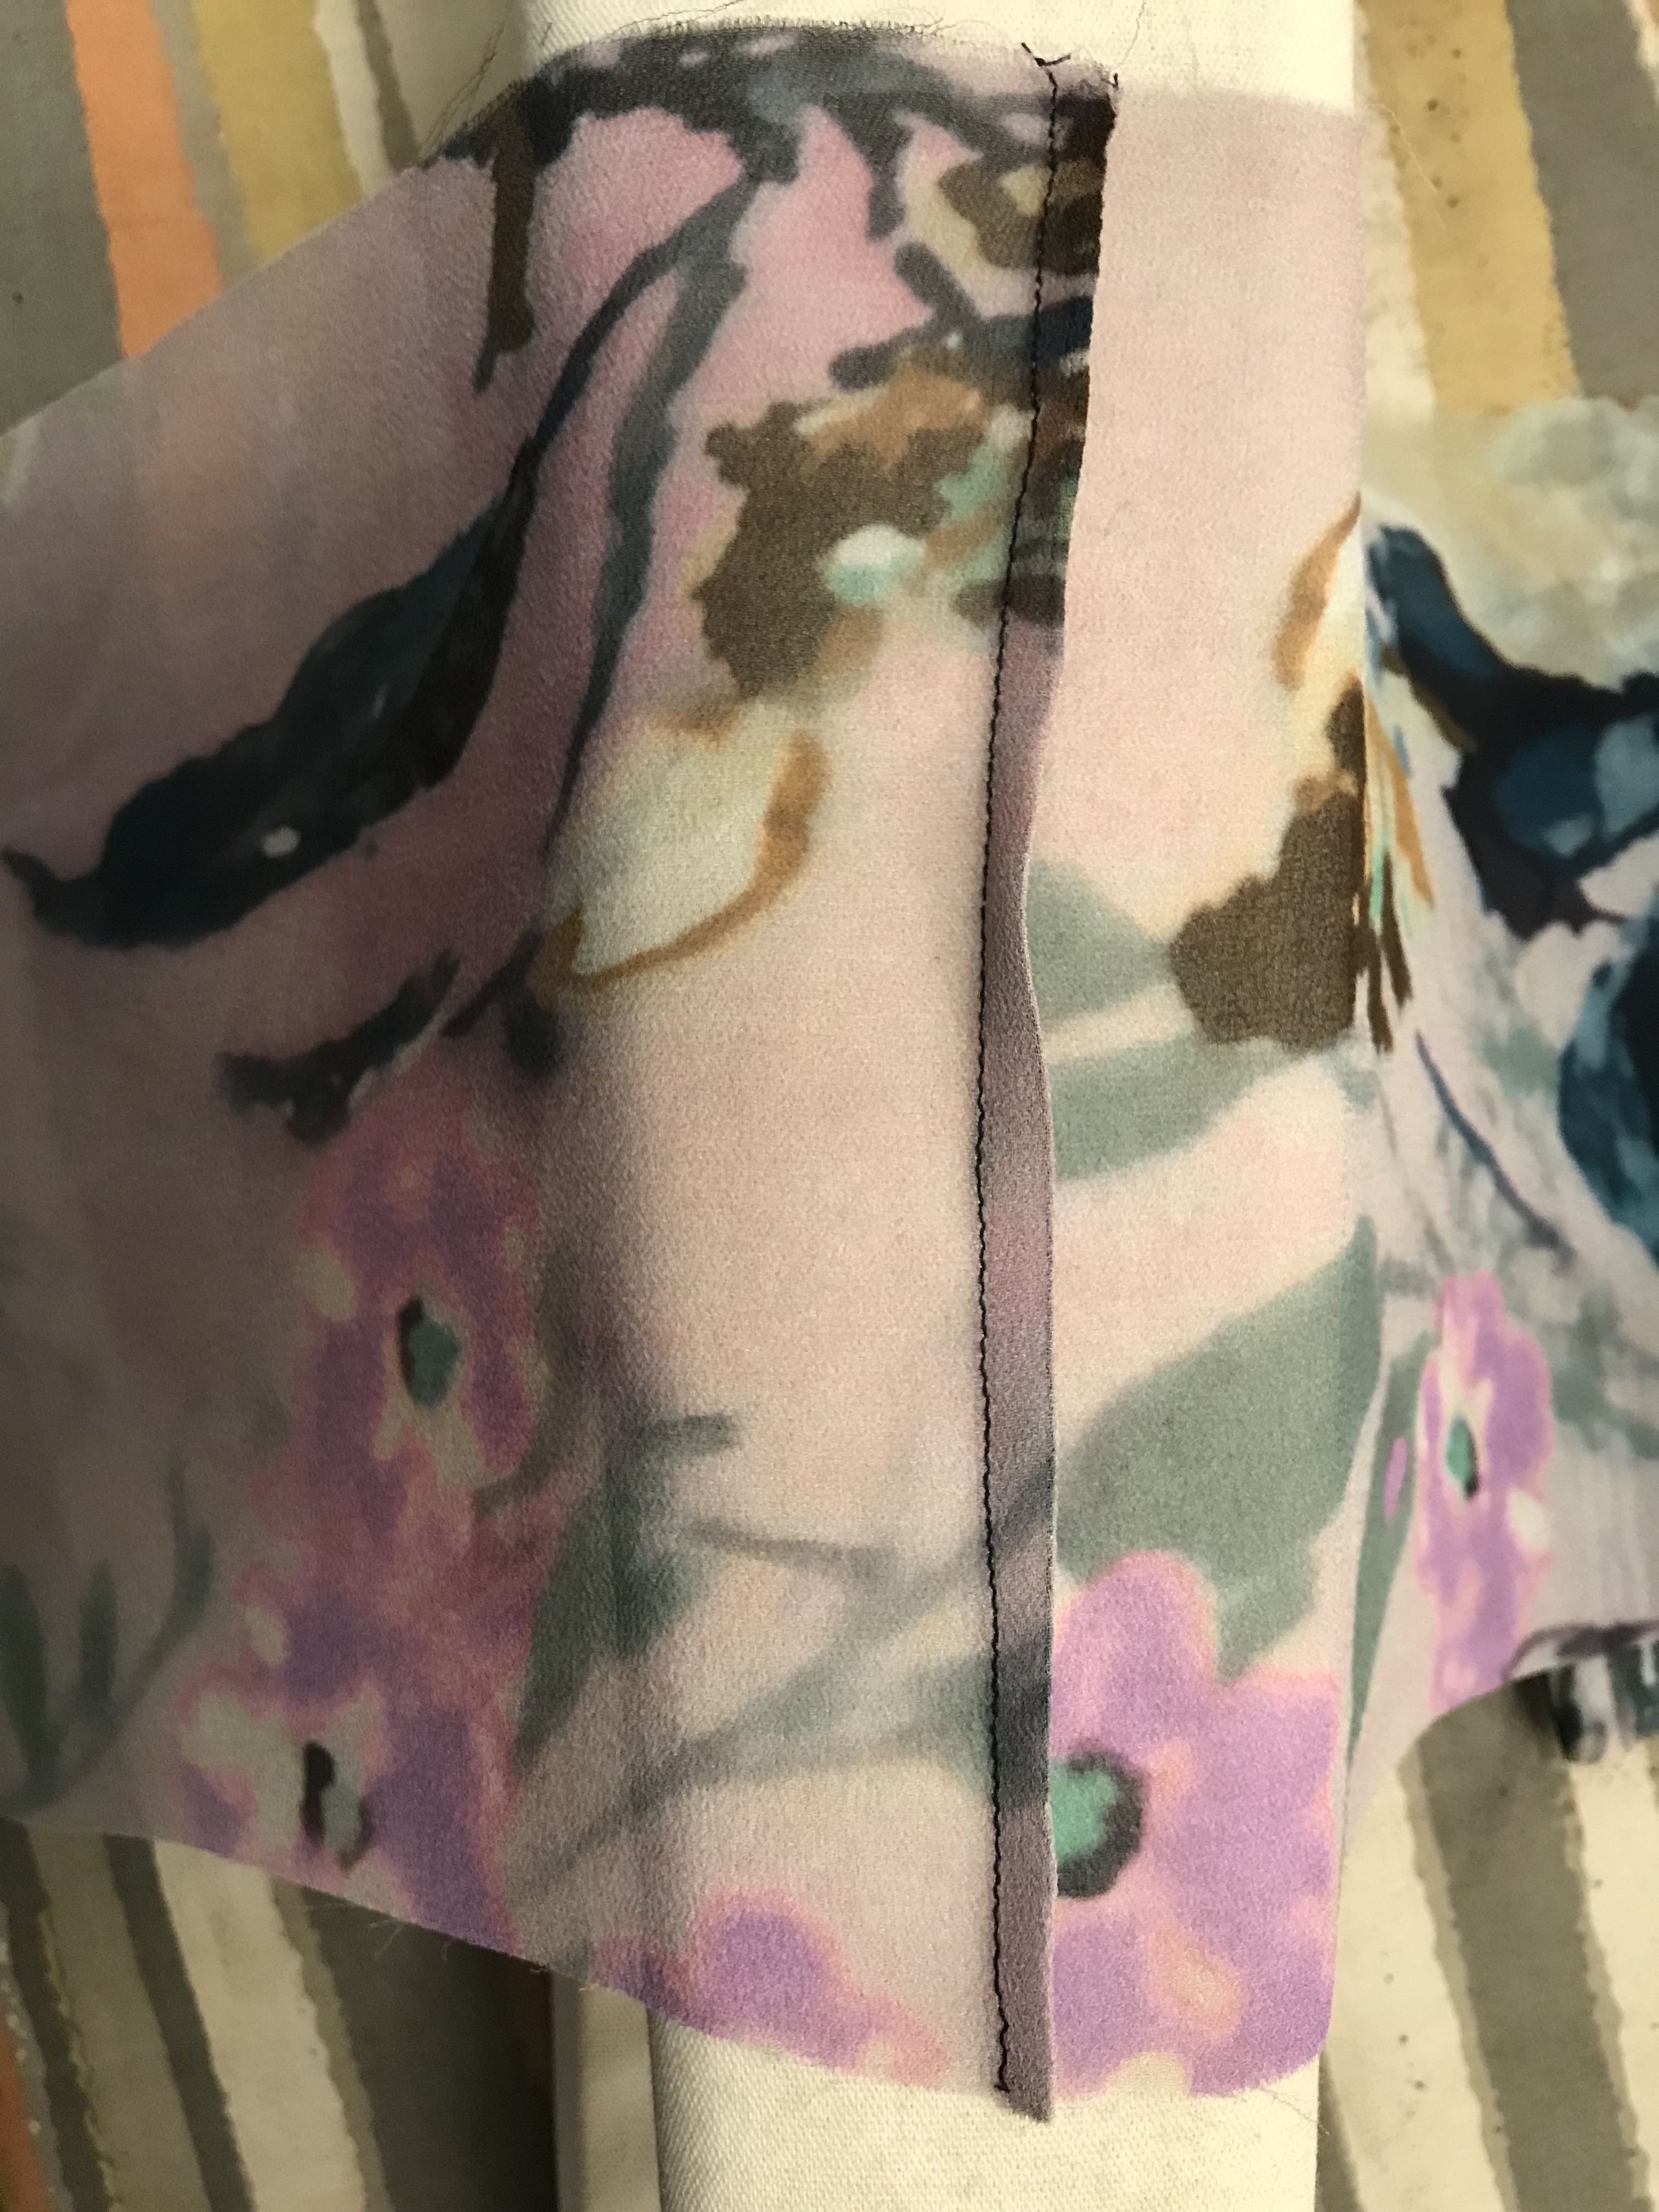
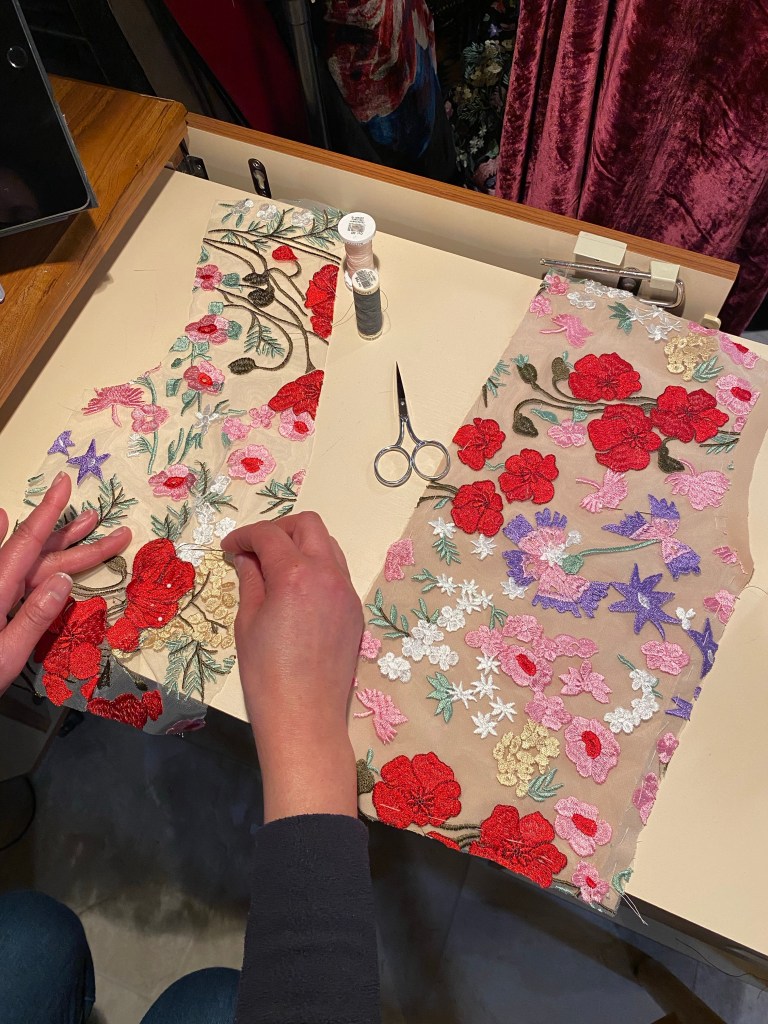
Cutting out the HUGE skirt pieces of this dress was quite the challenge. I had to be strategic about it, and part of the back panel of the skirt didn’t quite fit on to the part of the fabric with the embroidery, so I had to cut it in the plain mesh edge and later overlay scraps of the embroidered parts on by hand. More on that later.

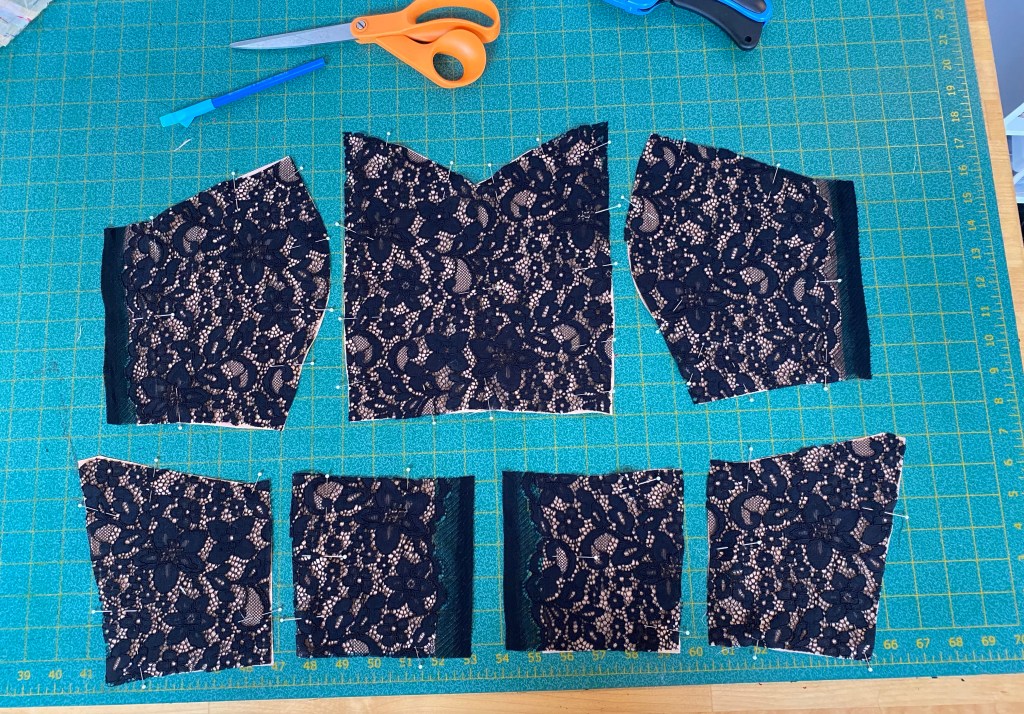
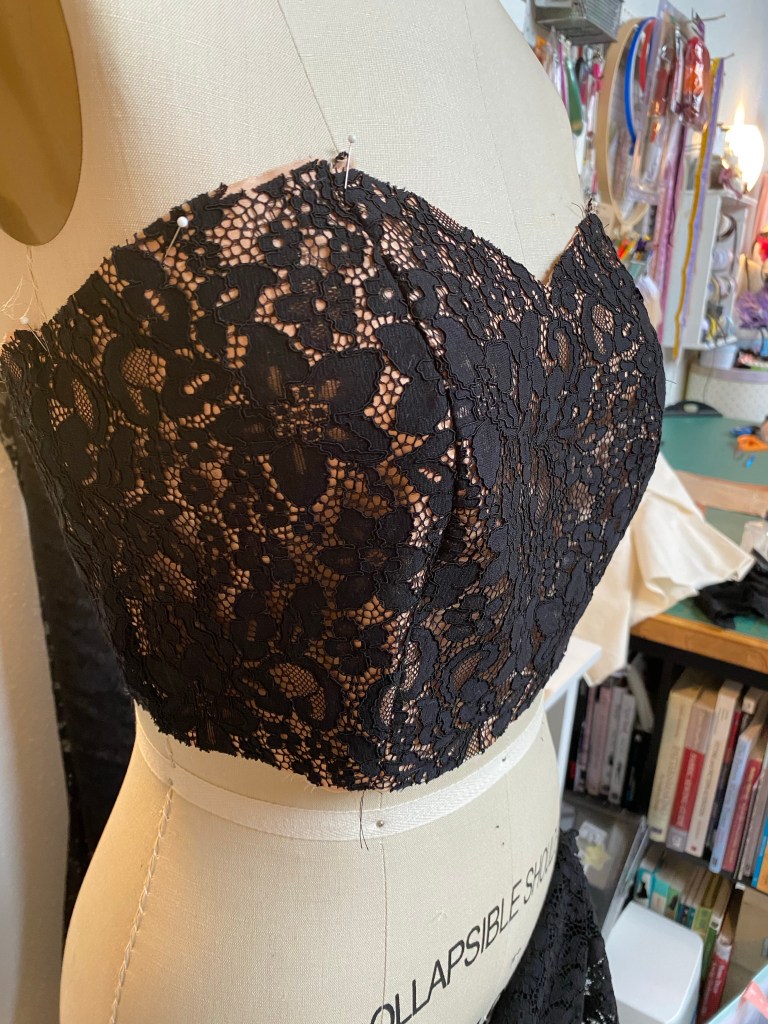
Cutting the bodice was a breeze as the pattern pieces are quite narrow and easily fit on to the fabric. I was able to be more strategic with the floral placement on the bodice and choose more of the red flowers near to her face as those were her favorite colors in the fabric.

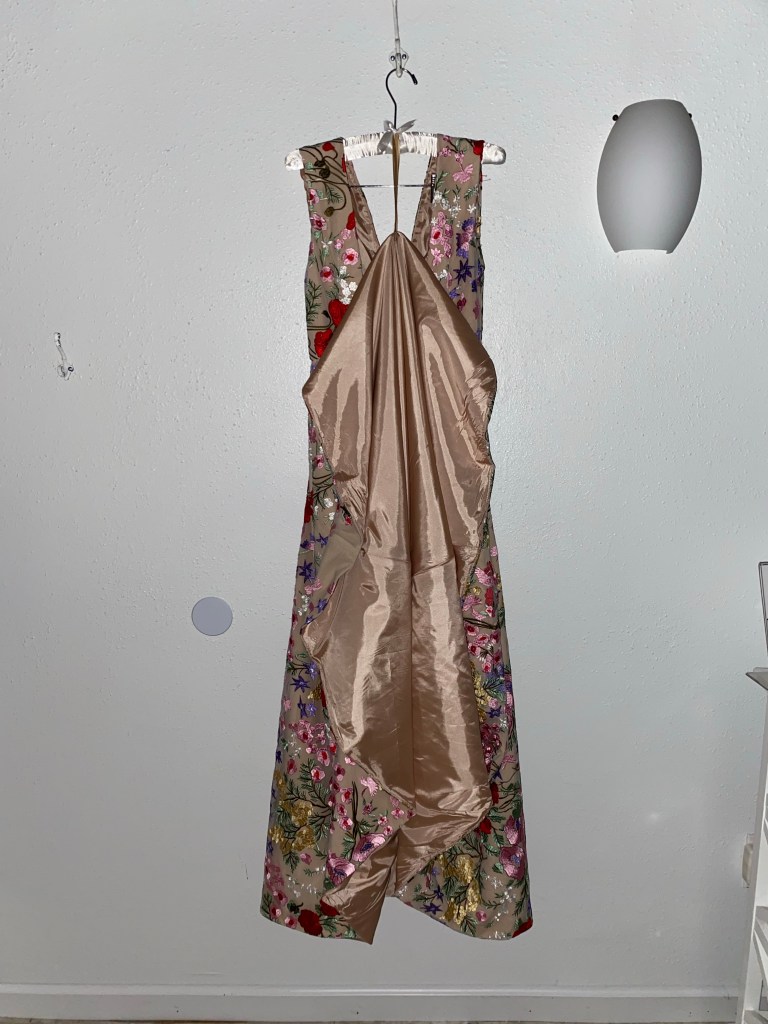
Once I cut out the pattern pieces in the mesh, I had to cut the same pattern pieces in the underlining that went directly under the mesh, and also the lining. Lots of cutting which was not fun, back breaking actually, but it had to be done.

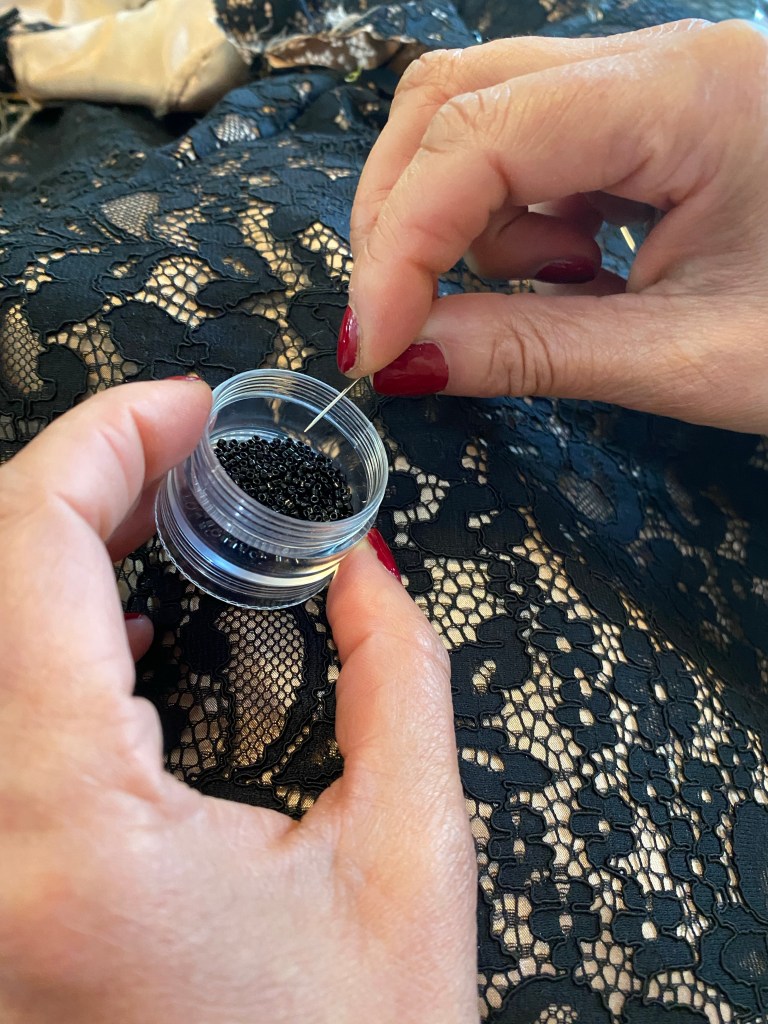
The bodice has a dart in it, which creates shape over a curved area, but also folds in the floral design when sewn. So to disguise the fold of the flower once I sewed the dart, I “patched” over the area by hand sewing a flower cut from a scrap of the fabric over the darts.

Hand sewing a flower patch over a dart

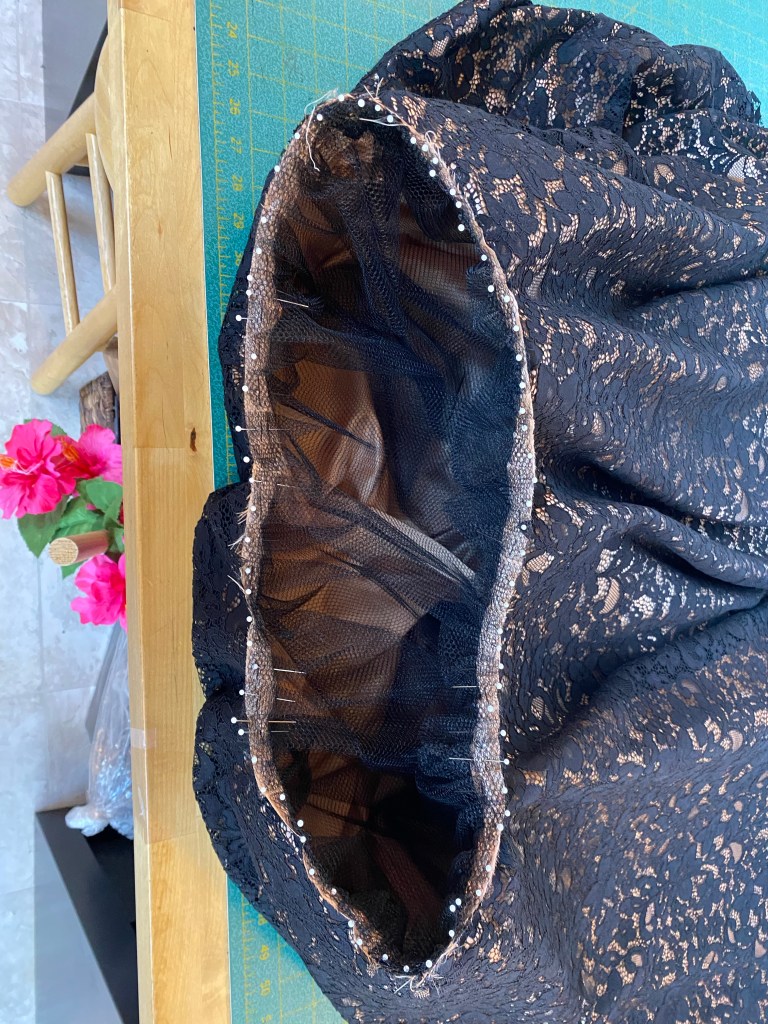
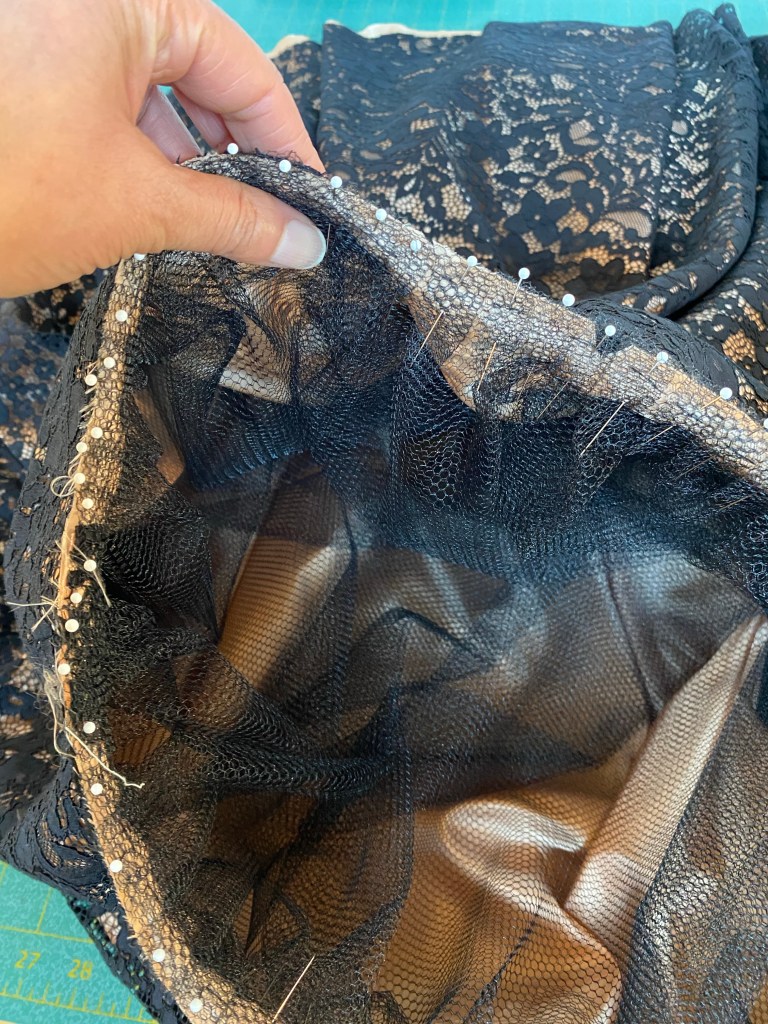
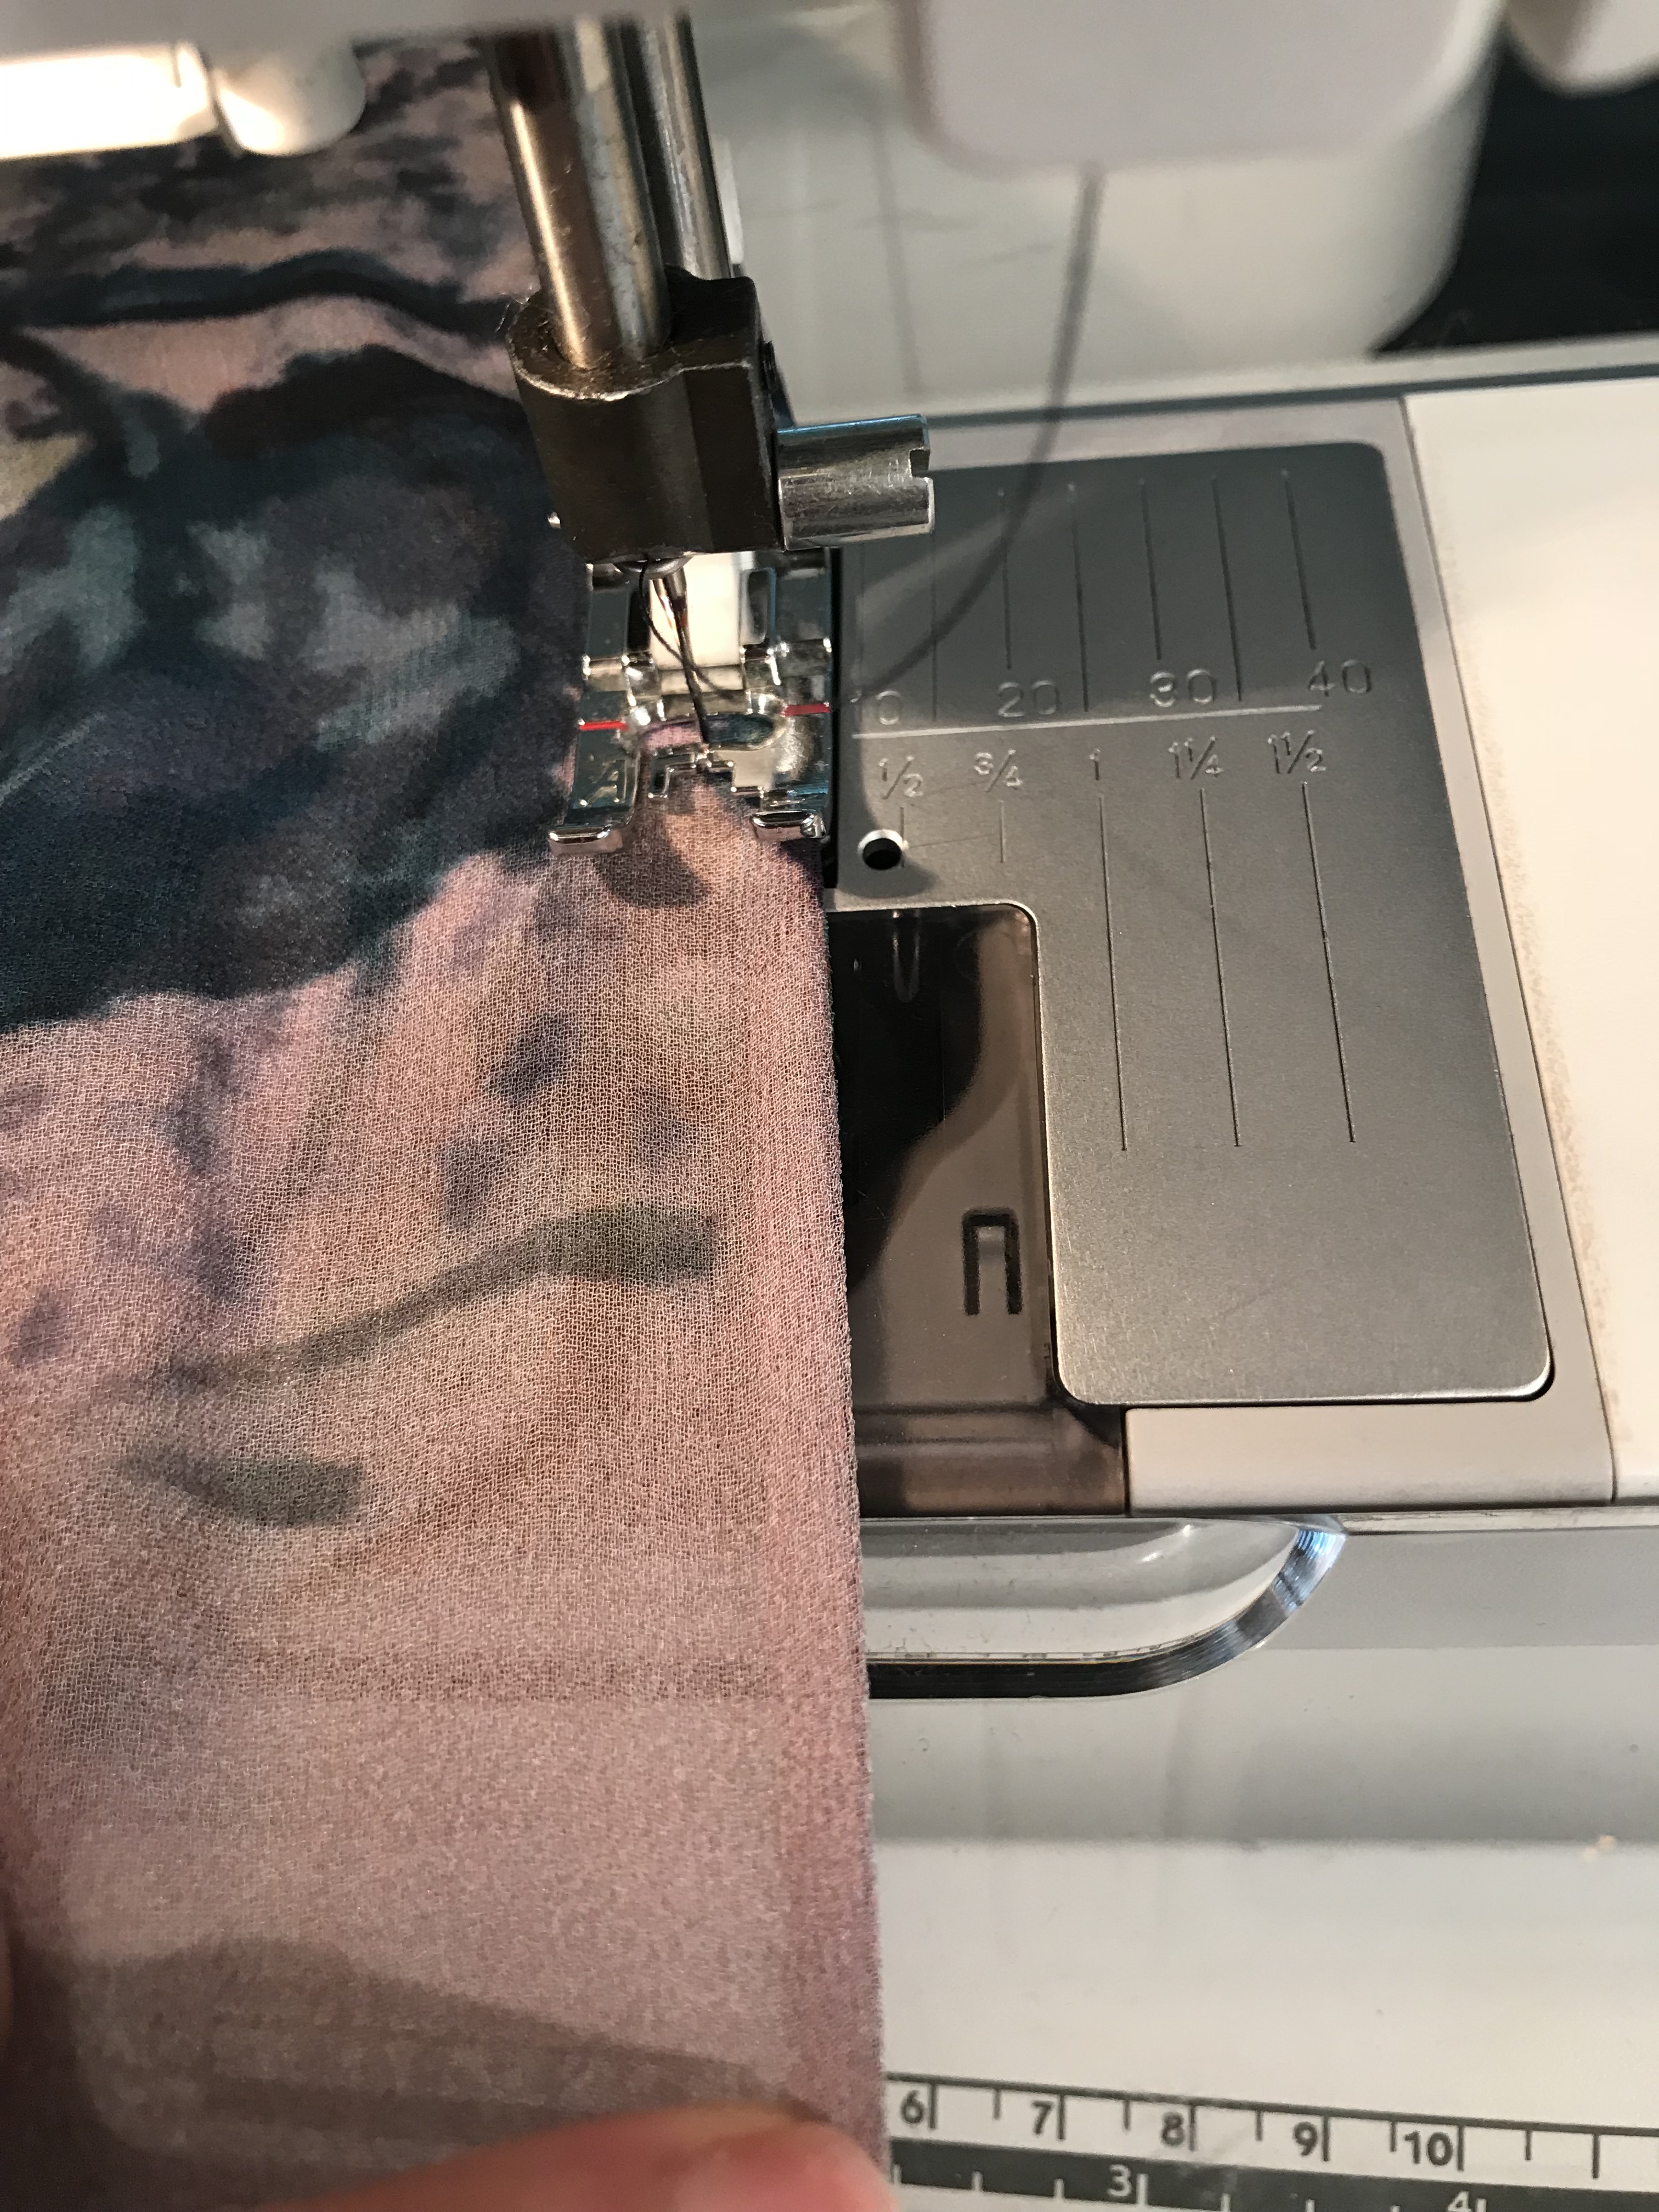
The next step was to underline the mesh pattern pieces with the flesh colored underling fabric, which as a crepe knit material with a slight stretch to it. Each piece was layered and basted (sewn with long stitches) together by hand to underline the entire dress. A long and tedious process for sure, but necessary to give structure and opacity to the delicate mesh.

You can see the mesh and underlining basted together in this image

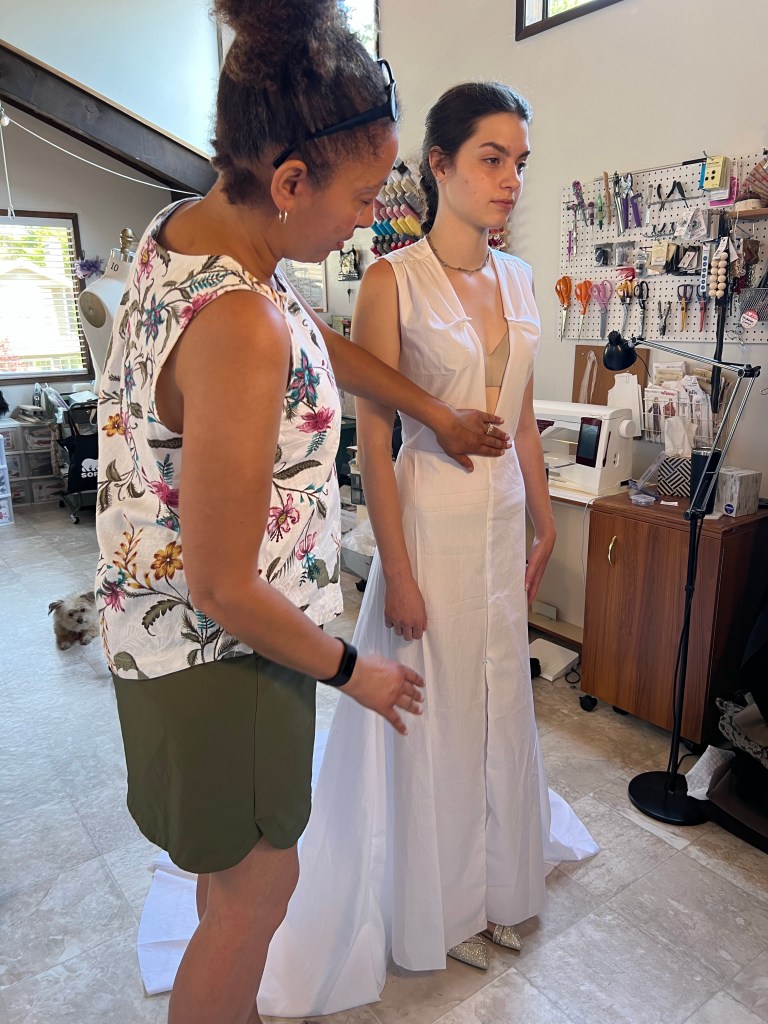
After the pattern was fully underlined and the bodice and skirt were sewn together, I had another fitting with Payton to make sure all was good before adding the lining and installing the zipper.

At the final fitting, deciding on the bustle placement.

As I mentioned earlier, some of the mesh couldn’t quite fit on the pattern during the cut out process, so I had to go back and patch over some areas by hand to make it look correct. It’s hard to see in this photo, but I essentially hand sewed an area of mesh with flowers to the blank areas, carefully going around the motifs and cutting away the doubled up layered areas. This took a while, but was necessary to not have a big bald spot on the back of the dress.

You can really see the “bald” area on the upper right side of the back of the skirt in this photo
It’s not easy to see what I am doing here, but that’s the point!

Once the fitting happened, it was time to sew together the lining and install it into the dress. I knew that this dress was going to be heavy to wear and drag on the ground, so I made sure to add hanging loops to the interior of the lining and a bustle to the long train.

I make most of my regular income altering bridal and special occasion gowns and dresses, so I get to see the insides of these dresses and how they are built to be pretty on the outside and functional on the inside. Most long dresses have some sort of hanging straps sewn to the inside of them to hang them up and prevent falling off the hanger and stretching out the shoulders. I love incorporating these little details on the interior of dresses that I make as I feel it adds that little touch of thoughtfulness and luxury to the dress.

For Payton’s gown, I chose a wide satin ribbon to make the hanging loops for the bodice and a narrow satin ribbon for the wrist and hanging loop for the train. Both ribbons are not seen from the outside, but I chose a nude color that matched the lining, just to be more inconspicuous.

I sewed these ribbons in, at a measured length for the area in particular, into the seams of the lining as I was sewing it together. I then also tacked the lining to the inside of the dress at the seams so that they wouldn’t pull apart and the whole dress would act as one in these areas. The same holds true for the one-point over bustle I made using little hooks and eyes, reinforced with a button underneath, as I often do for a bridal gown alteration.

The dress hanging, using the interior loops for support
You can see the interior loop of the train doing it’s job!
And the pretty satin lining, also doing it’s job!
Sewing in the bustle by hand

Not shown are little foam bra cups sewn in between the lining and the interior of the dress. She isn’t busty, but needed some cup support for modesty and all as there is NO way she could wear a bra with this dress! I considered also adding boning in the bodice, but nixed that idea as she really didn’t need it.

With the dress finally done and prom rapidly approaching, I was able to recruit my amazing friends to help me plan and execute a photo shoot featuring Payton in the gown. My husband and I own a second home in Sunriver, Oregon, a beautiful and popular resort area out in Central Oregon, that we rent out on Airbnb, but also love to stay there whenever we can. It’s a great home, with 3 bedrooms, 2 bathrooms and sleeps 8 guests. We were able to have Payton, her dad, stepmom, little sister, as well as my friends Mark and Julie all come and stay with us at the house and participate with the photo shoot. Mark is the photographer, his wife (and my good friend) Julie is his assistant, and of course, Payton as the model.

I created a mood board to share my ideas with Payton and my friend Mark who would be taking the photos on how I wanted the photos to look, a good location, and some images of the feeling I wanted to portray in the dress.

My crafty mood board project
Fort Rock Park: A great location out in the high desert of Central Oregon, a perfect backdrop for the photos

I packed up the dress and all of the sewing supplies I might need, and we headed out to Sunriver. We got there a couple of days before the others arrived which gave me time to do some last minute finished on the gown and get it all ready for the shoot.

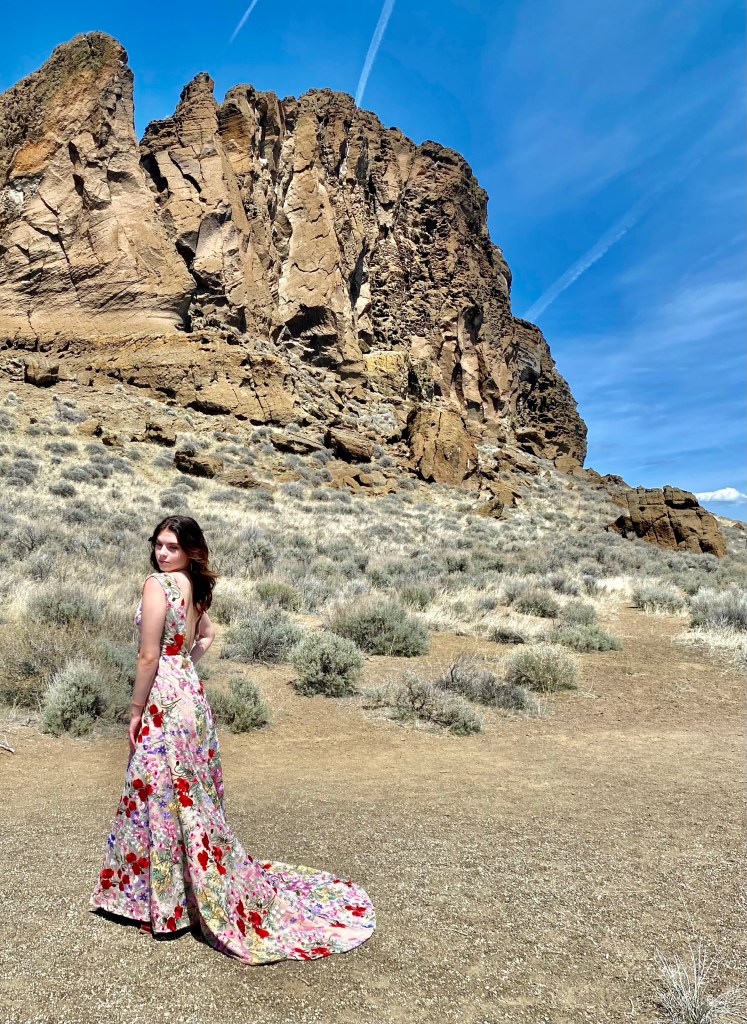
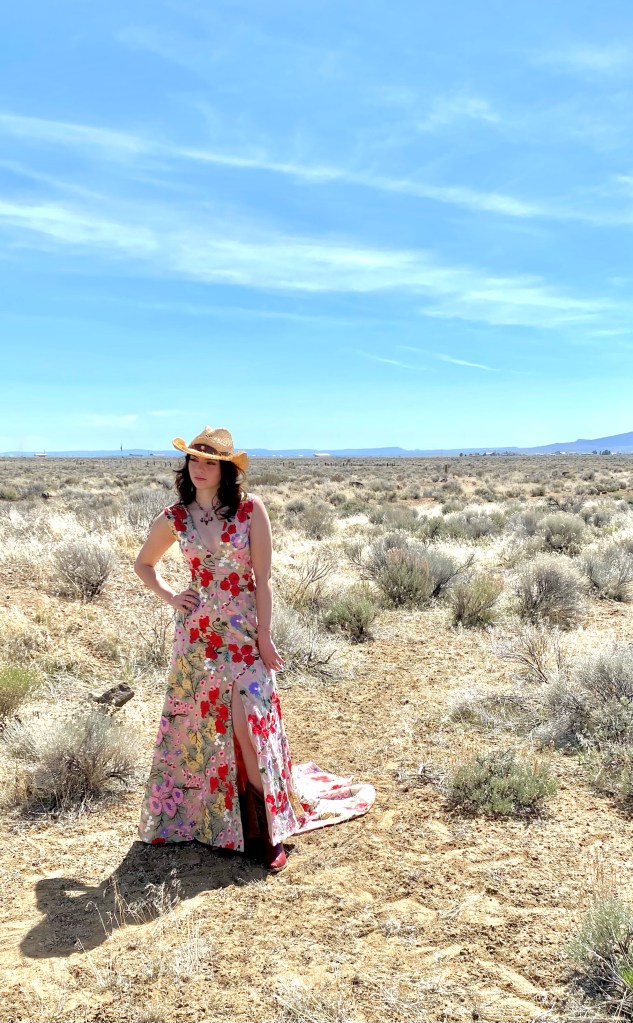
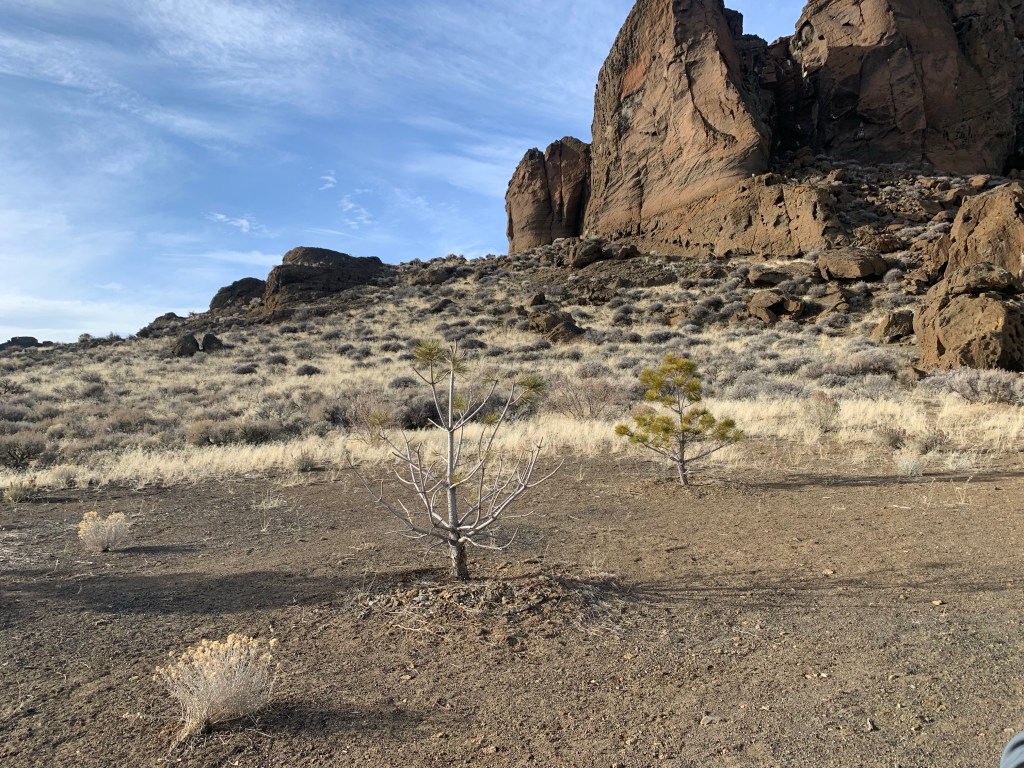
The big day came and we were all ready to make the hour long drive in two SUV’s from Sunriver to the location at Fort Rock. It was a gorgeous warm day which was perfect for being outside before and during the shoot.

Abby applies makeup to Payton out on the deck on this gorgeous day

Julie’s nieces Abby and Lauren were able to join us the day of the shoot to help with makeup and styling and just tag along for fun. I had met Abby before and she was wonderful to be a model for some of my dresses last year, also photos shot by her uncle Mark. It was great to have them as they both really helped out, plus are around Payton’s age (a little older) and helped her feel more comfortable and relaxed, and gave great tips on makeup and poses to do during the shoot.

We arrived at the location and were in awe of the beautiful spot with the big lava mountain stuck out in the middle of nowhere. The sky was amazing and looked almost like a fake backdrop! We got started right away with Mark taking photos, Julie helping with the equipment, the girls giving good posing direction, and me fluffing the dress whenever necessary.

The team in action!
Lauren giving Payton sexy gesture direction
What a great team effort!

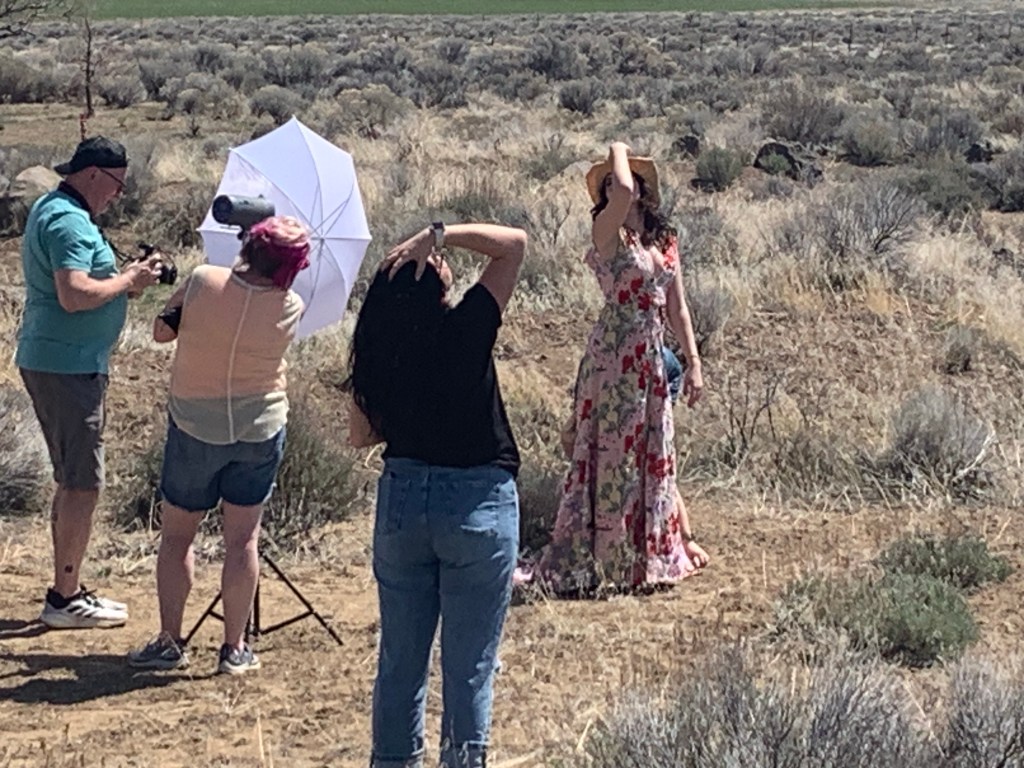
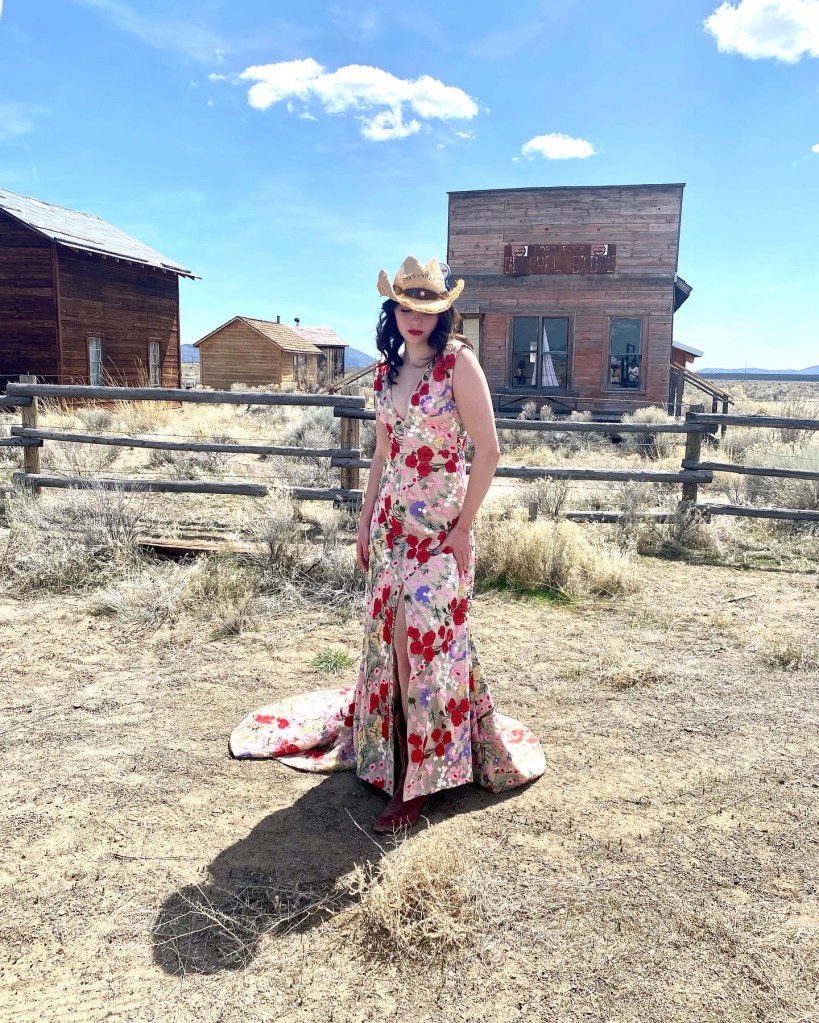
We got some great shots in a few areas around the park, some standing in the field, some on the dirt path that went around the enormous rock, some sitting on a rock, and then some at the little abandoned town that was down the street a bit from the rock. Mark really captured it all beautifully and Payton was spectacular in the gown!

I am just overjoyed with how it all came out in the end! The gown is gorgeous, Payton looks amazing, and Mark really captured my vision. I can’t thank them all enough for their contribution to this project, it was really special and dear to my heart!

The photos are just amazing and I believe will help me take my dressmaking business to the next level.

Abstract Wearable Art

My dear friend told me about an event that was going on in Portland that she bought a ticket for and thought I might be interested in joining her. The event was a combination fashion show, art exhibit and promotion of new happenings in the city. It was hosted in a former retail space in Pioneer Place mall , a once booming luxury mall that had been hit hard since the riots of 2020 and was loosing traffic, but is showing a renewed interest with some high end shops and new use of some of the otherwise unoccupied spaces. A new art gallery has opened in one such space in the mall, Gallery Go Go, which features local artists, hosted the event and invited other fashion, makeup and performance artists, and most notably, the amazing botanical artist, Francois Weeks. All of the amazing makeup art was done by a talented team at Event Cosmetics.

Of course, I was thrilled to hear of such a show and immediately purchased a ticket to join in the fun and also to support some local talent. Plus I got to hang out with a wonderful, fun and beautiful friend who also shared a passion for fashion and culture as I do.

I began to plan what I wanted to wear to this event as I just LOVE fashion shows and events that involve socializing, seeing amazing artists work, and dressing up!

Since the event was happening in early March, I thought it would be wise to make a statement coat or jacket of sorts so that I wouldn’t have to worry about what I was going to wear as outerwear over my outfit. I felt it was a great idea to make a unique jacket and embellish it with floral and botanical inspired embroidery, beading and appliqués, and line the asymmetric peplum with a complimentary pop of color. I gathered up my pattern ideas, materials and ordered some lovely appliqués from Etsy and began to work on it.

Some sketches of my idea
An appliqué and beads that could work on the jacket
Or these 3-D rose appliques
Another gorgeous appliqué I purchased

If you know me at all, you know that I tend to have TOO many ideas swimming around in my head and only occasionally take the idea to a finished project. Well you guessed it, the idea was a great one, I started on it, but time just began to run out and I knew that I couldn’t finish it in time to wear to the show. Argh!

So, I tabled plan A and moved on to plan B.

I have plenty of lovely fabric in my stash, fabrics that are already embellished or printed and only need a blank slate to make them come alive. Enter the idea to make a great jacket using a pattern that I have always wanted to make and some great fabric I’ve been saving for such an occasion!

I got to work cutting out this McCalls pattern #M7879 that I had in my collection, choosing the view with the interesting leg ‘o mutton sleeve and longer hem so that I could be warm and stylish, but not too hot if it were to be hot at the event:

McCalls 7879 pattern cover
The line drawings for the pattern. I made view C

If you happen to be interested where I got the Leg ‘o Mutton description of that style of puffed sleeve, it is actually a style of sleeve that has been around since the 1800’s and is to resemble the leg of a lamb.

https://thepragmaticcostumer.wordpress.com/tag/leg-o-mutton-sleeves/
https://genealogylady.net/2015/07/12/fashion-moments-leg-o-mutton-sleeves/

Did you know I also am a huge fashion history nerd? You heard it here, Folks! Love it.

On to the project!

I had this interesting floral and abstract printed cotton blend fabric that had a Scotch-guard surface treatment, perfect for a light outerwear piece, or a home decor project. It has some abstract floral print and black zebra-type stripes on a bright white background. I had purchased enough yardage of it with the intent to use to make it into a rain jacket, so it was just right.

It didn’t take too long to make up the jacket, between other client projects and teaching sewing classes, about two weeks on and off in total. Even though the jacket is fully lined and making the sleeve like that was new to me, I managed to stay up late some nights and power through it.

I tell you, with having my own sewing business, operated out of my lovely and inspiring home, I have more time, mental space and ability to do special, last minute projects like this and that makes me so, sew happy! I have all my tools, machines, notions, thread, buttons, fabrics, patterns, trims, beads; essentially all of the things I need to make most any garment at my fingertips. No need to even leave the house! Such a dream come true.

A pop of color using bias piping trim, inserted to the inside of the jacket between the lining and the facing. A little design feature I love to add to jackets and coats whenever I can.
The jacket lining installed and getting close to being finished. I had this silk/spandex blend fabric in black on hand in my fabric stash. I love using silk to line better garments. It’s so luxe and slippy!

Alas, I finished the jacket just in time to take a few photos of it, put it on with the rest of my outfit, do my makeup and hair, and head out the door to meet my friend for dinner before the show.

She’s finished!
I’m ready to go and excited to wear my new creation!
I wore my new jacket over a black cashmere turtleneck and faux leather leggings with some Sorel booties. Perfection!
#sewingismysuperpower

The show was amazing and so fun to see such wonderful creations by talented artists featured on bodies of beautiful people. The featured artist Francois Weeks created spectacular live botanical displays and wearable works of floral art. Check out some of the photos I took from my seat at the show and afterwards. Click on the photos to see some of the detail work that will blow your mind! Amazing and SO inspirational!

At the Gallery Go Go pre-show

I was so mesmerized by the amazing arial artist, I only got this one photo of her, about to approach the arial hoop, at the very beginning of doing her magic during the show:

The arial artist, a mesmerizing show!

Even the music from the featured DJ’s was super sweet! We also got a great goodie bag that included some lip balm from Event Cosmetics that I have been loving, an amazing perfume sample, and some other great little treats to enjoy!

We had an amazing night out, seeing such talent and inspiration to be creative, and just fun to hang out with some cool people of Portland! I was perfectly comfortable and felt great in my jacket and the outfit I put together with it. I got tons of compliments on my jacket, before and after the show, as well as from my social media posts following that night. The icing on the cake happened when McCalls Pattern Company contacted me through my Instagram post, asking if they could feature my jacket on their page. WOW!!!

My Form of Art: Fashion

Lace Ballgown for a Beauty

I’ve known Michel for a few years now. She has come to me on several occasions to alter and do minor repairs on her clothing. She loves fashion and is always intrigued with what projects I am working on, especially the custom dressmaking ones. She would say to me that someday, she’d love to have me make something custom for her. Well, that day came along when she was asked by her best friend to be the Maid of Honor in her wedding, and she had the choice of what to wear in the wedding as long as it was formal, elegant and black.

As soon as Michel was asked, she reached out to me to see if I was available to create a gown for her. Of course I was! Michel is such a wonderful person and a repeat client of mine, so I was honored to create something special for her.

We had our first meeting at my house on a warm sunny afternoon, over a light lunch and refreshments, sitting out on my back deck. We talked about what style she likes, what parts of her body she’d like to highlight and what she’d rather not. We talked about color (black), and fabric options, the timing of the wedding, and I showed her some images I put together on Pinterest.

A black lace gown I pinned on Pinterest

She loved the idea of a fit & flare dress, or a mermaid style that is fitted from the bodice to the upper leg, then flares out at below the knee. She wanted to highlight her slim waist and also wanted sleeves as the wedding was scheduled for the end of January, so she might get cold. It was great as we worked together to decide on a suitable style as she had an idea of what she wanted, but also put a lot of trust in me and my experience in the fashion industry, dabbling in image consulting.

I found a couple of sewing patterns to start with, and eventually decided on this one: McCalls 6838.

McCalls 6838 sewing pattern

The pattern cover is really not all that elegant, but if you look past that and look at the illustrations and line drawings, the pattern becomes much more appealing. To me, at least!

Line drawings of McCalls 6838 sewing pattern

In my sewing experience so far, I like to take an existing pattern that is already graded and figured out, and make it extra by adding design details, using nice quality fabrics, linings, embellishments, and leveled-up sewing and dressmaking techniques to really make the design special and valuable.

As a side note, I have been working solely for myself since June of 2022, running my design, dressmaking and bridal alterations business Love, Stephanie. Since then, I have leveled up my sewing and strive to create high quality garments with special details including fit, better fabrics, quality construction and special personal touches. Doing so, I have also revised my price list and raised my prices, no longer giving friends and family discounts or doing free-bee trades just because I feel like I am charging too much or still in training. Now, I charge accordingly for my work, my experience, my dedication to my clients, and my attention to detail. Saying that, this gown took a lot of time and effort to create, and I priced it at $1,400 not including fabric. Just in case you were wondering!

Back to the dress!

We had our first fitting using the pattern tissue paper to just get an idea of fit for the main parts of the pattern. Michel has a great figure, virtually zero body fat, so the pattern essentially fit right out of the envelope with very little adjustments needed. Must be nice, huh!

Tissue fitting!

From there, we went fabric shopping together and Michel chose and purchased a lovely black lace with a little floral motif all over, and a scalloped edge which I used later for the neck and sleeve edges of the shrug.

The pattern and the lace! Please excuse the cluttered background of my studio!

I then moved on to making a muslin mock-up of the dress to further ensure the fit and style are what she likes before I cut into her fashion fabric. I only had to make a few more fitting tweaks at the muslin stage, taking notes along the way to keep track of what I needed to do as I made progress.

The muslin!
In her mock-up, Michel just needs a few tweaks to the fit, and to decide what lining she preferred (nude lining won!)

For each of my custom sewing clients, I keep a dossier type folder with my notes, sketches, pattern pieces, inspiration images, fabric swatches, receipts, and have this handy as I’m working on the project to keep it all together and organized. I keep and store each client’s dossier after the project is complete for my own records as well, and as a reminder as to how far I’ve come along which is nice 🙂

Michel’s dossier cover image, with my sketching & scribbles, stored in a pocket folder, with all my notes kept together

With the muslin fitting stage completed, it was now time to start cutting into the fabric and constructing the dress.

I cut out all of the lace pieces of the dress, including the bodice, the skirt, and the lower skirt flounce. I also cut the exact same pattern pieces out of a light weight lining material in a flesh tone to underline the lace and give it structure and opacity. Here I have my pattern pieces all cut out, stacked and pinned with the lace and underlining, ready to be hand basted together and later treated as one layer to be sewn together.

The bodice pieces cut out in lace with underlining pinned and ready to be basted together by hand
The upper skirt pieces marked and ready to be basted together by hand
One half of the lower skirt portion ready for basting the layers together.

Once the layers were basted together, I could move on to sewing the pattern pieces together and start forming the dress.

The bodice sewn together
The bodice and upper skirt sewn together. It looks great just like this!

To give the lower circle skirt more body, bounce and twirl appeal, I added a layer of tulle between the lace and the lining, gathering it as I sewed it to the upper seam edge before attaching it to the lower skirt. I thought this was a great idea as I’ve seen this kind of layer in big ball gown type skirts, knew it would be easy to do and create a great effect.

Lots of pins to keep this tulle in check!
It looks like a messy nest, so one pin at a time controls the tulle before and during machine stitching

This is the stage where I wanted to start adding the beading. I planned it at this stage of the construction process as I wanted the stitching and threads of the beading to be hidden between the outer layer (the lace and underlining) and the lining. I bought some lovely little black glass seed beads and black sequins and created a little stack of them and sewed 2-3 stacks to the large flower motif in the center. It wasn’t all that noticeable on the dress, especially in a photo, but in person, it gives the dress a tiny little shimmer and adds a slight texture to the lace.

Hand sewing the seed beads and sequins, one by one, to the lace
I created tiny little stacks of seed beads and sequins to the center of the large flower motifs all over the dress and flounce

As I sewed the beads and sequins to the dress, I kept track of my time using the timer on my iPhone and jotting it down as I went. Adding it all up, it took me about 9 hours to bead the dress. If I had the time, I would have beaded more of the dress, but this wasn’t feasible with just my two hands and lack of time!

As the dress progressed, I had a couple of more fittings with Michel, this time in the fabric, before I added the lining, just to check fit again and make sure everything was perfect before the lining installation

Michel pinned into her dress, the straps and belt also just pinned, and deciding on the finished hem length.
Pinned into the dress, with the unfinished shrug (again, please excuse the mess!)

She also wanted a sleeve option for the dress, so I made a little matching shrug for her using Butterick 4731 for the pattern.

Butterick 4731 for the shrug only (although I also like the gown in this pattern)
I used the sleeves of view A and the front and back of view B to make the shrug
I cut out the shrug in the same layers as the dress, also beading the outer lace layer before adding the lining

I used the pretty scalloped border of the lace material to create a trim to go around the edges of the shrug at the neckline, around the back, and the sleeve hem.

Hand stitching the lace edge trim to the finished shrug

I wanted to be sure to have a well made garment that would last a long time, and be extra special to slip on and wear comfortably. I added two hanging loops into the side seams of the lining using a narrow satin ribbon, so that when the gown was hanging, not all of the weight of the dress was on the straps and it was supported with the loops. These loops would then just fall down into the dress when worn and are not seen. I also added a little waist stay right at the waistline of the dress using a wider ribbon and a hook and bar. This feature helps to support the weight of the dress on the inside. I see both of these interior details in some of the wedding gowns that I have altered, so I like to adapt them into my dresses for a high end, secret quality detail!

The hanging loops do their job to help support the dress while hanging
The waist stay added as her exact waist measurement inside the dress for support

Jumping ahead, as the wedding date was rapidly approaching, the dress and shrug were turning out so well, and I couldn’t wait to get Michel in it and delivered before the big day.

Before delivering it though, I wanted to add a little special and personal touch to the garment bag that I usually include with the dresses that I make for my clients. This time, I used my embroidery machine and made a monogram for her on the outside of the garment bag.

The purchased garment bag with the personal monogram

Finishing up the dress and delivering the finished product always feels great! She’s excited, I’m excited and everyone can’t wait to see her dazzling in her new custom made gown!

Checking and double checking the hem is even and balanced

The time finally came that I was 100% finished with the dress and I was ready to deliver it to Michel. It kind of feels like I am handing off a little part of me whenever it’s time to deliver the dress, so I try to take the time to get some good photos of the finished product before she’s gone off to her rightful owner!

She’s done! Isn’t she lovely!
With the matching shrug

All dolled up and in her gown, Michel is absolutely STUNNING! She’s a natural beauty and does not need makeup of any kind, but boy, when she dresses up and gets all dolled up, WOW! Breathtakingly beautiful!

Stunning!
Simply gorgeous!
Michel and her best friend, the lovely bride Megan!

Another dream dress come true!! Onwards and Upwards!

A Twinkle in His Eye 1955

My silk gown and reversible overskirt

This lovely creation all stemmed from a challenge. I belong to a professional sewing association, ASDP, that hosts an annual sewing challenge in conjunction with Threads Magazine.

For the 2022 Threads Challenge, we were to use a vintage pattern from the pattern archive at the University of Rhode Island as an inspiration.

I thought that this was quite fitting as both my father and I graduated from URI! My father graduated in 1954 and I was in the class of 1992. My parents met while my mother was in college at the University of Connecticut which was also in the 1950’s, so I thought I would choose a design that was popular during that era

Evening Ball Gown 1955
Dress with Overskirt

I also had this sewing pattern, the recently released version from McCalls, as well as the original pattern released in in 1955 from McCalls which I bought on eBay.

I could imagine that my mother would have worn a gown like this in her day as she was quite the stylish and elegant lady, so I kept her in mind and close to my heart as I planned out and sewed up this dress.

The original 1955 pattern release. I love the fashion illustration!
McCalls re-release of the style from their Archive Collection

I ordered 9 yards of the silk dupioni from Mood.com to ensure I had enough for the sheath dress and the overskirt. Once the gorgeous material arrived, I went to my local favorite fabric store and purchased enough material to line the dress in silk habotai, and also line the overskirt, which is not part of the patter, but something I wanted to add to catch the eye when wearing this already eye-catching dress.

The materials and patterns

I got to work making a mock-up in muslin of the dress and asked for help with the fitting from my go-to expert Marla Kazell.

Once I was confident with the fit of the dress, I got to work cutting out the fabrics and the new version of the pattern, McCalls 7897

Ready to cut into this spendy silk!

I sewed the dress up without much issue, using the pattern instructions to follow, and making it fully lined. The pattern has you create a facing for the inside edges which I thought wasn’t good enough, and fully lining the dress would make for a nicer finish in my opinion.

The work in progress

For the overskirt, I just made the printed silk organza lining out of the same pattern pieces and hemmed it to meet the outer red material before attaching it to the waistband strip.

The pattern also has a cummerbund as part of the look, but I left that off as I wanted to have the overskirt easily removable for the showcase of the garment. I have enough leftover silk to make the cummerbund, so perhaps one day I will make that as well.

I submitted my garment into the challenge, along with photos of the finished garment, a description of the dress, and the story behind why I chose this style and pattern, to the ASDP Challenge committee. Here are some photos that I submitted to the committee:

Front of dress wit overskirt
Back of dress with overskirt, and the lining peeping out
The dress and overskirt from the side-I love the volume!
Front of the dress, with the overskirt reversed, showing off the lovely floral print!
The sheath dress on it’s own, so sleek and elegant!

After several weeks, I got a notice that my submission had been chosen as a finalist in the challenge, and I was to send in or bring the dress along with me to the ASDP conference where all of the challenge finalists would be in the fashion show and the judges and audience would choose the winner. I was overjoyed to hear this news, and excited to share my make with fellow sewing enthusiasts that would be attending the conference in Baltimore, MD in October.

I packed the dress and overskirt in my suitcase, along with hand sewing needles, thread and a little sewing kit, and made it to the conference almost ready to submit my dress. I knew that I had to make some final sewing touches to the dress, and of course, left these to the very last minute! I still had to sew the lining down to the inside edges, at the shoulder and to the zipper, and hem the skirt lining. I did this all by hand, rushing through it in my hotel room at the very last minute, just in time to submit it to the contest committee for the final review. That, I believe, really hurt my chances of winning the challenge, as the judges of the challenge are expert seamstresses and would surely be examining my rushed and messy sewing up close.

The time came for the fashion show at the conference where dresses from past challenge winners, students and finalists from the 2022 challenge showcased their work to the audience of other conference attendees as well as anyone who wanted to attend the show. I modeled my dress, as I made it to fit myself, and got many ooh’s and ahhh’s on my completed look! I was next to last in the runway line up, standing proudly amongst some other amazing creations and works of art. I felt so honored to have been a finalist in the challenge, yet a little disappointed I didn’t win any of the challenge prizes for the work that I did.

I love my dress and am OK with not being the winner. I just wish I had snapped a photo of me wearing it or asked for a photo from the fashion show! There was a photographer there throughout the show, so I am sure I’ll get some photos of me in it eventually.

I put time and effort into my creation, and know that it wasn’t perfect, certainly not up to the standards of expert seamstresses or for the editors of a nationally published magazine such as Threads. Am I disappointed in myself? Yes, certainly, as I had the time to do a much better job with the finishings of the garment. However, I am very proud that I was chosen as a finalist, and have learned a great deal about the level of workmanship that needs to go into a project that would be chosen by a contest judge.

After the Threads challenge winner was chosen for her wonderful workmanship and design, they announced the theme of the 2023 Threads challenge for next year. This time, the challenge consists of designing a piece of outerwear that is inspired by a 2-dimensional piece of art. What an amazing challenge! Since I didn’t win this year’s challenge, I am eligible to enter the next one, so with that, I think I’ll go for it! Now, to find some inspiration and start planning what I can make…and DO IT! That’s the new challenge!

Modeling my creation!

Watercolors in Silk

I just love a great watercolor painting, how the colors softly flow into each other, creating emotion with how they blend together to evoke a mood.

Speaking of Mood, the renown fabric store in New York, Los Angeles, and online at MoodFabrics.com, the store where the Project Runway design contestants run around like chickens with their heads cut off trying to find fabric, trim, notions and inspiration (and hopefully a lucky Swatch sighting), all within a ridiculous 30 minutes, is running a series of contests using their fabrics. I thought how fun it would be, and also a challenge for me, to order some silk and whip up something for their MoodMadeSilk18 contest by the deadline of today, April 30th, 2018.

I went ahead and ordered 2 yards of this gorgeous watercolor floral silk chiffon and was even happier when it arrived!

IMG_E8948

Isn’t it SO pretty?!

I gave it a gentle wash and laid it flat to dry, then got to smoothing it all out perfectly on grain and ready to be cut:

IMG_8951

I thought this would be a perfect fabric for this pattern view A from McCall’s that I had recently acquired from their new Spring ’18 collection:

M7747_a

Pinterest is one of my favorite resources to find inspiration and ideas for sewing (also for cooking, art and other ideas). I found a couple of flouncy cold shoulder tops and pinned them for inspiration and thought, “I could make something like that, easy!”

floral cold shoulder long sleeve top                                             coral flounce cold shoulder top

So, I proceeded to do just that!

By taking measurements of the flat pattern and comparing them to my own body measurements, I knew that the torso would need to be lengthened in order to not feel too short on me when done, so I altered the pattern and added one inch to the front and back pieces using the “slash and spread” method (sorry, that sounds kinda dirty) before cutting the top out of fabric:

With the top only being a few pattern pieces, it went together fairly quickly, not including the pain-in-the-assery of working with silk chiffon, of course. For one thing, I had to carefully mark the wrong sides of the fabric as I went along so that I didn’t sew them incorrectly:

IMG_8973

Plus, make French seams on most seams since the fabric is so sheer and frays like a beeotch:

IMG_8982

sewing seam part #2 of a French seam

I decided that the fabric of the top was SO sheer that I would feel indecent prancing around in this with all of my “stuff” showing underneath, so I ran out and bought enough additional silk chiffon in a deep navy to layer under the print to create some opacity:

The top took me a little over a week to completely cut out and sew in my free time, so that was not too bad. I love the flounce and halter neck, and the fabric most of all on this top.

As for pattern changes, I left off the elastic at the waist, and didn’t add the zipper as the pattern suggests as I think that would be too much weight for this super delicate and sheer material. I also skipped the facing and sewed the lining in it’s place for a much better finish to the edge and to combat some of the sheerness.

IMG_8983

Detail of the French seam made on the flounce piece

I am not 100% sold on this pattern as I feel the fit is a tad “off” and the cold shoulder is really, really cold showing so much skin. It is way too big in the underarm as it turns out and shows off a good deal of side boob here. Making a dart here to take up some space is not going to work on the finished top (note to self: make more pattern alterations in this area, and maybe try a muslin too, before cutting into spendy materials like this, silly girl Steph!) so for now, I think I’ll make up a coordinating bra or a panel on the side to avoid any wardrobe malfunctions…

DSC_0315

Don’t look now, but your side boob is showing…

I finished the top just in time to throw it on, slap on some makeup, do something to tame (or tease?) my crazy hair, and have my sweet and patient man snap some photos of me to post on my Instagram with the hashtag #MoodMadeSilk18 to enter the contest by the deadline. I would love to win the $100 gift card to Mood as the winning prize, but there are some other amazing garments that sewists have made with silk from Mood for this contest, so I wouldn’t be upset if I didn’t win. Just making stuff and challenging myself is fun for me!

DSC_0325_2

DSC_0327


THANK YOU MOOD!!! Say “hi” to Swatch for me!

Ruffle Me Pretty!

I’ve finally finished this dress and I am really excited about it!

IMG_6119

I purchased the beautiful floral print silk and cotton blend voile at Josephine’s Dry Goods and the pink silk habotai lining at Mill End Store back in April, as well as the McCall’s 7537 sewing pattern around the same time. I gently laundered the fabric and cut out the pattern fairly shortly after that, and that is saying a lot because many of my desired projects sit and wait patiently their turn in the sewing queue.

I eagerly got started on this dress as I had a special event for which I wanted to make this that occurred back in June. However, by the time the date rolled around for the event I was not even close to being done in time for the event, plus it poured buckets that day and I would have been miserable (not to mention way overdressed!) if I had worn it, so it wasn’t meant to be quite yet.

Usually, I don’t take too much time sewing up trendy garments, but something about ruffles just calls to my inner femininity and I felt that the pattern silhouette it was classic enough that the trend would stick around for at least a little while, so I went for it.

Here are some of my ruffle inspiration looks that I find to be quite appealing, super feminine and flattering:


As with most dresses or garments that carry the details at the top and near the neckline, this pattern took the most time and attention to make at the bodice and gathered waist band. This pattern is labeled “Advanced” on the envelope and I can agree with that rating as there are quite a few pattern pieces and more advanced sewing and construction details.

Looking at the pattern envelope, it is a little more difficult to see all these pretty details with the print of the dress she is wearing:

M7537_a

However, the line drawing shows these details clearly:

M7537 Line Art

I was immediately drawn to the feminine and girly silhouette of this dress! I love the sort of boho-chic, gypsy vibe this dress gives off. I think it would be amazing (although a total beeotch to sew) in a floaty silk chiffon, with or without the sleeves, made with all couture seams and construction (of course) and I believe would turn out a high end boutique-worthy frock.

So, I took to making this dress the best I could with the spendy fabric and luxe lining. I used French seams where ever I could, and took the time to sew by hand where needed.

It took many hours to carefully pin and sew the two separate ruffles, each ruffle consisting of three pattern pieces to be sewn together first and then hemmed with a micro-mini curved hem before attaching to the neckline:

M7537k

Then, a lined facing was attached over the two tiers of ruffles and slip stitched by hand to the inside of the facing. I don’t have a photo of this in process, but it took a great deal of time and ended up kind of bulky, uneven and wavy with all of those layers. I skipped the elastic loops and lace up ties since there was NO WAY I could get these tiny loops made from elastic thread to sew down. I then edge stitched around the inner edge go the neckline to try to tame the ruffles and keep them from sticking up too much.

I read other sewing reviews about this on my favorite go-to sewing website Pattern Review that claimed that the neckline on this pattern was a pain to work with, which I do agree with, and very low cut, but I find the neckline to be OK and not reveal too much boobage.

Next came the gathered midriff. This was not too tough to do, just getting the gathers even between the top and bottom of the midriff was the only real challenge. As a finishing touch, I’ll make tiny invisible tack stitches on these gathers in various spots to keep them from poofing out or shifting around. This is a little trick I learned while working in alterations at a bridal shop where many dresses and gowns had this technique done on gathered areas of midriffs and necklines.

I thought I might make the long gathered sleeves of this dress, lengthening them to wrist length to suit my liking, but then as the summer days in Oregon reached temperatures in the 100 degree range a few weeks ago, I couldn’t bare the thought of a long sleeve and decided to cut the little cap sleeves from view C of the pattern:

M7537 view C line art

Here is the bodice before and after I sewed on the sleeve:


The pattern directions have you just sew the sleeve to the armhole and press it towards the bodice, but I felt that this left a raw edge here that could potentially show and fray when worn (or hanging on a pretty hanger in a fancy boutique!), so I serged over the armhole and sleeve seam after sewing it and plan to tack it down at the under arm seam to keep in under control. I usually don’t like to serge seams and take shortcuts when I am making a dress as “couture” as possible, so if I were to make this pattern again in the future, I would most likely make a French or some other finished seam here.

Before the serger:

M7537d

Sewing the skirt and skirt lining was a breeze. I used French seams for the side seams of both, then attached the two at the top and part of the side where the zipper opening was. Attaching it to the bodice while gathering it to fit proved to be a tedious task, but I got through it carefully and slowly as not to have any uneven gathers or puckers here.

Next, I slip stitched the midriff facing (or lining, whatever you want to call it) over the skirt seam by hand. I usually really enjoy this step in making a dress, whether with ot without a waistline band, as it really finishes off the inside of the dress, and is usually near the end of the process. Here is the facing pressed under and pinned in to place ready to hand stitch in place:

M7537f

Putting in the side zipper was a little tricky since the seam doesn’t open all the way (the zip opening begins a couple of inches down from the armhole and extends through the midriff into the skirt), so it is a little difficult to maneuver the zipper in. The inside of the zip opening doesn’t look very pretty, so I might go back over this covering it with a binding to finish the edge and prevent stray threads from getting caught in the zipper teeth. I think I have enough of the lining material to make self binding over the zipper tape, that would be nice!

I hemmed the dress and lining just doing a fold and turn hem, nothing too crazy. Possibly an invisible hem would have been a little better for the outer skirt, but I don’t have my better sewing machine with the blind stitch foot and setting with me just yet (I’m in the process of moving and currently just have my “travel” machine at home with me), so I just made do with the turned under hem as shown here on the lining:

IMG_6111

A few things I wish I had done differently with this dress is to 1) make in seam pockets. That would have been great, and an easy add. And 2) I should have taken the time to make a muslin mock up, even if it was just the bodice and midriff, as I feel that it is a little short in the torso length for me, and slightly too tight. We will see how it wears and how comfortable it is. Otherwise, the dress is great and very pretty!

I really enjoy how this dress turned out after all, but am not 100% sure if it is a great fit (whoops, I skipped the muslin mock up and just compared my measurements to the pattern measurements), or of it’s a great look for me. It may end up becoming a one of a kind Love, Stephanie for sale garment, so prepare to possibly place your bids Kids!


Have a great day and thanks for stopping by!

Love,
Stephanie