Abstract Wearable Art

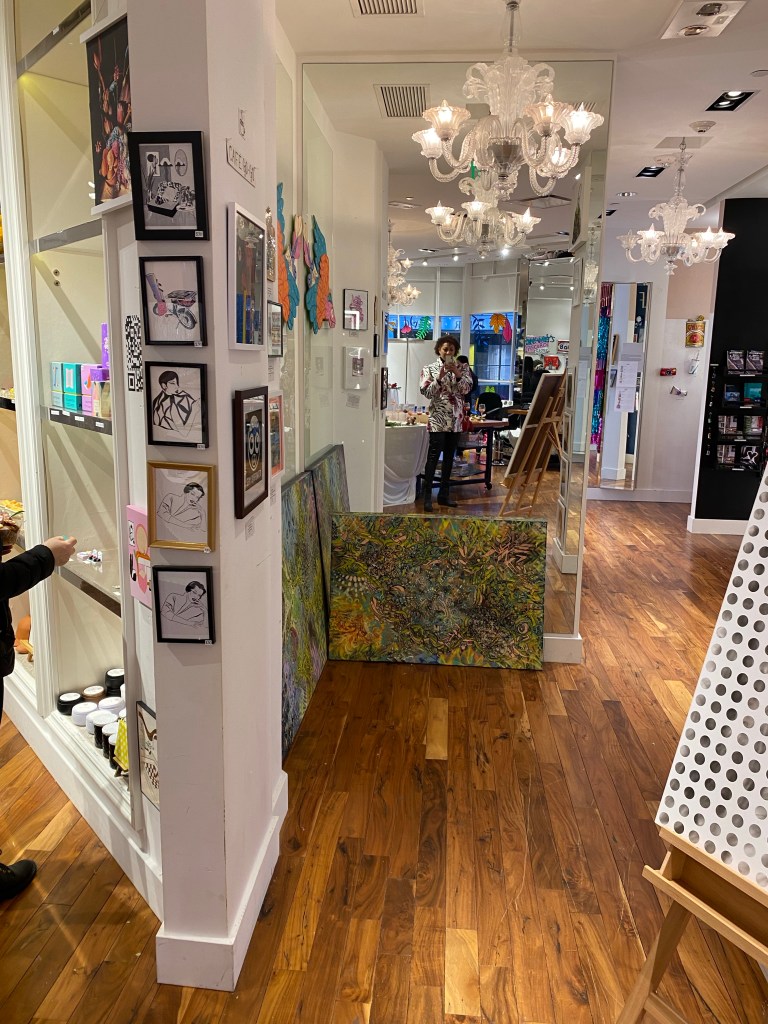
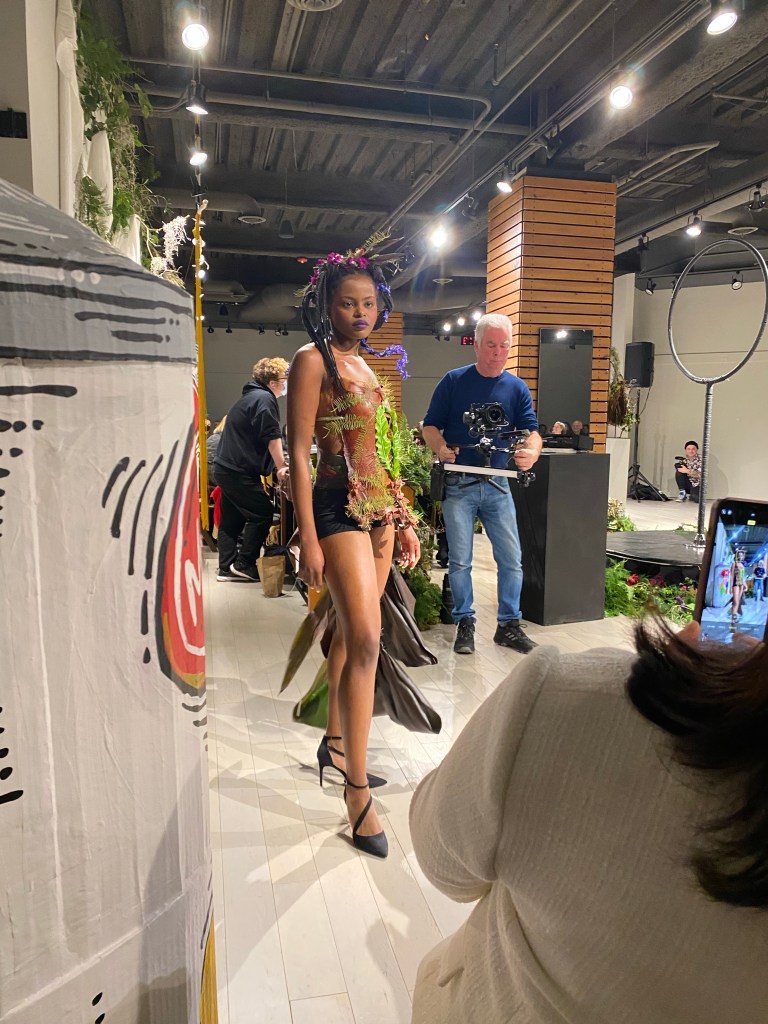
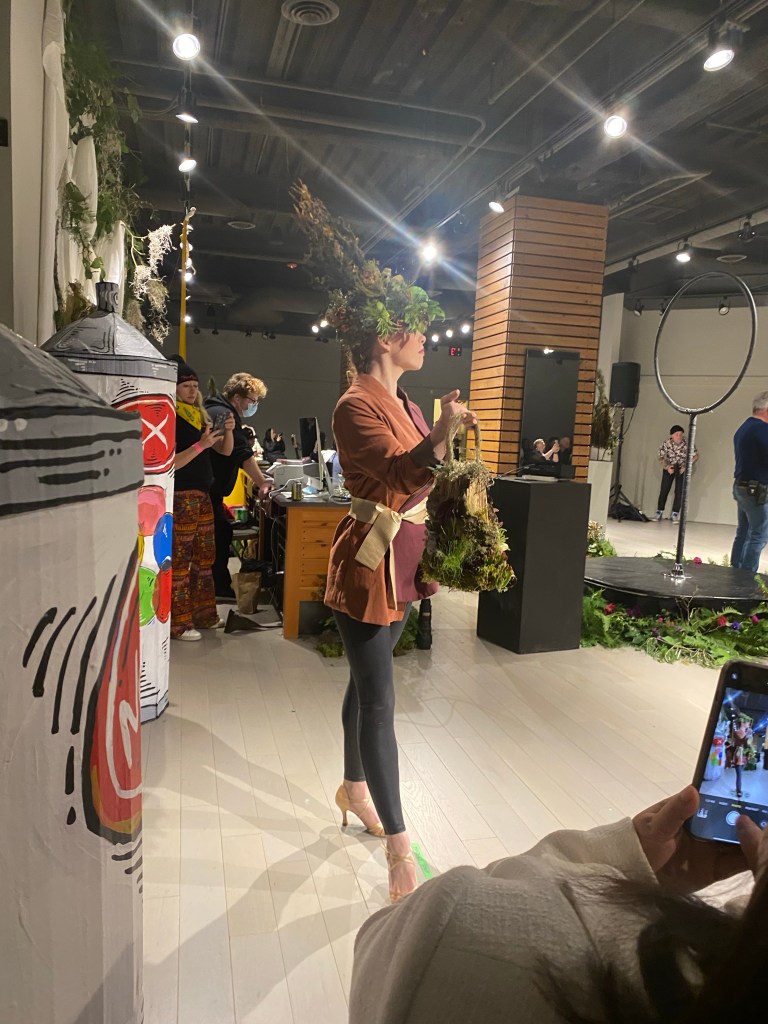
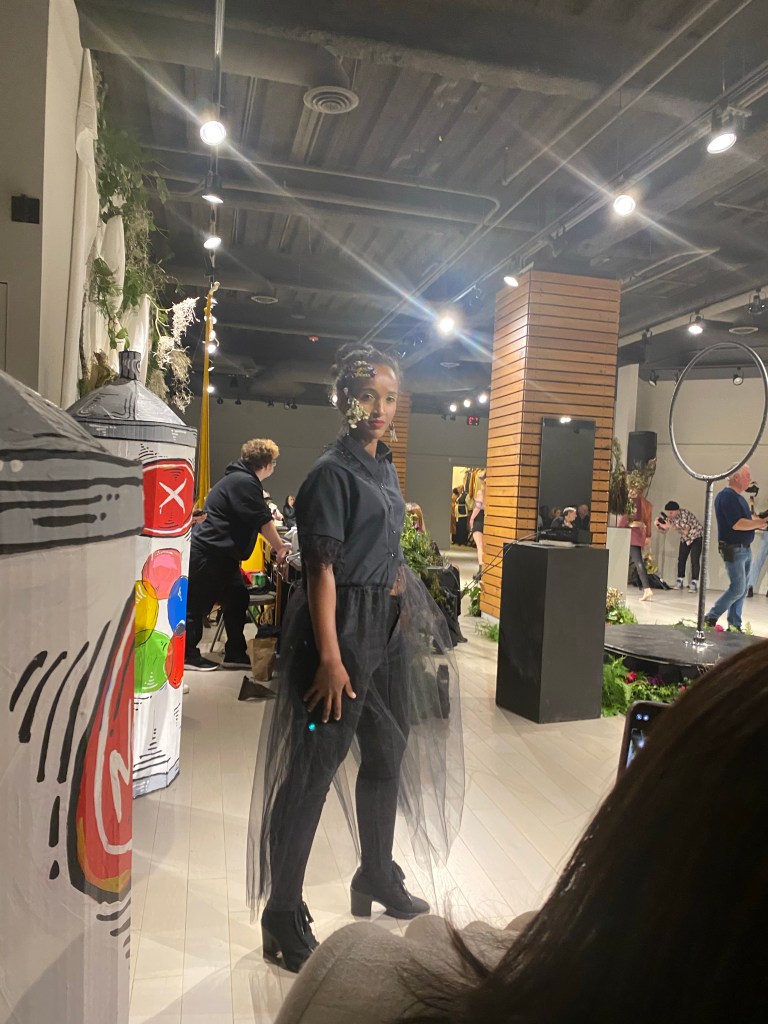
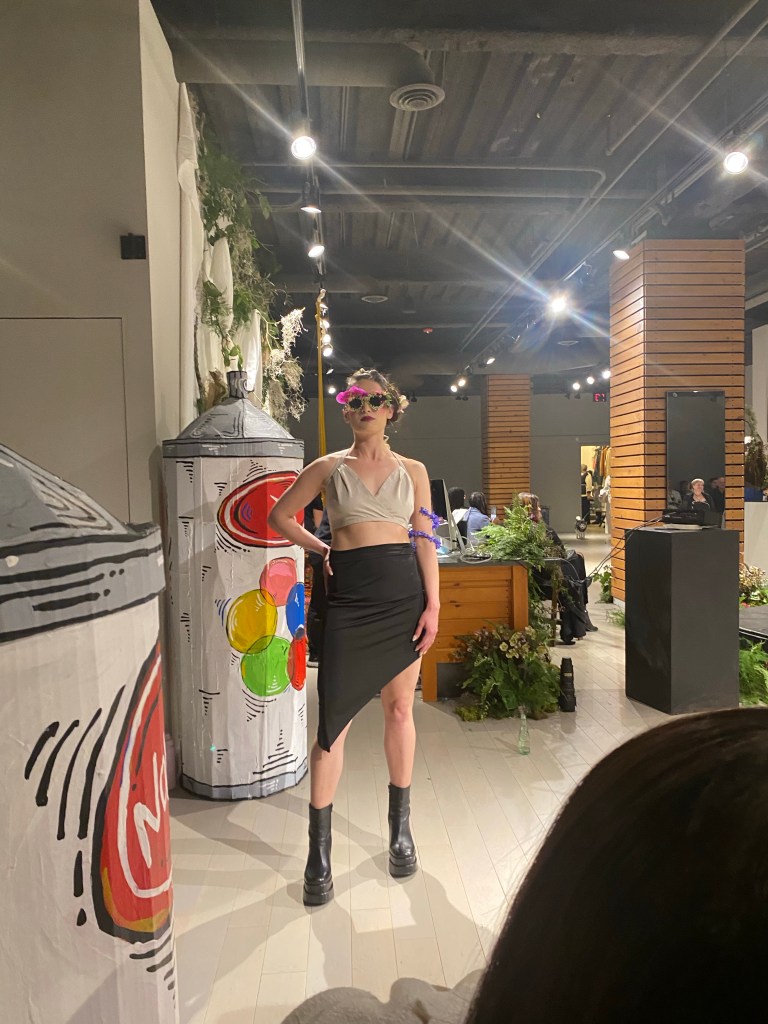
My dear friend told me about an event that was going on in Portland that she bought a ticket for and thought I might be interested in joining her. The event was a combination fashion show, art exhibit and promotion of new happenings in the city. It was hosted in a former retail space in Pioneer Place mall , a once booming luxury mall that had been hit hard since the riots of 2020 and was loosing traffic, but is showing a renewed interest with some high end shops and new use of some of the otherwise unoccupied spaces. A new art gallery has opened in one such space in the mall, Gallery Go Go, which features local artists, hosted the event and invited other fashion, makeup and performance artists, and most notably, the amazing botanical artist, Francois Weeks. All of the amazing makeup art was done by a talented team at Event Cosmetics.

Of course, I was thrilled to hear of such a show and immediately purchased a ticket to join in the fun and also to support some local talent. Plus I got to hang out with a wonderful, fun and beautiful friend who also shared a passion for fashion and culture as I do.

I began to plan what I wanted to wear to this event as I just LOVE fashion shows and events that involve socializing, seeing amazing artists work, and dressing up!

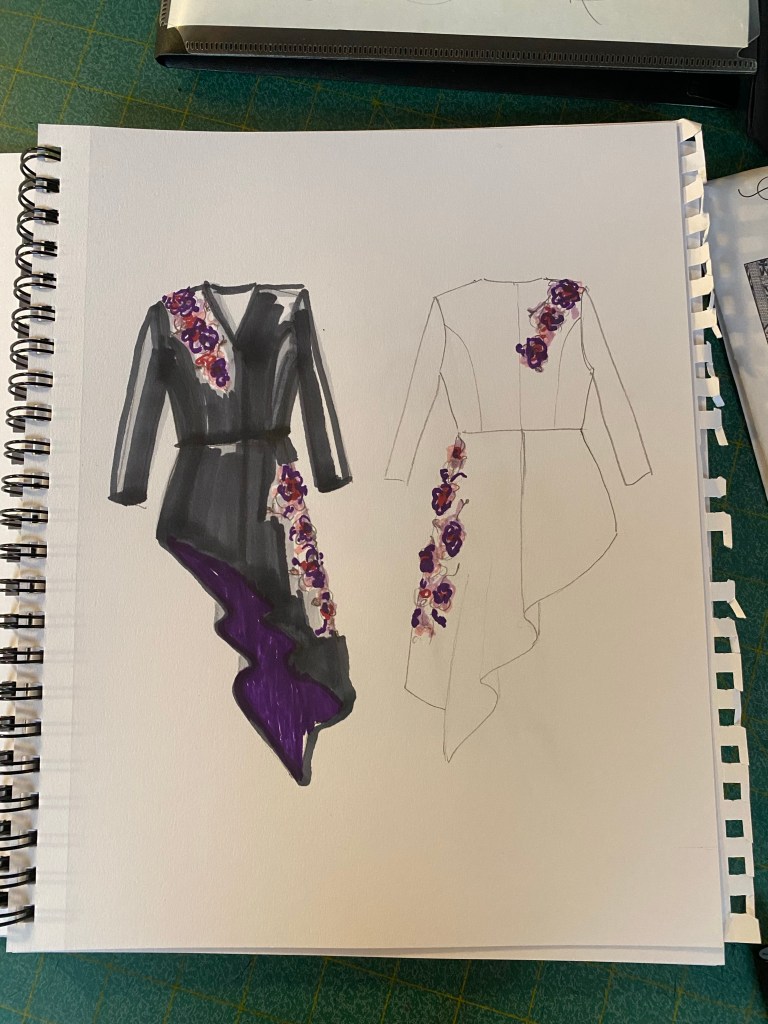
Since the event was happening in early March, I thought it would be wise to make a statement coat or jacket of sorts so that I wouldn’t have to worry about what I was going to wear as outerwear over my outfit. I felt it was a great idea to make a unique jacket and embellish it with floral and botanical inspired embroidery, beading and appliqués, and line the asymmetric peplum with a complimentary pop of color. I gathered up my pattern ideas, materials and ordered some lovely appliqués from Etsy and began to work on it.

Some sketches of my idea
An appliqué and beads that could work on the jacket
Or these 3-D rose appliques
Another gorgeous appliqué I purchased

If you know me at all, you know that I tend to have TOO many ideas swimming around in my head and only occasionally take the idea to a finished project. Well you guessed it, the idea was a great one, I started on it, but time just began to run out and I knew that I couldn’t finish it in time to wear to the show. Argh!

So, I tabled plan A and moved on to plan B.

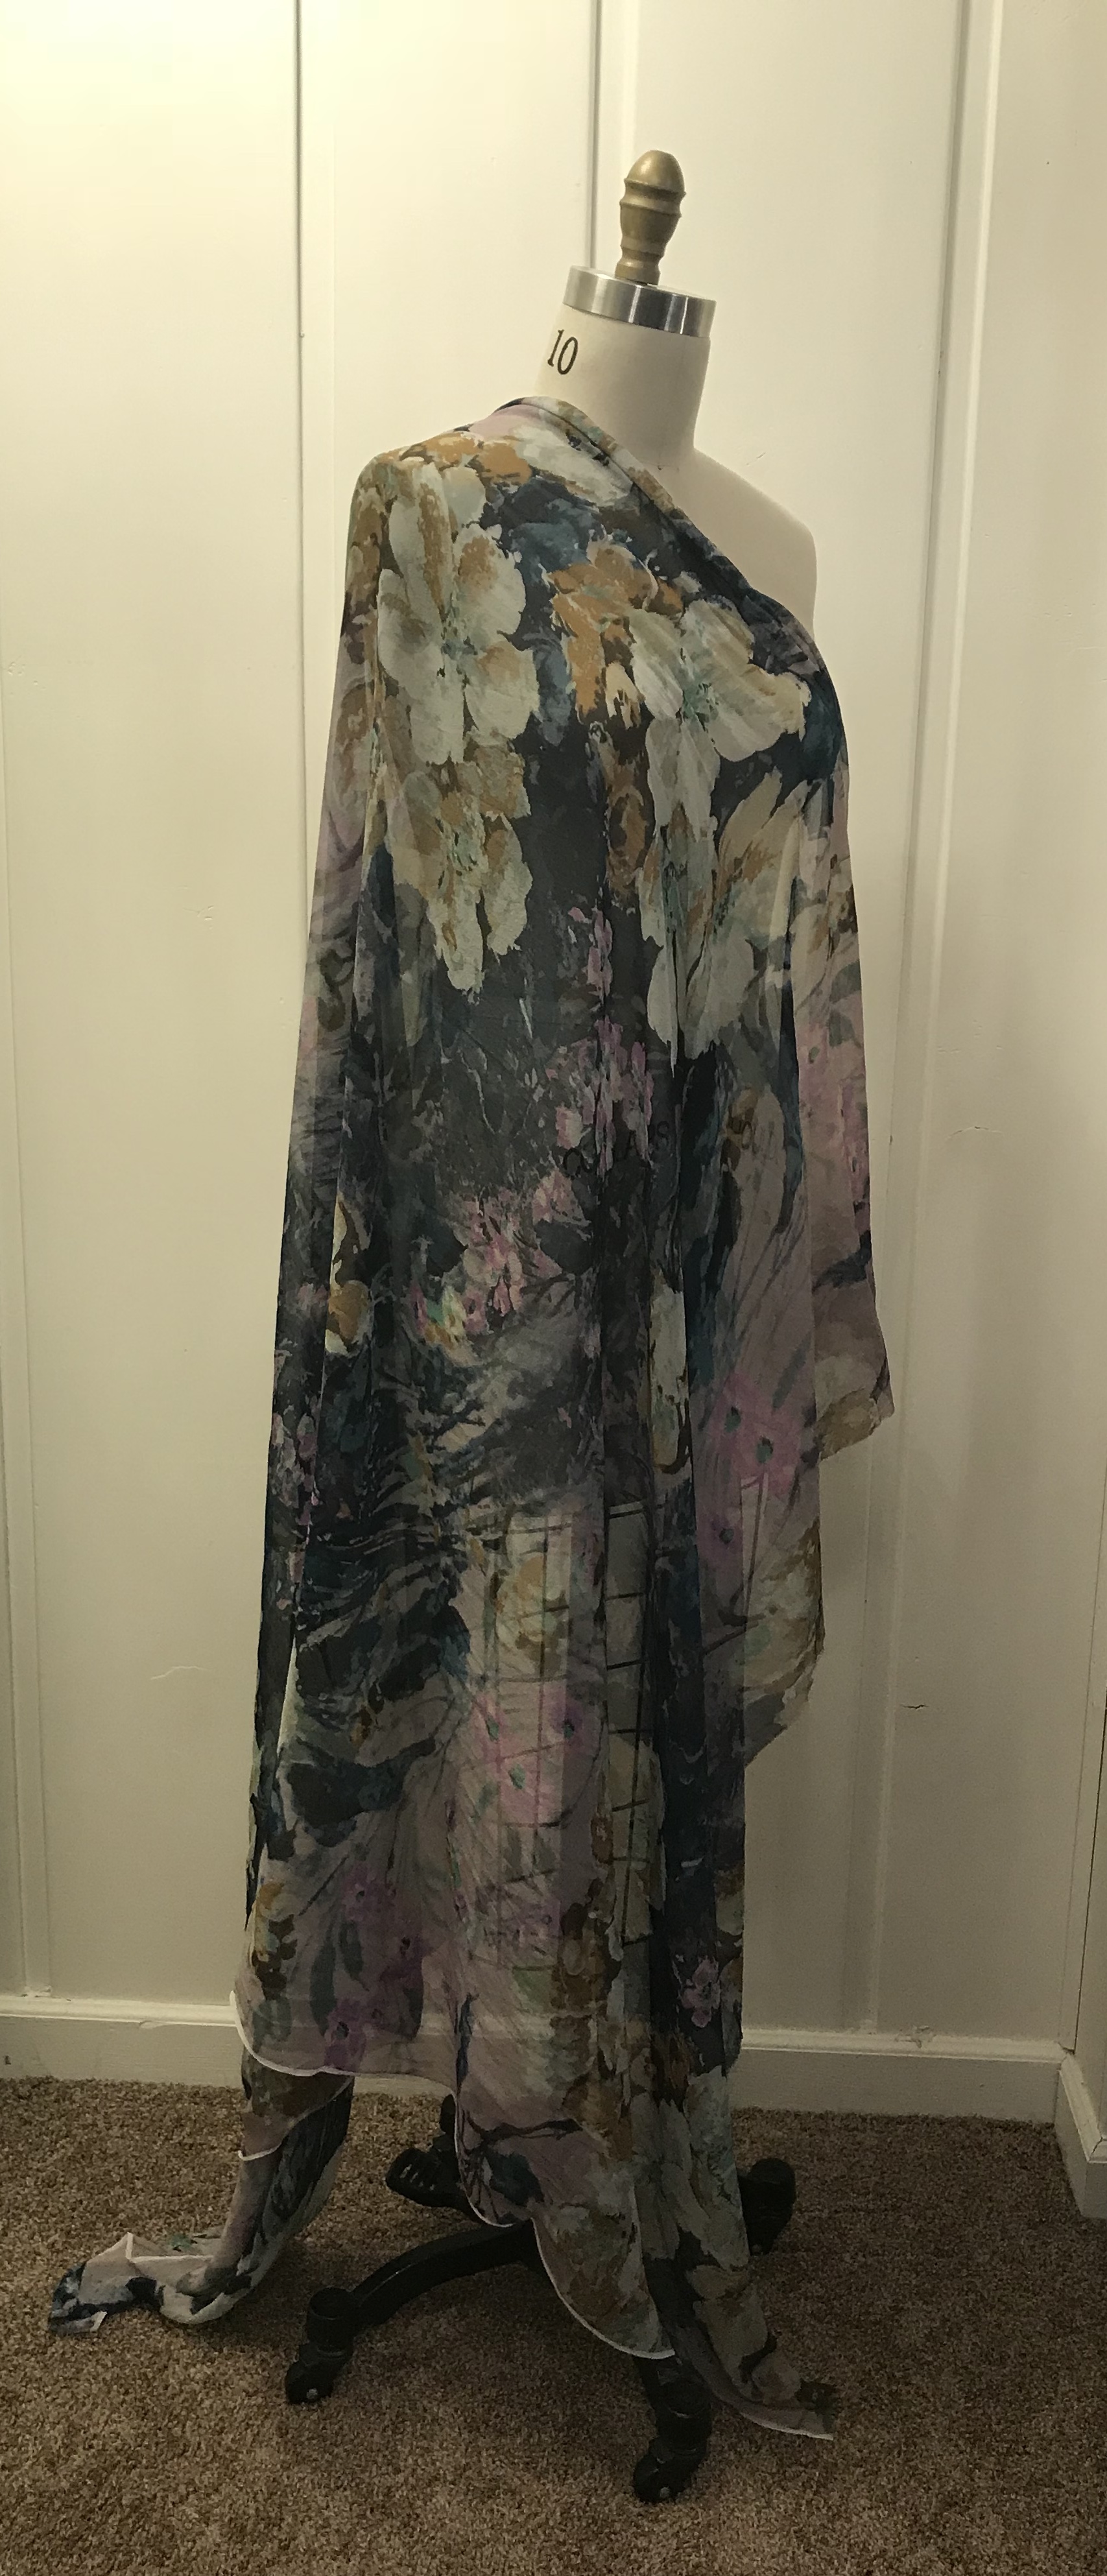
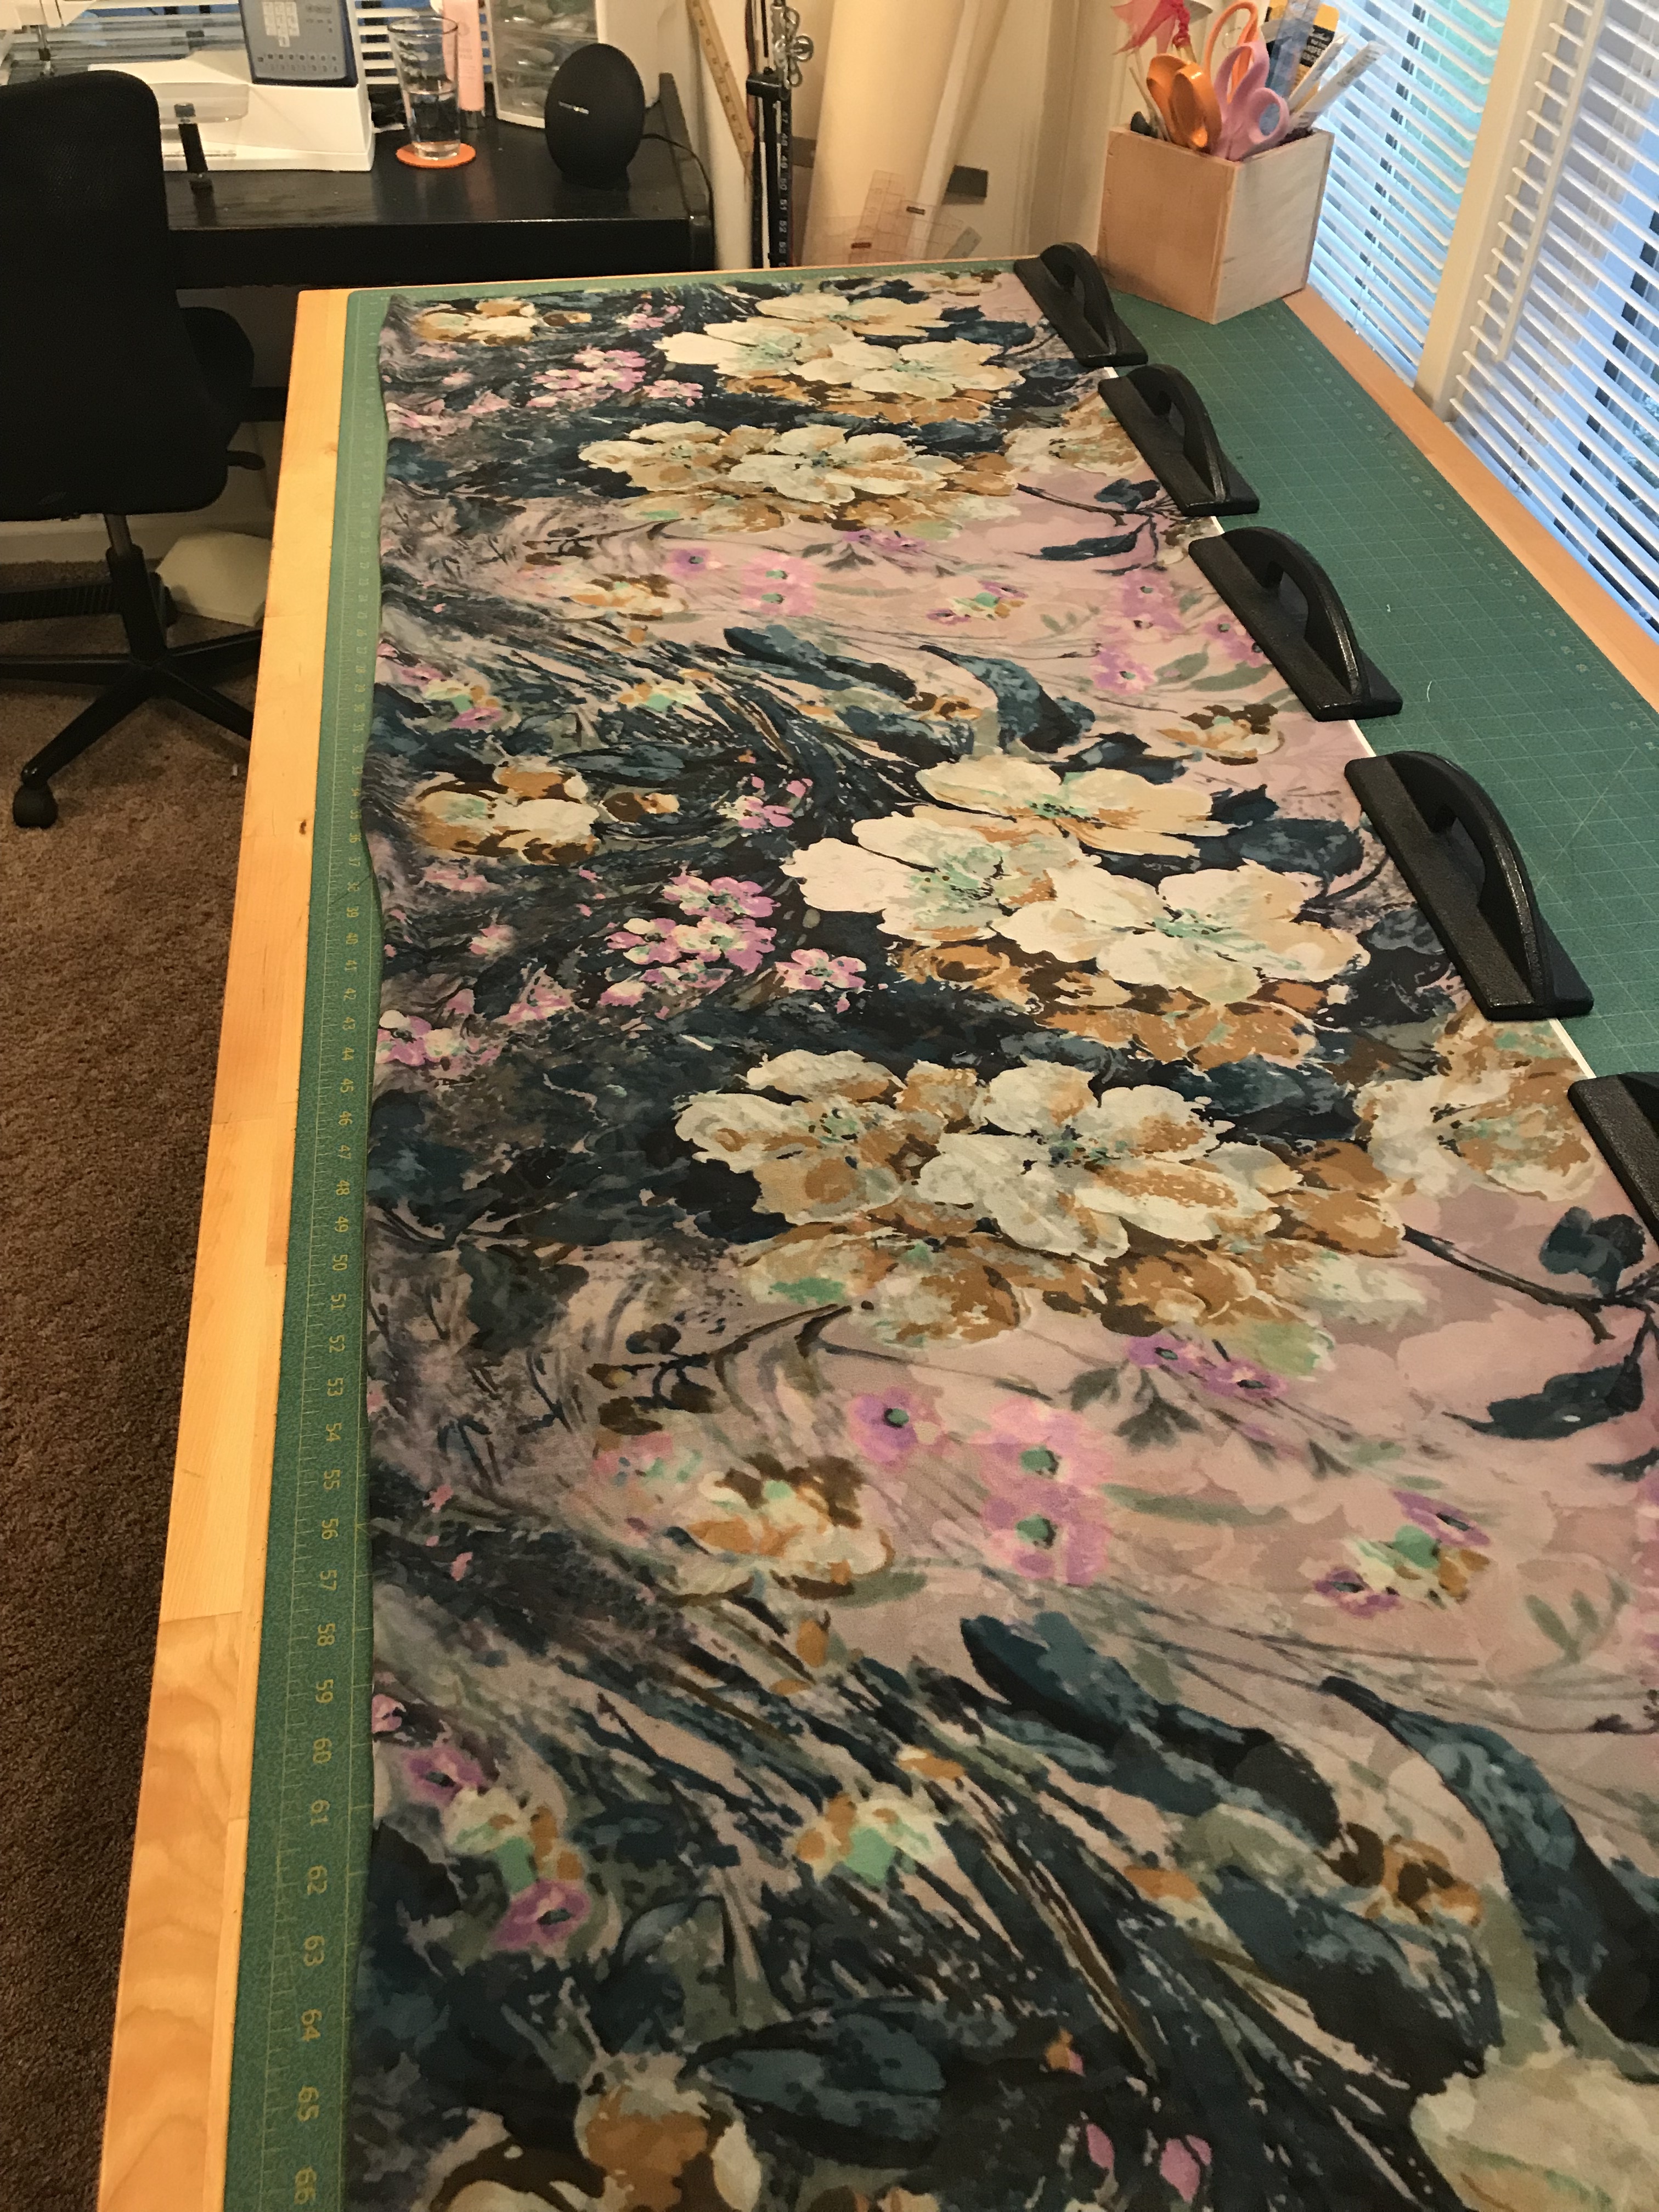
I have plenty of lovely fabric in my stash, fabrics that are already embellished or printed and only need a blank slate to make them come alive. Enter the idea to make a great jacket using a pattern that I have always wanted to make and some great fabric I’ve been saving for such an occasion!

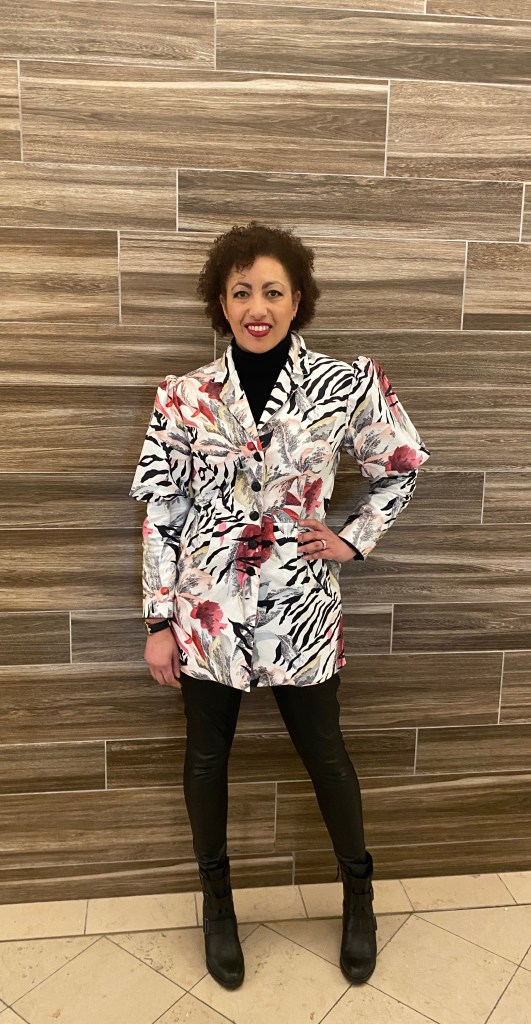
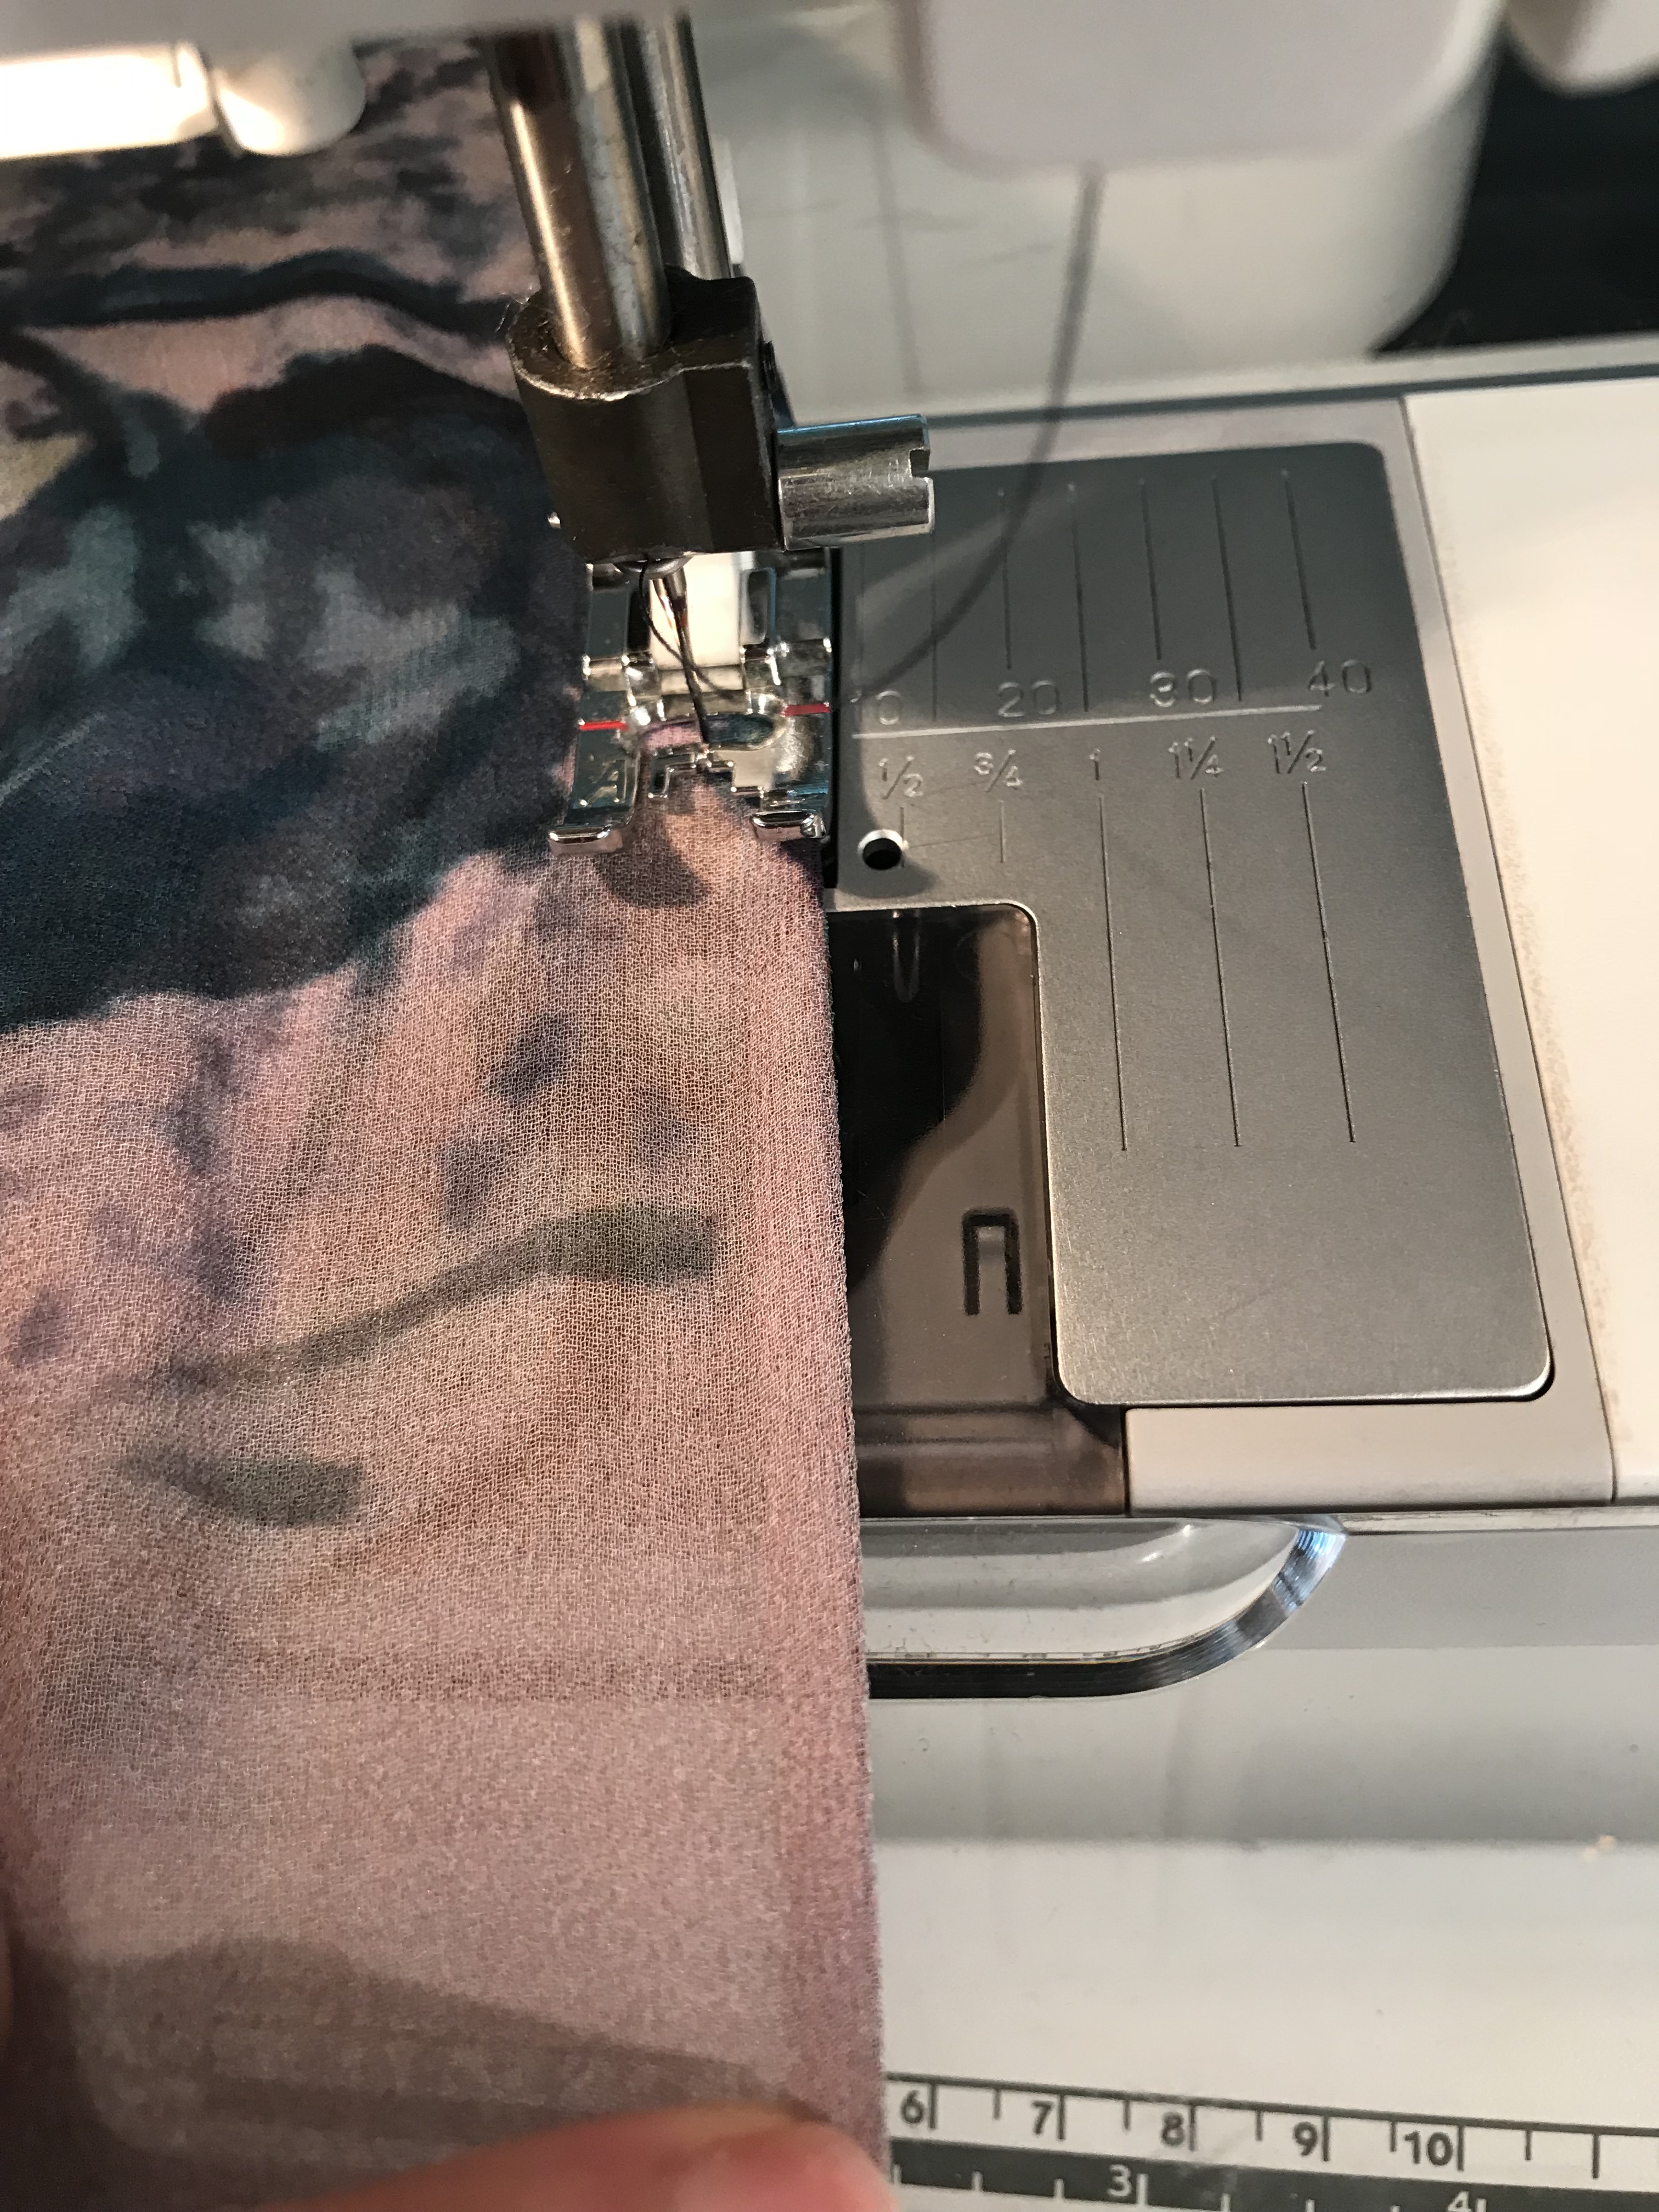
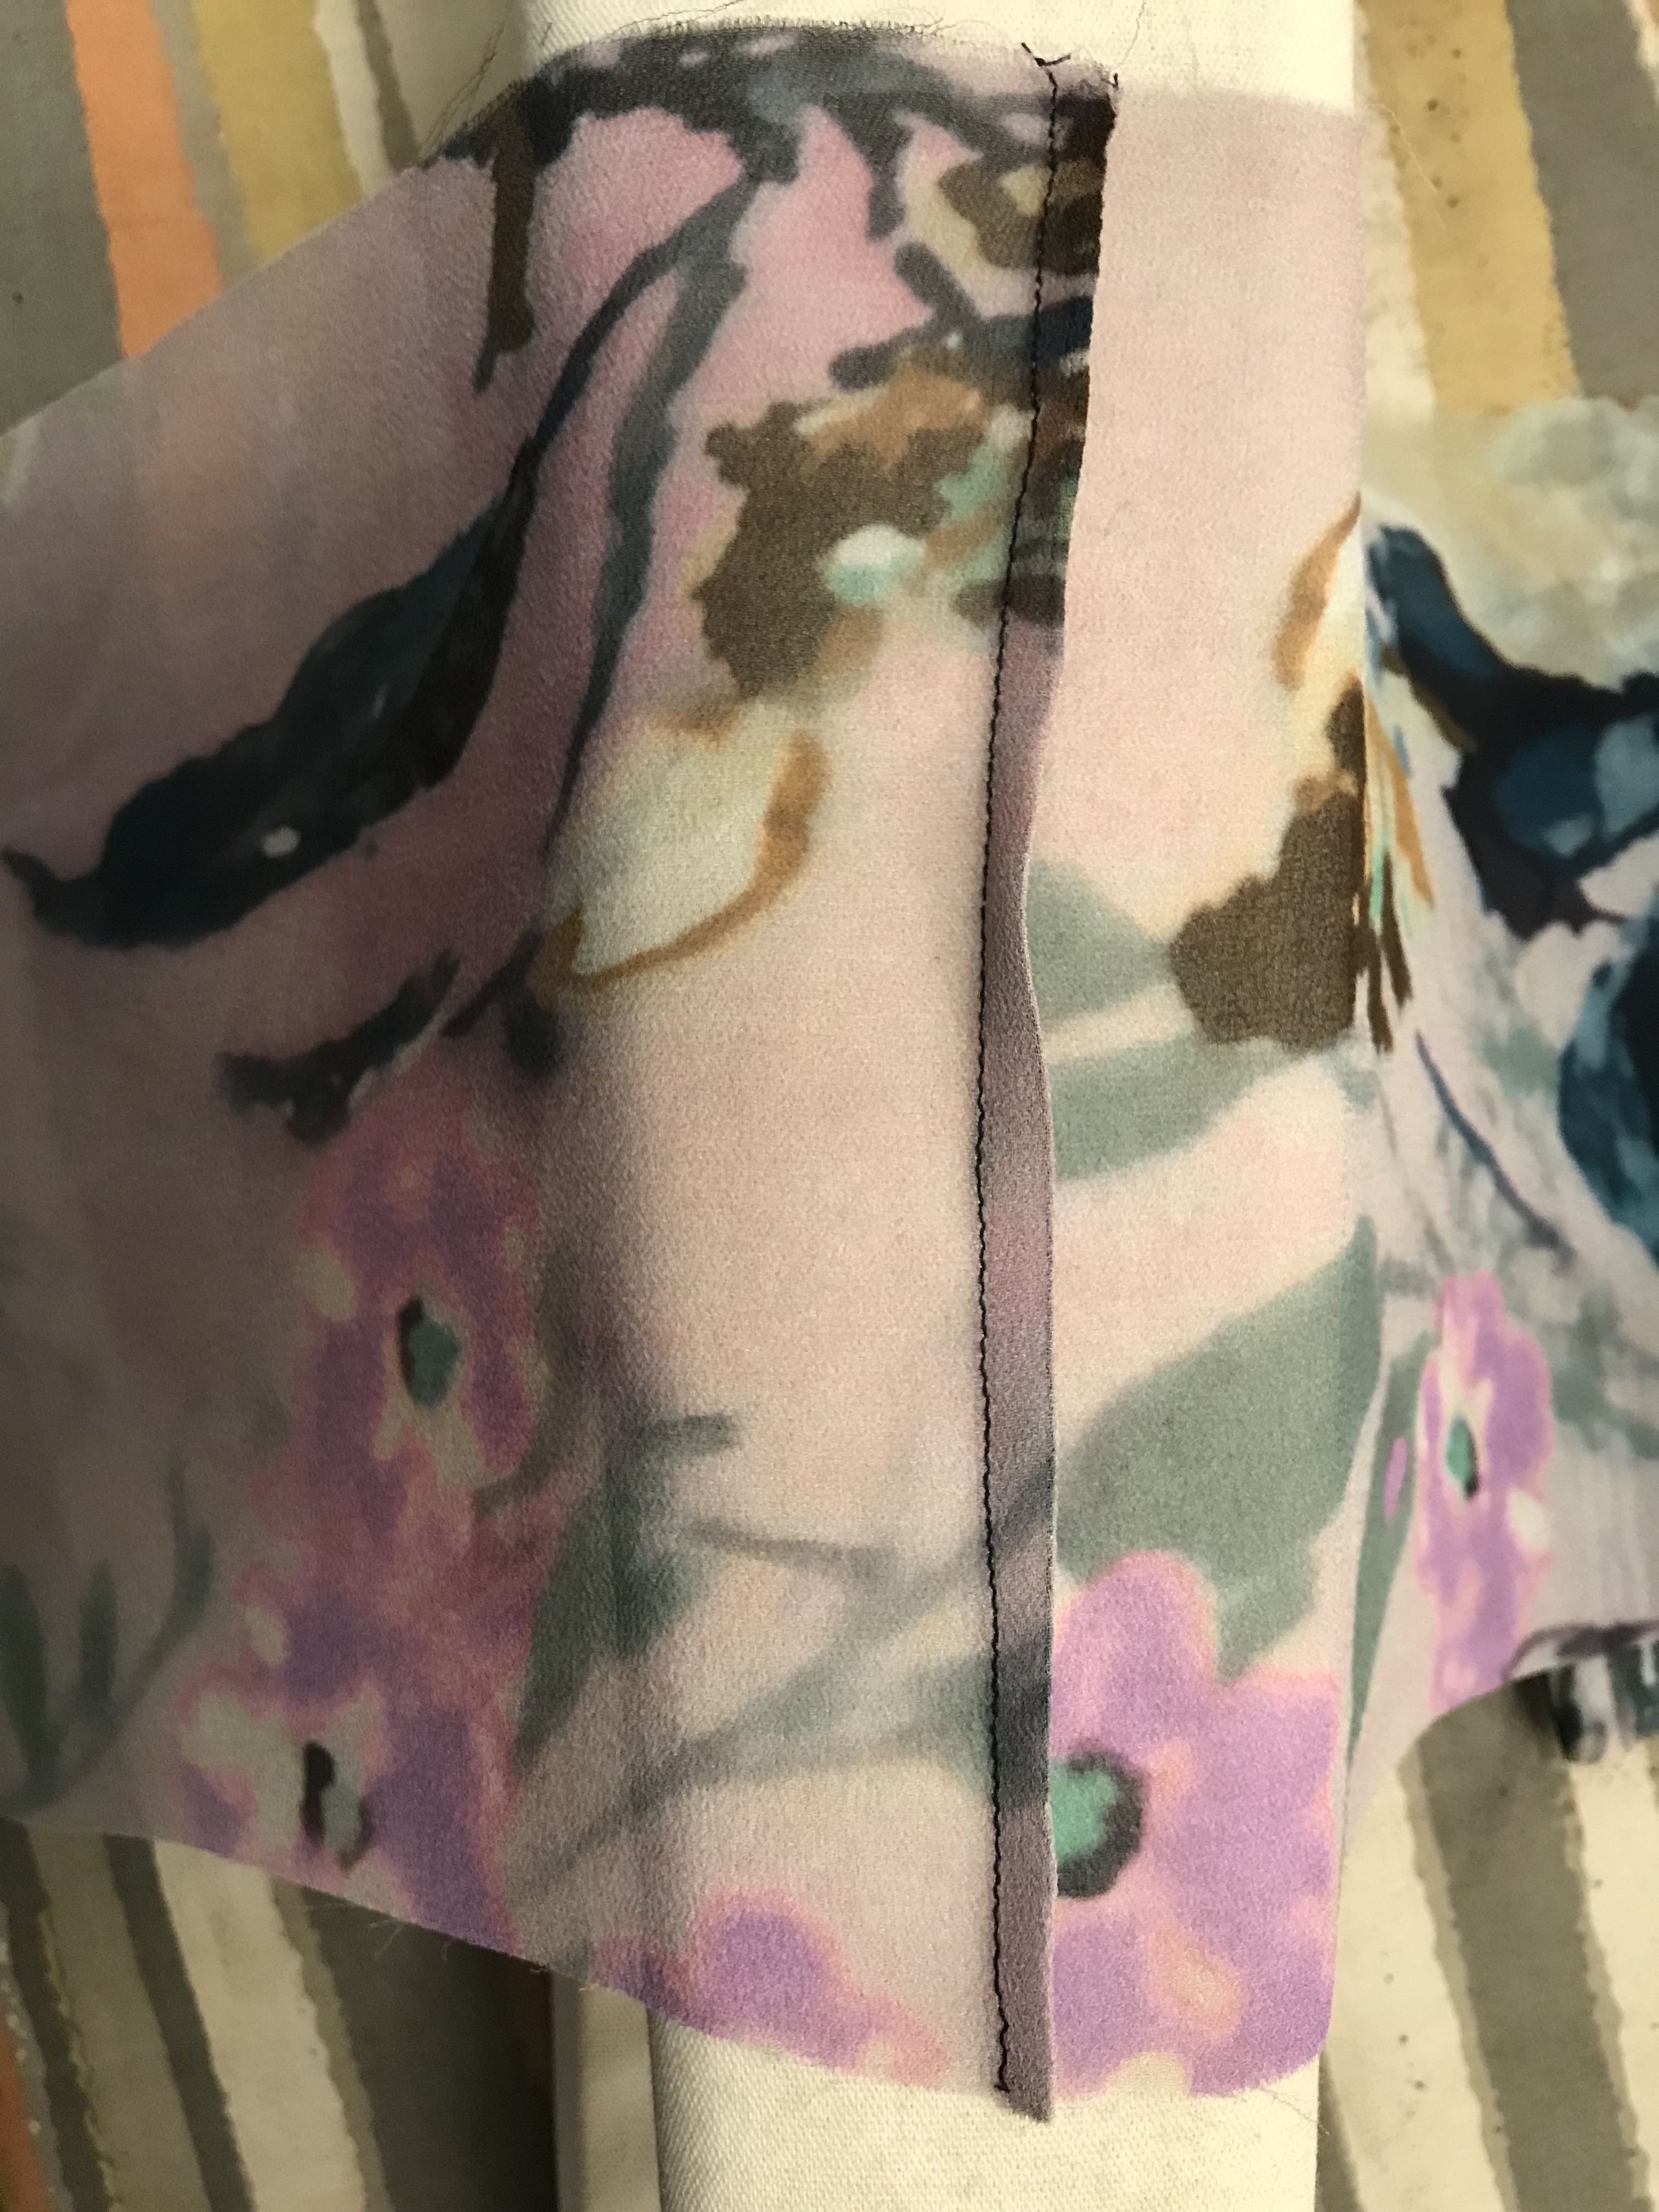
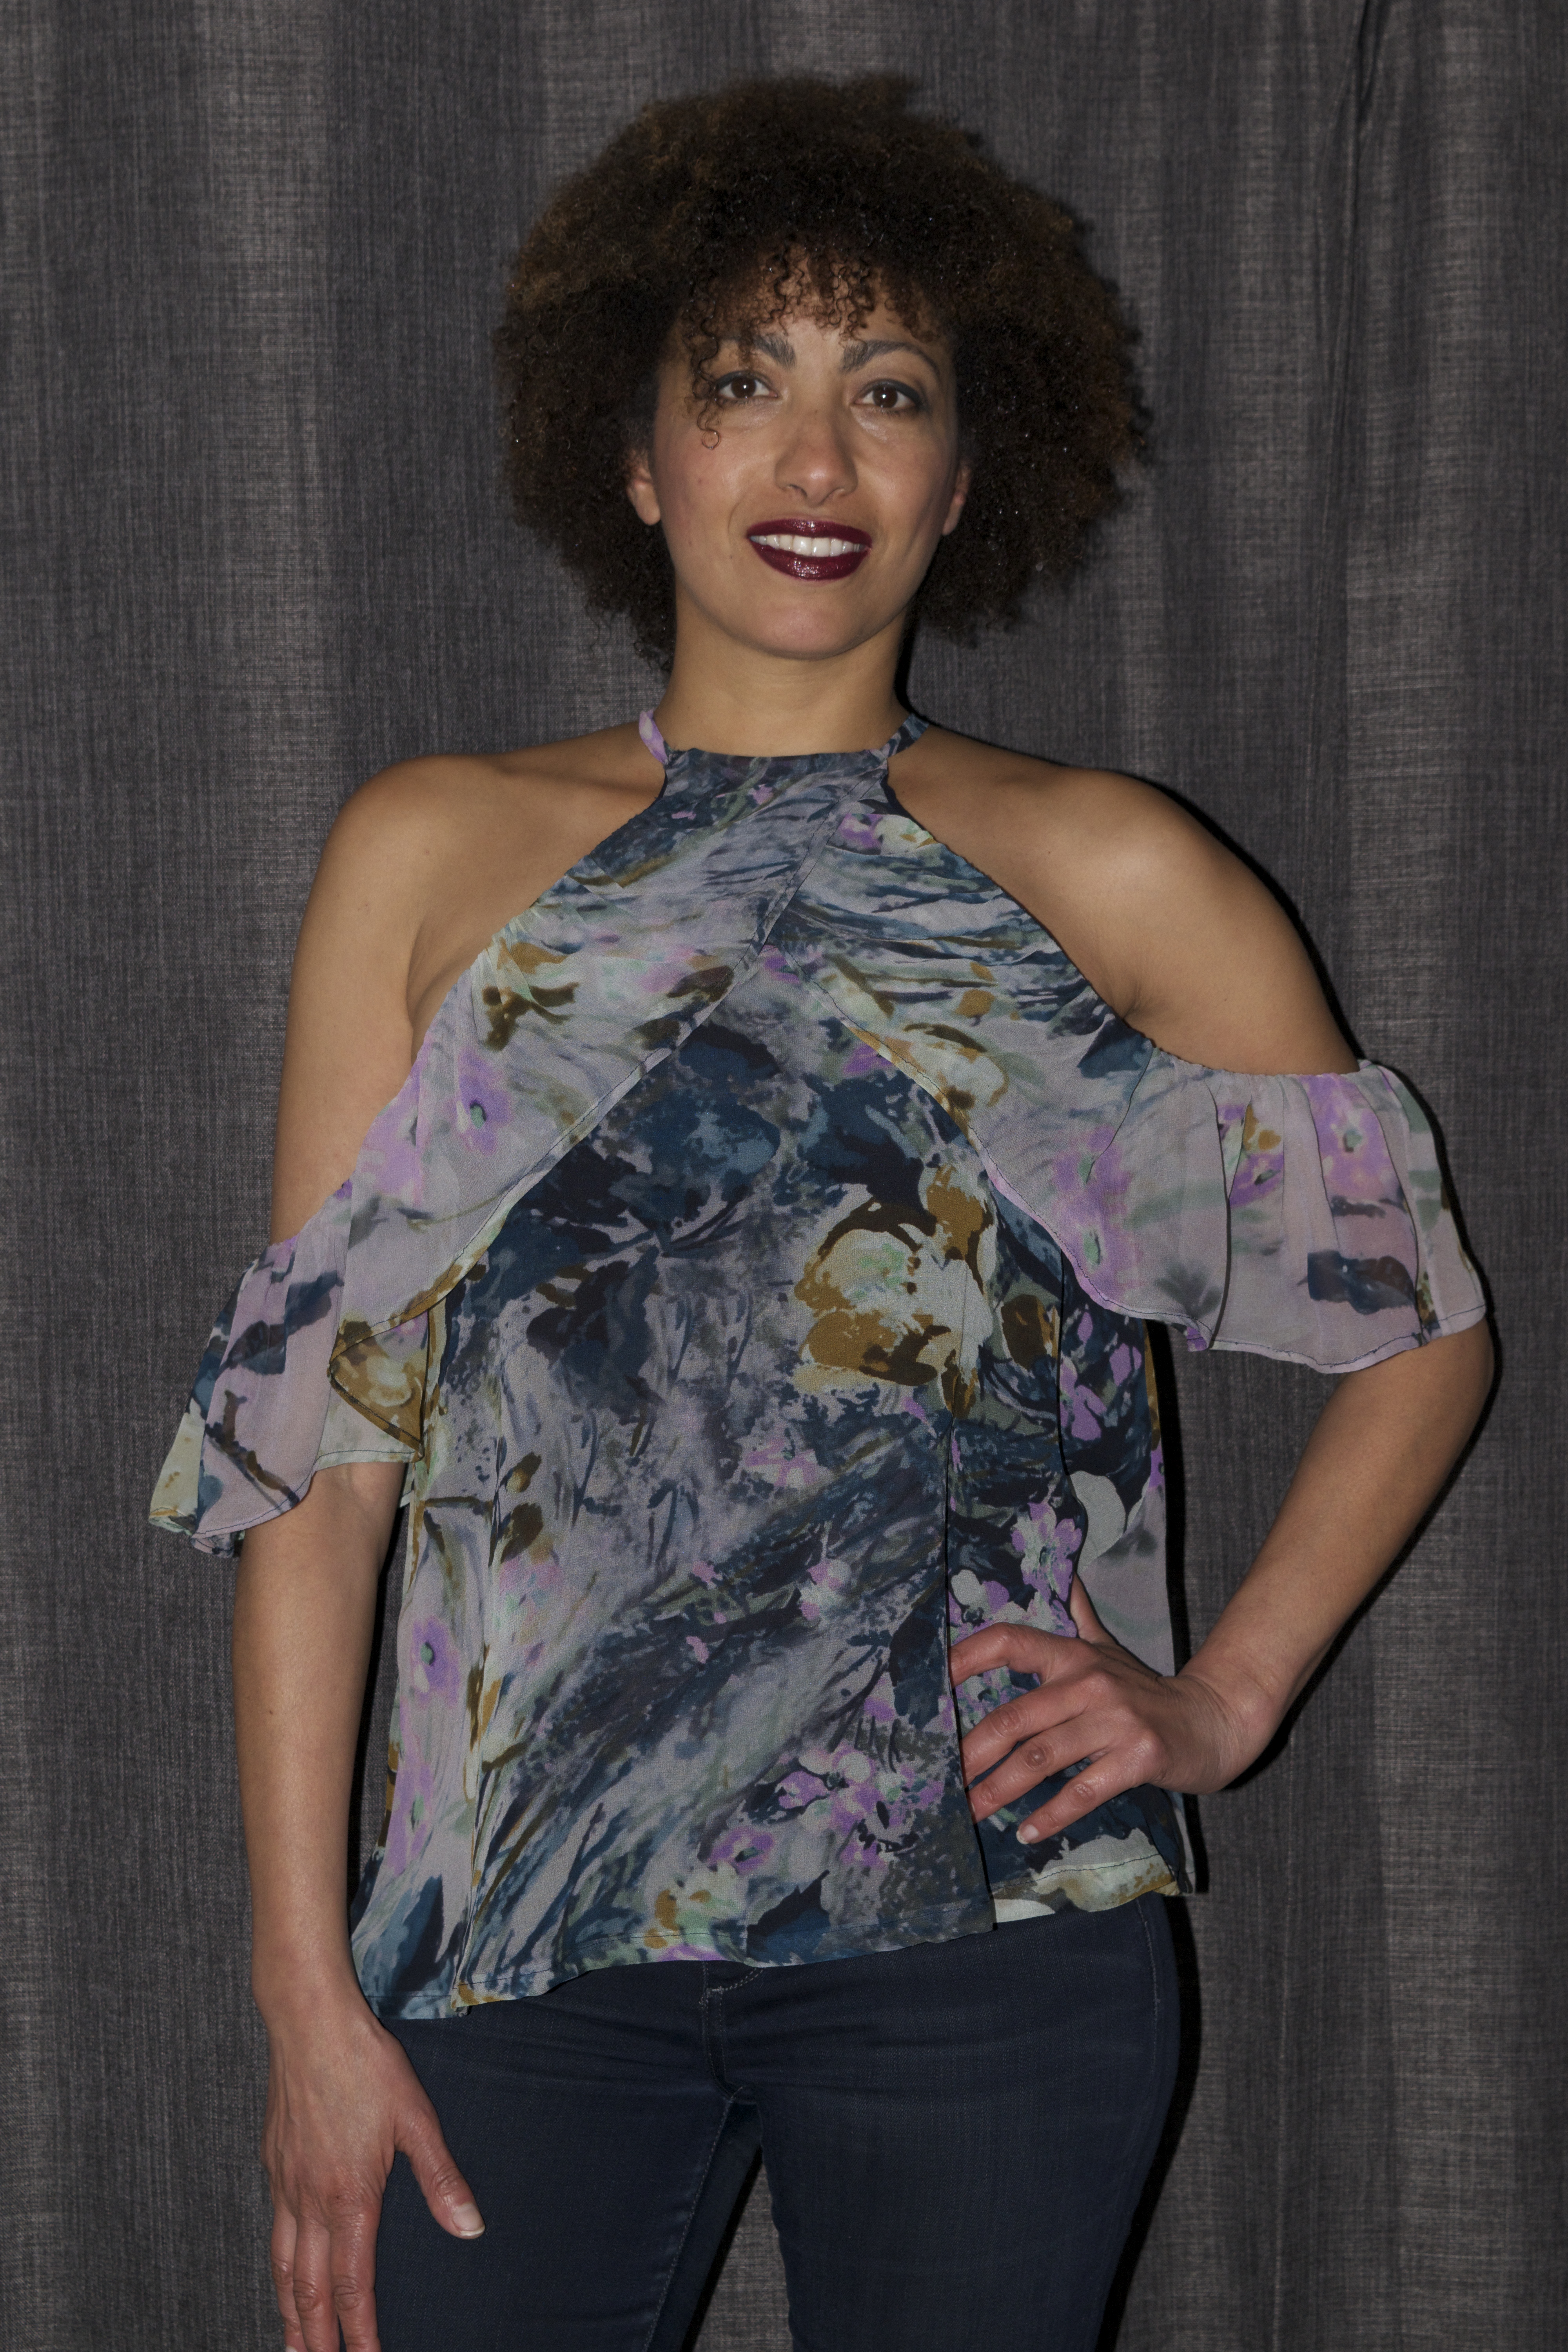
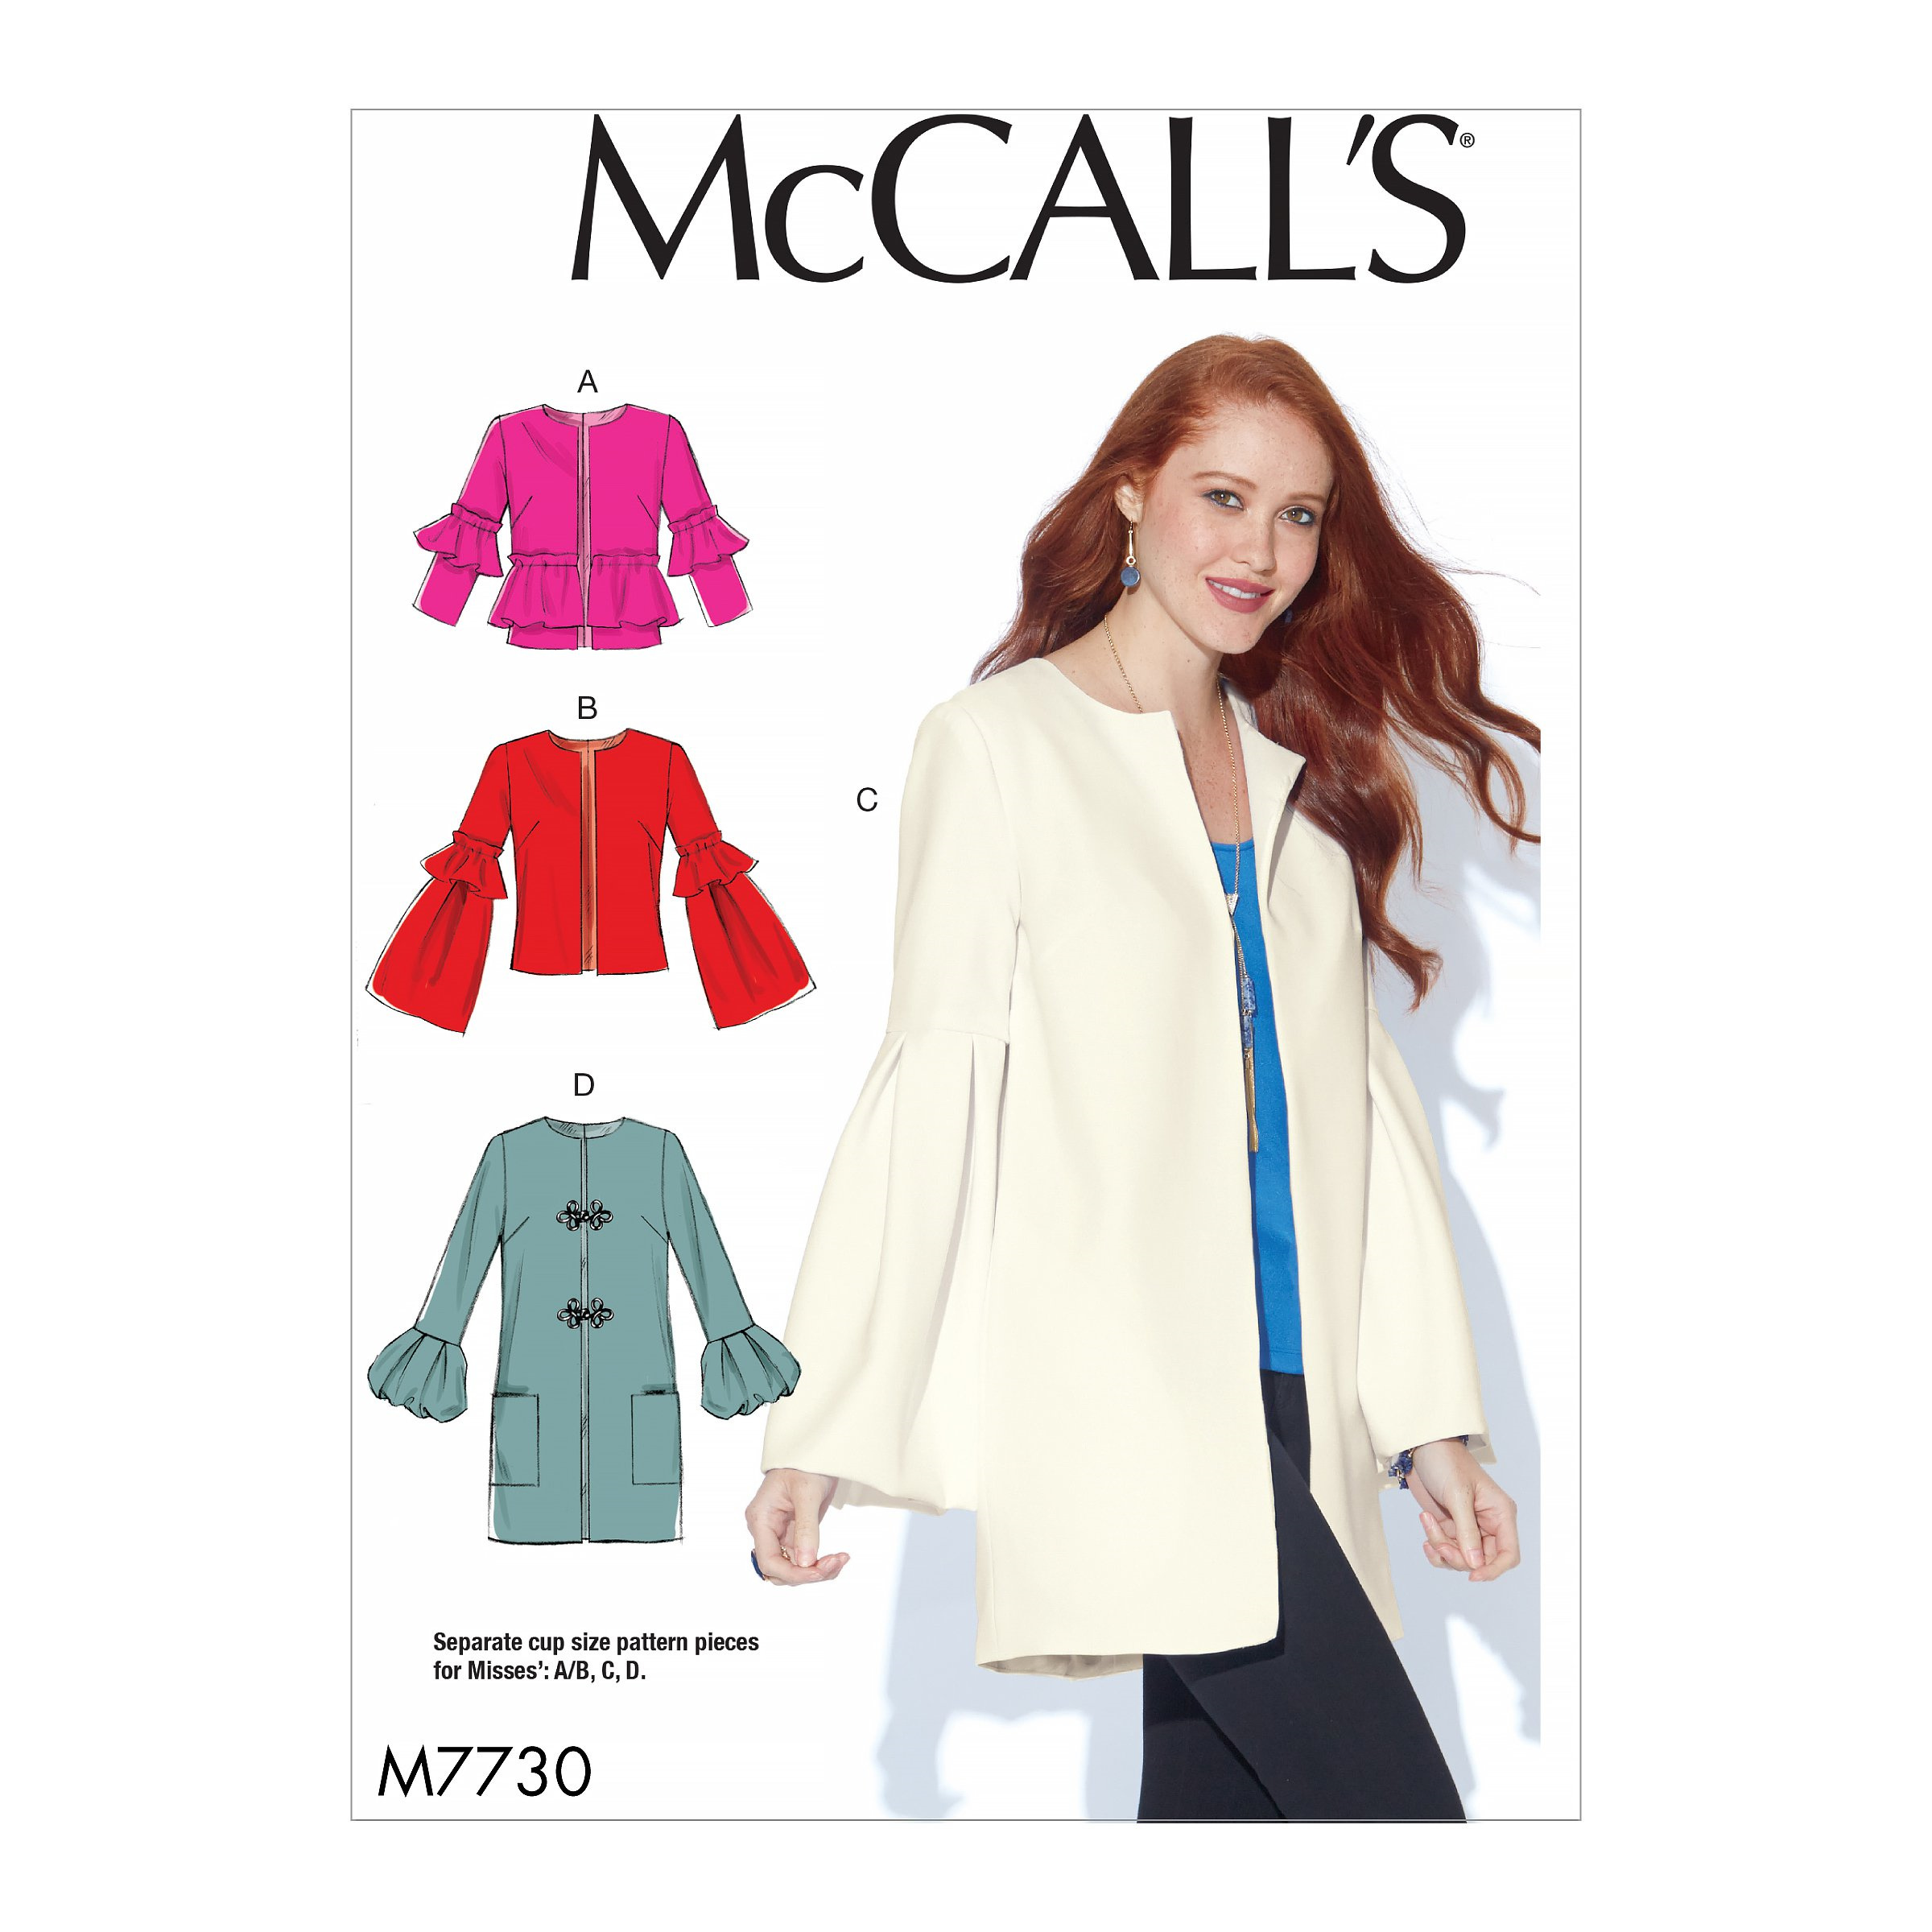
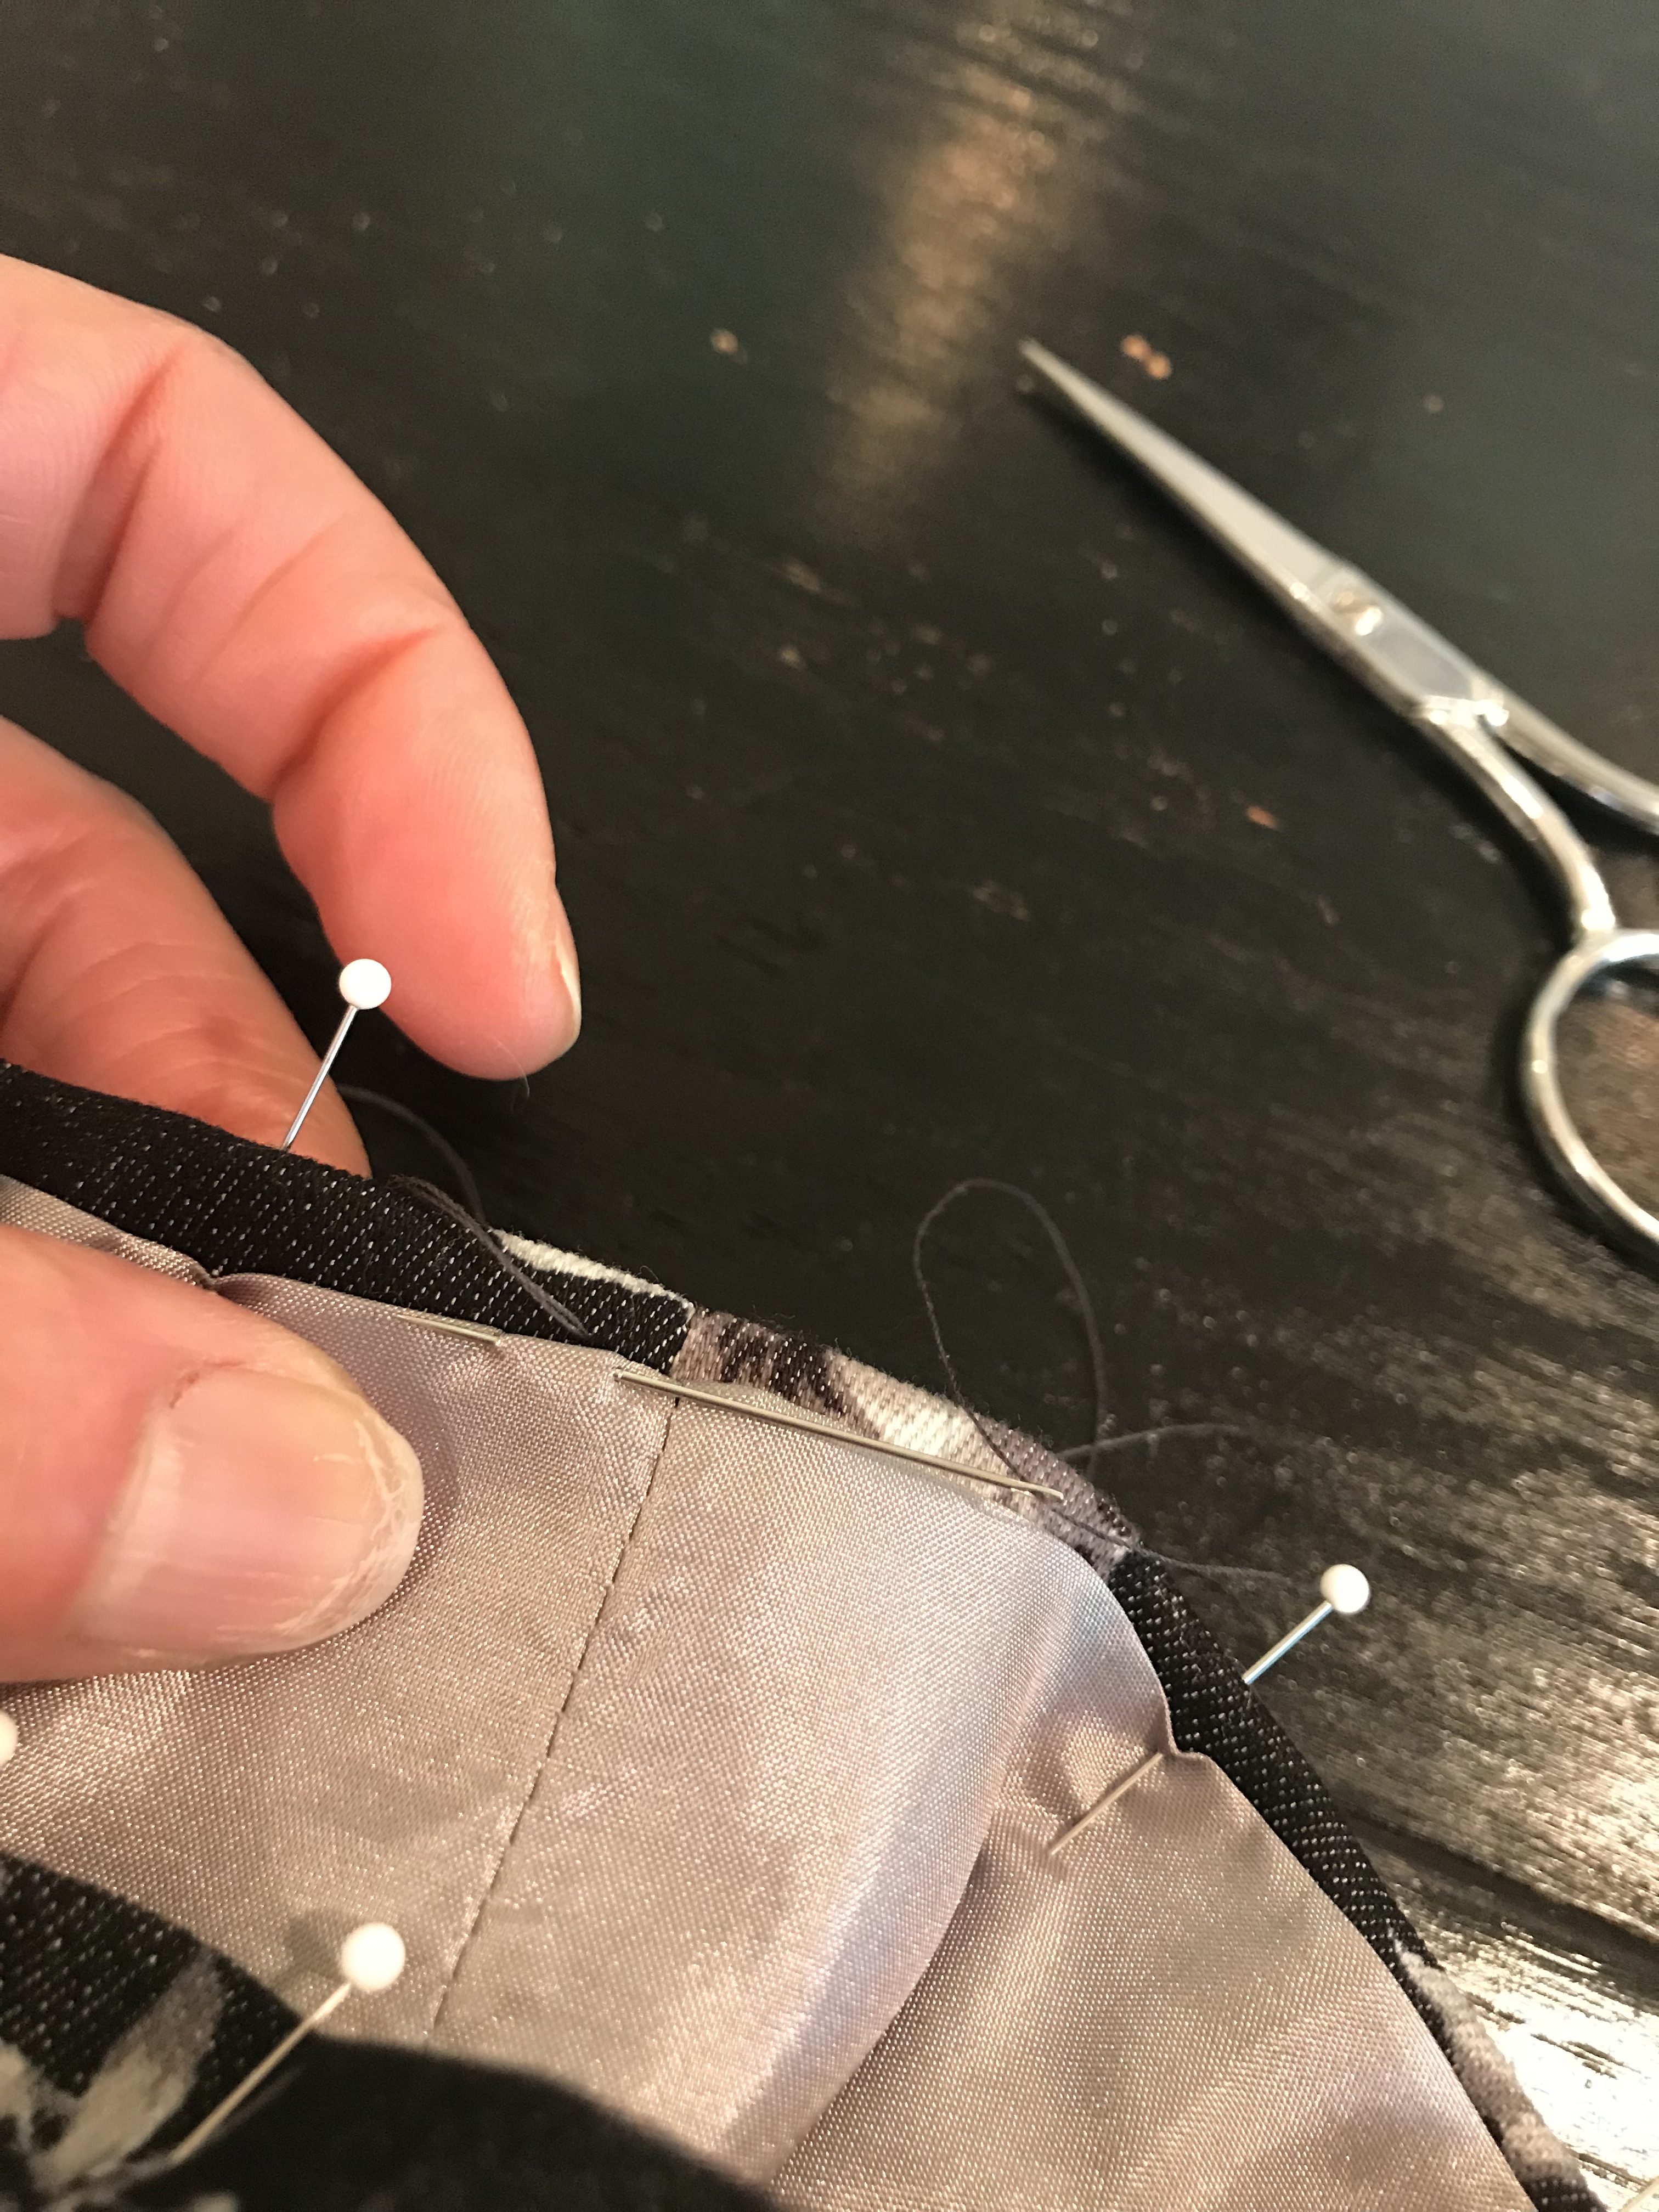
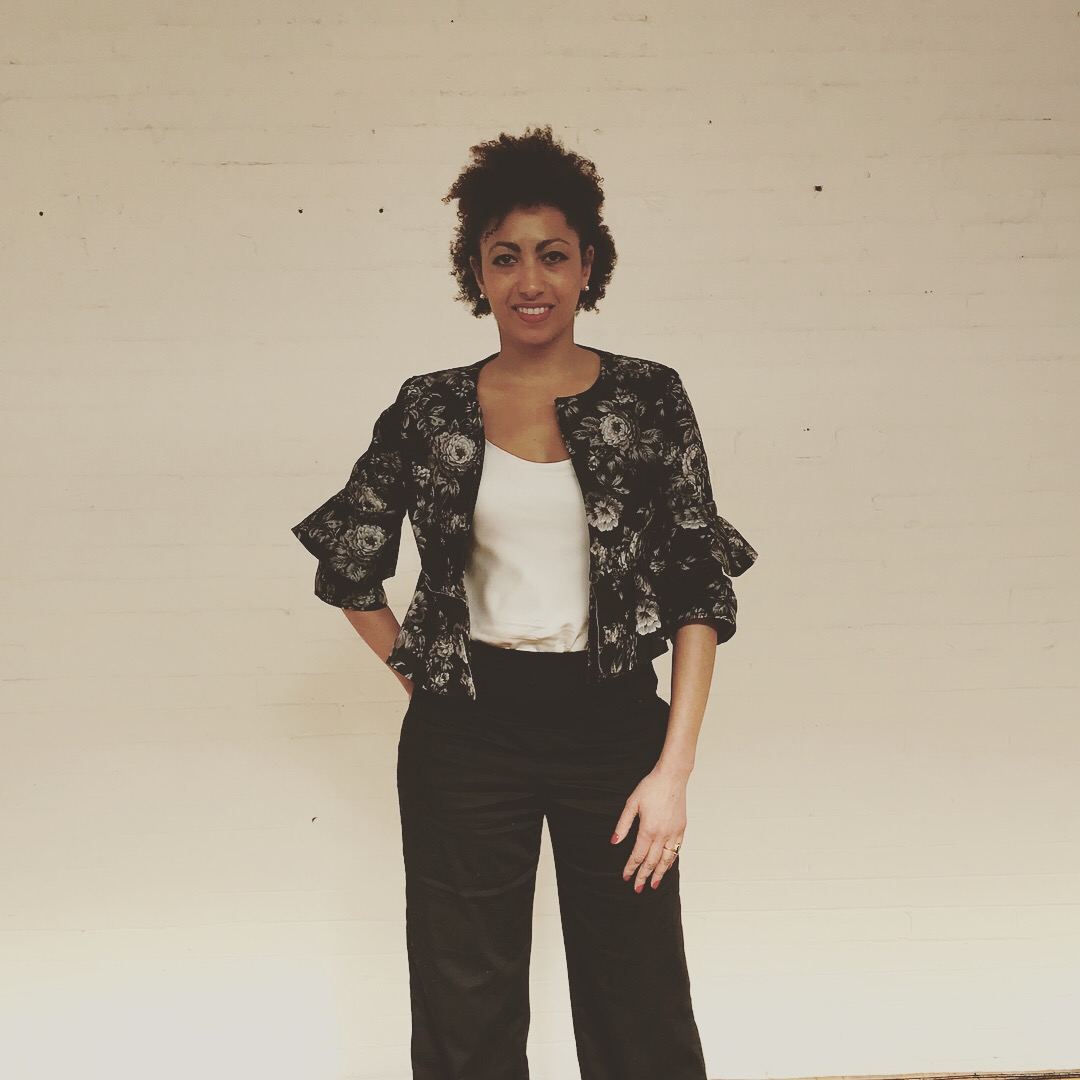
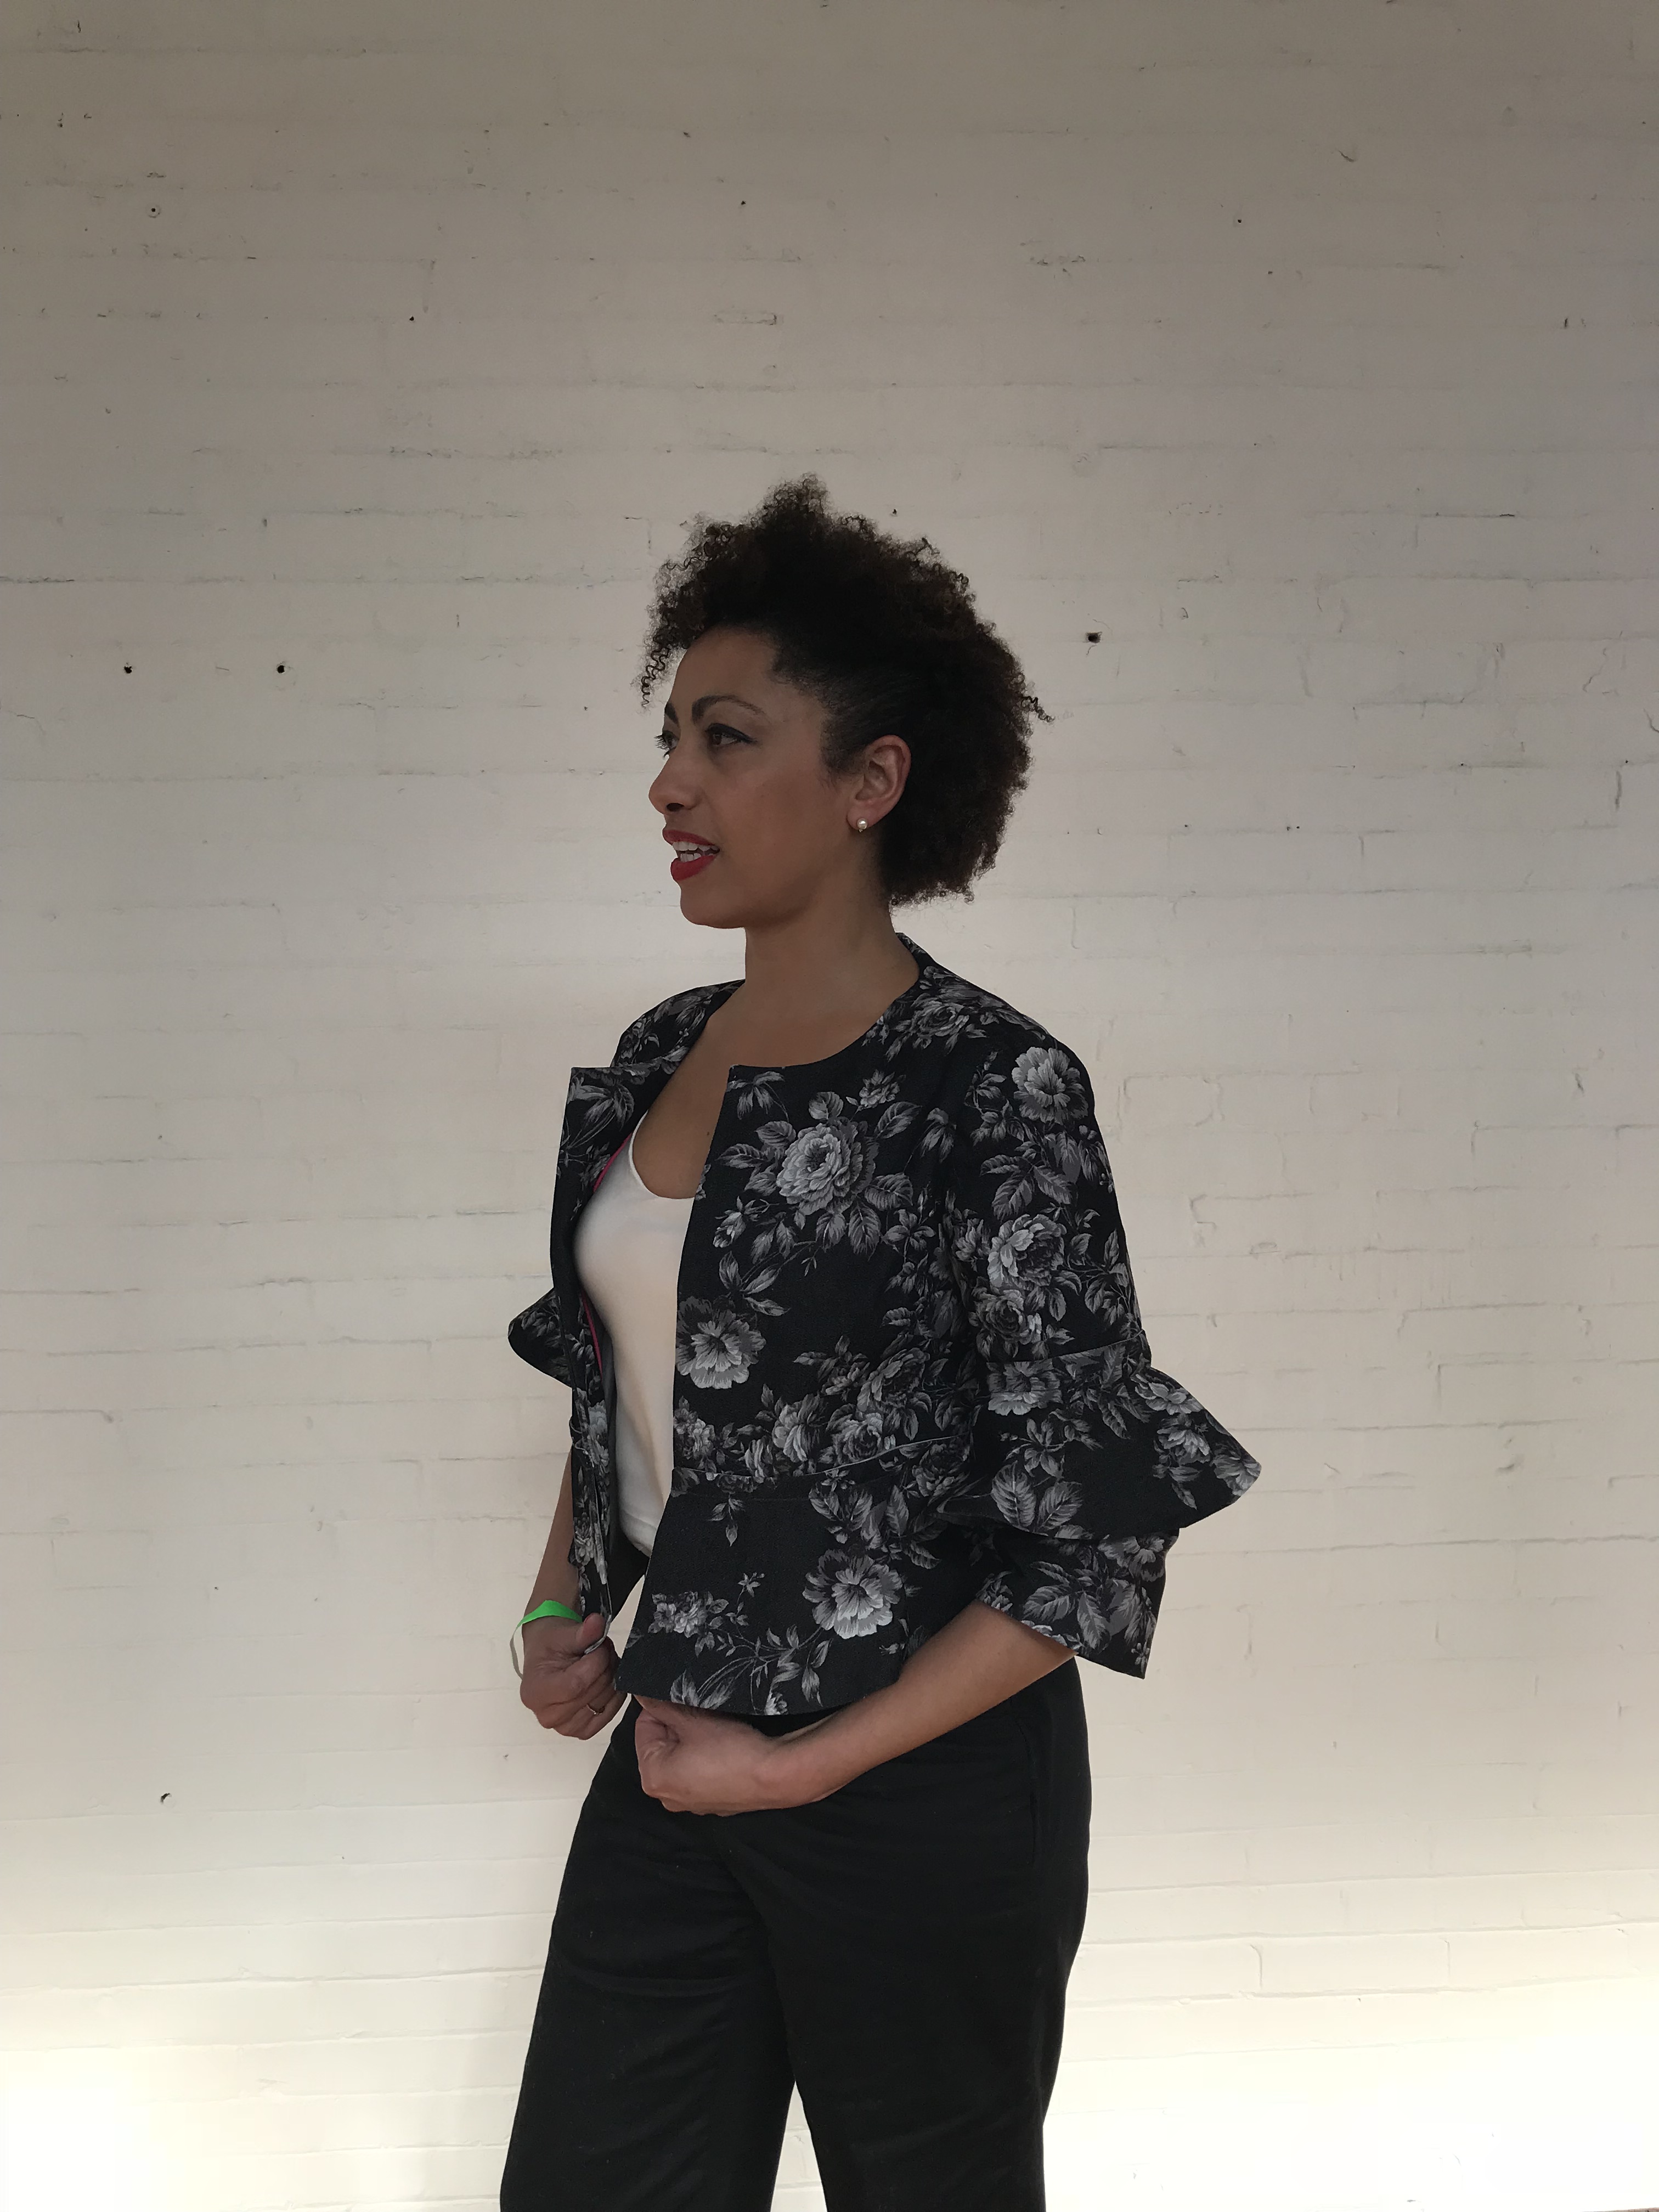
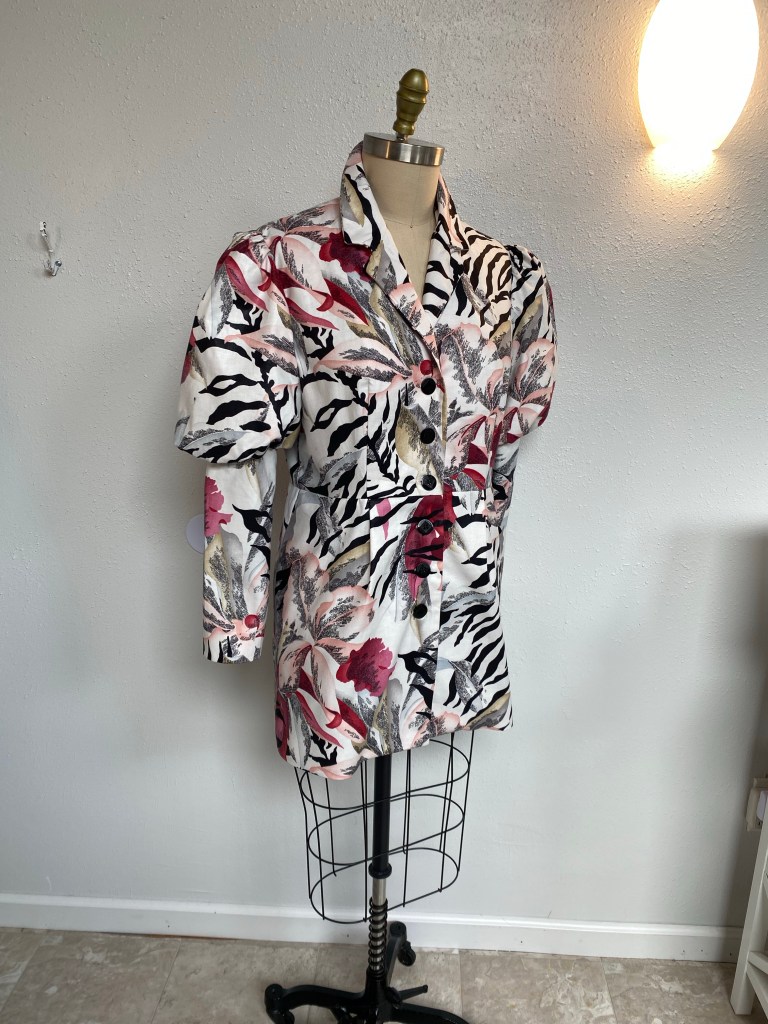
I got to work cutting out this McCalls pattern #M7879 that I had in my collection, choosing the view with the interesting leg ‘o mutton sleeve and longer hem so that I could be warm and stylish, but not too hot if it were to be hot at the event:

McCalls 7879 pattern cover
The line drawings for the pattern. I made view C

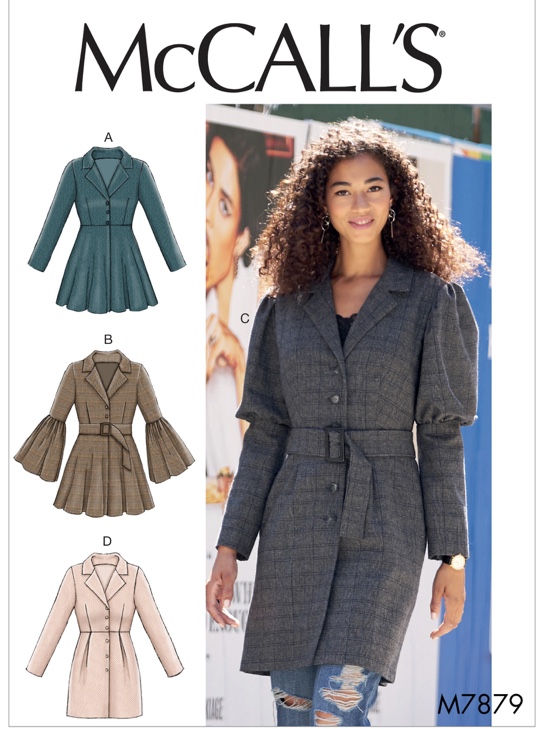
If you happen to be interested where I got the Leg ‘o Mutton description of that style of puffed sleeve, it is actually a style of sleeve that has been around since the 1800’s and is to resemble the leg of a lamb.

https://thepragmaticcostumer.wordpress.com/tag/leg-o-mutton-sleeves/
https://genealogylady.net/2015/07/12/fashion-moments-leg-o-mutton-sleeves/

Did you know I also am a huge fashion history nerd? You heard it here, Folks! Love it.

On to the project!

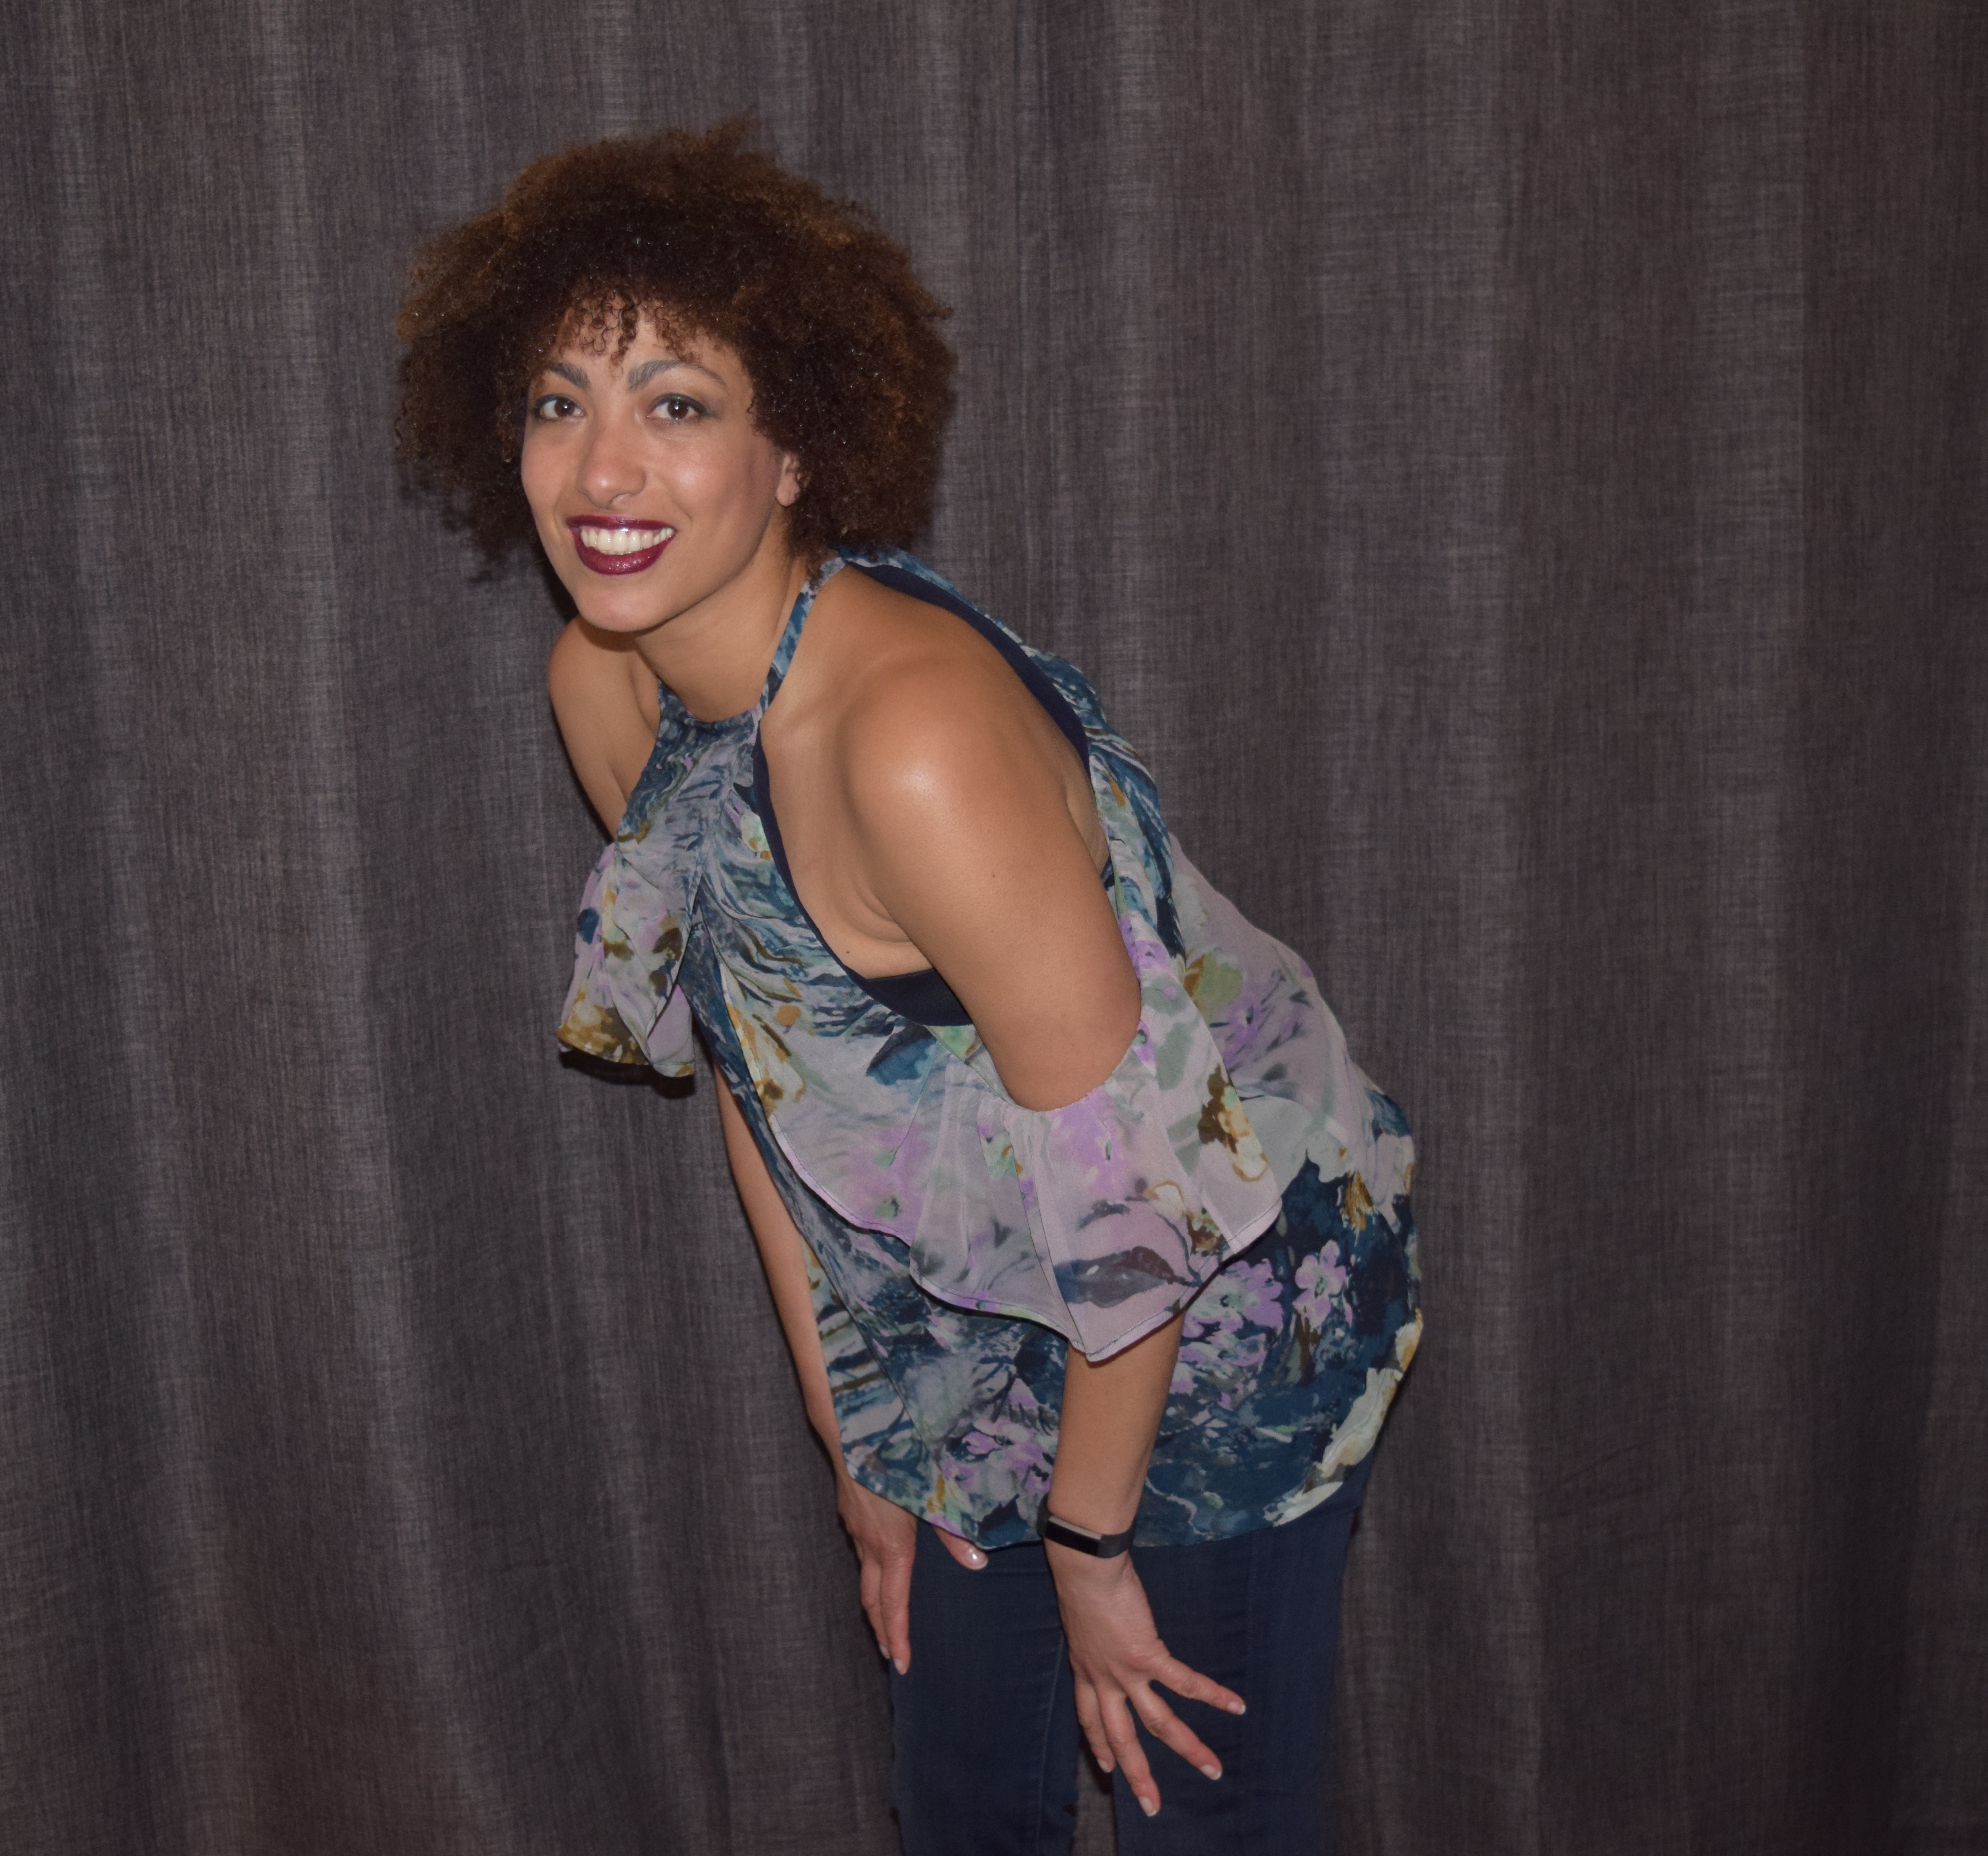
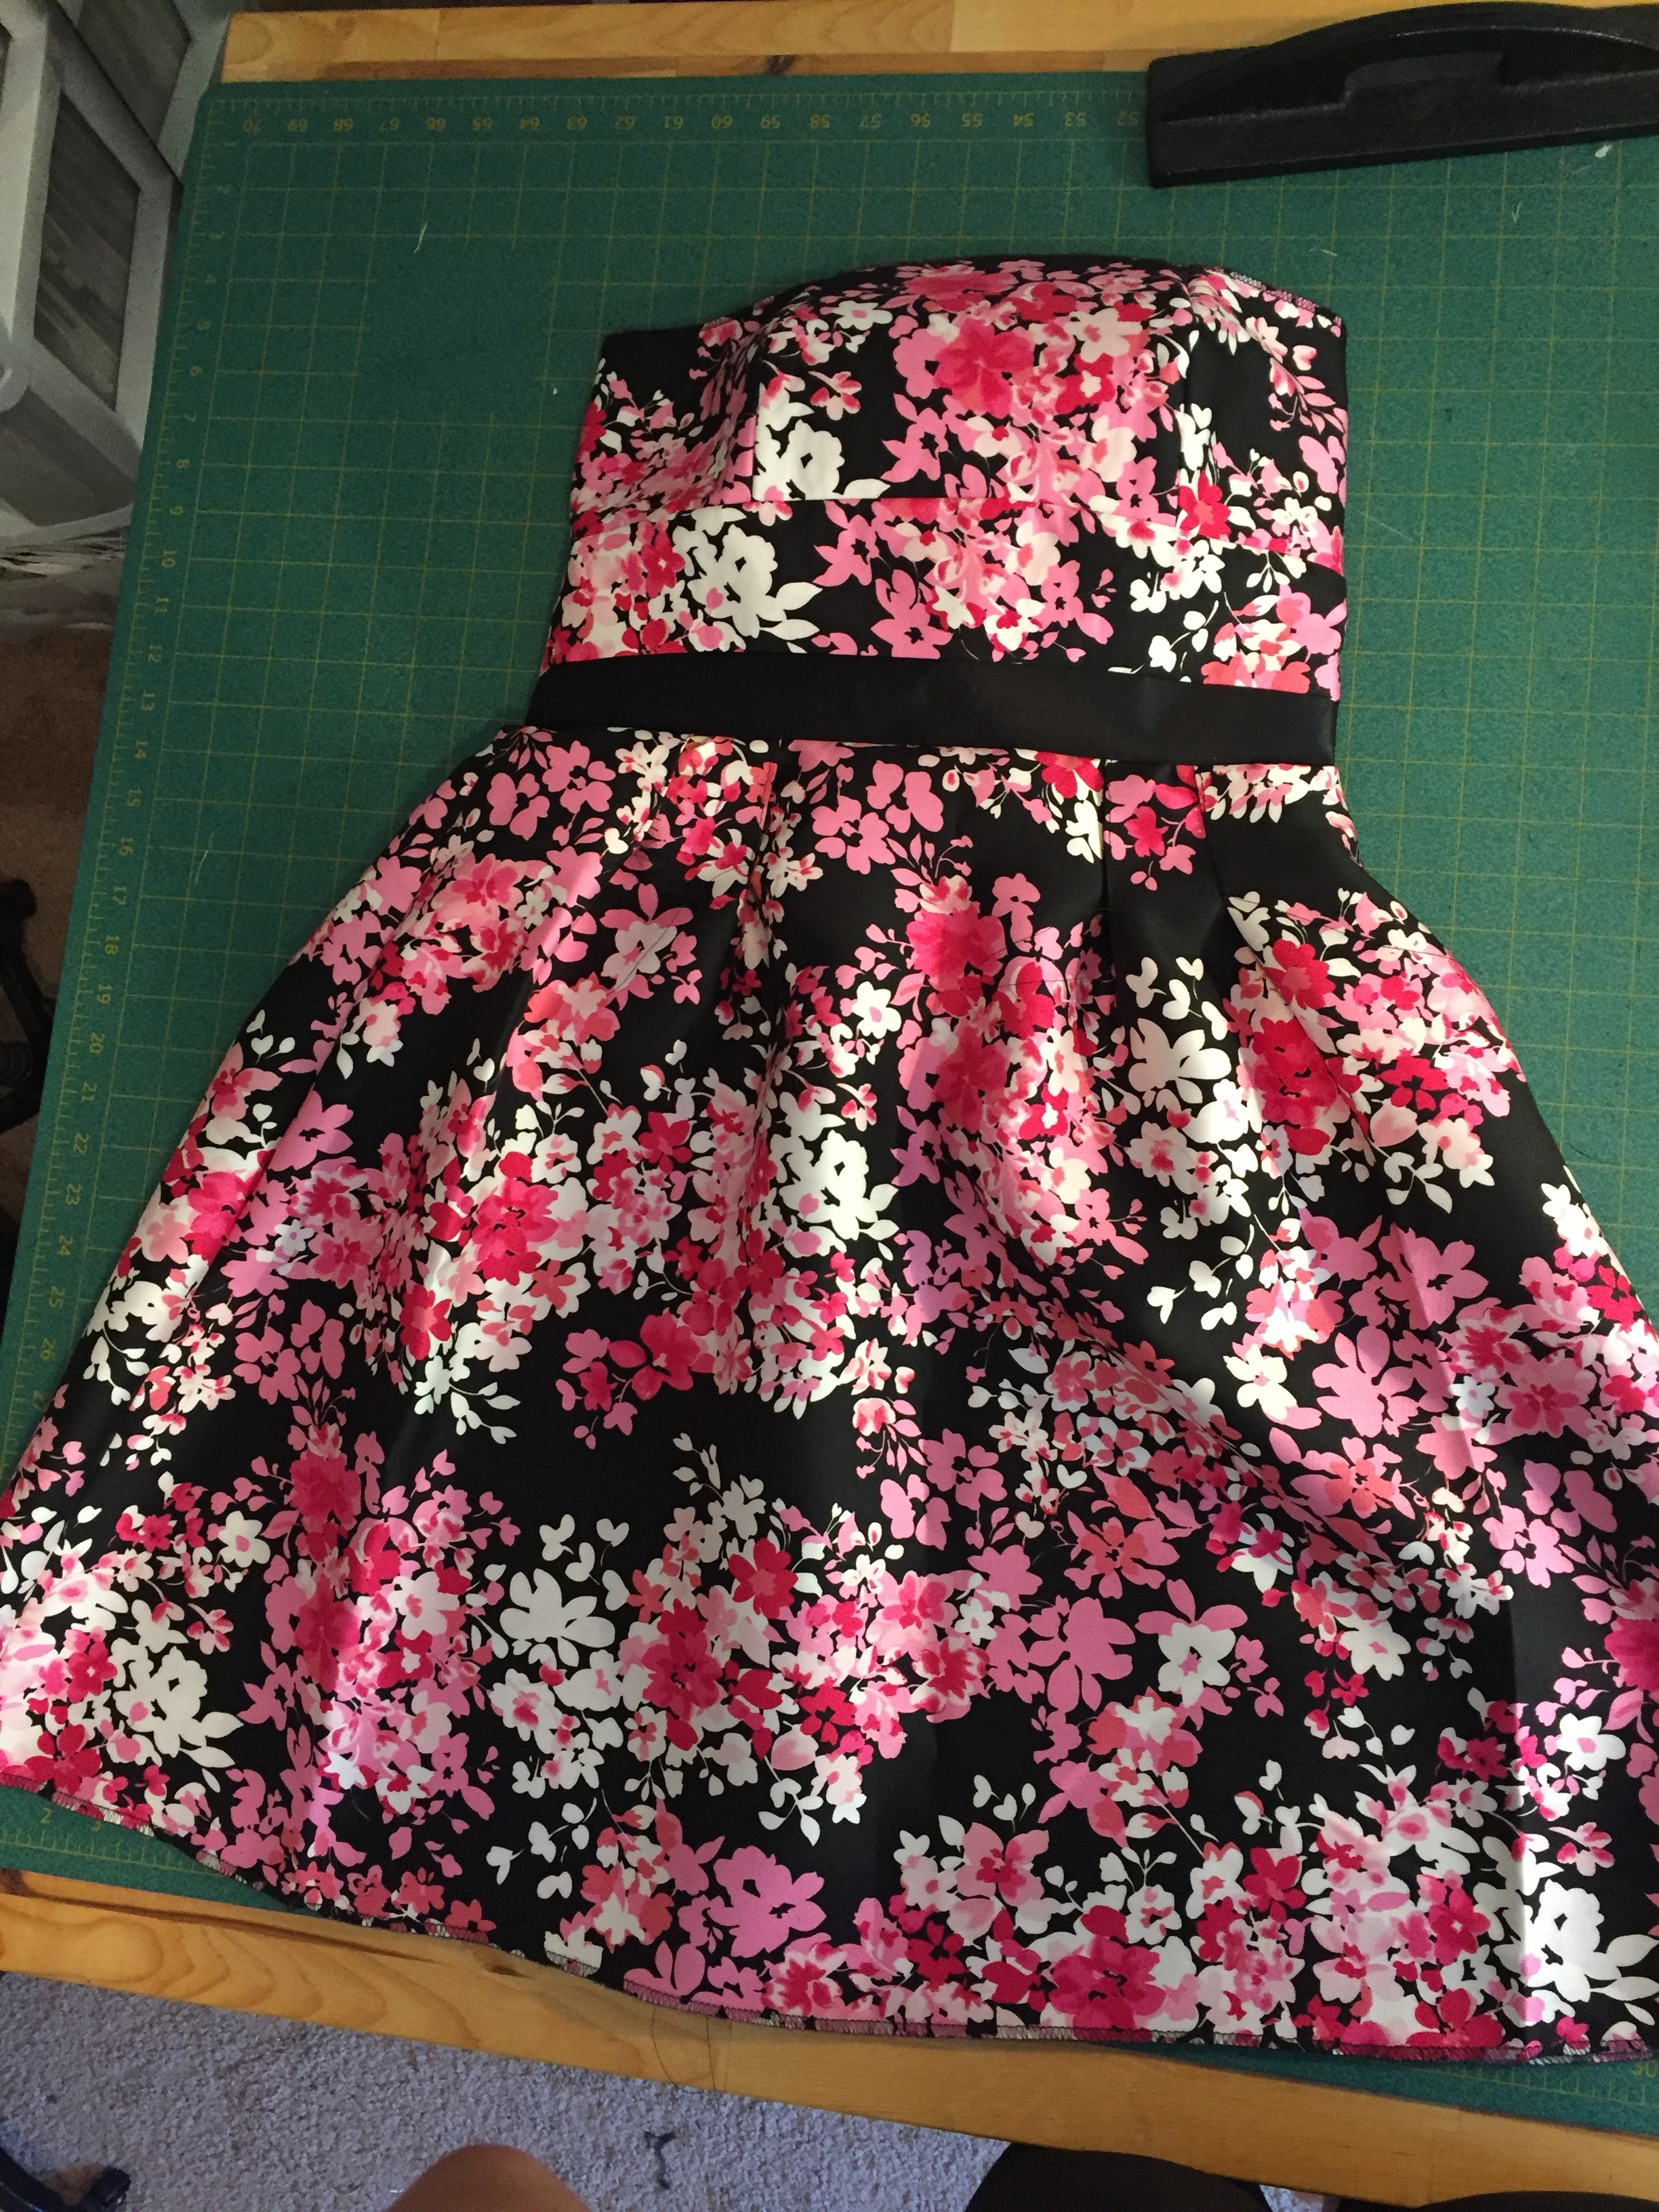
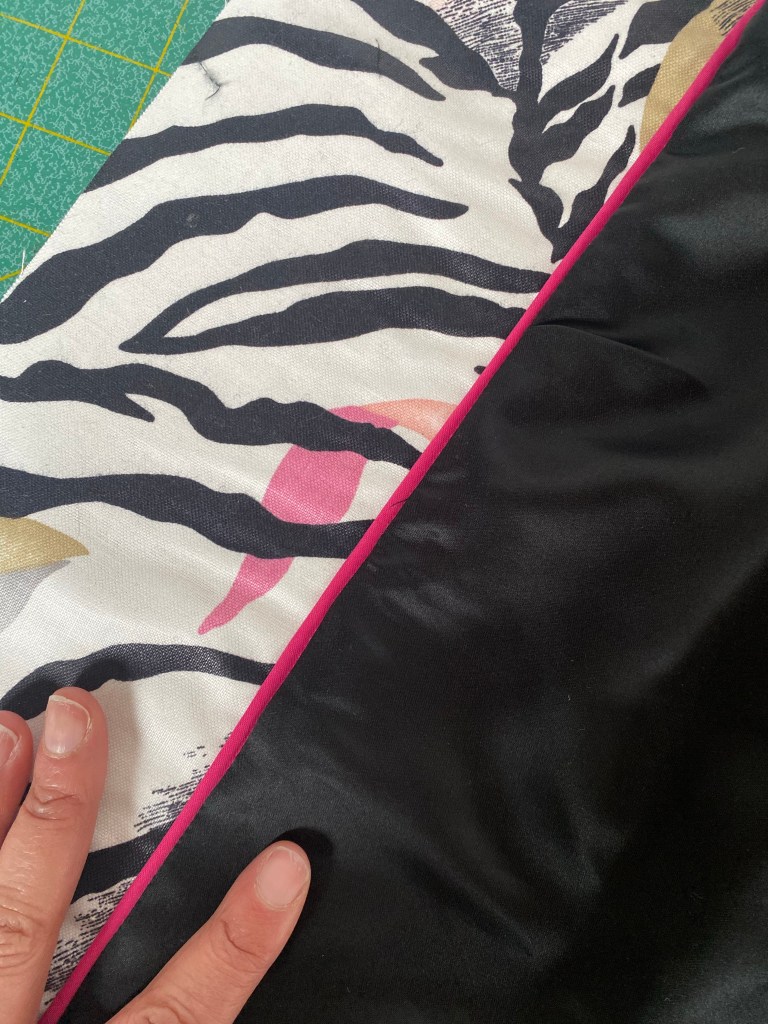
I had this interesting floral and abstract printed cotton blend fabric that had a Scotch-guard surface treatment, perfect for a light outerwear piece, or a home decor project. It has some abstract floral print and black zebra-type stripes on a bright white background. I had purchased enough yardage of it with the intent to use to make it into a rain jacket, so it was just right.

It didn’t take too long to make up the jacket, between other client projects and teaching sewing classes, about two weeks on and off in total. Even though the jacket is fully lined and making the sleeve like that was new to me, I managed to stay up late some nights and power through it.

I tell you, with having my own sewing business, operated out of my lovely and inspiring home, I have more time, mental space and ability to do special, last minute projects like this and that makes me so, sew happy! I have all my tools, machines, notions, thread, buttons, fabrics, patterns, trims, beads; essentially all of the things I need to make most any garment at my fingertips. No need to even leave the house! Such a dream come true.

A pop of color using bias piping trim, inserted to the inside of the jacket between the lining and the facing. A little design feature I love to add to jackets and coats whenever I can.
The jacket lining installed and getting close to being finished. I had this silk/spandex blend fabric in black on hand in my fabric stash. I love using silk to line better garments. It’s so luxe and slippy!

Alas, I finished the jacket just in time to take a few photos of it, put it on with the rest of my outfit, do my makeup and hair, and head out the door to meet my friend for dinner before the show.

She’s finished!
I’m ready to go and excited to wear my new creation!
I wore my new jacket over a black cashmere turtleneck and faux leather leggings with some Sorel booties. Perfection!
#sewingismysuperpower

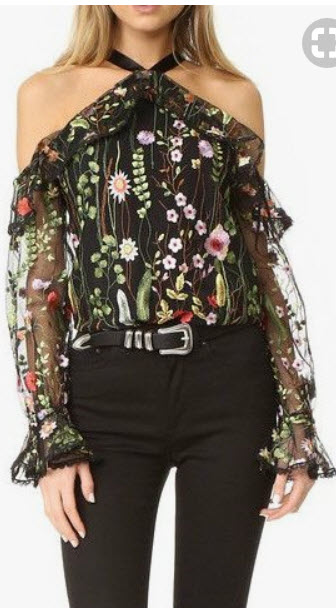
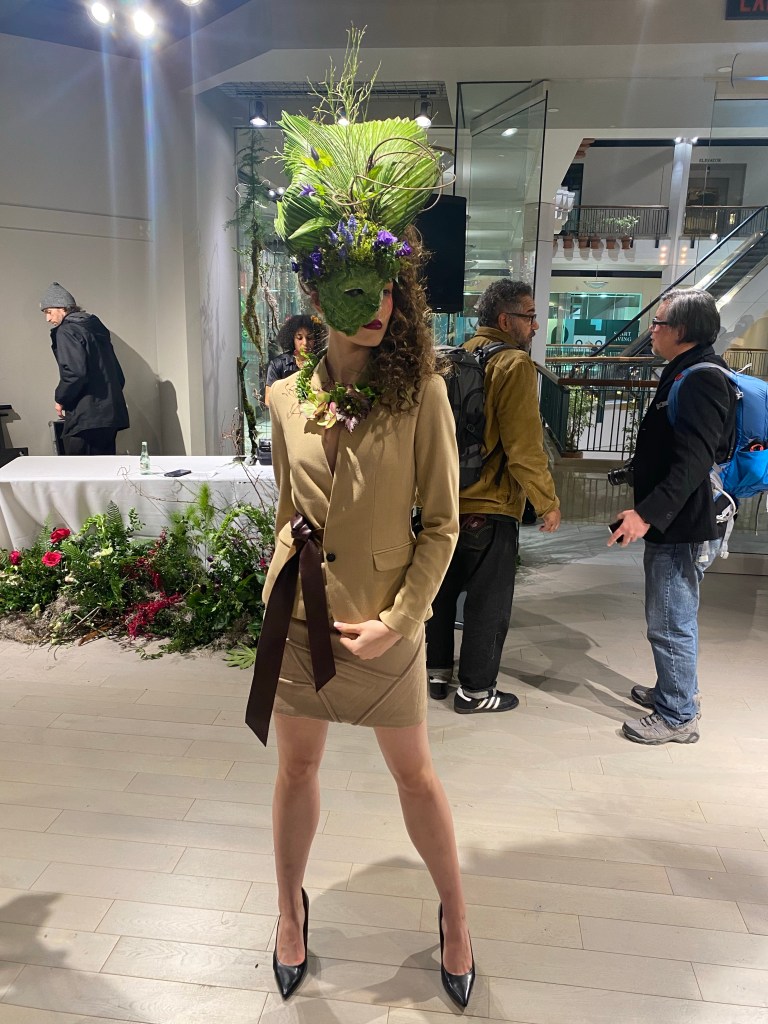
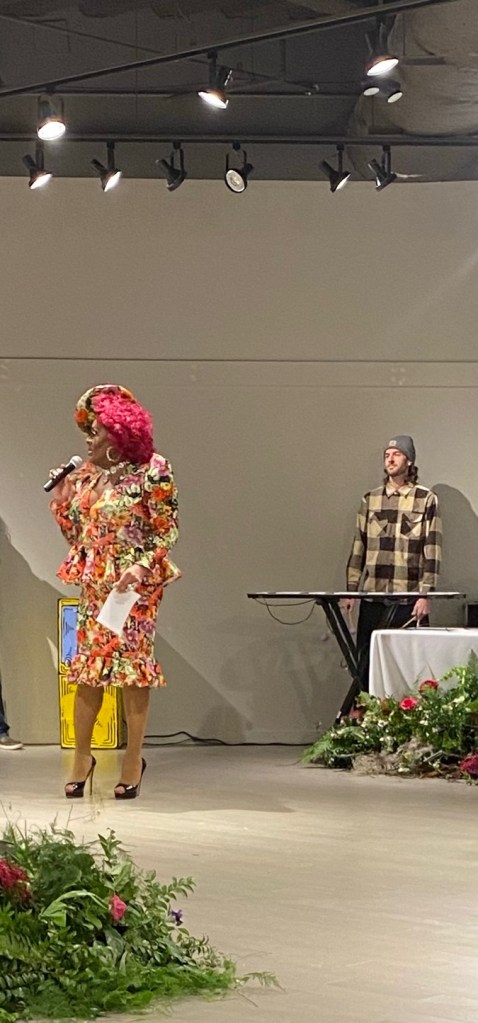
The show was amazing and so fun to see such wonderful creations by talented artists featured on bodies of beautiful people. The featured artist Francois Weeks created spectacular live botanical displays and wearable works of floral art. Check out some of the photos I took from my seat at the show and afterwards. Click on the photos to see some of the detail work that will blow your mind! Amazing and SO inspirational!

At the Gallery Go Go pre-show

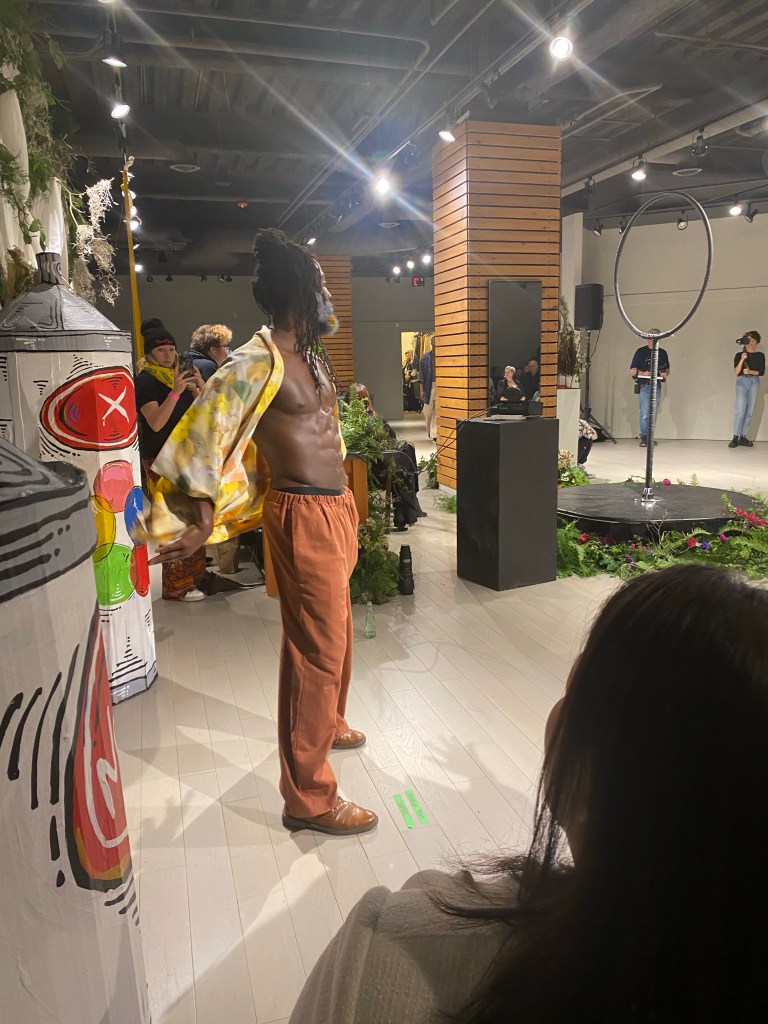
I was so mesmerized by the amazing arial artist, I only got this one photo of her, about to approach the arial hoop, at the very beginning of doing her magic during the show:

The arial artist, a mesmerizing show!

Even the music from the featured DJ’s was super sweet! We also got a great goodie bag that included some lip balm from Event Cosmetics that I have been loving, an amazing perfume sample, and some other great little treats to enjoy!

We had an amazing night out, seeing such talent and inspiration to be creative, and just fun to hang out with some cool people of Portland! I was perfectly comfortable and felt great in my jacket and the outfit I put together with it. I got tons of compliments on my jacket, before and after the show, as well as from my social media posts following that night. The icing on the cake happened when McCalls Pattern Company contacted me through my Instagram post, asking if they could feature my jacket on their page. WOW!!!

My Form of Art: Fashion

Watercolors in Silk

I just love a great watercolor painting, how the colors softly flow into each other, creating emotion with how they blend together to evoke a mood.

Speaking of Mood, the renown fabric store in New York, Los Angeles, and online at MoodFabrics.com, the store where the Project Runway design contestants run around like chickens with their heads cut off trying to find fabric, trim, notions and inspiration (and hopefully a lucky Swatch sighting), all within a ridiculous 30 minutes, is running a series of contests using their fabrics. I thought how fun it would be, and also a challenge for me, to order some silk and whip up something for their MoodMadeSilk18 contest by the deadline of today, April 30th, 2018.

I went ahead and ordered 2 yards of this gorgeous watercolor floral silk chiffon and was even happier when it arrived!

IMG_E8948

Isn’t it SO pretty?!

I gave it a gentle wash and laid it flat to dry, then got to smoothing it all out perfectly on grain and ready to be cut:

IMG_8951

I thought this would be a perfect fabric for this pattern view A from McCall’s that I had recently acquired from their new Spring ’18 collection:

M7747_a

Pinterest is one of my favorite resources to find inspiration and ideas for sewing (also for cooking, art and other ideas). I found a couple of flouncy cold shoulder tops and pinned them for inspiration and thought, “I could make something like that, easy!”

floral cold shoulder long sleeve top                                             coral flounce cold shoulder top

So, I proceeded to do just that!

By taking measurements of the flat pattern and comparing them to my own body measurements, I knew that the torso would need to be lengthened in order to not feel too short on me when done, so I altered the pattern and added one inch to the front and back pieces using the “slash and spread” method (sorry, that sounds kinda dirty) before cutting the top out of fabric:

With the top only being a few pattern pieces, it went together fairly quickly, not including the pain-in-the-assery of working with silk chiffon, of course. For one thing, I had to carefully mark the wrong sides of the fabric as I went along so that I didn’t sew them incorrectly:

IMG_8973

Plus, make French seams on most seams since the fabric is so sheer and frays like a beeotch:

IMG_8982

sewing seam part #2 of a French seam

I decided that the fabric of the top was SO sheer that I would feel indecent prancing around in this with all of my “stuff” showing underneath, so I ran out and bought enough additional silk chiffon in a deep navy to layer under the print to create some opacity:

The top took me a little over a week to completely cut out and sew in my free time, so that was not too bad. I love the flounce and halter neck, and the fabric most of all on this top.

As for pattern changes, I left off the elastic at the waist, and didn’t add the zipper as the pattern suggests as I think that would be too much weight for this super delicate and sheer material. I also skipped the facing and sewed the lining in it’s place for a much better finish to the edge and to combat some of the sheerness.

IMG_8983

Detail of the French seam made on the flounce piece

I am not 100% sold on this pattern as I feel the fit is a tad “off” and the cold shoulder is really, really cold showing so much skin. It is way too big in the underarm as it turns out and shows off a good deal of side boob here. Making a dart here to take up some space is not going to work on the finished top (note to self: make more pattern alterations in this area, and maybe try a muslin too, before cutting into spendy materials like this, silly girl Steph!) so for now, I think I’ll make up a coordinating bra or a panel on the side to avoid any wardrobe malfunctions…

DSC_0315

Don’t look now, but your side boob is showing…

I finished the top just in time to throw it on, slap on some makeup, do something to tame (or tease?) my crazy hair, and have my sweet and patient man snap some photos of me to post on my Instagram with the hashtag #MoodMadeSilk18 to enter the contest by the deadline. I would love to win the $100 gift card to Mood as the winning prize, but there are some other amazing garments that sewists have made with silk from Mood for this contest, so I wouldn’t be upset if I didn’t win. Just making stuff and challenging myself is fun for me!

DSC_0325_2

DSC_0327


THANK YOU MOOD!!! Say “hi” to Swatch for me!

Flounces in Floral

I usually don’t identify myself as being overly girly or feminine, but I’m finding myself drawn to flounces, ruffles, florals and other “girly” details in fashion lately. So, I figured, why not succumb to my femininity and make myself something floral, flouncy and flirty! (Yes, I am a total dork if you were wondering.)

Last summer, I came across this floral stretch denim fabric at Joann’s and really liked it, so I purchased a couple of yards of it, with the intention of making a little dress out of it:

Floral Stretch Denim

We were planning a trip to Las Vegas in August 2017 and I thought this would be a great opportunity to sew a little strappy fitted dress for the trip, but then the trip was cancelled so this particular dress project was also cancelled, at least for the time being.

Fast forward to early Spring 2018. McCall’s Pattern Company released some really great patterns and for a couple of dollars, I picked up this one, and a few others, during one of Joann Fabrics pattern sales:

M7730

I’m not all that crazy about the ginormous sleeves on view B and C on this pattern, but I really like the little jacket shape and flounces of view A:

M7730viewA

I thought I could make up a cute little spring jacket like this one I spotted on Pinterest:

Flounce Sleeve Jacket

This pattern, although trendy, could easily be made up in solid colors, prints, or with more of a classic look by just leaving off the flounces that are constructed separately and sewn to the outside along a marked stitching line.

One thing that I thought could improve the quality of the jacket in terms of construction and wear was a facing. Without a facing on the inside of this jacket, the lining would come all the way to the edges of the jacket and possibly show or peek out from the inside of the jacket. Upon doing some research of other sewists that have made this jacket, some of them had added a facing and were much happier with the result. So, I decided to take the time to do the same to mine.

I pulled up my online Craftsy sewing class Mastering Construction: Linings and Facings with instructor Sara Alm for a refresher on how to make facings and got to work adjusting my pattern.

Commercial break: I absolutely LOVE Craftsy and have learned so much from these great online classes! The classes offered are an invaluable tools for learning for creative-minded people.

I traced a 3″ facing from the jacket front and back pattern pieces, then also traced the lining (minus the facing area) from the same pattern pieces to create facings and a new lining pattern (adding seam allowances to each):


I then decided to add a little fun pop of color to this jacket that is ultimately just shades of grey and chalk white. I used packaged piping in bright fuchsia pink to sew between the lining and the facing. I see this type of detail in some ready-to-wear garments and knew it would be a relatively easy detail to add to the interior (I also learned how to do this by watching another one of my favorite Craftsy classes, Sew Like a Designer: Fashion Details):


IMG_8904

Oh, and I also decided that I would like to have a pocket in this jacket, so I just traced off a rectangle (using a notebook that was handy and my clear grid ruler) and cut out two of these from the lining material, sewed them together leaving an opening to turn, turned it inside out, gave it a good press, then top stitched it to one of the front sides of the lining. I thought of doing a nice welt pocket here, but wasn’t in the mood to take the time to do that. Maybe next time!

It was exciting to see my jacket was really starting to come together! I love how the entire jacket is lined, including the underside of the sleeve and peplum flounces. Here is one sleeve getting pressed on my handy sleeve board after the flounce was gathered slightly and sewed to the outside of the sleeve:


The final touch of slip stitching by hand the sleeve lining to the sleeve at the hem:

IMG_8905

All in all, this jacket was a fairly easy sewing project and only took a few evenings after work and Saturday morning to complete. I am so happy with it and glad that I chose to make this up, especially in a floral print.

I got a kick out of showing off the lining, piping and little pocket that I added to the construction of this little gem:

IMG_8910                     IMG_8911

And, of course, my Love, Stephanie label too:

Label in Floral Flounce Jacket

I enjoyed wearing this out to a local fashion event, along with a silk camisole and black wide leg trousers, also items that I have sewn. I even received a couple of compliments on my jacket! Good times!


IMG_8940


IMG_8930

Happy Spring!

Strapless Floral Girly Dress

I just love a strapless dress! For some reason, the style just looks so elegant and flattering (if the fit is absolutely perfect: not too tight, never too loose) on a special occasion dress, or even a summer day dress. Something about showing off the neck, décolletage, shoulders, arms and upper back I find so alluring while daring and sensual on a woman.

        I started making this dress over a year ago in hopes to wear to a garden wedding. The fabric, “Shimmering Pink Floral Polyester Twill” which I believe is from Oscar de la Renta,  I acquired from Mood Designer Fabrics back in 2015 and have been holding onto for the perfect dress. It’s time has come!

shimmering-pink-floral-polyester-twill-306019-14

As I was nearly done with it, I decided that it was a little too “young” looking on me and not quite as a sophisticated a look I was going for the occasion I was attending. So, with two days to spare, I set it aside for the wedding and whipped up a quick floral silk maxi dress (which turned out to be perfect) instead.

Meanwhile, about a year later, I managed to finish the floral dress (less a finished hem) and I just love the result and am just getting around to blogging about it:

IMG_7339

I began this dress with the fabric, a pattern and a vision:

IMG_7344

As you might notice from my sketch, I envisioned this dress with a horizontal sheer inset panel in the skirt made of organza. I also was planning to add black piping within the seams of the bodice to add texture and dimension, but neither of these design features made it into the dress.

I love these designer dresses with the pretty floral prints, fit & flare silhouette, flirty strapless bodice, and best of all, pockets!


Here is an image of a lovely skirt by Donna Karan from which I was thinking of borrowing the sheer inset design detail:

Donna Karan Sheer Inset Skirt

I used this dress pattern 7082 View A from McCalls to create this dress:

M7082

McCalls 7082

I started this dress the “proper” way with a fitting muslin so I wouldn’t risk totally messing this dress up by just cutting out the pattern, and assuming all would fit right out of the package, like I have done too many times before. I did want to make the best use out of my pretty fabric after all the work and time that is put into projects such as this, so making a muslin version first just made sense.

The fit was pretty good in muslin. I needed to take in the back. Actually, now that I look at it more carefully and have had more sewing and fitting education and experience in the past year, I should have taken some length out horizontally in the back as I can see bunching and wrinkling here where it should lay smoothly across my back:

I then started cutting out and constructing the dress in the printed fabric as well as the wonderful bright pink lining after transferring the changes back to the pattern:

The rest of the construction went pretty smoothly. Making the bodice:

IMG_3596

IMG_3597

The boned bodice lining:

IMG_3608

and the skirt, adding fun and handy pockets to the pattern (because I can!):

The inside of this dress makes me happy with the bright pink satin lining and the cute black and white polka dot ribbon I added to the side seams of the bodice to serve as hanging loops:

Here she is, the entire outer dress sewn together, ready for the lining to be set in:

IMG_3602

The inside of this little gem looks almost as good as the outside!

IMG_7349

I just love my little dress and hope for an occasion to wear it, or sell it off to one lucky lady who would enjoy this one of a kind sweet little dress! Any takers out there?

On to the next sewing adventure…Bye for now!