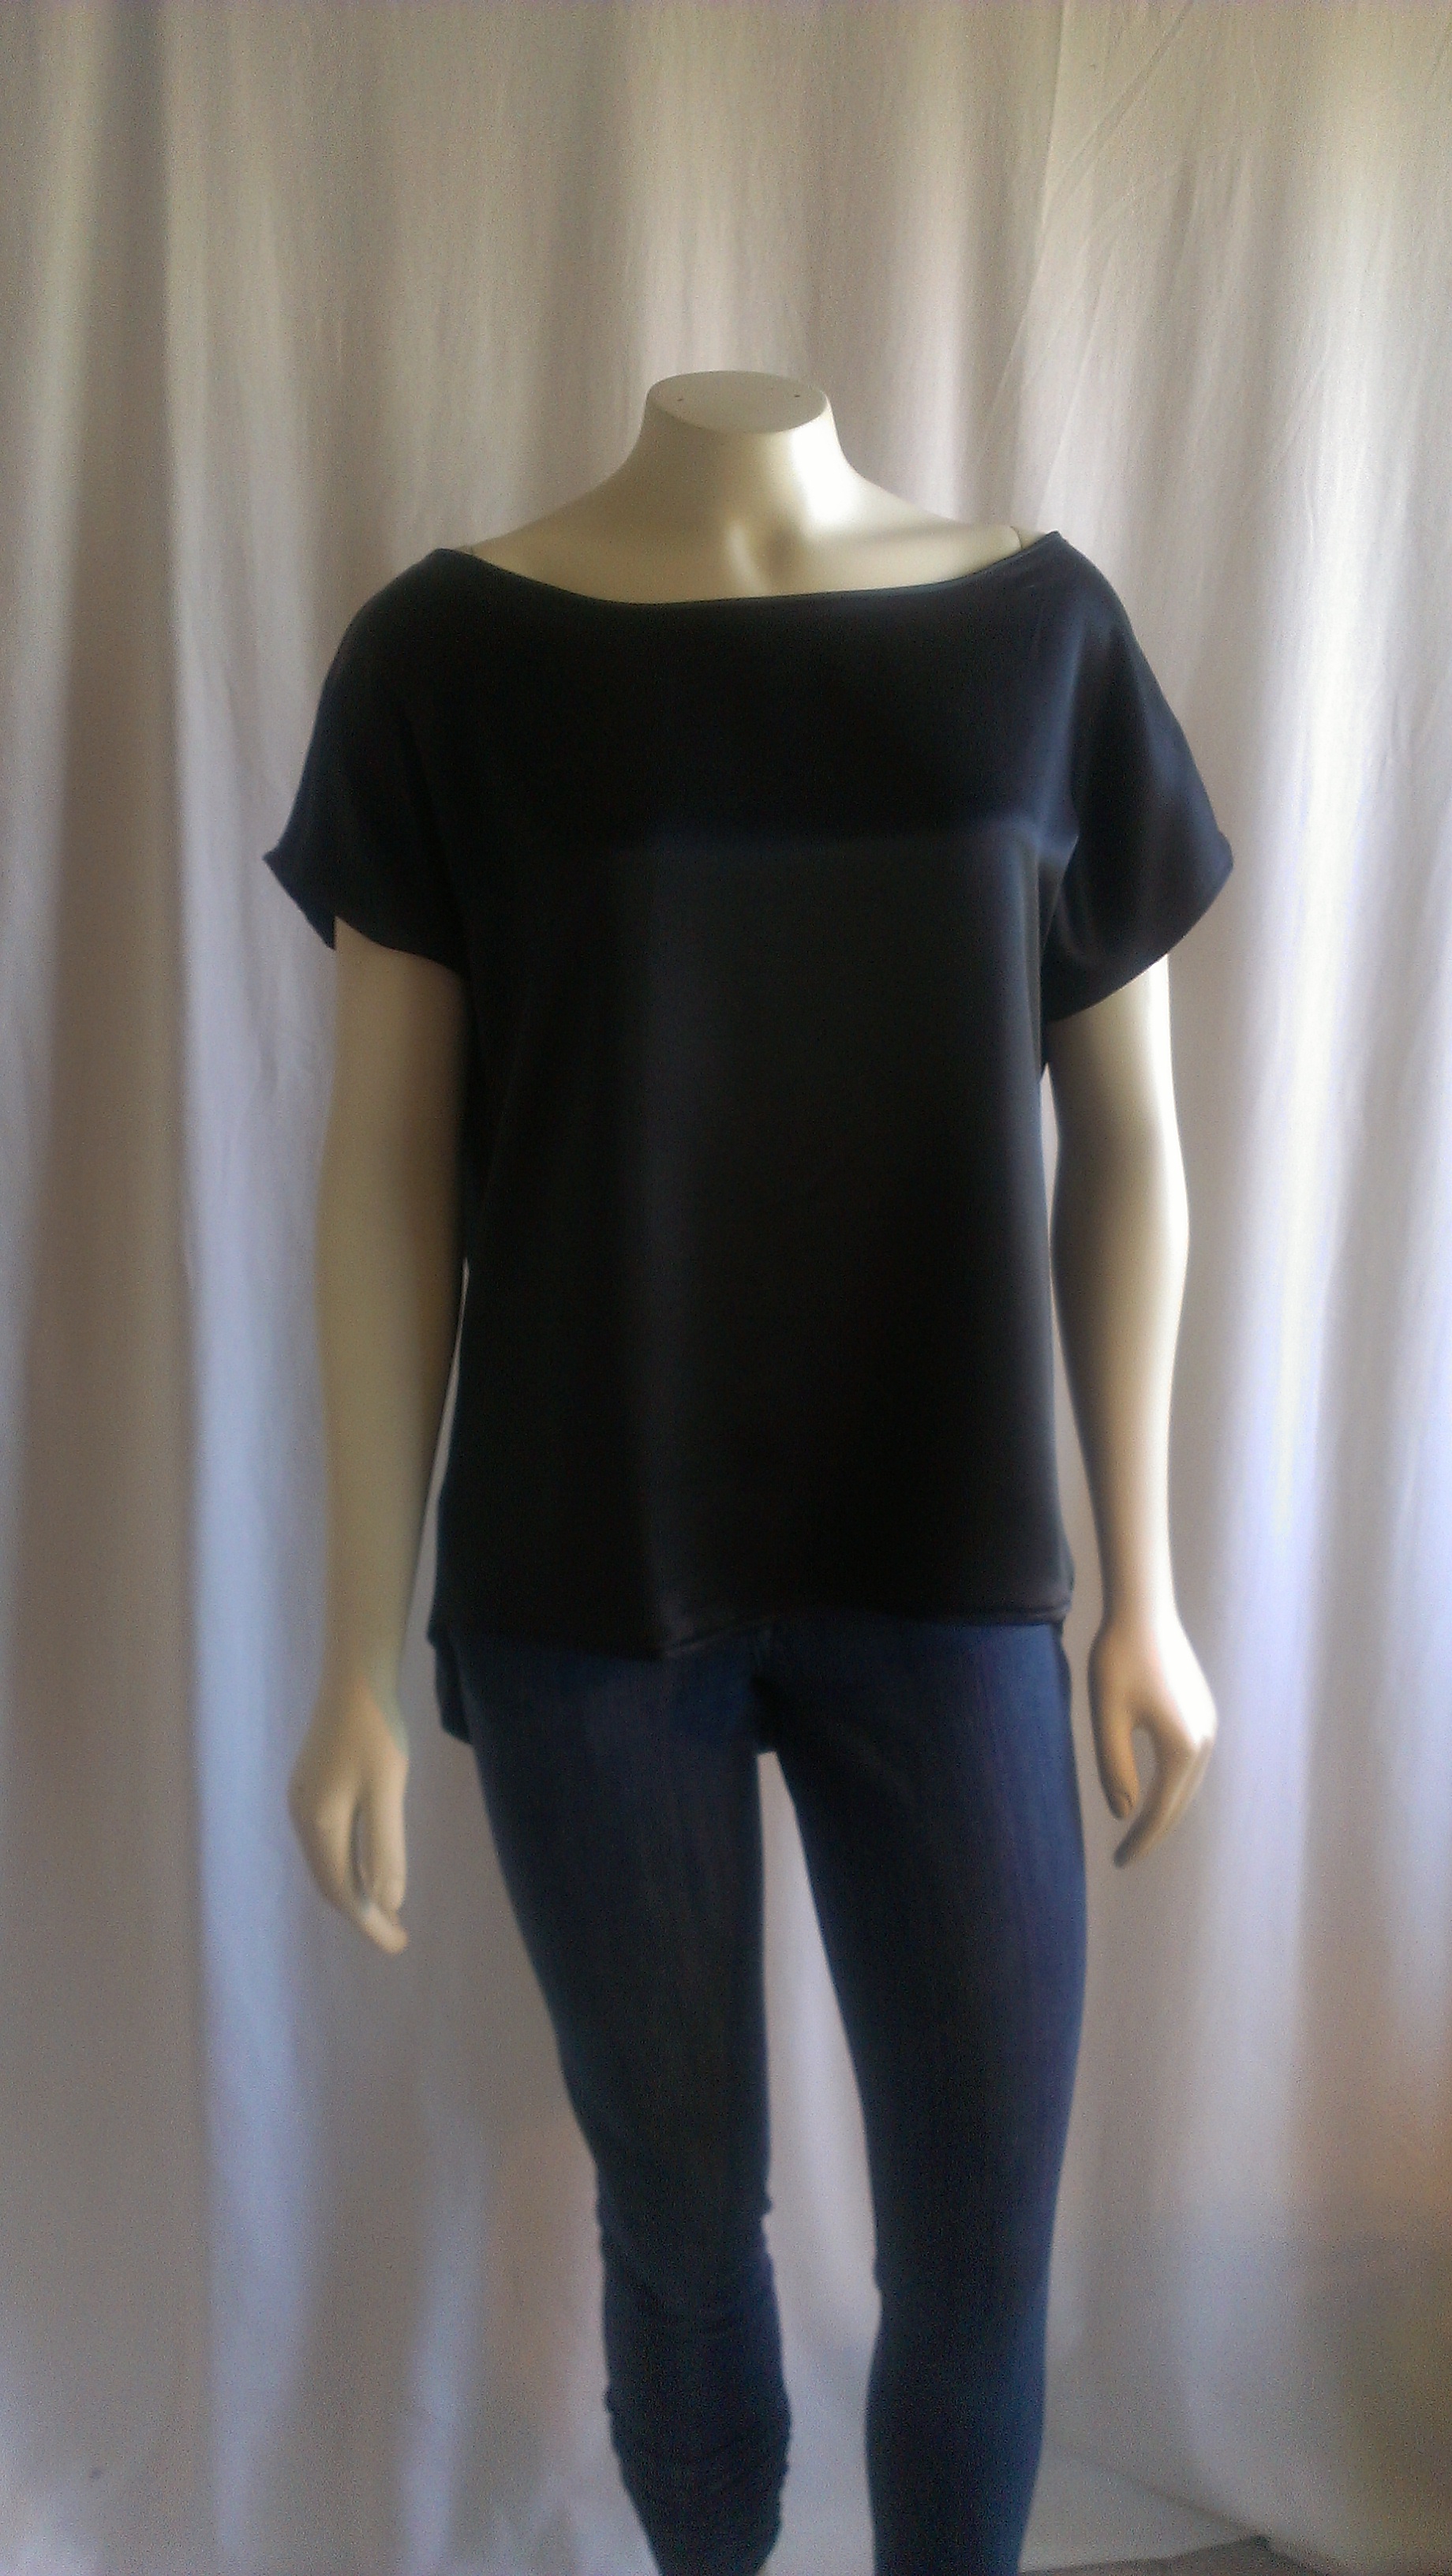
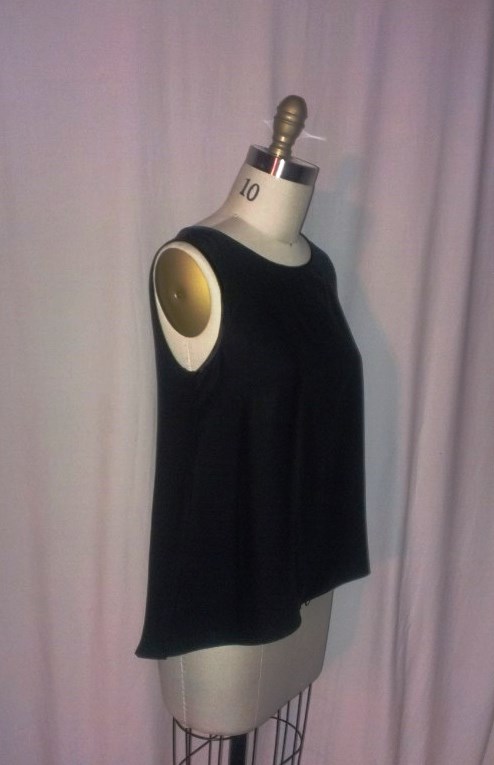
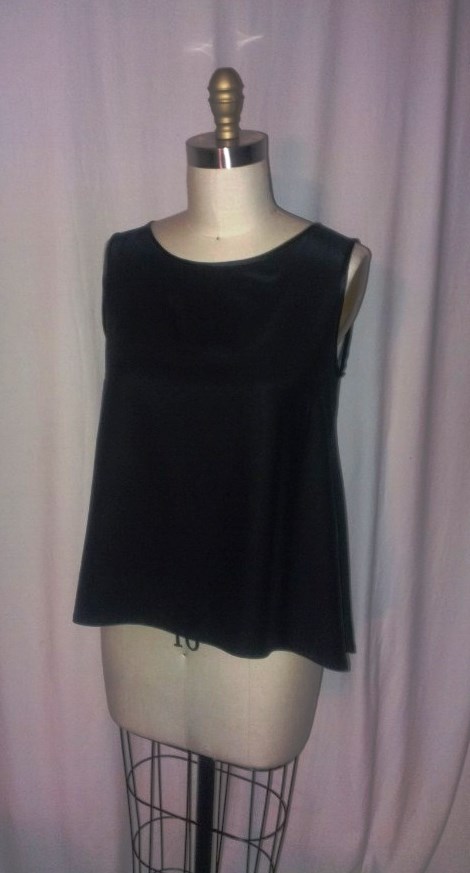
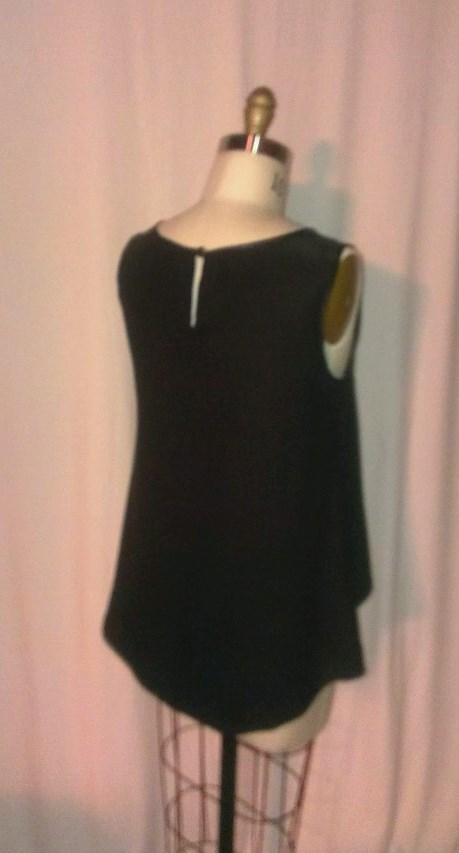
Dipped back hem of topSide view of topSilk charmeuse t-shirt top
I made this top in about 2 1/2 hours based on New Look 6217 pattern view B. I lowered and shaped the back pattern piece to make a lower, dipped hem that I am so fond of lately. I also cut the back piece on the fold of the fabric to eliminate the center back seam. French seams were done for the side and shoulder seams. It doesn’t get much easier than this to make a quick luxe t-shirt top!
I used a lovely silk charmeuse in black purchased at Mill End Store in Milwaukie, Oregon (one of my favorite fabric stores in Portland) as they were running a 20% off silk sale.
I have been wanting a simple black silk tee shirt for some time now and am happy that I finally made one. I am sure I will wear this top often as it can be worn casually or dressed up.
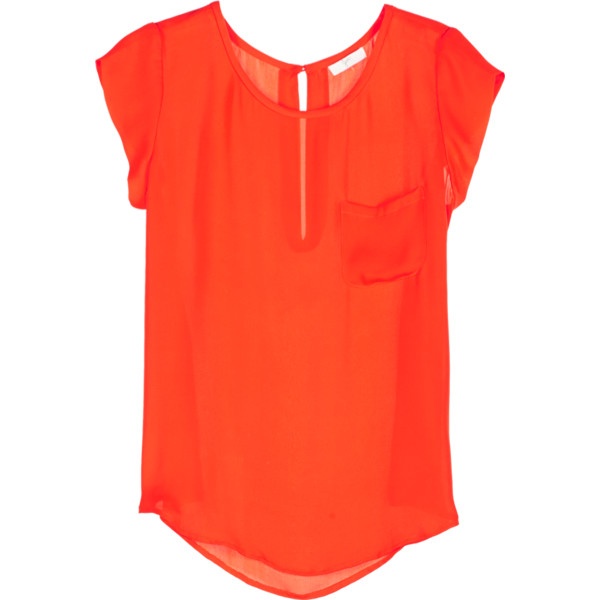
I pinned some tops on Pinterest as inspiration:
Joie “Rancher” silk top $158 on PolyvoreTraci French top in Triacetate polyester blend $95
Go Me! I made this top costing about $40 in gorgeous silk. Boom.
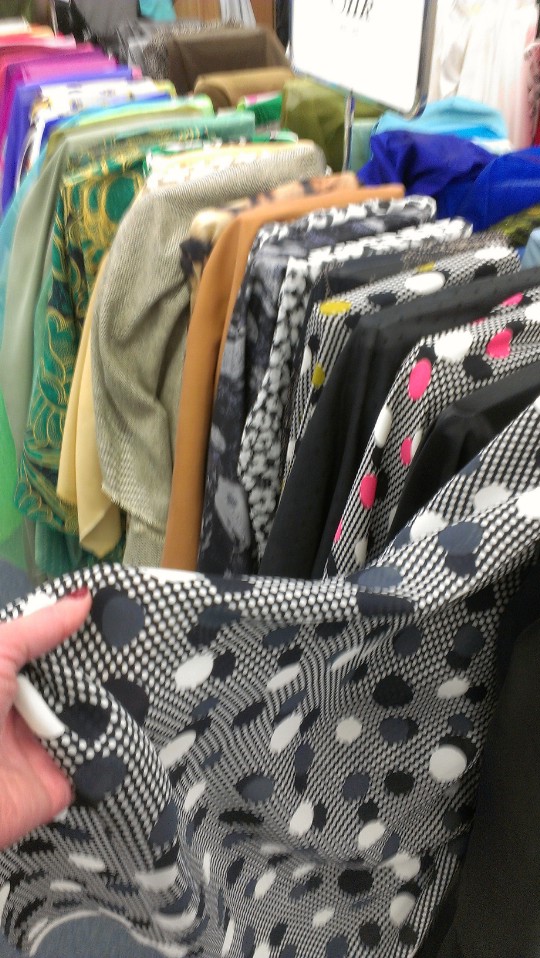
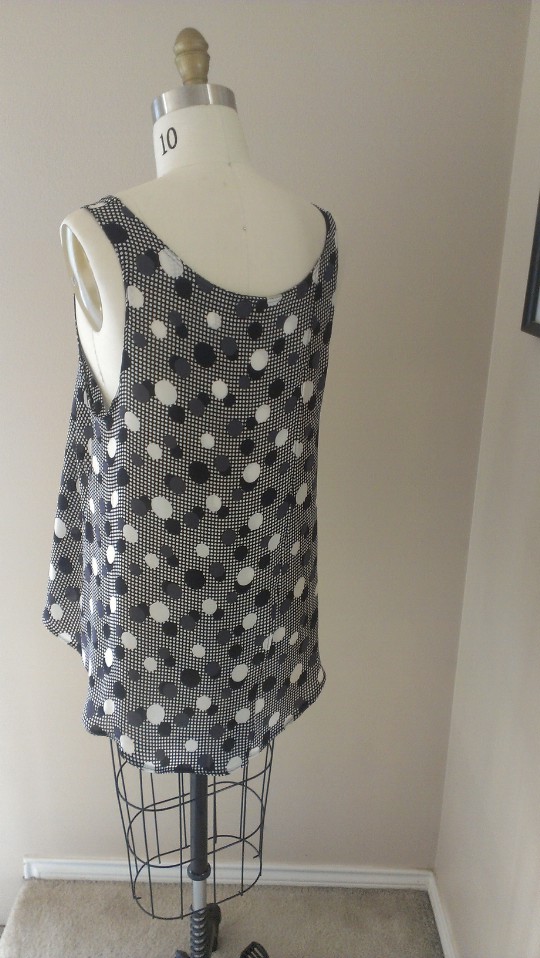
I saw this lovely silk georgette black, white and grey polka dot fabric at Fabric Depot and have been thinking about it for several weeks:
Silk georgette polka dot material by Milly
Last weekend as I was fabric shopping (a usual thing on weekends!), I saw it again and had a coupon, so figured I’d grab two yards and put my mind at ease in fear that it would all be sold out and gone forever! I brought it home and gently pre-washed it and discovered that the fabric is from the design house Milly by the printing on the selvedge of the fabric. Woo hoo! Love designer fabric!
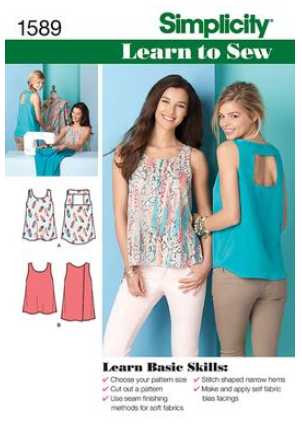
So, between major sewing projects, I wanted a quick fix sewing project to make and wear for the nice weather to come. I cut out and sewed this top in a total of about 3 hours, including taking time to change the pattern back peice to a curved side hem as opposed to the short, then angular long hi/lo hem. I used my fashion curved ruler to draw in this new curve before cutting the pattern out of the tissue. Sorry, I don’t have a photo of the pattern changes made. Maybe I can manage to take some next time I take out this pattern to sew.
Simplicity 1589 pattern envelope
I am quite pleased with my new top and wore it to work Monday and received several compliments on it! It is very comfortable and I like the hi/low hem and flyaway open split to the back side of the top. One word of caution, this top has very low armholes and the flyaway feature of the back leaves the fit of the top quite loose and open, so a tank or tube top underneath is needed for coverage. Great top though and so fast and easy to make! I look forward to wearing this top in the summer with cute white capri pants or shorts 🙂
Front of top on meBack of top on meBack of top on dress formside of top on dress formFront of top on dress formopen fly away back of top
I think I may need to run back to the fabric store and snatch up more of this lovely fabric! As you can see from the photo above, they also have a pink and a green version of this fabric that I also like. Oh boy!
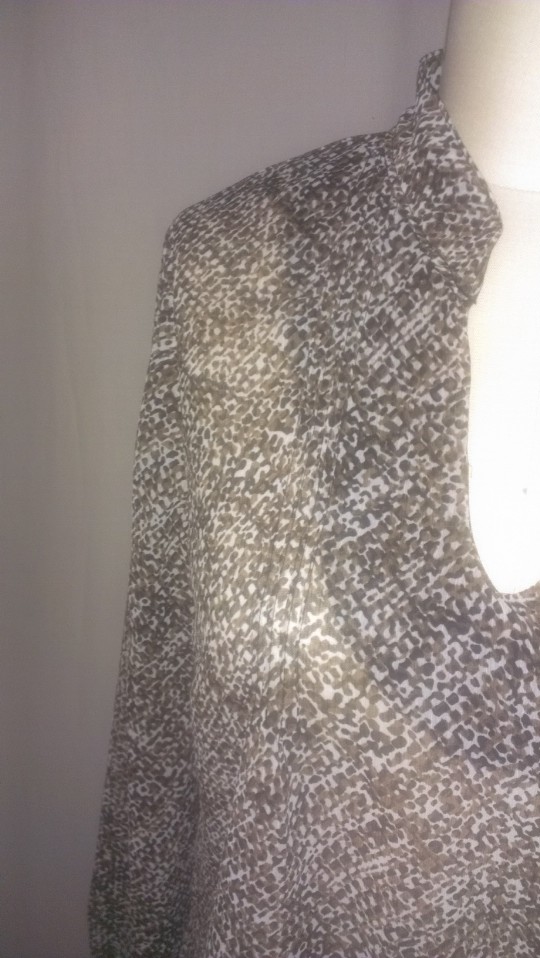
I just finished this lovely silk georgette top using Butterick 5997 sewing pattern. It was a fairly straightforward blouse to make, the most difficult parts were the pintucks and sewing with this very delicate and lightweight fabric. I made French seams throughout and made little self covered buttons for the cuffs.
I acquired this Nanette Lepore designer silk from Fabric Depot in Portland, Oregon. They have some great silks and other fabrics there lately! This fabric has a lovely soft hand and drapey sheerness to it. It is sort of an abstract small geometric print that looks a little like an animal print, but isn’t. You can barely see the details of the top as the print of the fabric really hides them.
Close up of the fabric and pintucking
I’ve seen many tops like this and have a few inspirations here:
Rebecca Taylor Silk Blouse $265Joie Silk Blouse $258
I really like my new top and can see sewing it again in other fabrics and colors. It is really comfortable and great to throw on over skinny jeans or tuck into a skirt or pant. Maybe I’ll sell one or two as well, but not quite at $250 or more!
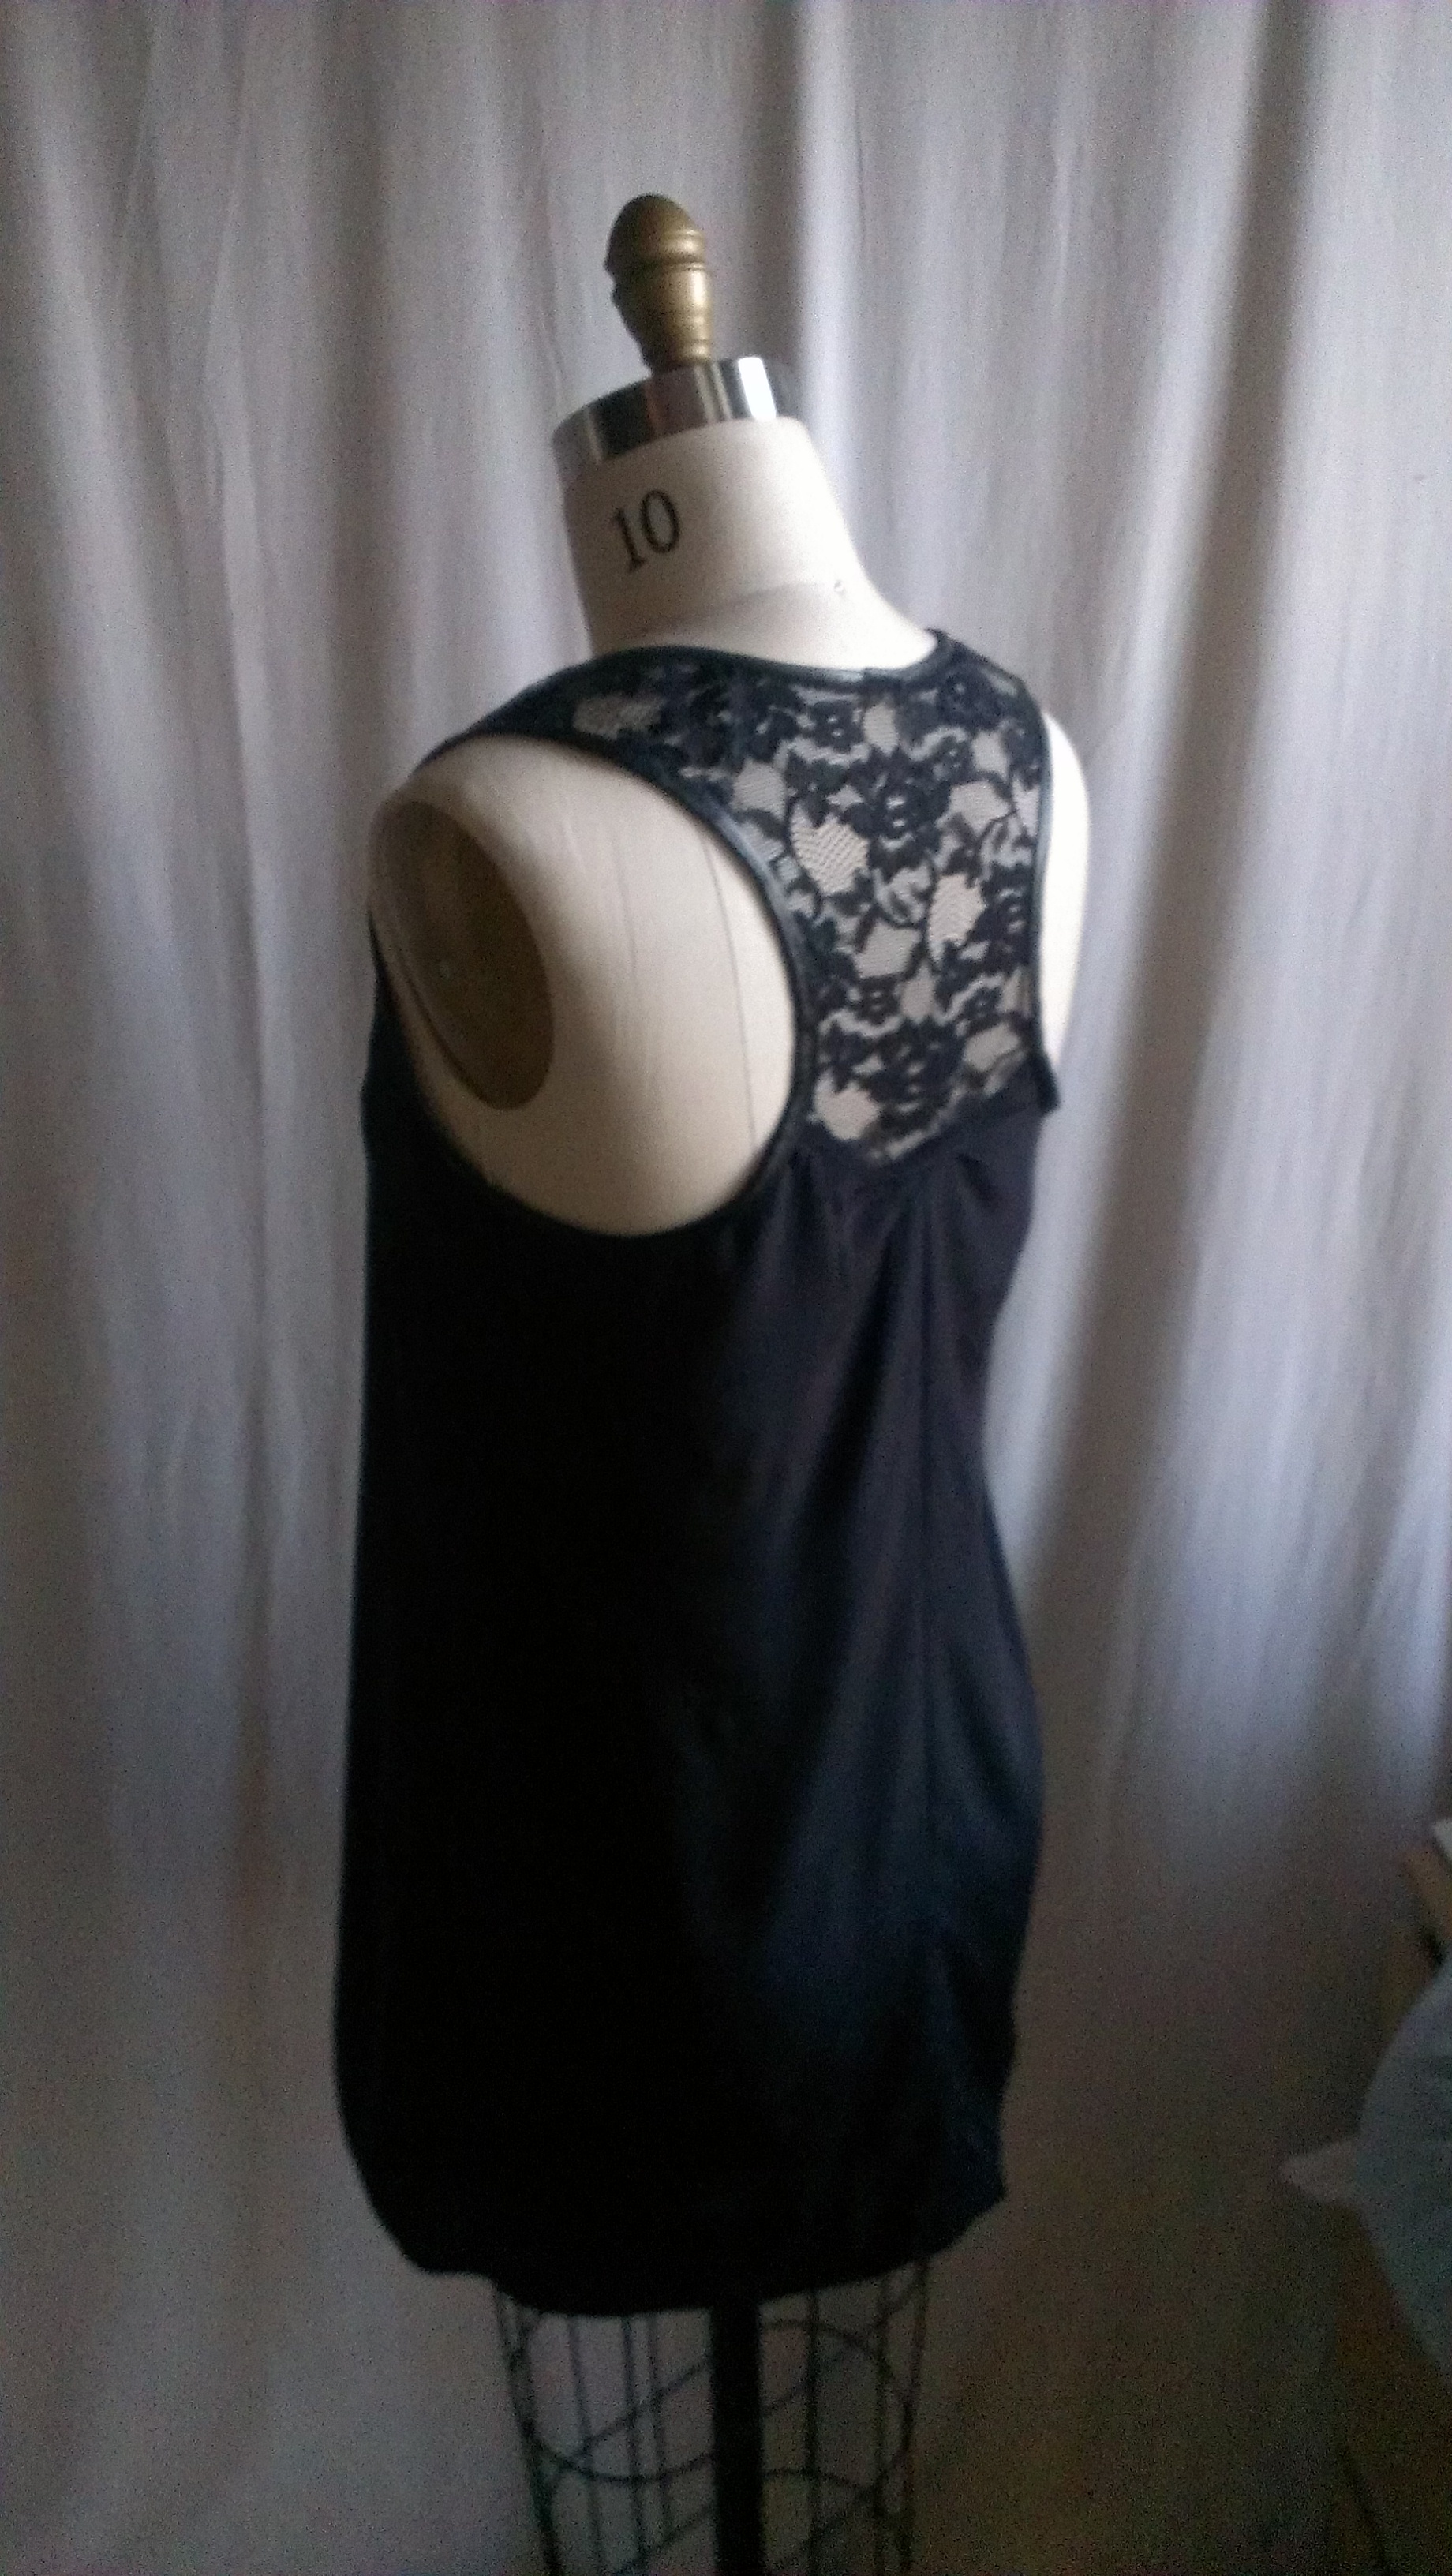
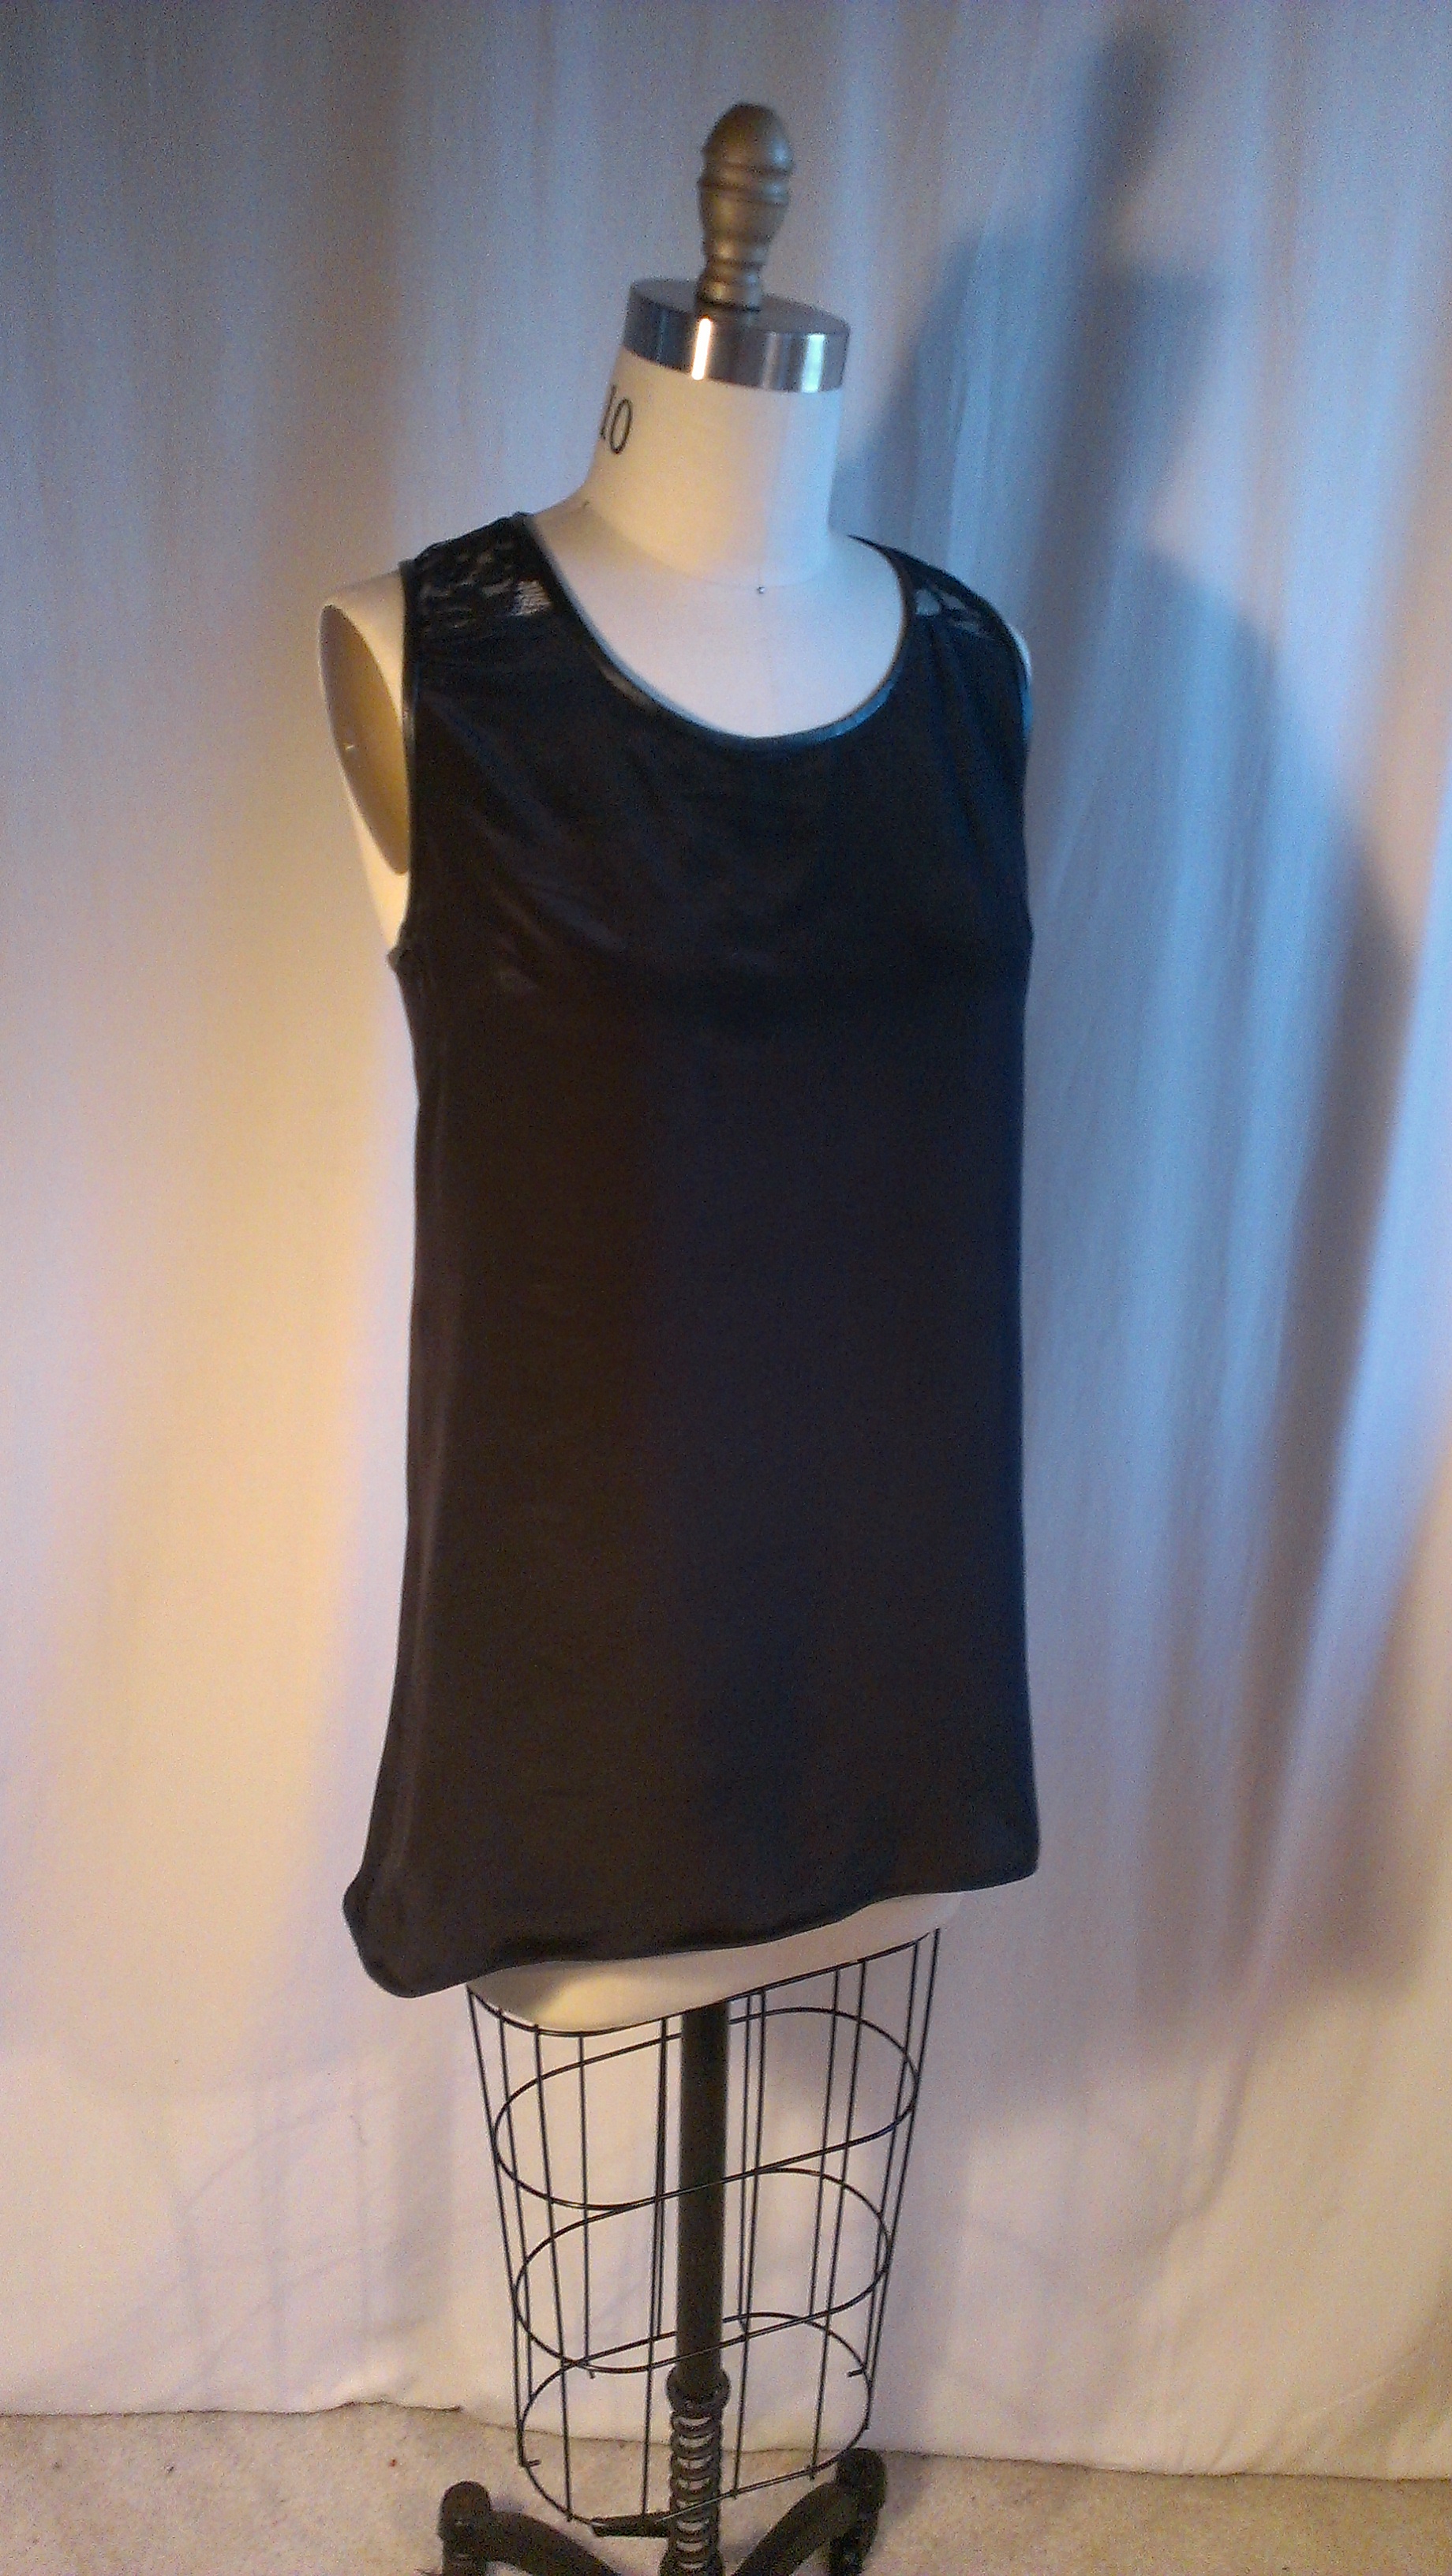
I made this fun and pretty racer back tank top from McCalls 6359 pattern.
Loose fitting tank top pattern with various neckline and hem design options.
I started this top a few months ago and never completed it. That seems to happen all too often!
I thought about binding the neckline and armholes with some of the silk, but then I though it would be fin to give it a little edge and trim it in leather. I bought a 12 yards of 3/8″ wide light weight double fold lambskin leather trim from Wallace Textiles through eBay. This stuff is really nice! The leather is thin and soft and quite pliable, perfect for a little binding or trim.
I am very happy with this top and can envision it with a colored underling under the lace. I think that will really make the lace stand out. Next time I make it, I will make it a little larger under the armholes and across the chest as it did fit a bit tightly here for me. I think this top could lead to a lot more design ideas….
I finally got to making this black silk tank top for my niece that I promised her nearly a year ago. Bad Auntie!
I made it from Simplicity 1693 pattern, which I have made for myself before, also in silk. I used the back side of the silk charmeuse so that it is not as shiny as the face of the fabric is, but it is still quite luxurious and soft to wear. I made the bias binding strips, using the shiny side of the fabric as the side that will show for around the neckline and armholes. I made French seams throughout and sewed a lovely faceted glass button from Button Emporium on for the back closure opening with a thread chain loop.
It is hard to see from the photos and in this inky black color the luxuriousness of this blouse and the bust dart, but trust me, it’s really nice! I have another identical one already cut out and ready to sew for myself, or to sell to someone if the opportunity arises. I have other nice silk materials that I could whip up into this top as well. It is a very simple style, but I think it will look great with skinny jeans, tucked into a pencil skirt, under a jacket or cardigan over it, and a with nice necklace or scarf around the neck. It is a great basic tank in a luxe, soft silk with a little updated style twist. Gotta have it!
I found similar silk tanks online from high-end retailers going for $129 to $179, so it makes me very happy to know that I can make this blouse in a few hours using a little over a yard of fabric costing about $30-$40 using really nice silk and a nice button, or other closure options (a nice lightweight little zipper would look cute here too). Other design options could develop from this pattern such as insets of other materials such as leather, mesh or lace, trim such as embellishments, beading, or bindings. I have so many ideas swarming around in my head!
Here are some images I gathered of comparable silk tanks going for at least $138 at Nordstrom and Neiman Marcus:
I am sending the tank top off to my lovely niece in Amsterdam, Holland today. I hope she likes it!
I’ve been slowly working on this silk crepe de chine blouse from McCall’s 6606 sewing pattern. It is a lovely, classically cut, set-in sleeve, button front blouse with a front yoke pleat, a back self-lined yoke, long sleeves, sleeve cuffs and a pointed stand collar. I’ve done hand stitching where needed, and sewn and pressed it with great care. Although not complete, the blouse is already hanging beautifully and softly and the deep red color is gorgeous.
Red silk crepe blouse in progress of sewing, floe to finish
I just need to complete the hand slip stitching inside of the collar stand, make the self-covered buttons (first time for doing this!), make the buttonholes down the front placket and on the cuffs, then sew on the buttons, and it will be done.
Here is a photo of hand basting in progress attaching the collar band to the collar stand. I used a silk thread for ease of sewing and removing later, which I really like to do as a technique for basting.
Basting stitches by hand with silk thread.
I can’t wait to wear this blouse! I have tried it on several times for fit and feel, and so far, it feels amazing to wear! So soft, luxe and a beautiful color. Plus the back hem dips down a few inches which is very nice for coverage on the backside. I most likely will be wearing this with skinny pants or jeans, or tucked in to a pencil skirt. The hem line is perfect for either of these fashion situations.
I am actually considering putting this up for sale before I wear it and make it my own 🙂 I think I could get a nice amount for this blouse, or make one in another size, color or print as a client desires. I think I should always have a silk top in the works, and finish some that I have already started. They are so nice and feel wonderful to wear, and people want them! So many things to sew…..
4/18/14 Update: I finally finished this blouse and I love it, but I am wearing it, so it is sadly not for sale 😦 Oh well, I’ll just have to make more!
Oliver has approved it too as he looks on at the “photo shoot”.
I made this beautiful silk chiffon scarf, and am in the process of making up more. Soft, beautiful, slightly warming, interesting, personal and romantic to wear around the neck, winding around the neck as many times as desired.
Love Letter script silk chiffon infinity scarf I made for a gift for my lovely girlfriend Stephanie. This was a perfect sewing gift to make that only took 45 minutes to make, making sure to hand sew in my little label reading Love, Stephanie, especially since the fabric is like a love letter that goes on for infinity.
I actually would LOVE to create my own script printed material as I can write a nice love letter, and my script handwriting is pretty nice. I could print it on cotton, silk, linen. Oooh! Another great creative idea on the list!
I got orders to create at least 5 of these, plus I need to have one for my self, and more to spare to sell or for gifts.
So, we got the bad news that my husband’s sweet Grandma passed away. She was a lovely lady and just so nice, but she had been suffering for some time now and she is probably in a better place now. We decided to make the trip back to Ohio for her funeral which is really nice in a way, it will be good to see family and pay our respects. I have actually been thinking for a couple a weeks now that if something were to happen to her, that we might be going to a funeral soon and I really should have something to wear. I don’t really have a black dress with any kind of long sleeve that would be appropriate for a funeral in winter, so of course, I needed to make one!
With a quick change of sewing priority from my LWD, I decided to make a classic black dress out of this raglan sleeve sheath dress pattern that I had in my pattern collection, Butterick 5520 view C (the red one on the pattern envelope) with no peplum and omitting the giant 80’s-esqe shoulder pads:
I, of course, had pinned some LBD’s in my Pinterest board that provided some good inspiration ideas for the outcome I was looking for the occasion. Here are some of those dresses I pinned:
I have this really lovely black tropical weight wool gabardine 1 1/2 yards of 60″ wide end piece from fashion designer Giorgio Armani that I picked up a Mill End Store in Milwaukie, OR a few months ago, just enough to squeeze out this dress. I also had some black lightweight silk habotai on hand for the lining. Both are perfect for this dress.
I would love to do some sort of design twist on this pattern, for example, using leather, lace or some sort of embellishment for the sleeves, but decided that a) I don’t have time to fuss with it, and b) I want to keep it simple, versatile and not show-y for the occasion. Again, next time!
So I started cutting out the pattern right away, but got side tracked by little Gidget who decided to lay right on my pattern tissue pieces and refused to move until she received a belly rub and several kisses! Aw, Gidge!
Moving on, I had to do some real puzzlework to figure out how to layout and fit all of my pattern pieces on to my fabric, but finally came to a good layout that worked:
I was able to add 1″ in length to the bodice front and back (after comparing to my pattern sloper that I made for myself in patternmaking class, I could see I needed to add at least an inch to the bodice so that it fit at my waist and was not sitting to high up too on my body), cut out and mark both the outer dress and lining fabric pieces, overlock all of the pattern pieces of the outer dress and lining, sew and crank out the bodice outer part one night, and got this far:
Not to bad for one night!
Last night, I rushed home after work and got started back to sewing most of the rest of the dress, staying up after 1 am to try to finish, as we leave late tonight and I am nearly out of time! I did get pretty far, though and only have to hand slip stitch the lining to the inside of the zipper and around the waist seam, finish sewing the hem, and sew on a hook and eye at the top of the back opening.
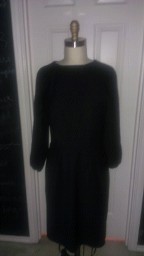
Luckily, the fit is pretty darn good for just trusting the pattern measurements and feel that I can actually wear it and not feel like a big sausage. Here is a photo of my dress so far. It is very hard to see the details of the seams and such, so it does look like a somber black blob, but hopefully once I have it on and I am all ready to go, it will look decent and as I hoped for the wake and funeral:
I will be bringing my sewing supplies and my battery operated tiny hand held sewing machine on the trip to Ohio to finish off the dress, and hopefully, get to finish my LWD and enter it in the contest. Wish me luck!
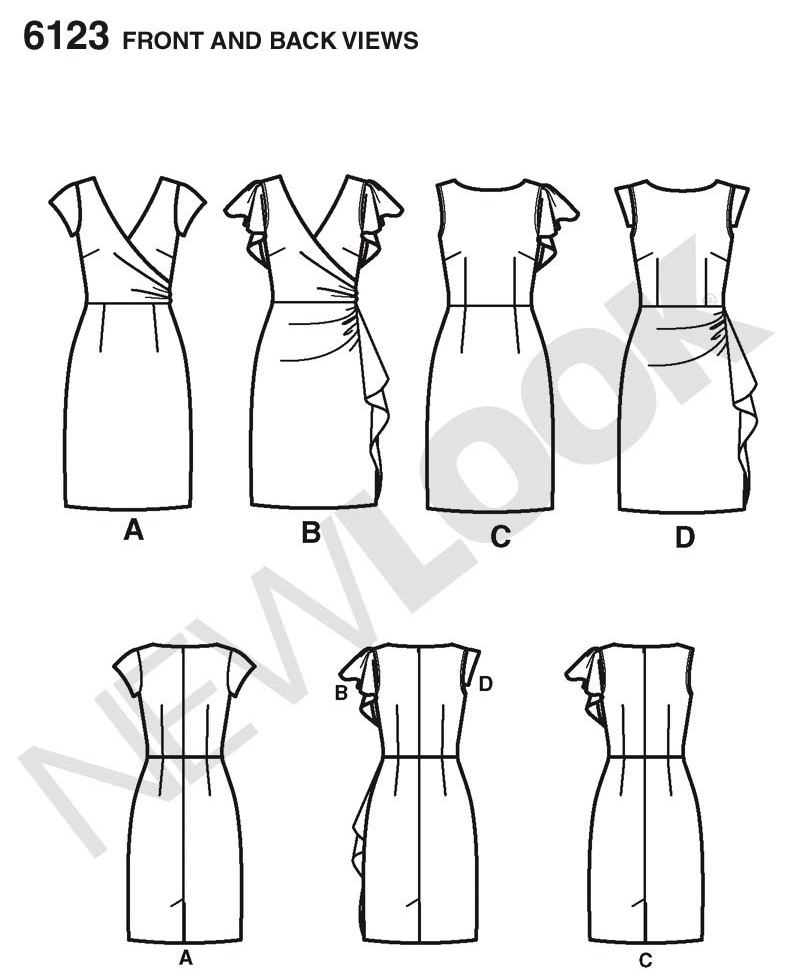
On Patternreview.com, the LWD Sewing Contest is in full swing, with only 8 days left to enter my version of a little white dress. I have decided, after debating over about 4 fitted sheath dress commercial sewing patterns, to sew New Look 6123, making view C with no sleeve flounce or any other drape, sleeve or added style details:
If this dress is successful, I will use this pattern again and possibly use some of the other included design details such as the little tab sleeve, the short, cap sleeve, the crossover bodice, and possibly the draped skirt (just the pleated part though, no extra hip and thigh attention is needed on this body). Plus, it would be a great dress for a client.
Some of my inspiration LWD dresses are the following silhouettes on these lovely ladies:
I am using a white stretch cotton lycra blend woven material, sort of like a stretch sateen minus the sheen, for the outer dress, and a poly/rayon/lycra (at least I think that is the blend) lining material.
As the pattern does not come with instructions for a lining for this dress, and the tight white dress with no lining will surely be too hideous by revealing all my awesome saddlebag cellulite and flabby little tummy pooch, I am going to make my own lining from the pattern pieces of the dress. Hopefully the stretch lining material from Mill End Store in Beaverton, OR I chose will help to smooth out and suck in my icky areas!
Too many of these nice dress patterns come with no lining instructions, or instructions for only lining the bodice. I find that so frustrating! But oh well. I suppose that is one of the many reasons why I have taken the time and spent the money to take sewing, pattern making, draping and apparel construction classes from various sources, conduct research online, and acquire sewing books that will teach me what I need to know about sewing. I plan to take the time to design my own patterns, be more creative, and fulfill my dreams of being a great sewer and designer. For now, I use commercial sewing patterns (I own more than 450 of them. Wow!), and I love every minute of sewing!
So, back to my dress creation. I have decided on a simple silhouette for a LWD as too much fuss on a LWD can just look, well, wrong. The bodice is sleeveless, high boatneck, with waist and bust darts. The skirt is a simple, darted, pegged-in, strait pencil skirt. Very basic, nothing crazy, kind of boring actually. But I want to keep it clean and streamlined. I may install the invisible zipper as the pattern calls for, or possibly the silver metal fashion zipper I bought at Joann Fabrics on clearance for $9, exposing the metal zip teeth for a design edge. I have not decided on that element yet.
The only pattern changes I made were to cut the skirt in size 14 (the bodice I cut the size 12) and taper the skirt waist to a 12 on the front and back top edges, and also to taper the hem of the skirt to be more of a pegged, pencil skirt. Both of these were done using my hip curve design ruler. I know I could get more creative with this simple sheath by moving darts, adding seams, adding a beading or embroidered design and such. Next time.
I am actually using this pattern as a test dress for fit, and if I like it, to use as a base for many style, color and fabrication versions. White is not very forgiving, nor is it usually slimming, and my weirdly shaped, aging body, is not getting much skinnier! But white is a great, cool color to wear, and has so many outfit options. So, a great fit in a nice fabric, made well, are the only true tools I have for this kind of sheath dress to be a winner and for the most flattering outcome. I hope it fits!
Plus, this is the first time I am using my new, wonderful Babylock Imagine serger in a project! So far, I used it to overlock all of the inside edges of my fabric cut out dress and lining pattern pieces for this dress to prevent fraying and to have nicely finished interior seams. So wonderful!
I will post my finished LWD (cross your fingers for a good one!) as soon as I am finished and follow up with more sewing and fitting notes!
Saturday 2/8/14
I worked on my LWD today for several hours. I basted it together and got it fitted by my husband. I found the upper part of the back too wide, as usual, but the rest of the dress fit well. I made adjustments to the pattern for future reference, and marked and re-serged the back edges of the dress as well as to the lining, creating a new center back seam allowance.
Here is the dress, basted together, and on my dress form. Also a shot of the back side of the dress with the silver metal fashion zipper pinned into the center back seam:
So far, so good! It looks a little “nurse-y”, but that can happen with LWD’s, so that’s to be expected.
I went on to sew the entire lining exactly the same as the outer dress leaving out the zipper. Here are the twin dresses. The outer dress (right dress) and lining (left dress), all ready to be sewn together and joined at the neckline and sleeve openings:
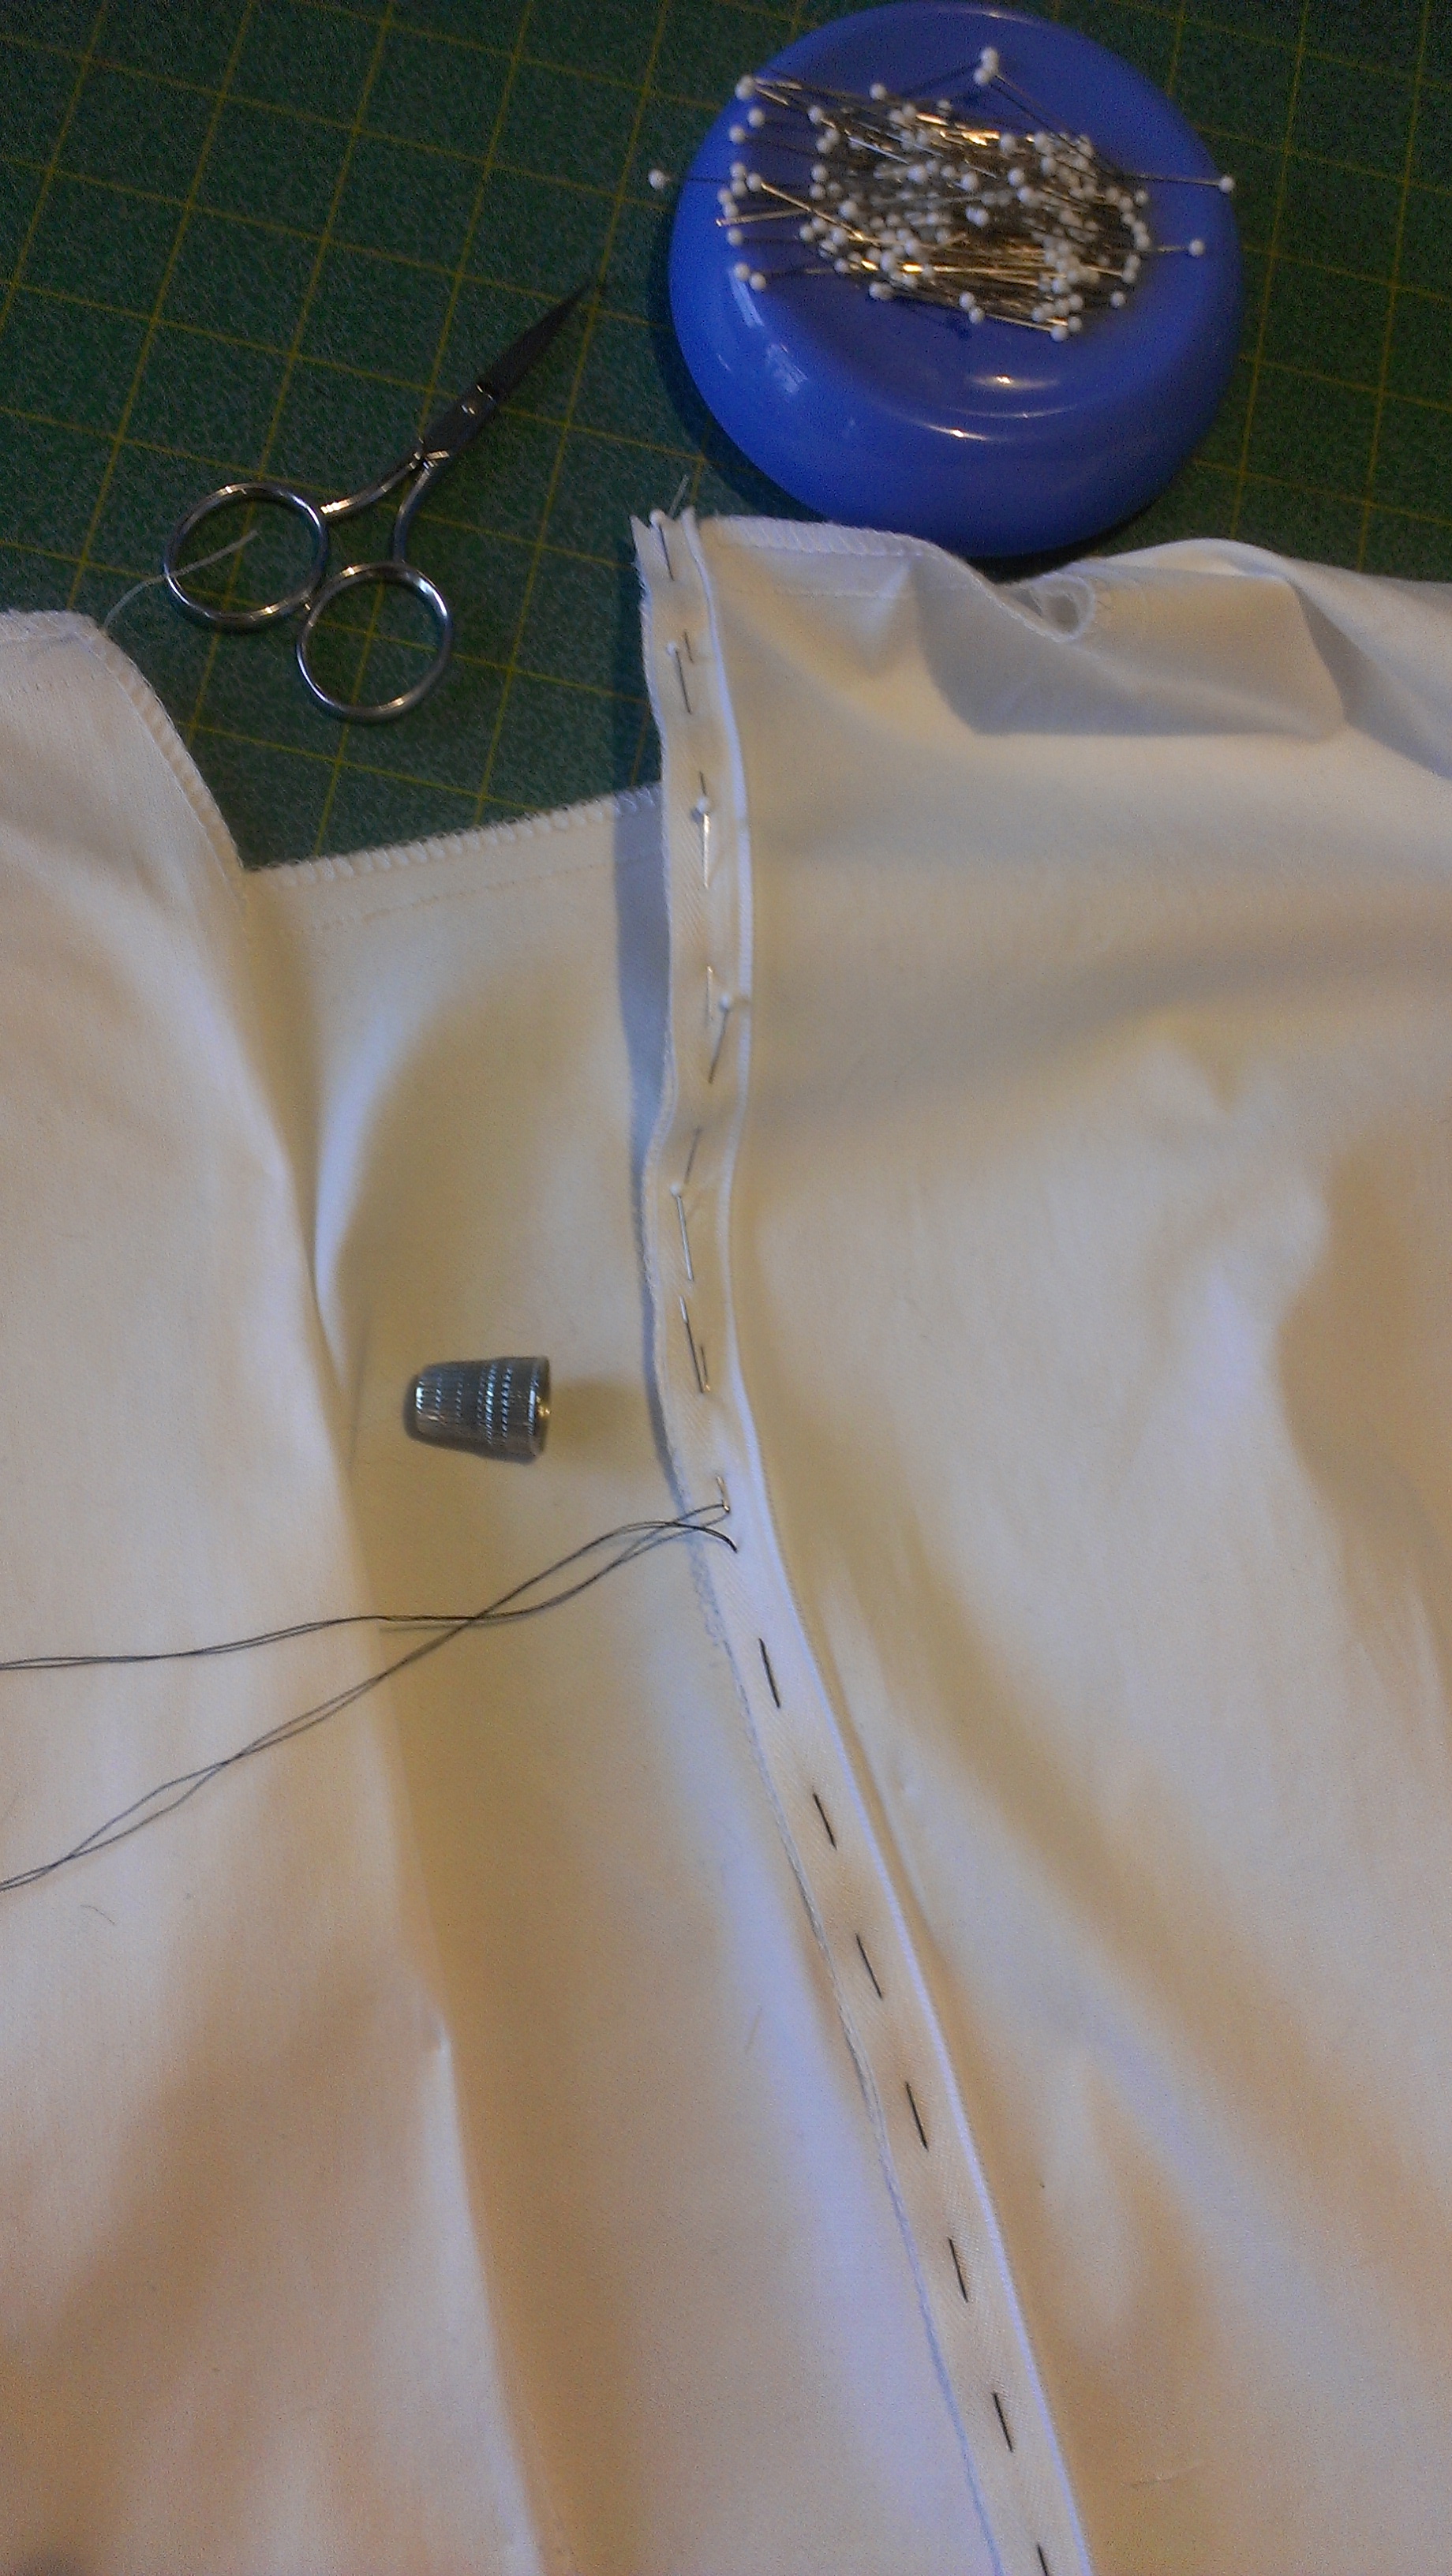
I decided to not do the silver zipper as it may limit the style in a way, so I chose the invisible zip as the instructions with the pattern include. Here is my progress so far with hand basting in the invisible zip:
Next up:
Finishing installing the invisible zip
Sewing in my Love, Stephanie label to the lining
Sewing the lining to the dress
Pressing well
Understitching the lining to the seam allowance
Stitching the lining to the zipper opening either by hand or machine
Figuring out how to do the back vent split with the lining
The hem
Update Thursday 2/13/14
Well I got a good ways on my LWD over the weekend, especially since we had a snow storm and the entire city shut down for 4 days, so I got a lot of good sewing done while cooped up in the house.
I followed a great zipper installation video tutorial on Craftsy.com to install my invisible zipper with the lining. It came out really nice! However, after the zipper was in, it was impossible to figure out how to sew and finish off the armholes and the bottom hem of the dress on the sewing machine, so I think I’ll have to resort to doing this by hand. I began pinning the armholes in preparation to slip stitch the lining to the outer material, but had to stop here and begin a new project right away, a black dress for a funeral. See the next post for this adventure.
Meanwhile, here is my LWD nearly done and laying on my table waiting with high hopes to be finished in two days to enter into the LWD contest:
July 31 2014 Update:
I finally completed my LWD! Needless to say, I did not make it in time to enter my LWD into the contest, but I did finish it in time for mid-summer wardrobe opportunities. I really should have finished this dress sooner as it’s a great little wardrobe staple, especially for summer!
I am very pleased with the fit of this dress and will go back to this pattern for more versions of it. It actually make a nice sloper to use for other dress designs. I have some other nice stretch woven materials in my stash, including some solids and a nice Ikat print, that would work very well made up in this pattern.
Also, I have enrolled in and have been watching the Craftsy online class Patternmaking and Design: Creative Darts and Seamlines with Suzy Furrer. In this classes, Suzy takes a basic sloper and shows how to add creative darts and seamlines to make a more interesting garment. I want to try some of the methods to create a more interesting twist beginning with a basic design, and this pattern is the perfect base to begin with.
Apologies for the blurry photos. My in-house photographer/Dear Husband is out of town on a business trip so I had to use the self timer on my camera to take photos today (does that count as a selfie???).
LWD completedSheath dress in white stretch sateenBack view of completed LWD
I’ve been a very busy girl, focused on finishing my degree program and trying to stay afloat with that, but not getting time to sew, much less update my blog about it. So, now that I am done with school, I can dedicate more time on doing what I love. Sewing and making clothing.
Since I have been back at school, I invested in a nice MacBook Air laptop and love it. I hope that this little notebook tool will help me to keep good notes (I do love to always have a cute little notebook and a pencil in my purse for quick notes and ideas. Just one of my “things”, and I learned it a long time ago from my awesome Uncle Bobby.) and photos of my work.
I also have majorly upgraded my sewing space. I bought a large wooden table top and 2 open bookshelves from Ikea, which is perfect for my large cutting mat and for storage underneath. Getting rid of the futon in my sewing room made the perfect space for this great worktop.
So here we go! I have made a few things since I have last posted, and have posted most on Pattern Review and BurdaStyle as I make them, but have not taken the time to really write about them and the total experience of making them from fabric, styles, inspiration to the cutting, sewing and completing a project. I will try to backtrack on my sewing projects, at least the most notable ones, to journal my work and try to learn from it, as well as share.