This journey began with a bright eyed beauty, curious to know more about what I might be able to create for her and what the process of creating a custom dress looked like. Laura contacted me, looking for a custom dress to wear to her sister’s wedding event. She wanted a dress with a 1930’s feel, one that had fabric interest with unique design details.
She had seen a dress in a movie that she loved and wanted to get a similar look. She sent me photos of screen shots from the movie, plus some inspiration shared on Pinterest
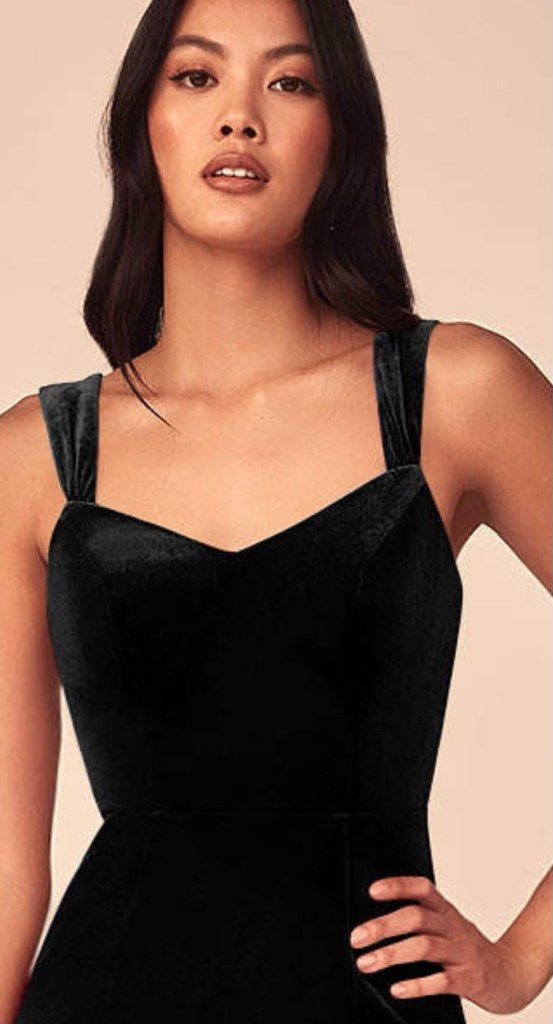
She loved the rich tones of the fabric combination, and the soft ruffled neckline of this dressShe also loves the straps of this dress
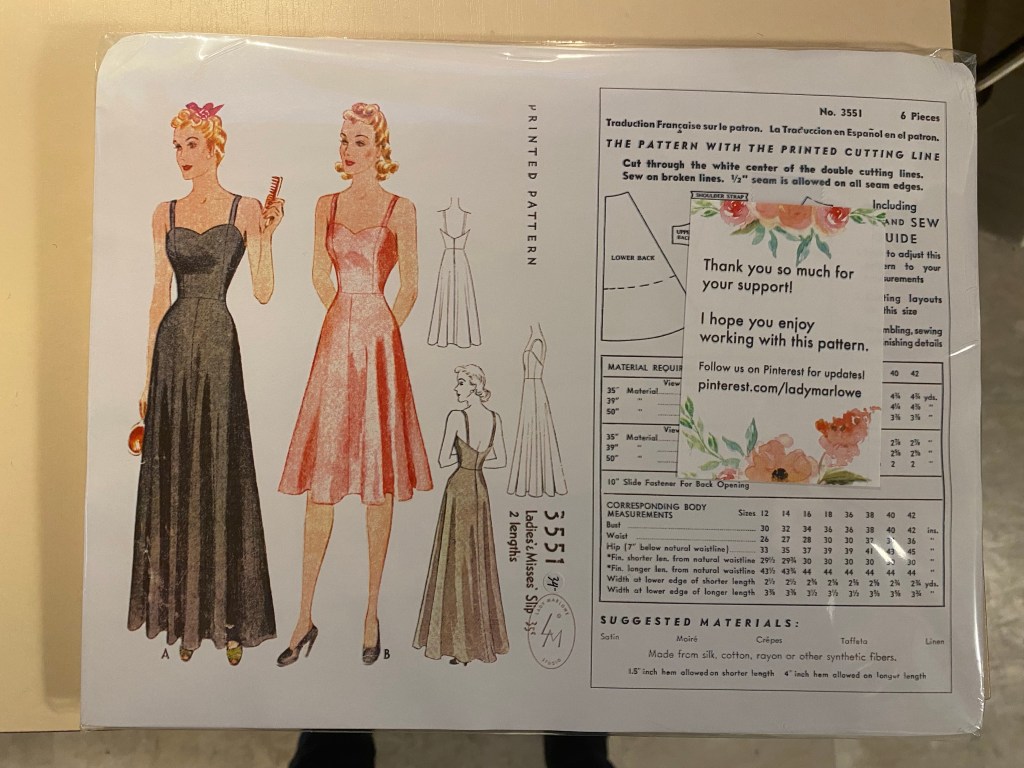
I got to work and found a pattern that was designed in the 1930’s and had the basic shape of the dress style she liked including the sweetheart neckline, the low back and the long, softly shaped skirt
I found this pattern and ordered it from Etsy
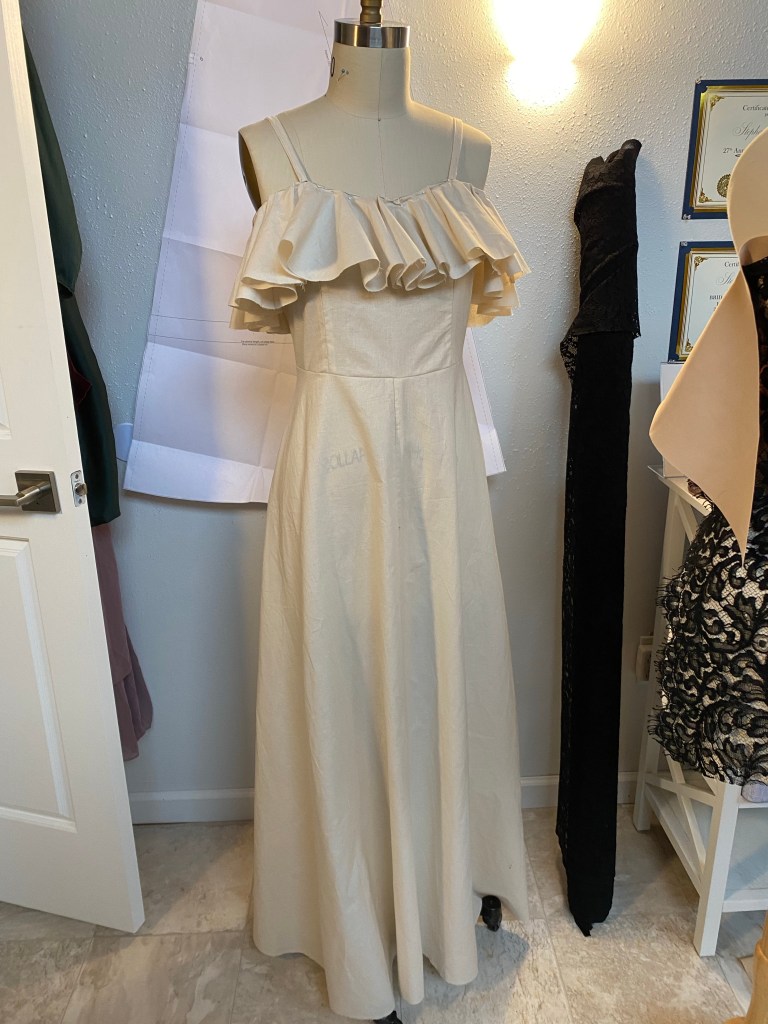
We hit the fabric store shortly after I received the pattern, and I also made a mock up of the dress for her to try on
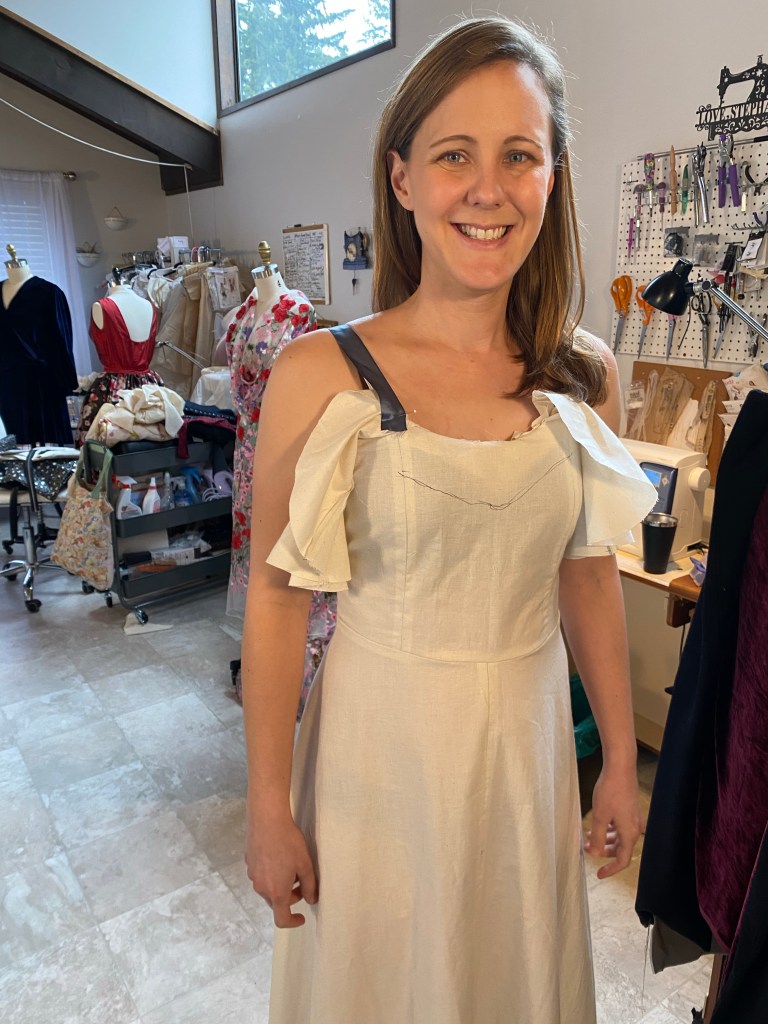
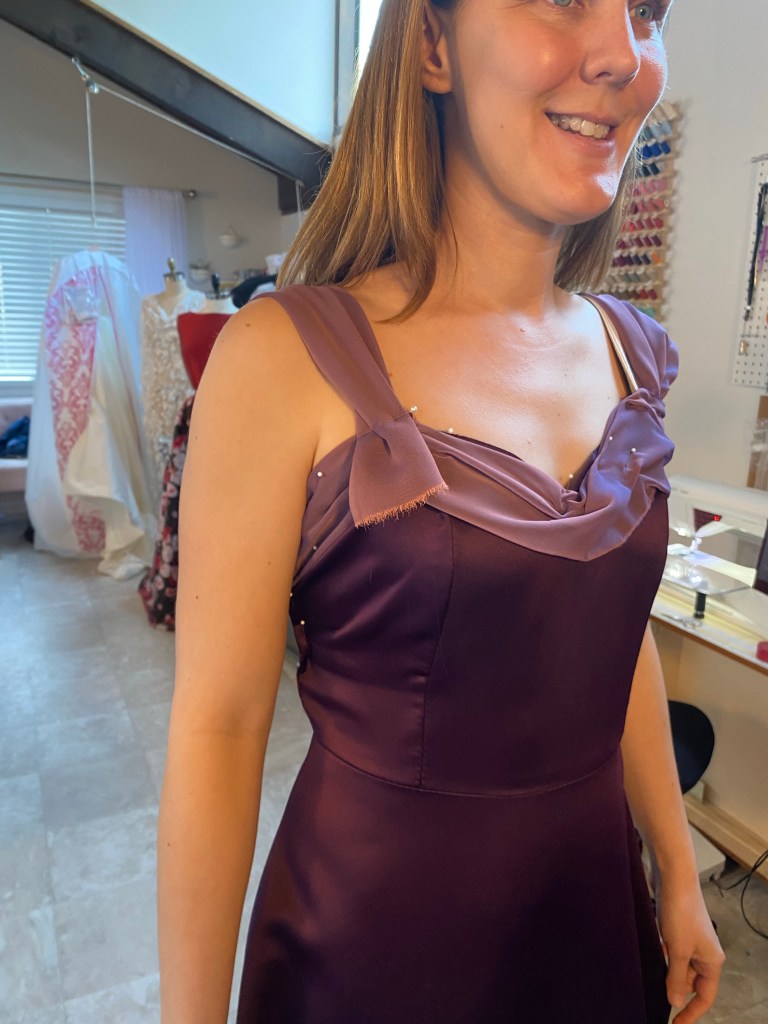
It was my first time making a ruffle like this at the neckline of a dress. Although we like it, we decided it was a bit too much for her.The fit of the dress was great, but here we are playing with different strap placement and neckline shape
Back to the drawing board!
As the construction of the dress progressed, I kept Laura posted with details of what I was doing and got her input on any options she had.
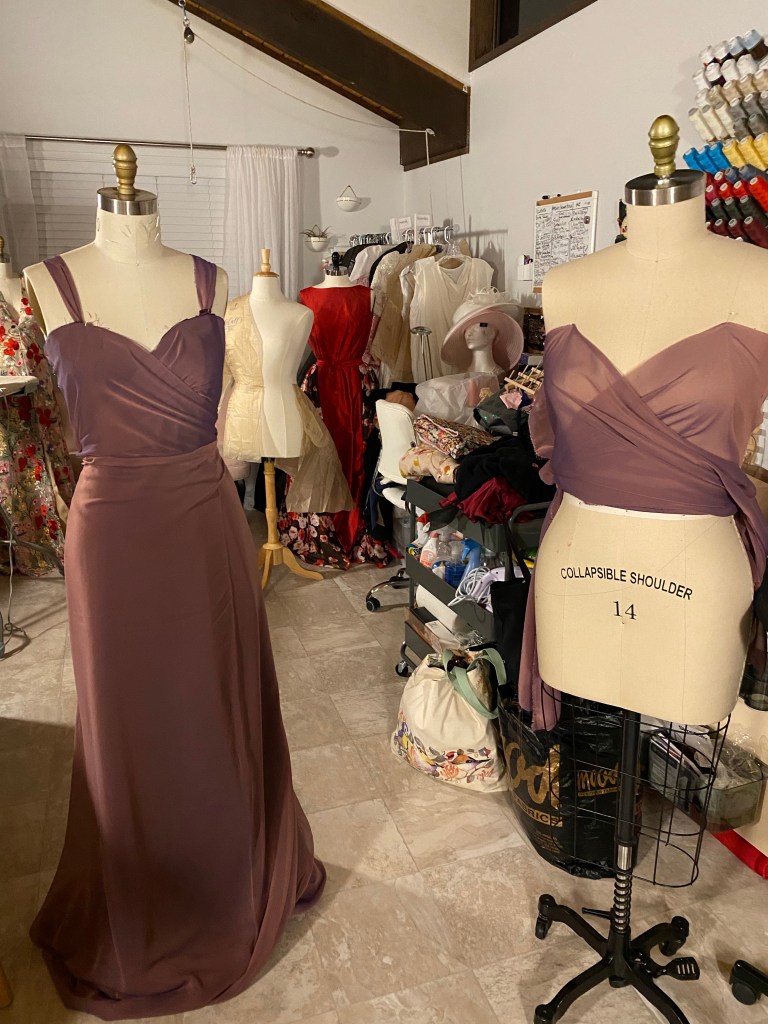
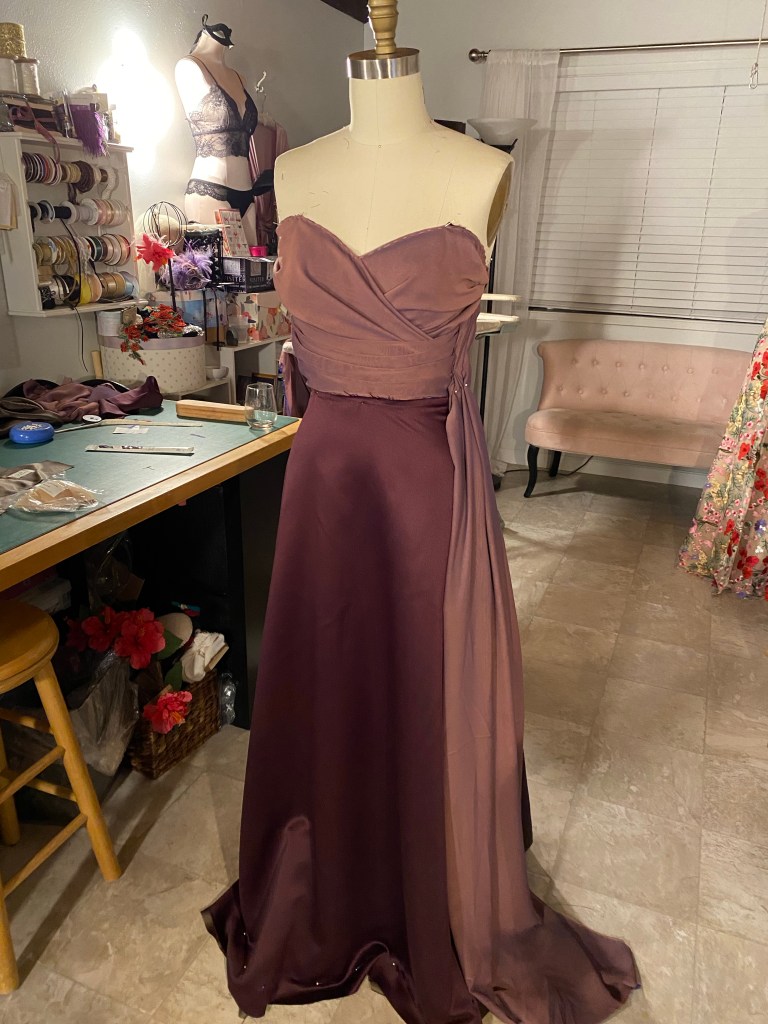
She loves the combination of the drapey lavender chiffon with the deep plus satin. I also thought the colors were beautiful together, just the placement was not as compelling as it could be.
I brought up an idea of draping over the entire top of the dress, allowing both fabrics to have their moment. I presented her with this idea of draping and criss crossing the chiffon over the bodice.
She really like that idea, approved it, so I got going on making it happen!
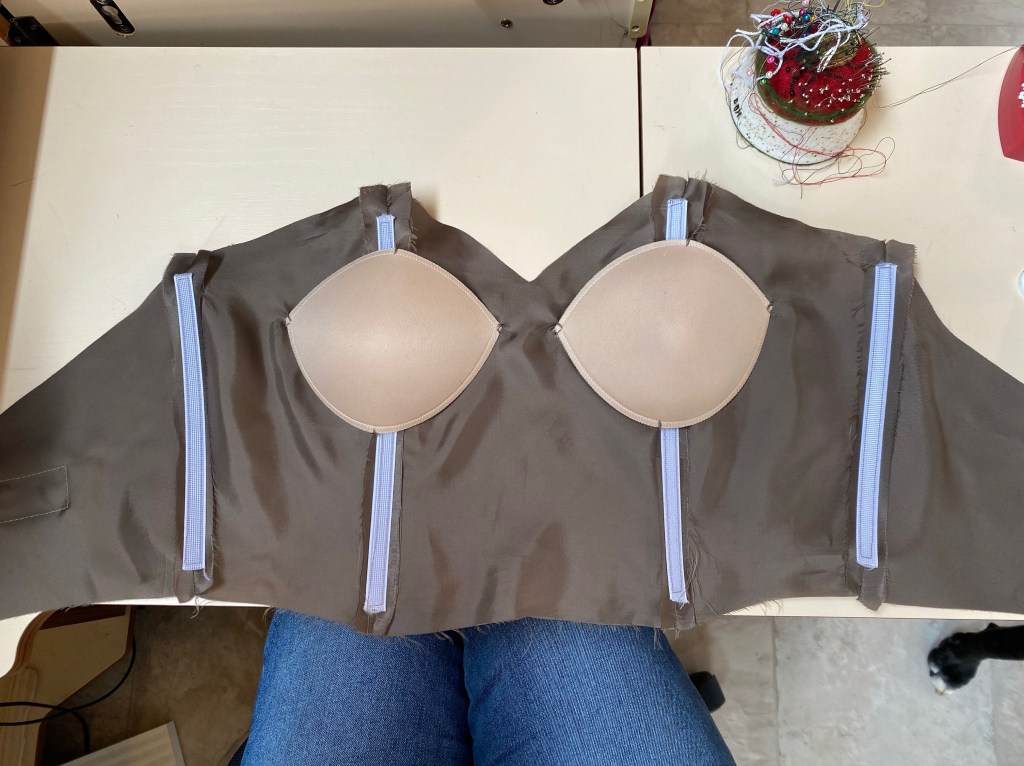
I finished constructing the dress underneath by adding boning and bra cups to the lining of the dress.
The lining turned out beautifully and was a pleasure to look at as she slipped into the dress. That kind of detail makes me happy, and hopefully also the case for the wearer!
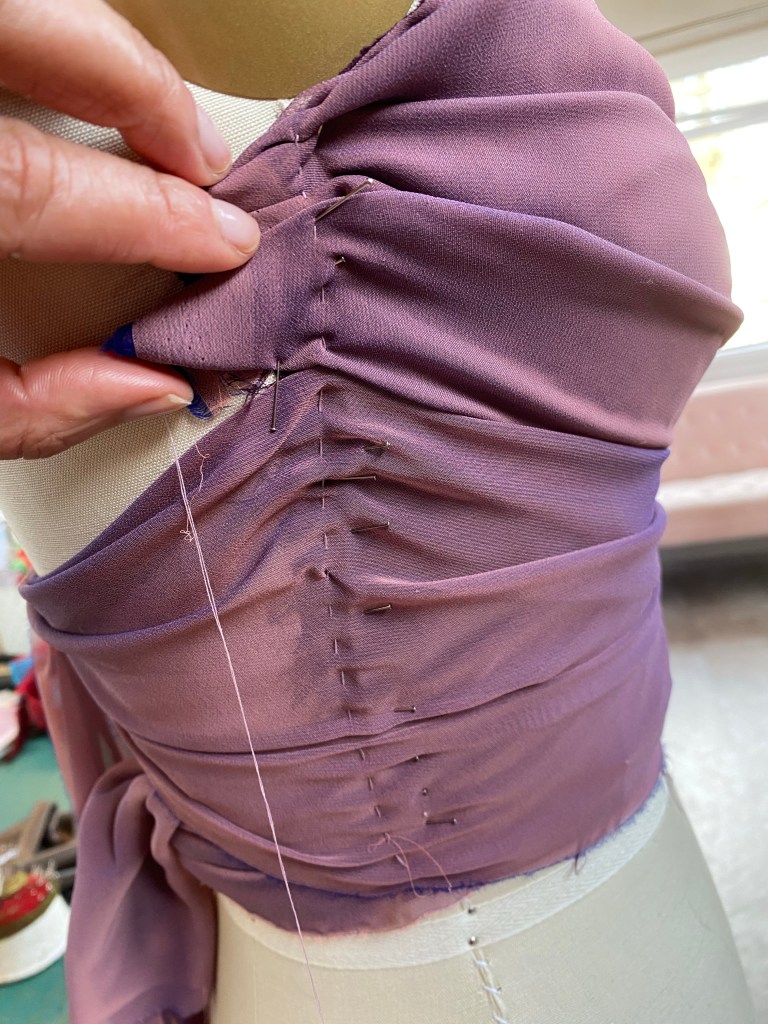
The bodice and skirt lining ready to be installed into the dress!Plenty of pining and hand sewing happening on my trusty dressformThe bodice front, sides, and eventual side drape piece, all pleated and basted, ready to be sewn together, then sewn over the main dress bodice.
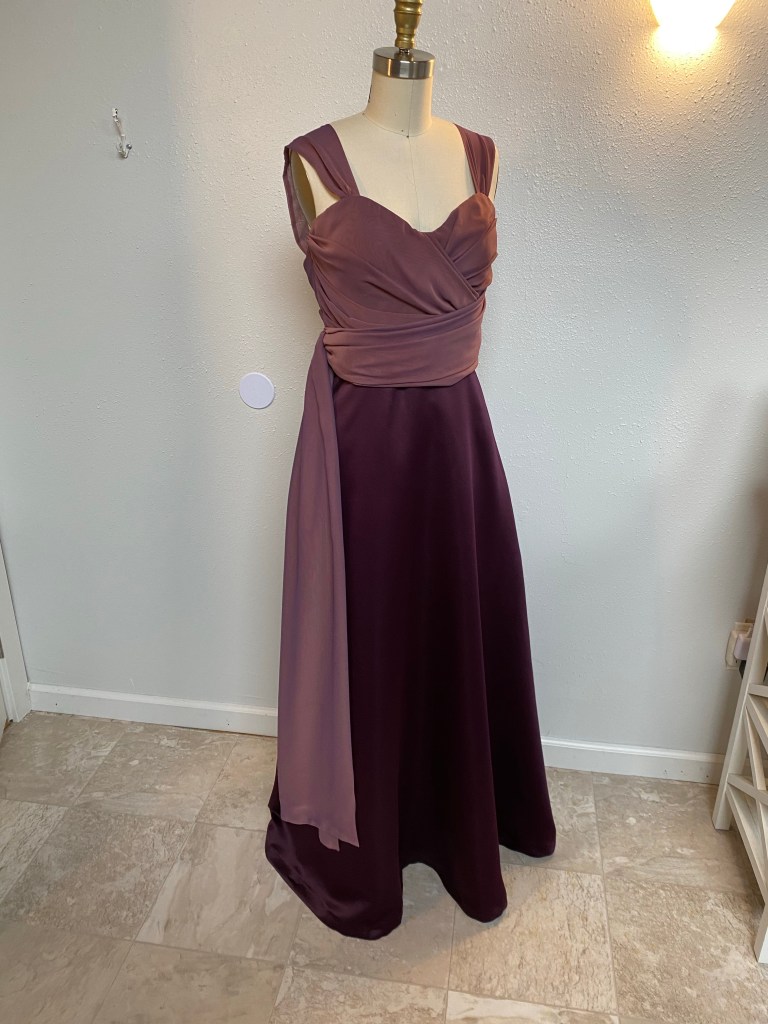
So after quite a bit of trial and error, as this was my first time creating such a dress with the draping detail, I finally finished the gown!
Here are some photos of the versions I sent over to her before finishing up on her final version:
She looks so pretty and elegant, even unfinished!The drape happening in the back would also look so gorgeous! I might need to make this dress again just for fun!
And the finale!
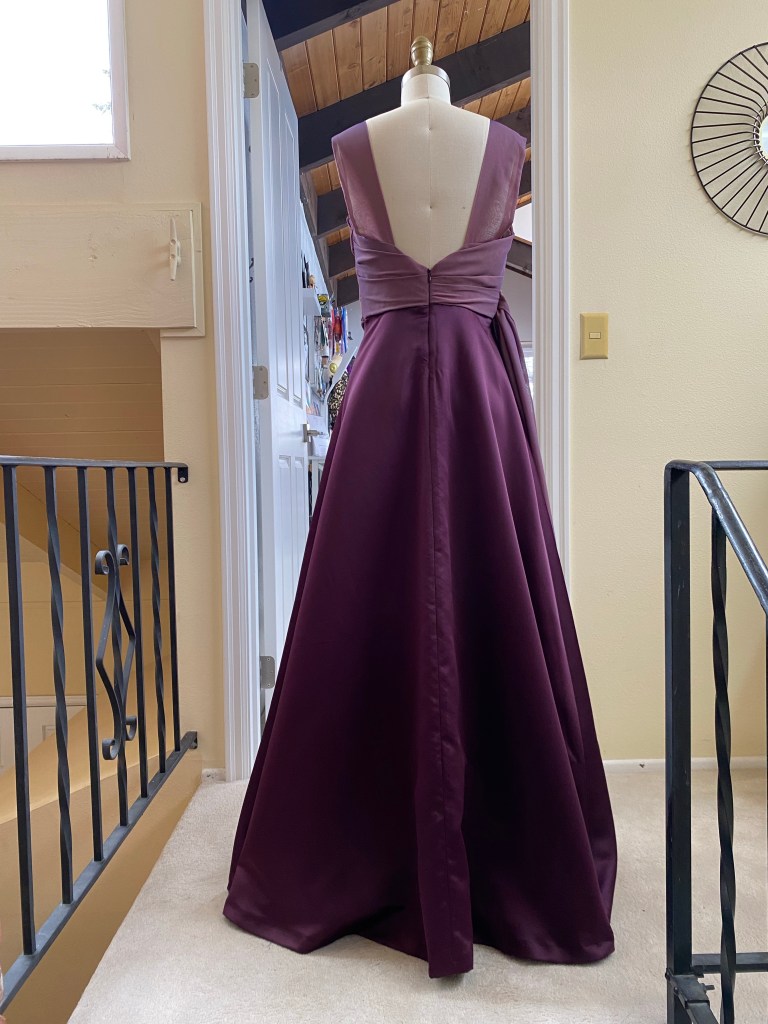
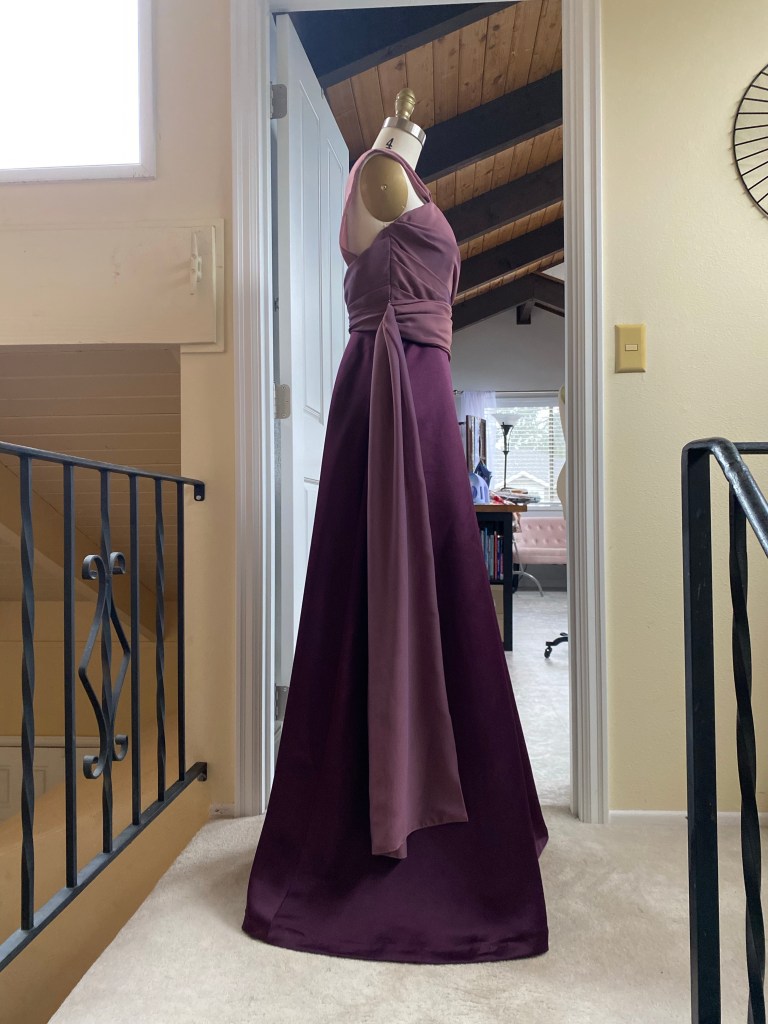
The final gown!
Meanwhile, Portland was hit with a big snowstorm that essentially shut down the city and trapped many people at home. Well, that didn’t stop me! My sweet husband offered to drive me and the finished gown over to Laura’s house and deliver it in person in his SUV that is great in the snow. What a nice guy!
Laura was radiant in her dress as she tried it on in her bedroom! I brought along a small sewing kit and supplies to do any last minute fixes as needed.
Well, it turned out that the dress needed a little more than just a few stitches to make it perfect. So, unfortunately I had to take the dress back home and make some fitting changes to the bodice and straps to make it just right. No problem! OK, one major problem: the dress was meant for her to take along to wear at her sister’s wedding event in California the next day and it wasn’t ready. UGH!!! I was hoping to be able to make the changes that same day and drive the dress back over so she could pack it for her trip. I ran out of time and wasn’t able to make it happen. You have no idea how SO disappointing this was for me, not to mention for her as well. So she left early the next morning for California, all without the dress we worked so hard to make in time for the event. GRR, I was SO upset with myself!
Well, now the dress is complete and altered and ready to go for the next occasion she may have to wear it. All in all, Laura was such a wonderful client to work with and I hope that she’s willing to work with me again on another gorgeous creation, and possibly even teach her some sewing lessons so that she can learn to make her own beautiful and unique clothes!
Lesson learned: time management is KEY to making deadlines and leaving room for error.
The gown turned out so elegant and eye catching! Every angle of the dress has interestWe love the low back! And the drape! So pretty and elegant!
Thank you so much Laura for choosing me to create such a beautiful gown for you! I enjoyed every moment of the process, mishaps and all. Enjoy wearing your dress and may you glow and shine in it as you do so naturally! Love, Stephanie
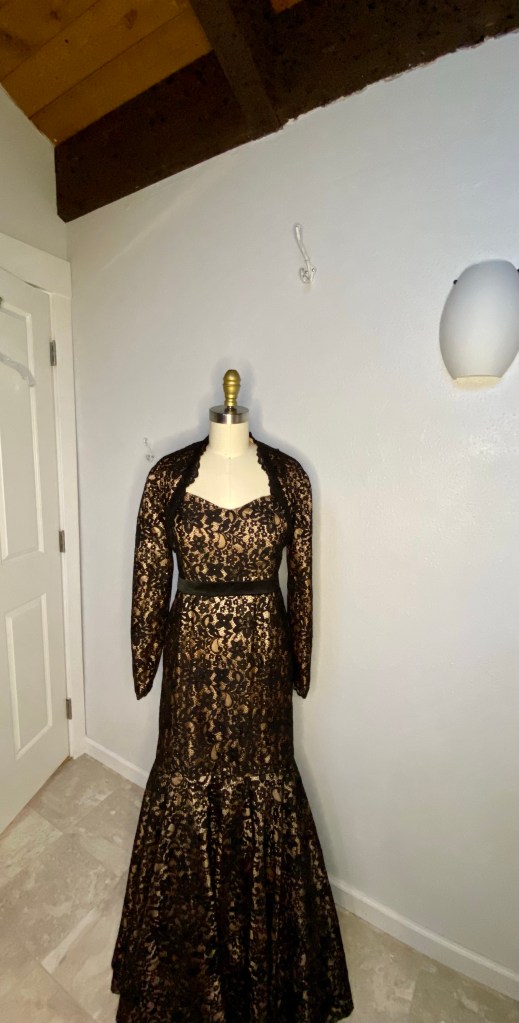
I’ve known Michel for a few years now. She has come to me on several occasions to alter and do minor repairs on her clothing. She loves fashion and is always intrigued with what projects I am working on, especially the custom dressmaking ones. She would say to me that someday, she’d love to have me make something custom for her. Well, that day came along when she was asked by her best friend to be the Maid of Honor in her wedding, and she had the choice of what to wear in the wedding as long as it was formal, elegant and black.
As soon as Michel was asked, she reached out to me to see if I was available to create a gown for her. Of course I was! Michel is such a wonderful person and a repeat client of mine, so I was honored to create something special for her.
We had our first meeting at my house on a warm sunny afternoon, over a light lunch and refreshments, sitting out on my back deck. We talked about what style she likes, what parts of her body she’d like to highlight and what she’d rather not. We talked about color (black), and fabric options, the timing of the wedding, and I showed her some images I put together on Pinterest.
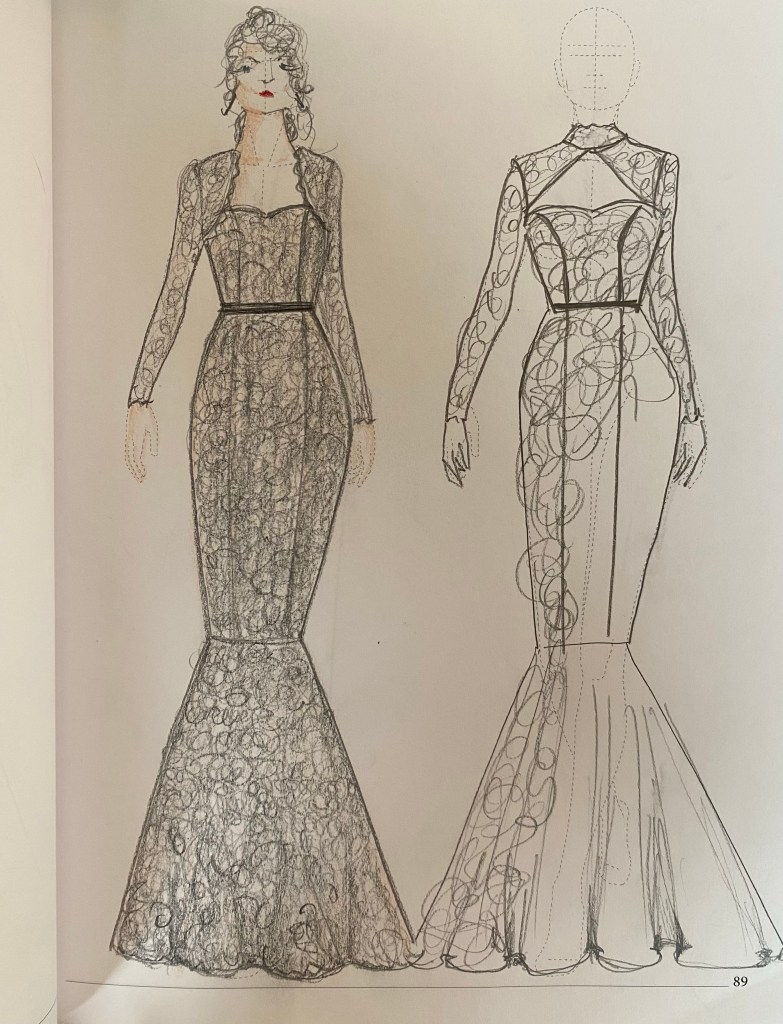
A black lace gown I pinned on Pinterest
She loved the idea of a fit & flare dress, or a mermaid style that is fitted from the bodice to the upper leg, then flares out at below the knee. She wanted to highlight her slim waist and also wanted sleeves as the wedding was scheduled for the end of January, so she might get cold. It was great as we worked together to decide on a suitable style as she had an idea of what she wanted, but also put a lot of trust in me and my experience in the fashion industry, dabbling in image consulting.
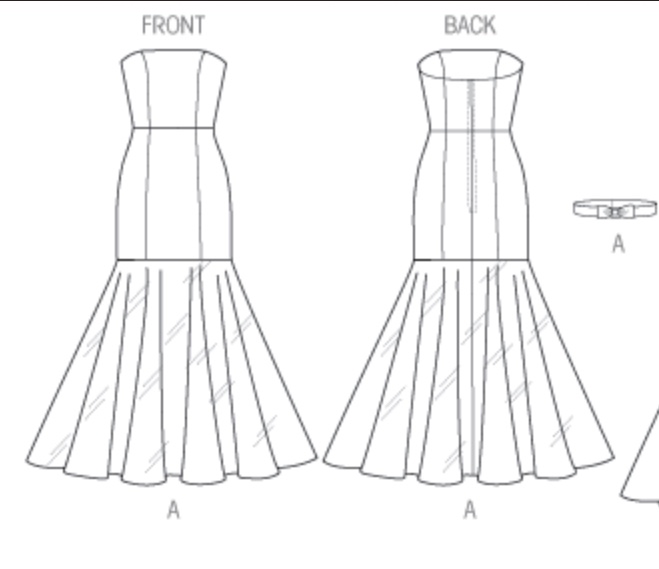
I found a couple of sewing patterns to start with, and eventually decided on this one: McCalls 6838.
McCalls 6838 sewing pattern
The pattern cover is really not all that elegant, but if you look past that and look at the illustrations and line drawings, the pattern becomes much more appealing. To me, at least!
Line drawings of McCalls 6838 sewing pattern
In my sewing experience so far, I like to take an existing pattern that is already graded and figured out, and make it extra by adding design details, using nice quality fabrics, linings, embellishments, and leveled-up sewing and dressmaking techniques to really make the design special and valuable.
As a side note, I have been working solely for myself since June of 2022, running my design, dressmaking and bridal alterations business Love, Stephanie. Since then, I have leveled up my sewing and strive to create high quality garments with special details including fit, better fabrics, quality construction and special personal touches. Doing so, I have also revised my price list and raised my prices, no longer giving friends and family discounts or doing free-bee trades just because I feel like I am charging too much or still in training. Now, I charge accordingly for my work, my experience, my dedication to my clients, and my attention to detail. Saying that, this gown took a lot of time and effort to create, and I priced it at $1,400 not including fabric. Just in case you were wondering!
Back to the dress!
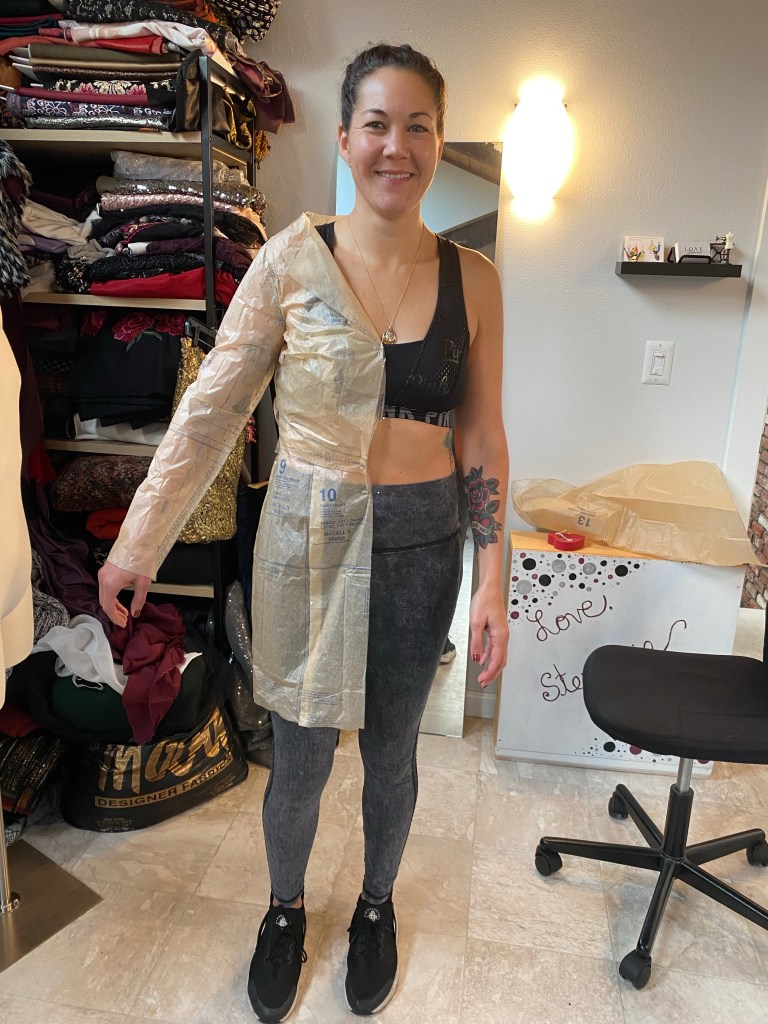
We had our first fitting using the pattern tissue paper to just get an idea of fit for the main parts of the pattern. Michel has a great figure, virtually zero body fat, so the pattern essentially fit right out of the envelope with very little adjustments needed. Must be nice, huh!
Tissue fitting!
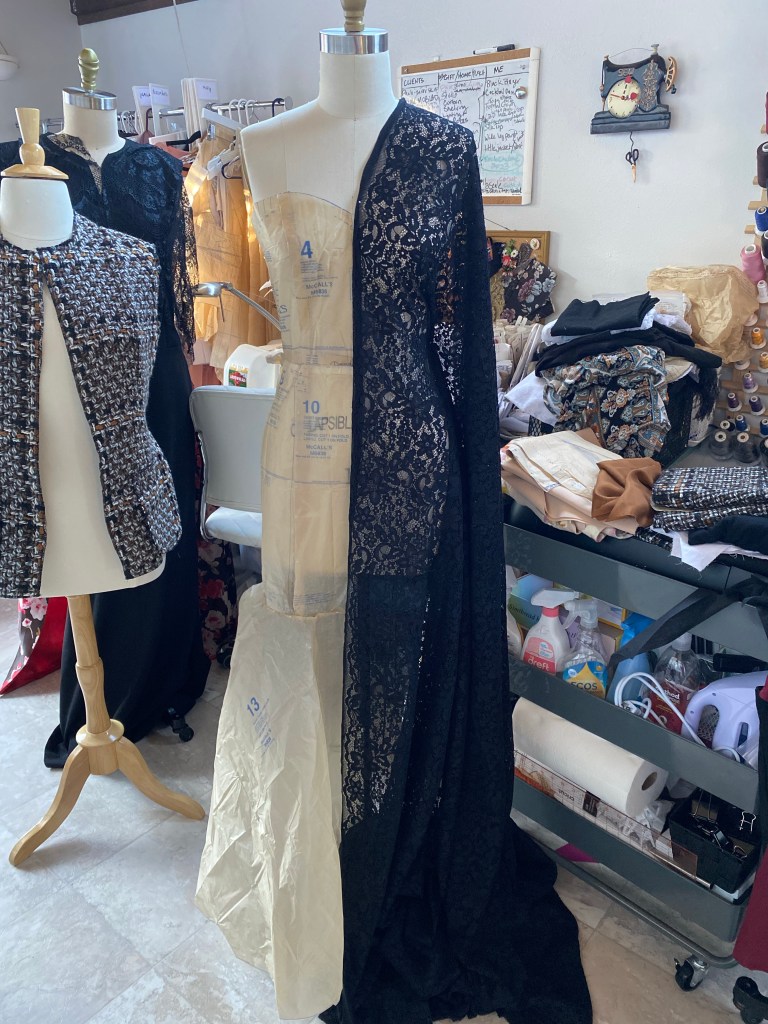
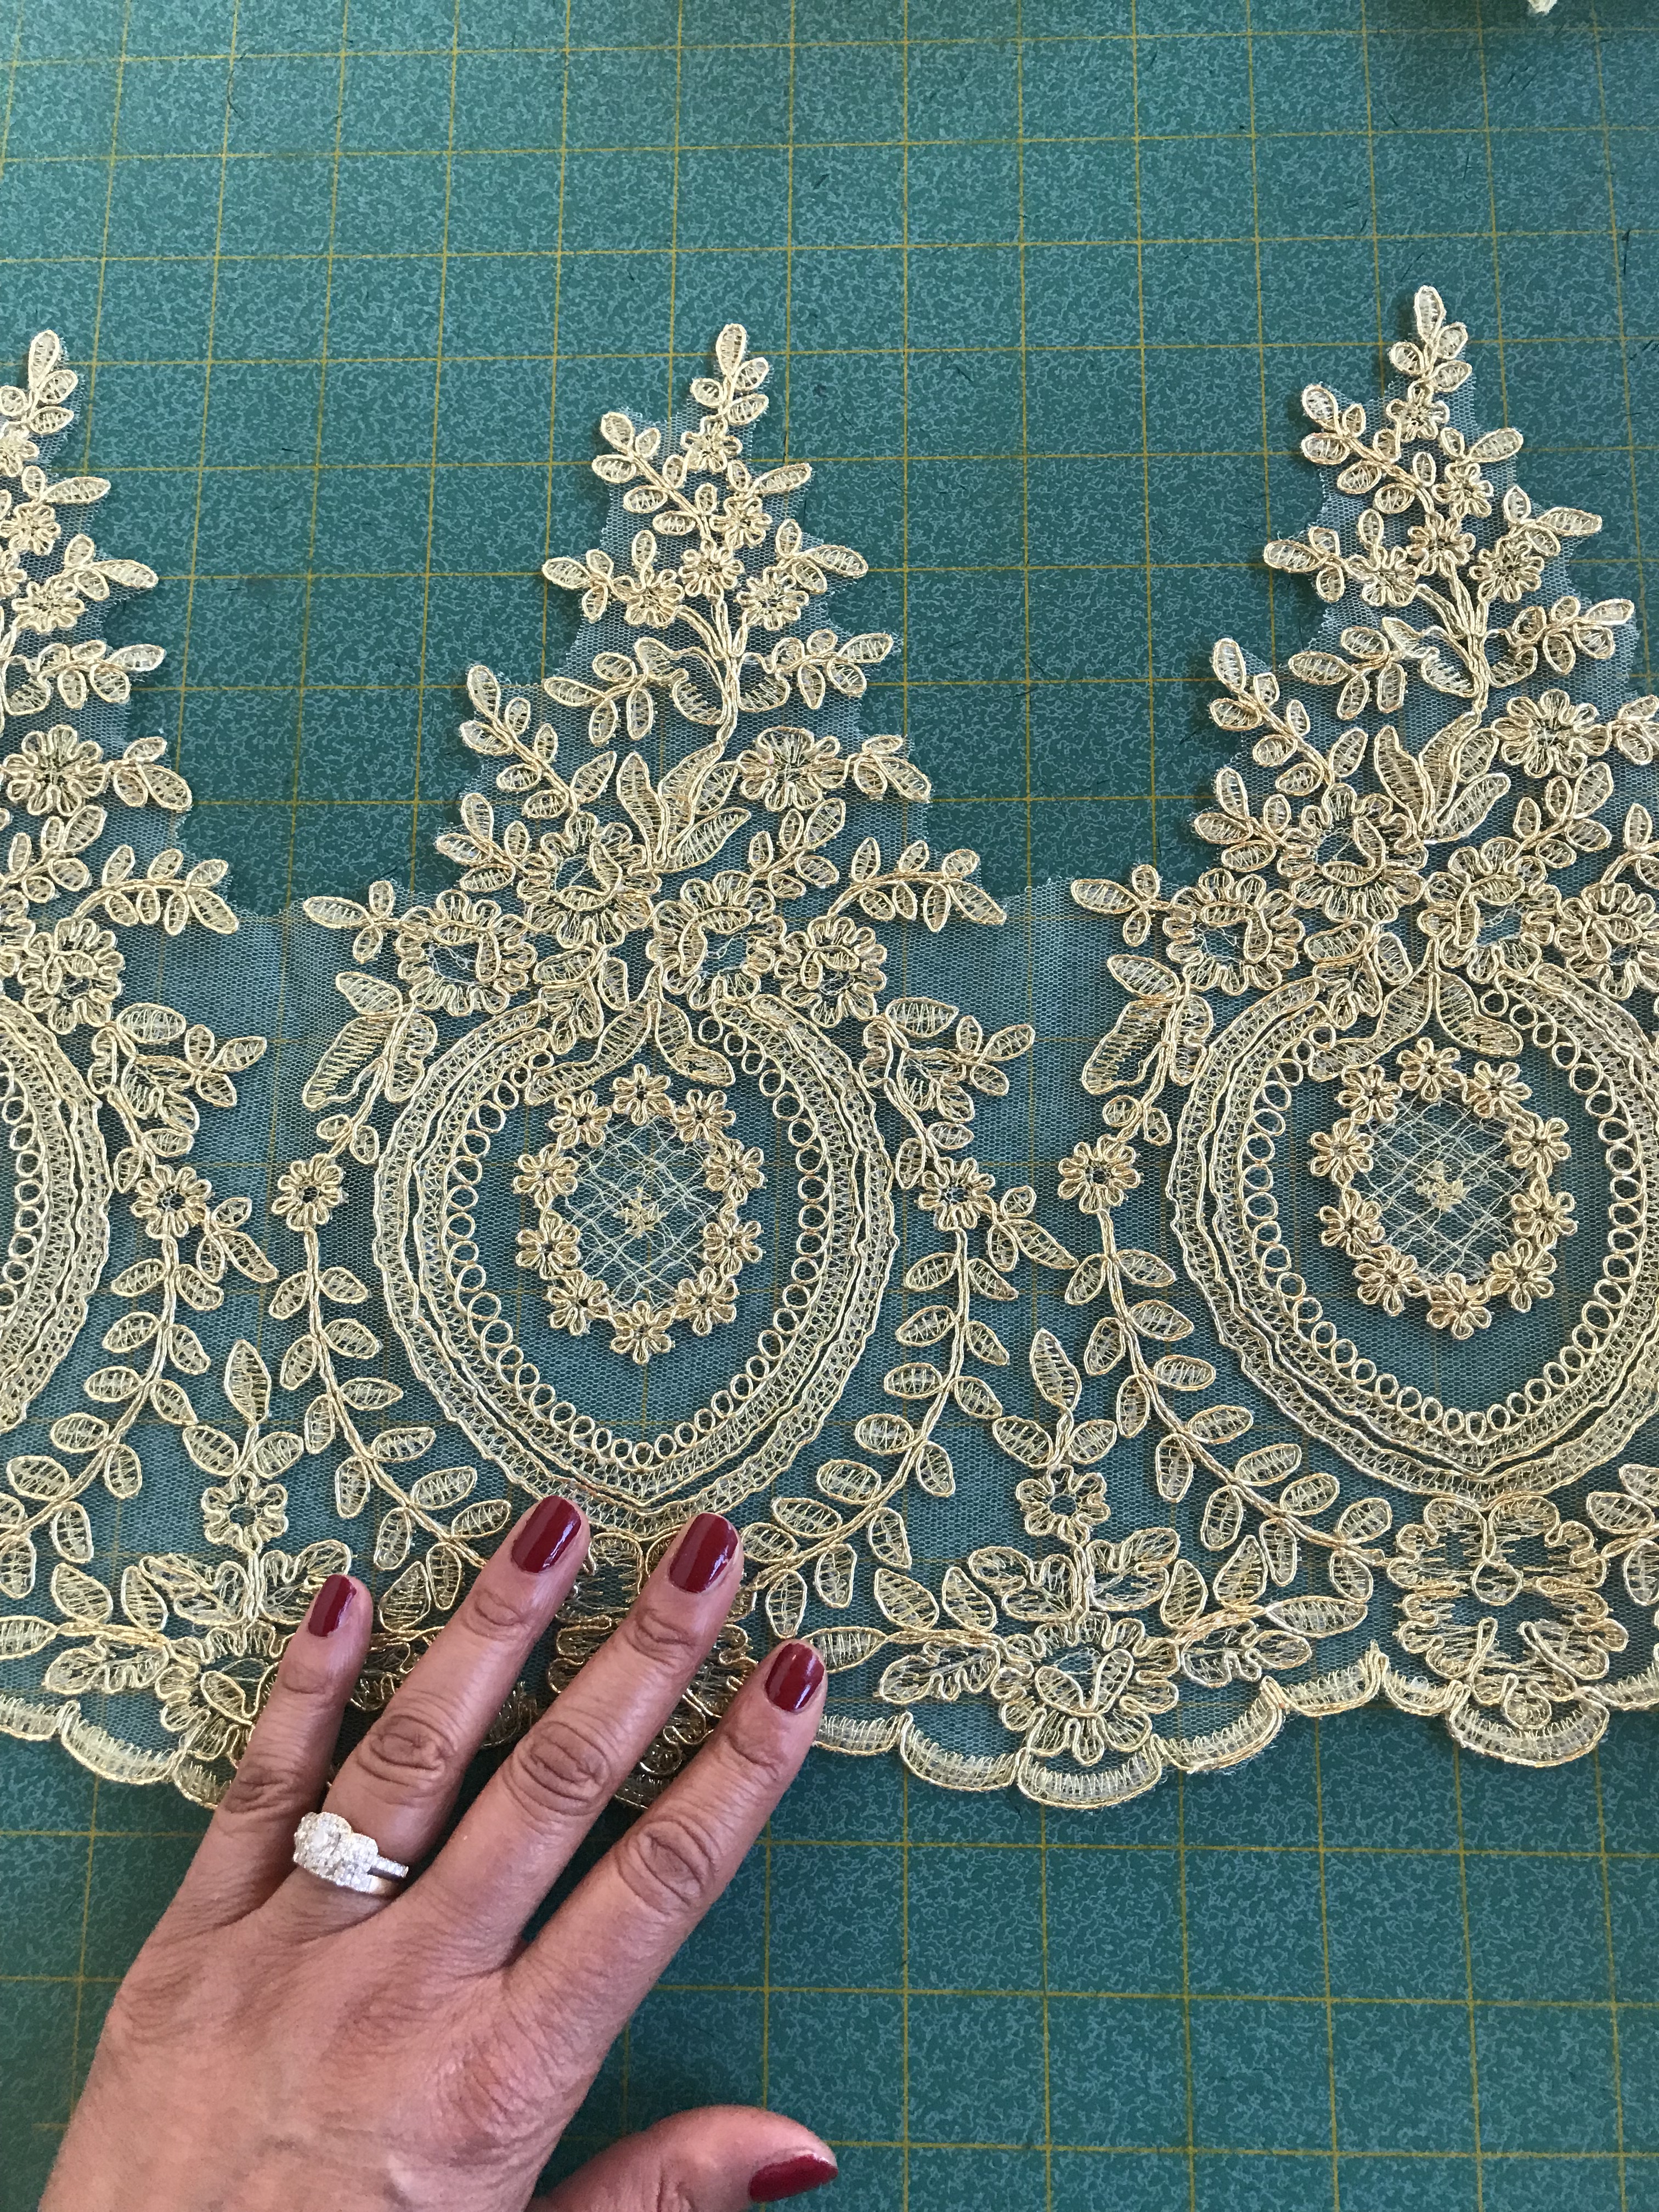
From there, we went fabric shopping together and Michel chose and purchased a lovely black lace with a little floral motif all over, and a scalloped edge which I used later for the neck and sleeve edges of the shrug.
The pattern and the lace! Please excuse the cluttered background of my studio!
I then moved on to making a muslin mock-up of the dress to further ensure the fit and style are what she likes before I cut into her fashion fabric. I only had to make a few more fitting tweaks at the muslin stage, taking notes along the way to keep track of what I needed to do as I made progress.
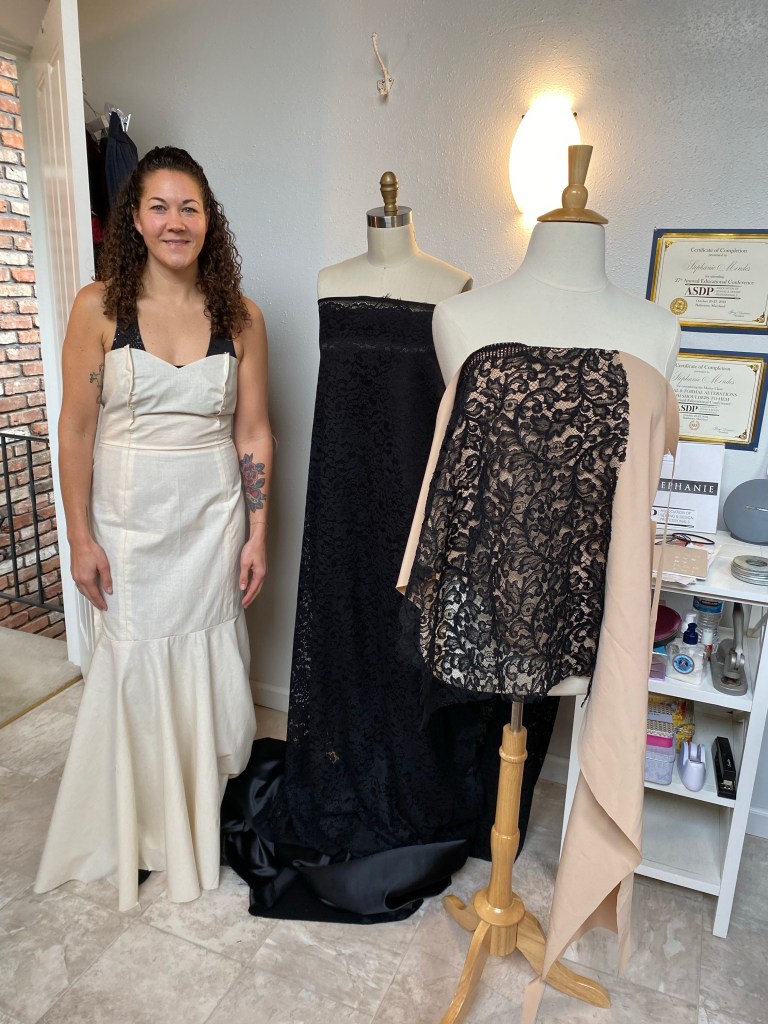
The muslin!In her mock-up, Michel just needs a few tweaks to the fit, and to decide what lining she preferred (nude lining won!)
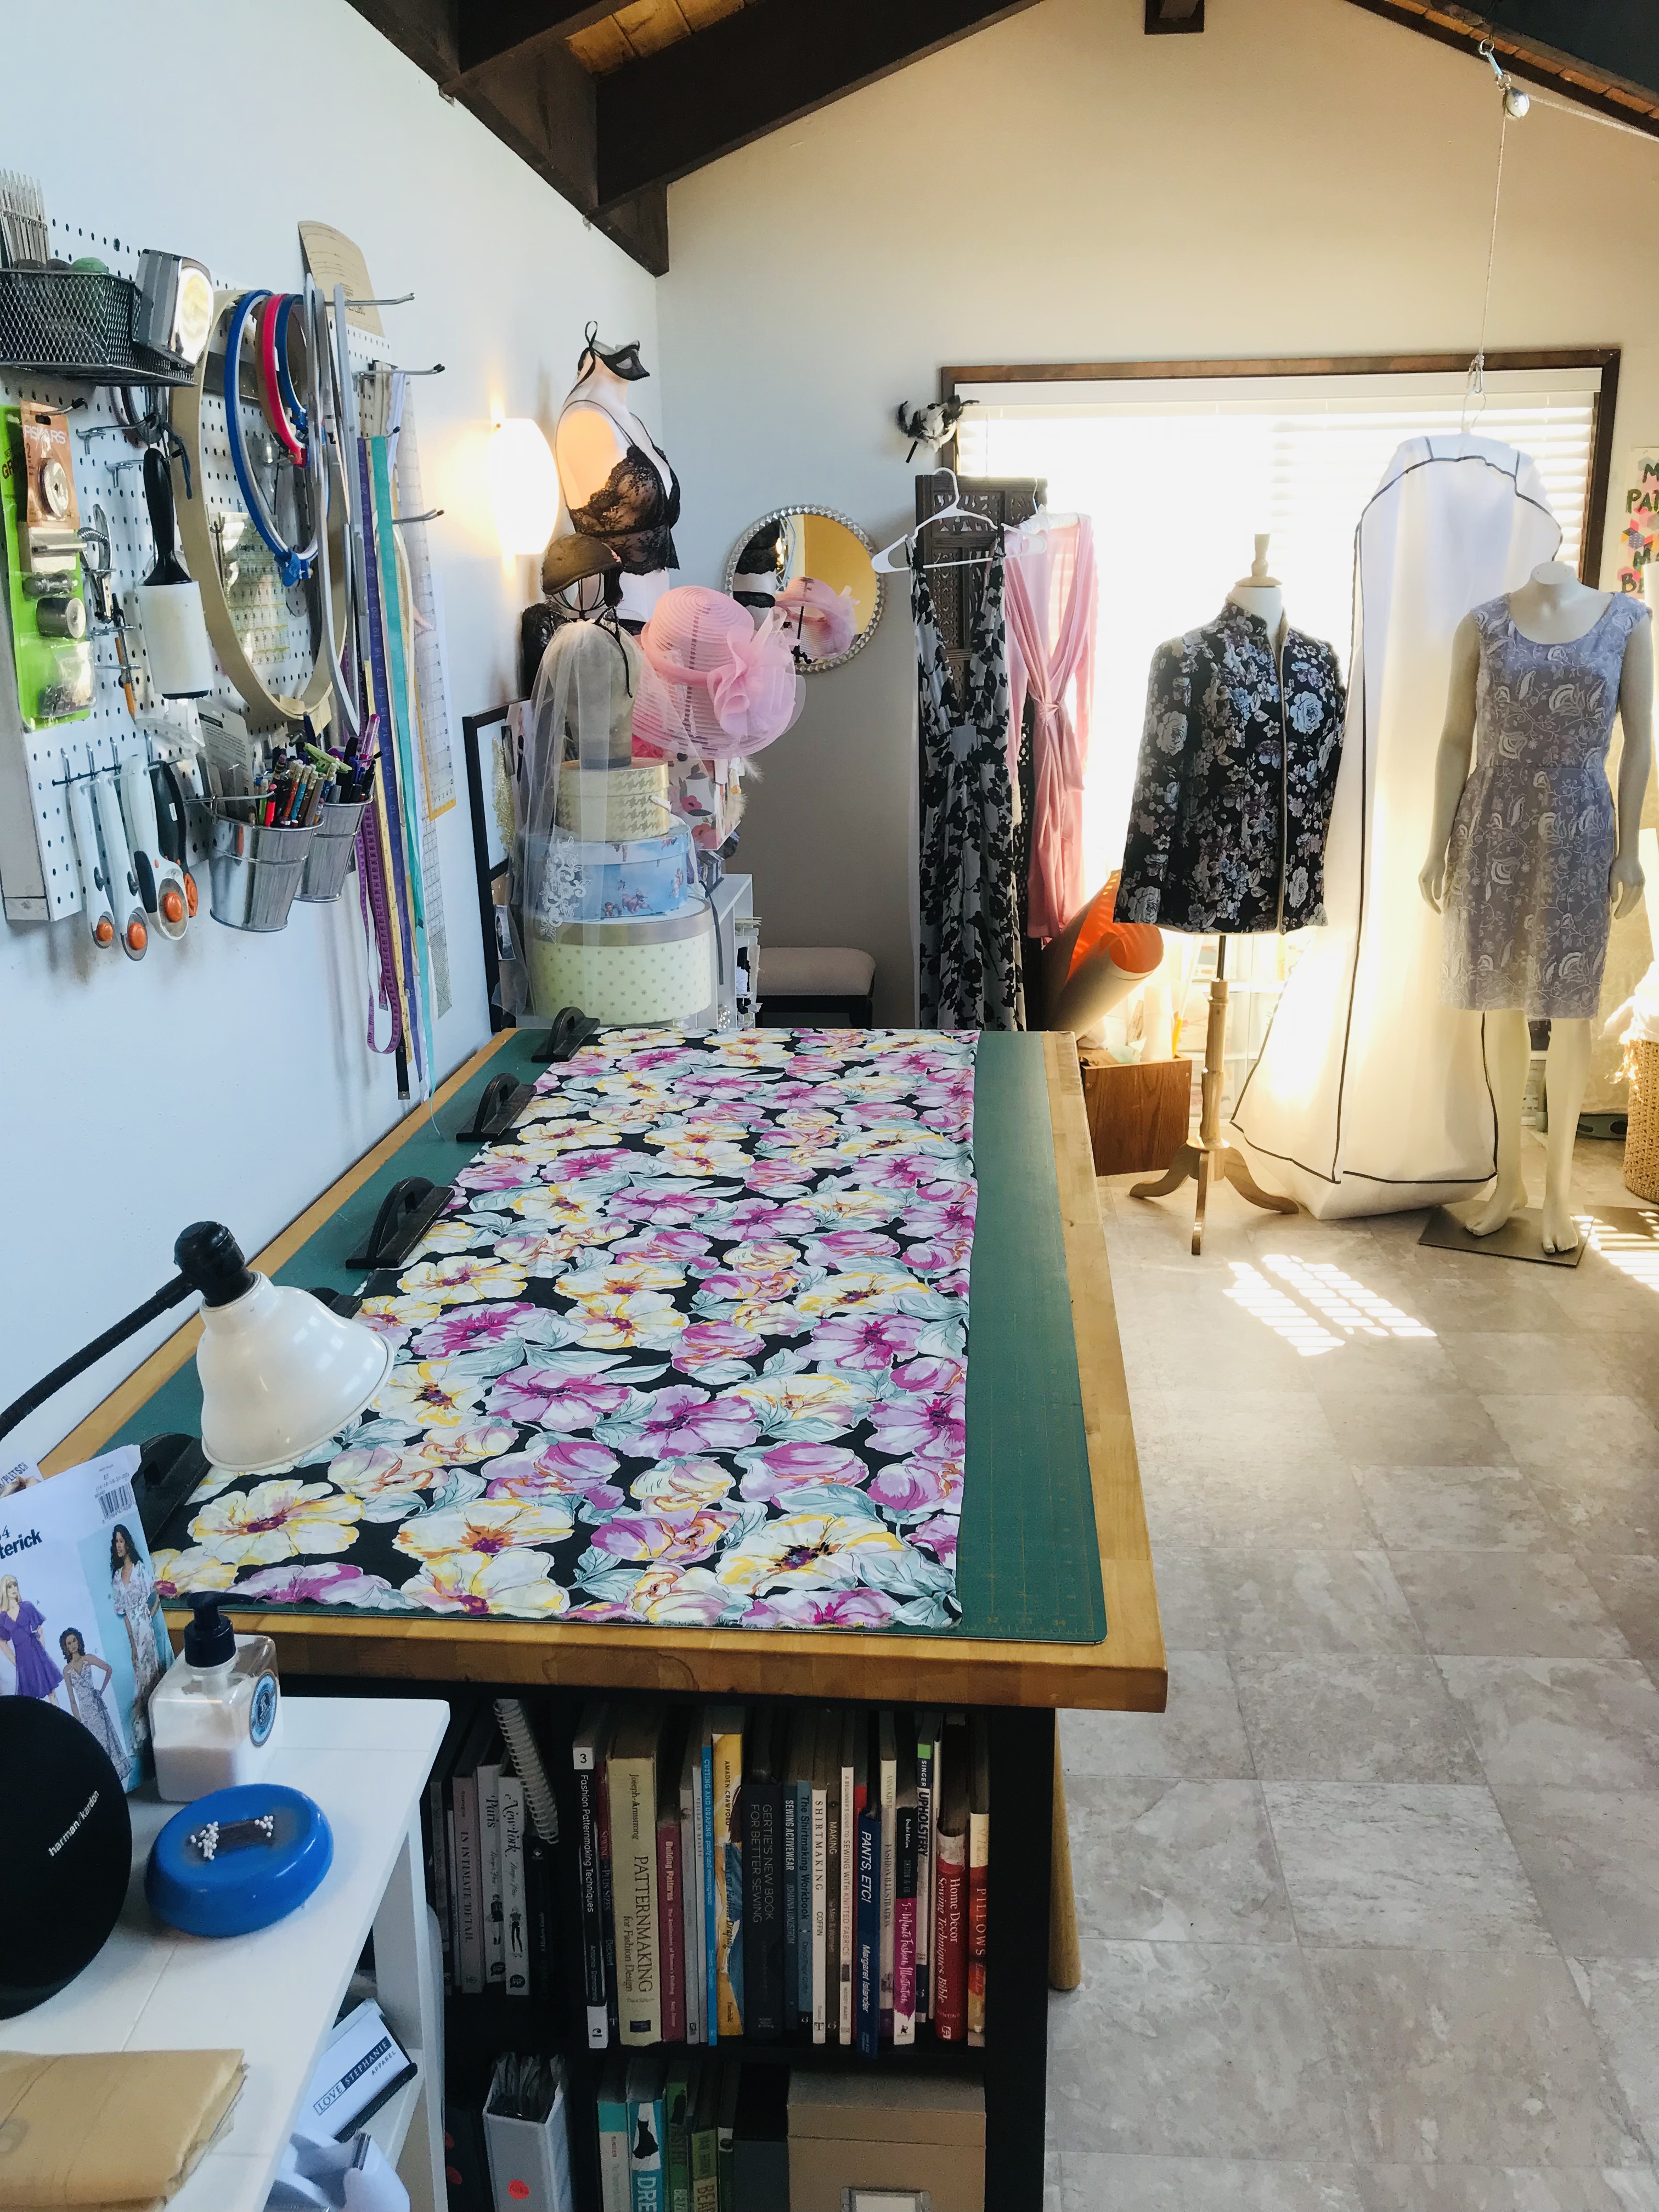
For each of my custom sewing clients, I keep a dossier type folder with my notes, sketches, pattern pieces, inspiration images, fabric swatches, receipts, and have this handy as I’m working on the project to keep it all together and organized. I keep and store each client’s dossier after the project is complete for my own records as well, and as a reminder as to how far I’ve come along which is nice 🙂
Michel’s dossier cover image, with my sketching & scribbles, stored in a pocket folder, with all my notes kept together
With the muslin fitting stage completed, it was now time to start cutting into the fabric and constructing the dress.
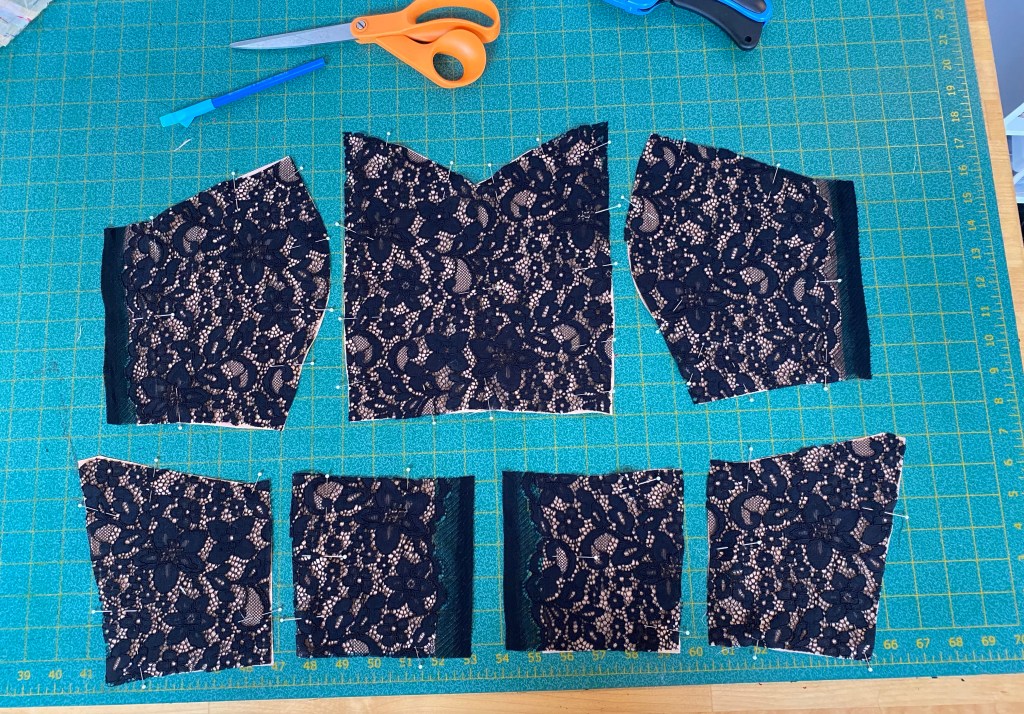
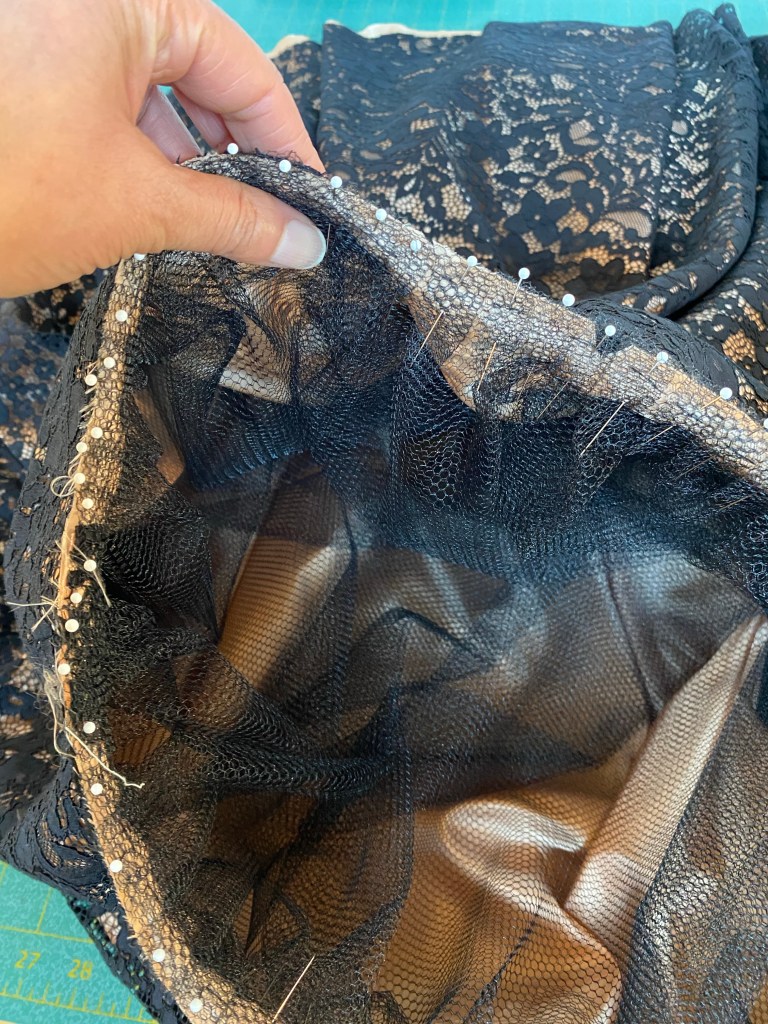
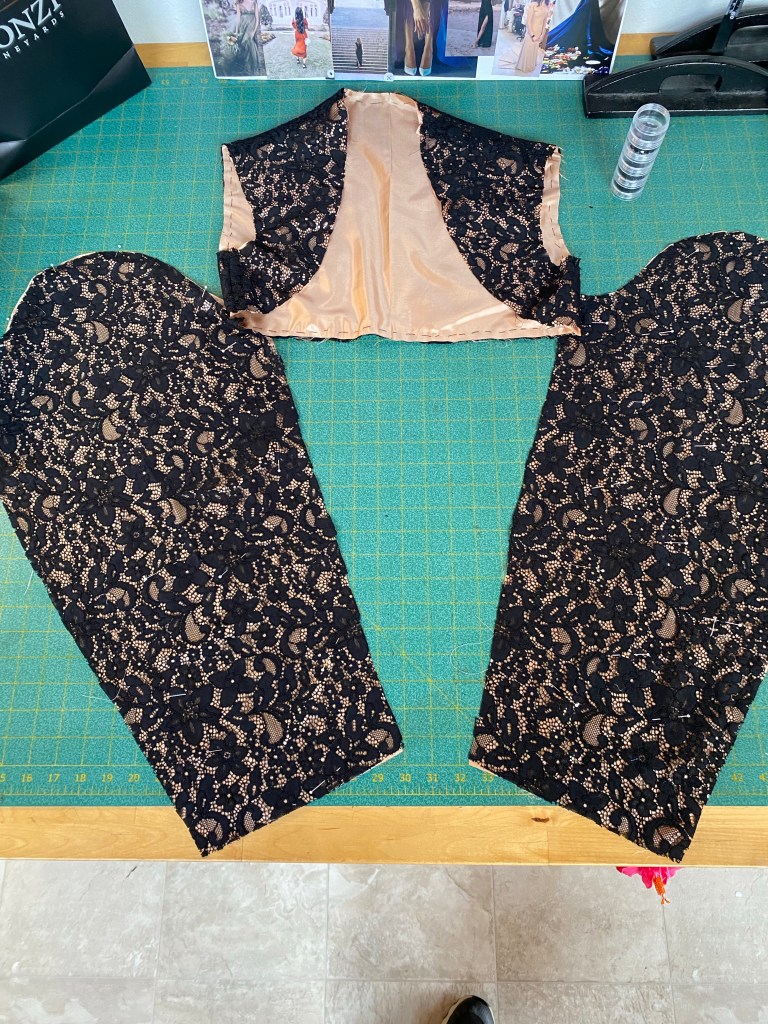
I cut out all of the lace pieces of the dress, including the bodice, the skirt, and the lower skirt flounce. I also cut the exact same pattern pieces out of a light weight lining material in a flesh tone to underline the lace and give it structure and opacity. Here I have my pattern pieces all cut out, stacked and pinned with the lace and underlining, ready to be hand basted together and later treated as one layer to be sewn together.
The bodice pieces cut out in lace with underlining pinned and ready to be basted together by handThe upper skirt pieces marked and ready to be basted together by handOne half of the lower skirt portion ready for basting the layers together.
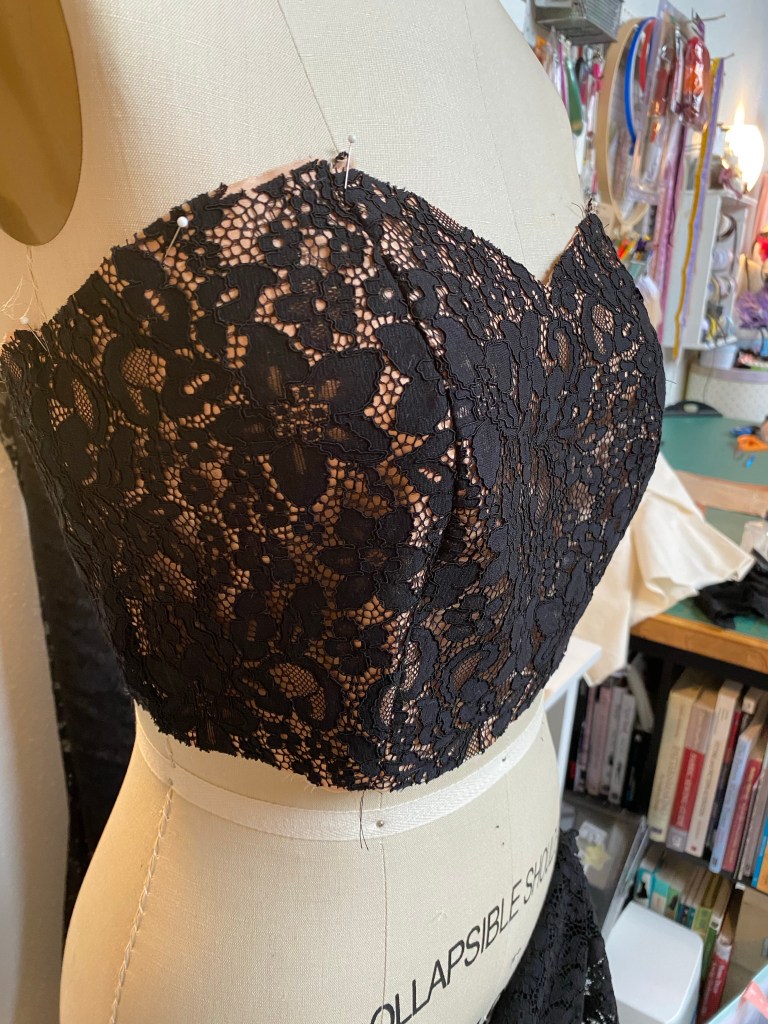
Once the layers were basted together, I could move on to sewing the pattern pieces together and start forming the dress.
The bodice sewn together The bodice and upper skirt sewn together. It looks great just like this!
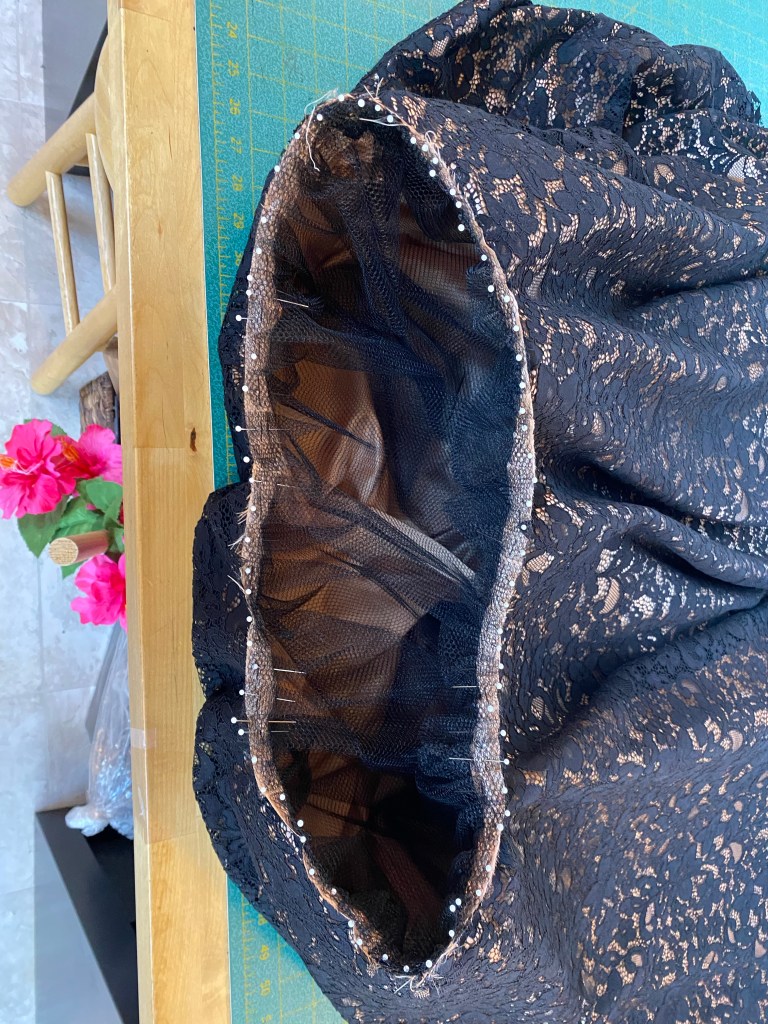
To give the lower circle skirt more body, bounce and twirl appeal, I added a layer of tulle between the lace and the lining, gathering it as I sewed it to the upper seam edge before attaching it to the lower skirt. I thought this was a great idea as I’ve seen this kind of layer in big ball gown type skirts, knew it would be easy to do and create a great effect.
Lots of pins to keep this tulle in check!It looks like a messy nest, so one pin at a time controls the tulle before and during machine stitching
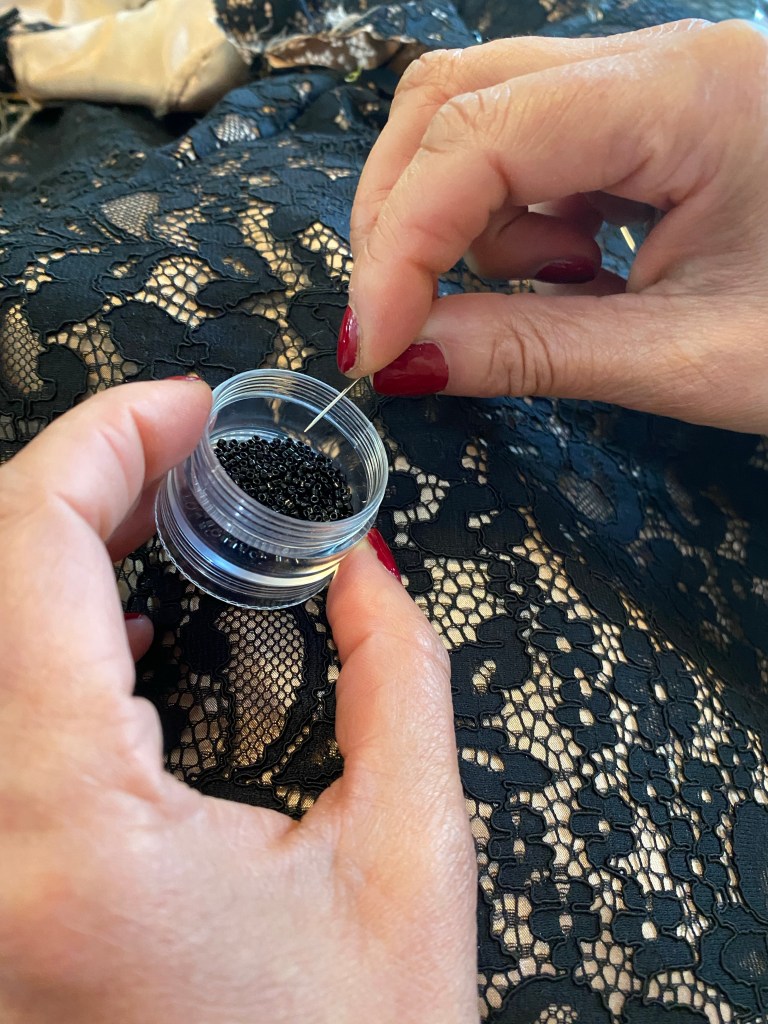
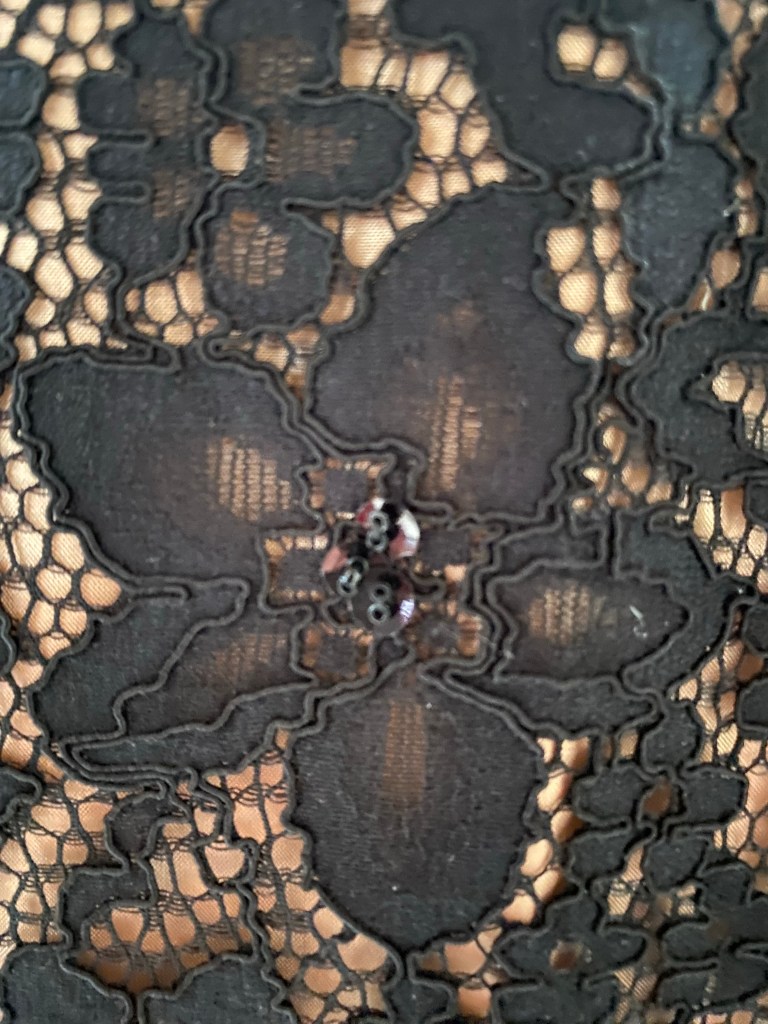
This is the stage where I wanted to start adding the beading. I planned it at this stage of the construction process as I wanted the stitching and threads of the beading to be hidden between the outer layer (the lace and underlining) and the lining. I bought some lovely little black glass seed beads and black sequins and created a little stack of them and sewed 2-3 stacks to the large flower motif in the center. It wasn’t all that noticeable on the dress, especially in a photo, but in person, it gives the dress a tiny little shimmer and adds a slight texture to the lace.
Hand sewing the seed beads and sequins, one by one, to the laceI created tiny little stacks of seed beads and sequins to the center of the large flower motifs all over the dress and flounce
As I sewed the beads and sequins to the dress, I kept track of my time using the timer on my iPhone and jotting it down as I went. Adding it all up, it took me about 9 hours to bead the dress. If I had the time, I would have beaded more of the dress, but this wasn’t feasible with just my two hands and lack of time!
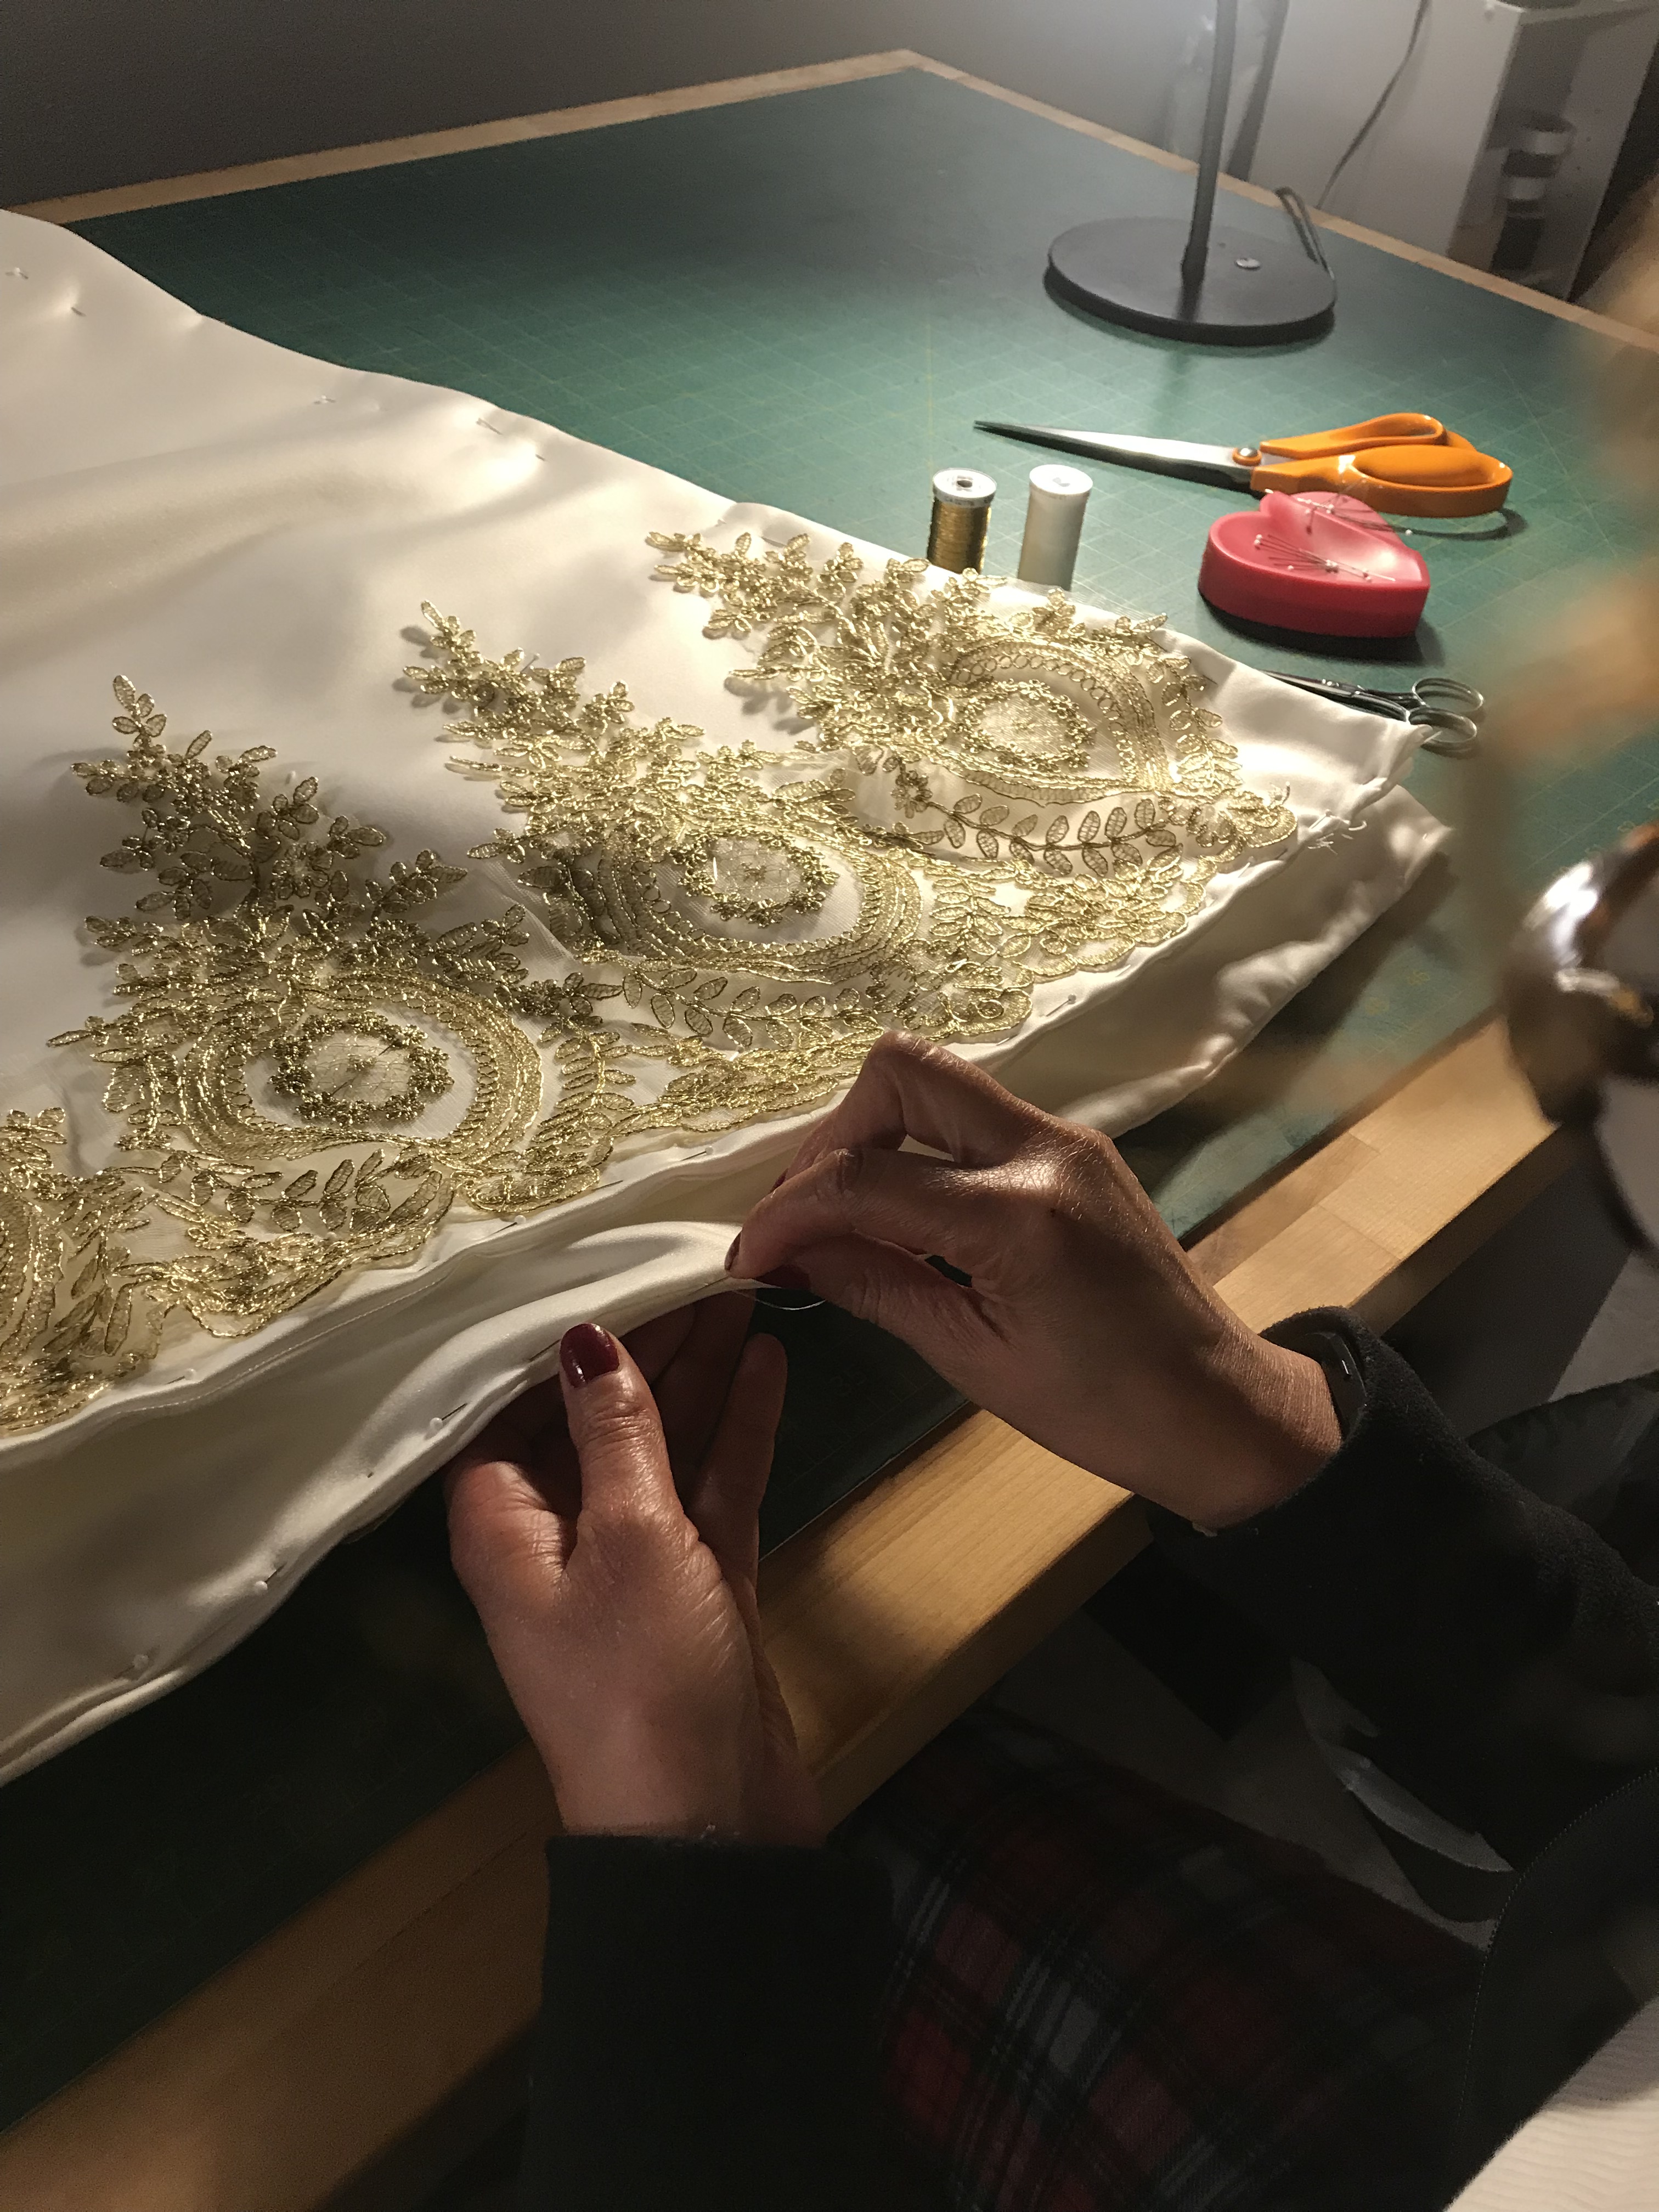
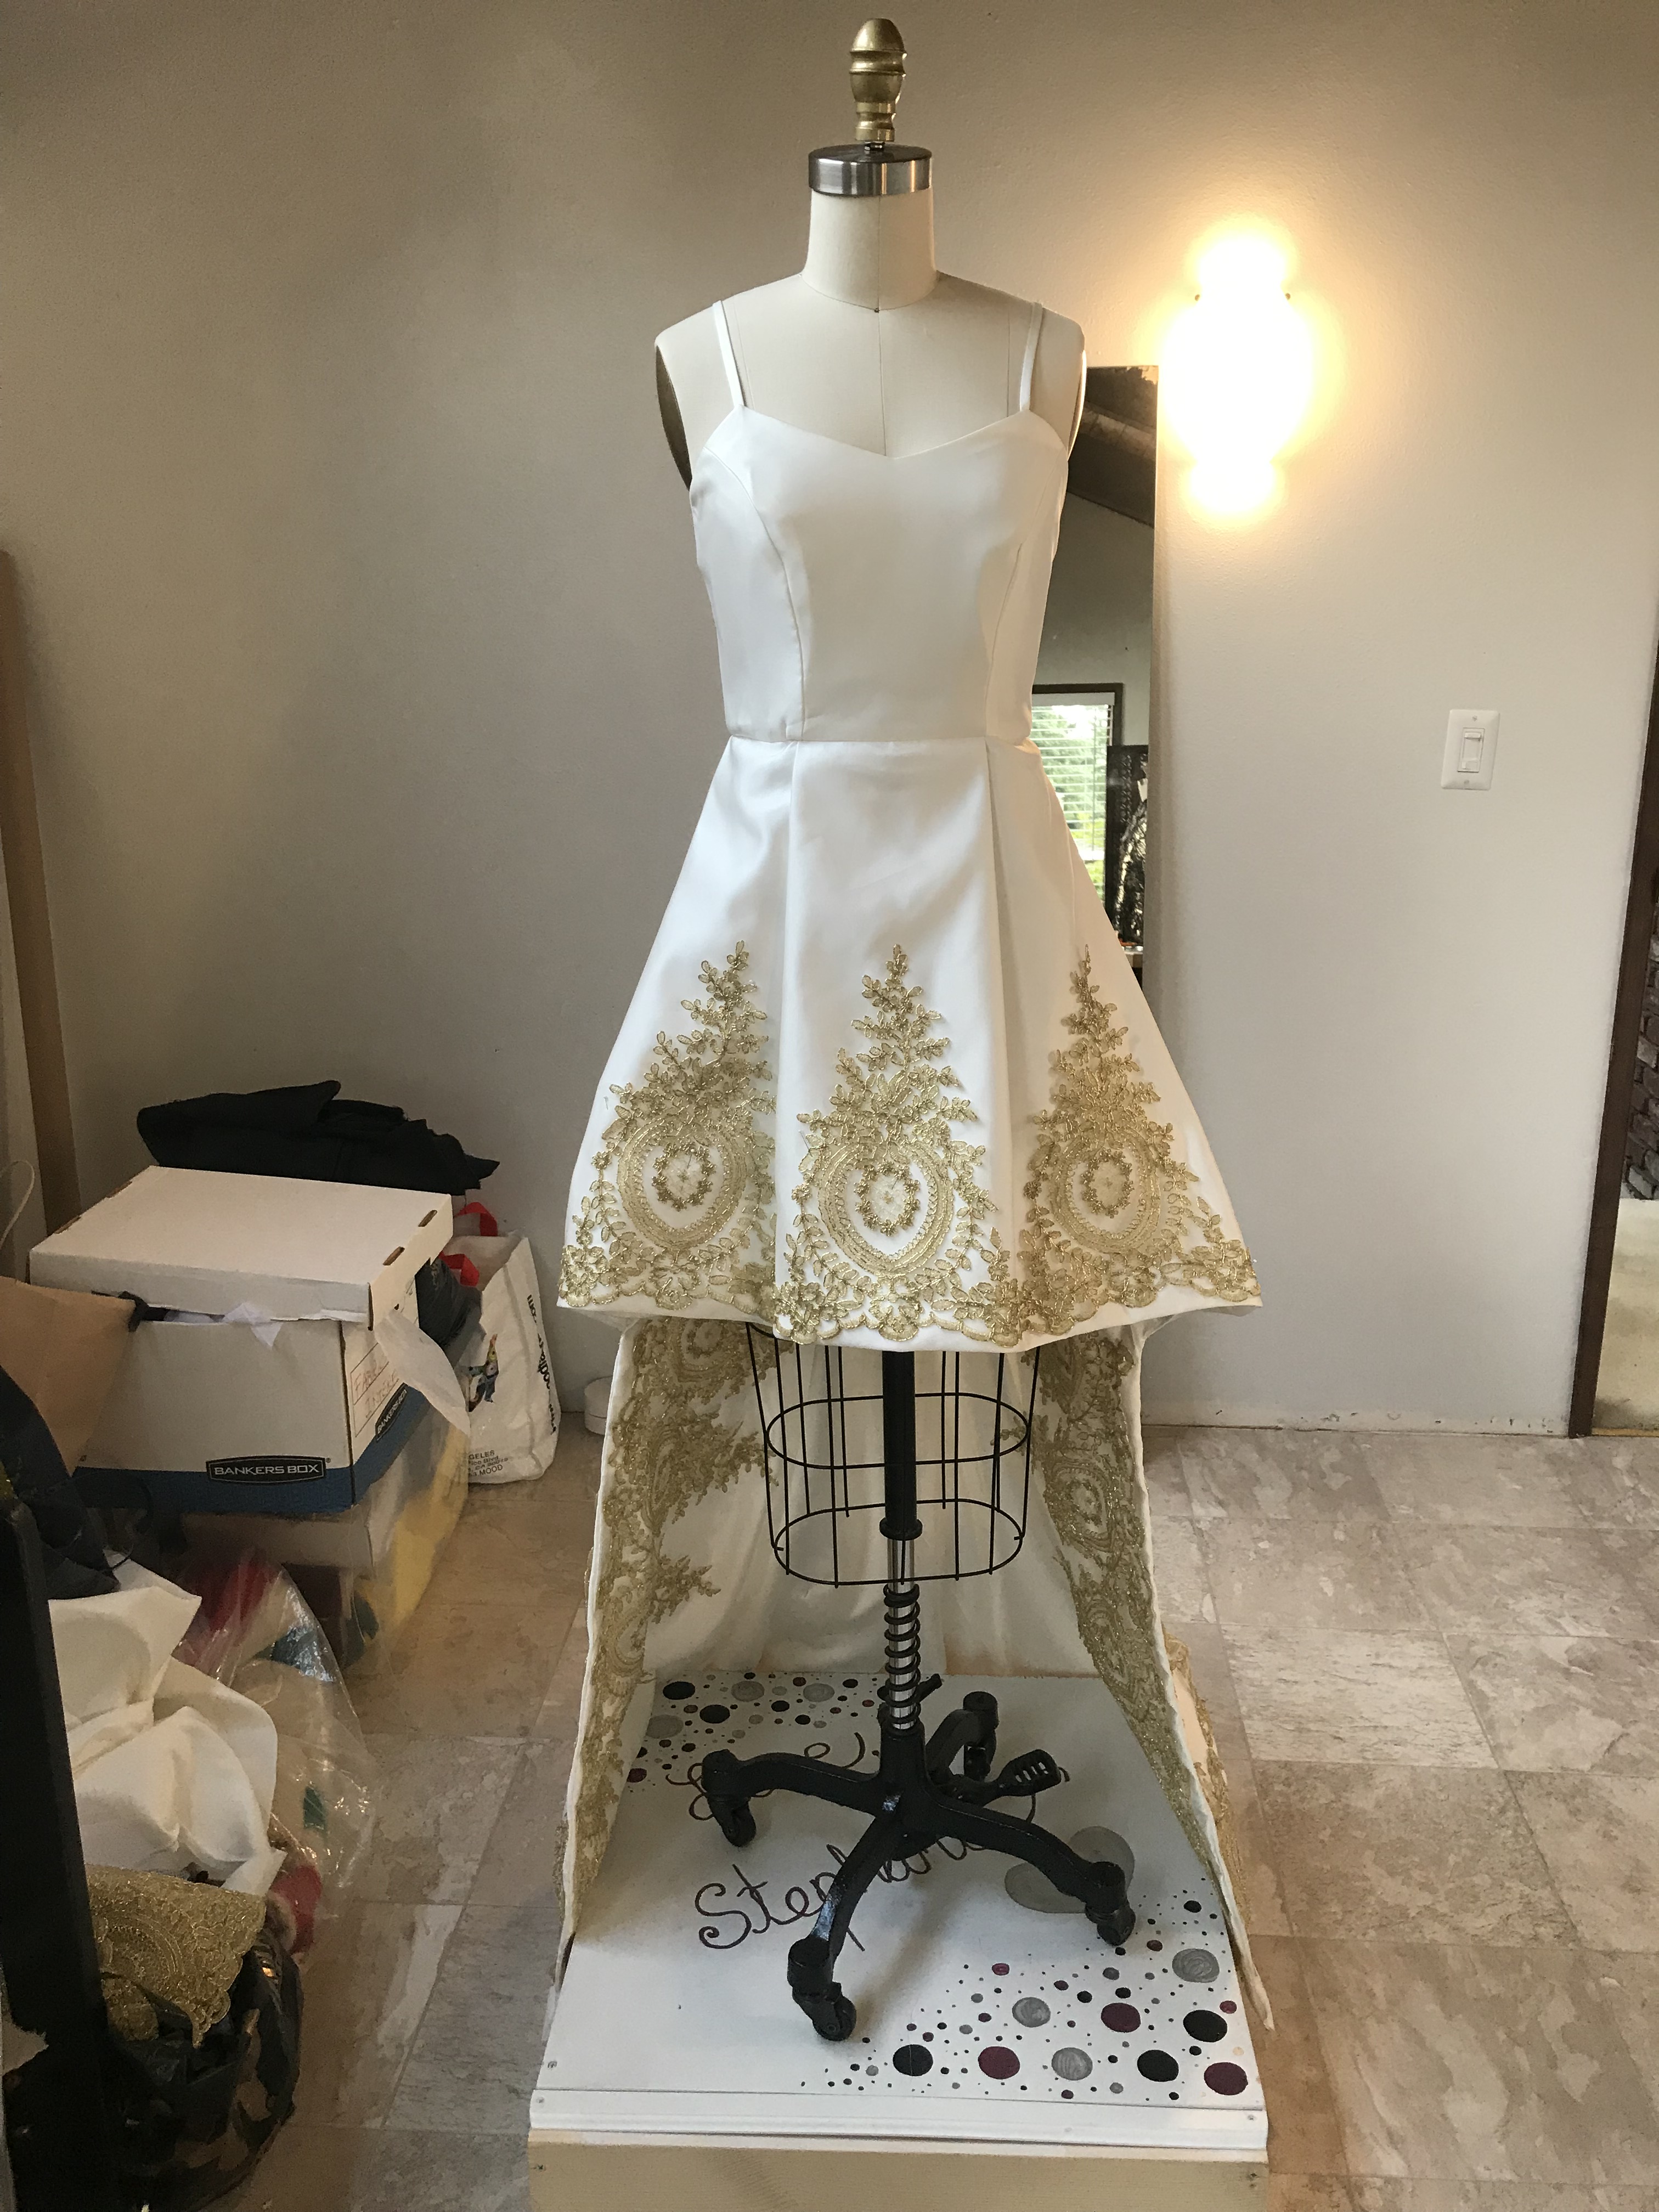
As the dress progressed, I had a couple of more fittings with Michel, this time in the fabric, before I added the lining, just to check fit again and make sure everything was perfect before the lining installation
Michel pinned into her dress, the straps and belt also just pinned, and deciding on the finished hem length.Pinned into the dress, with the unfinished shrug (again, please excuse the mess!)
She also wanted a sleeve option for the dress, so I made a little matching shrug for her using Butterick 4731 for the pattern.
Butterick 4731 for the shrug only (although I also like the gown in this pattern)I used the sleeves of view A and the front and back of view B to make the shrugI cut out the shrug in the same layers as the dress, also beading the outer lace layer before adding the lining
I used the pretty scalloped border of the lace material to create a trim to go around the edges of the shrug at the neckline, around the back, and the sleeve hem.
Hand stitching the lace edge trim to the finished shrug
I wanted to be sure to have a well made garment that would last a long time, and be extra special to slip on and wear comfortably. I added two hanging loops into the side seams of the lining using a narrow satin ribbon, so that when the gown was hanging, not all of the weight of the dress was on the straps and it was supported with the loops. These loops would then just fall down into the dress when worn and are not seen. I also added a little waist stay right at the waistline of the dress using a wider ribbon and a hook and bar. This feature helps to support the weight of the dress on the inside. I see both of these interior details in some of the wedding gowns that I have altered, so I like to adapt them into my dresses for a high end, secret quality detail!
The hanging loops do their job to help support the dress while hangingThe waist stay added as her exact waist measurement inside the dress for support
Jumping ahead, as the wedding date was rapidly approaching, the dress and shrug were turning out so well, and I couldn’t wait to get Michel in it and delivered before the big day.
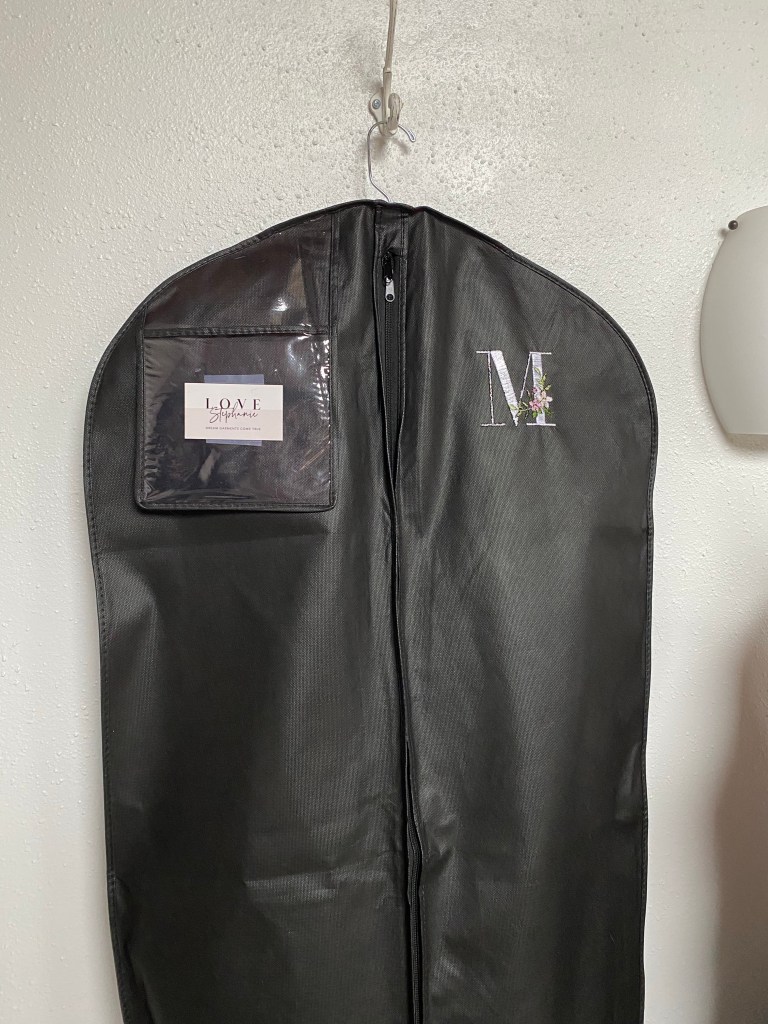
Before delivering it though, I wanted to add a little special and personal touch to the garment bag that I usually include with the dresses that I make for my clients. This time, I used my embroidery machine and made a monogram for her on the outside of the garment bag.
The purchased garment bag with the personal monogram
Finishing up the dress and delivering the finished product always feels great! She’s excited, I’m excited and everyone can’t wait to see her dazzling in her new custom made gown!
Checking and double checking the hem is even and balanced
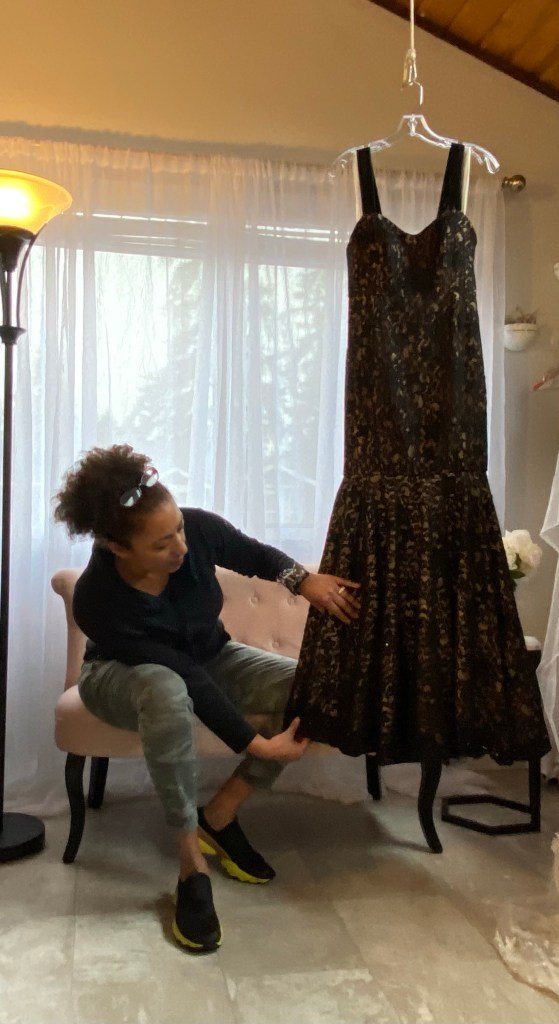
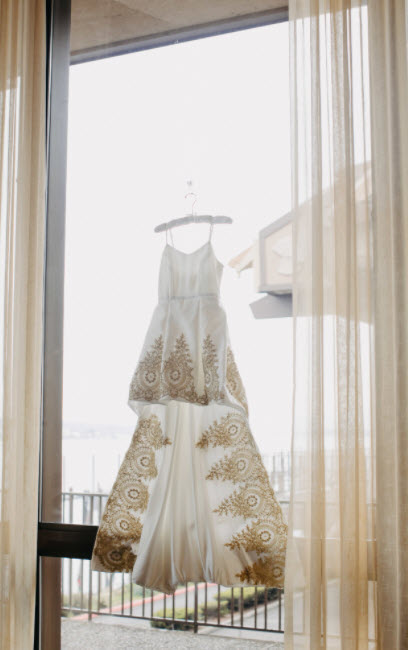
The time finally came that I was 100% finished with the dress and I was ready to deliver it to Michel. It kind of feels like I am handing off a little part of me whenever it’s time to deliver the dress, so I try to take the time to get some good photos of the finished product before she’s gone off to her rightful owner!
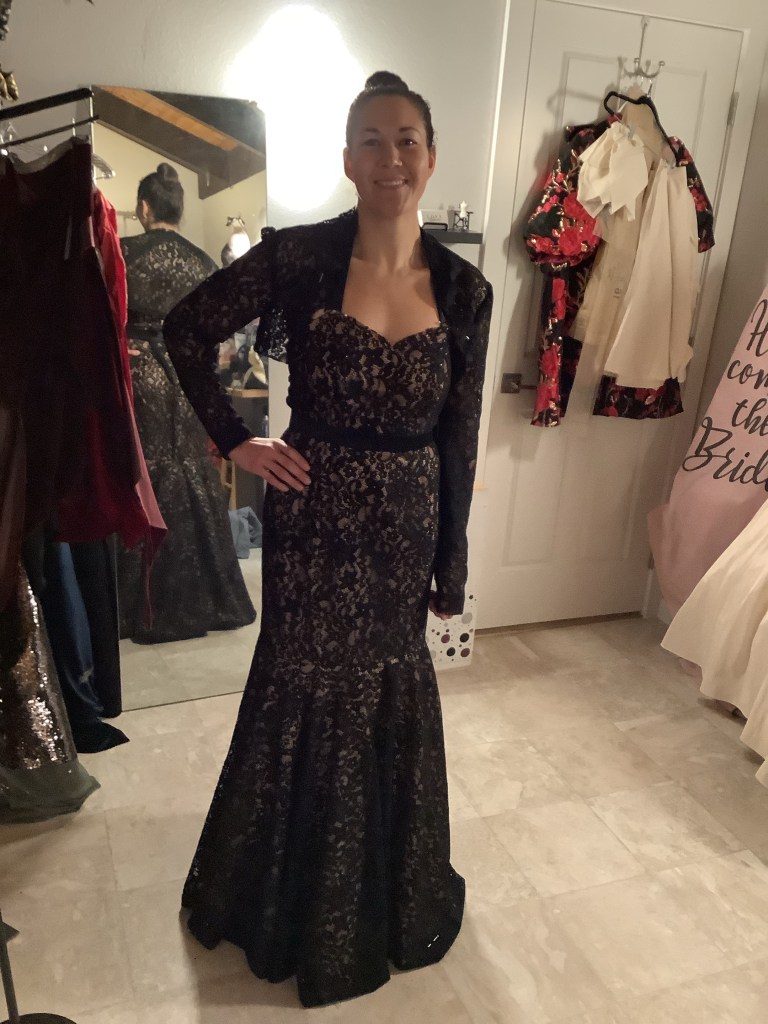
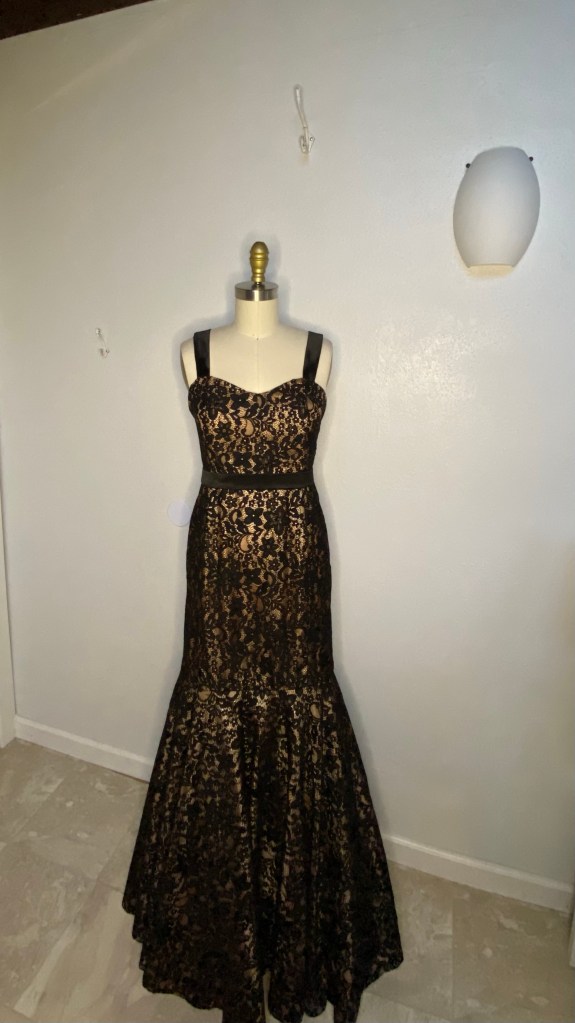
She’s done! Isn’t she lovely!With the matching shrug
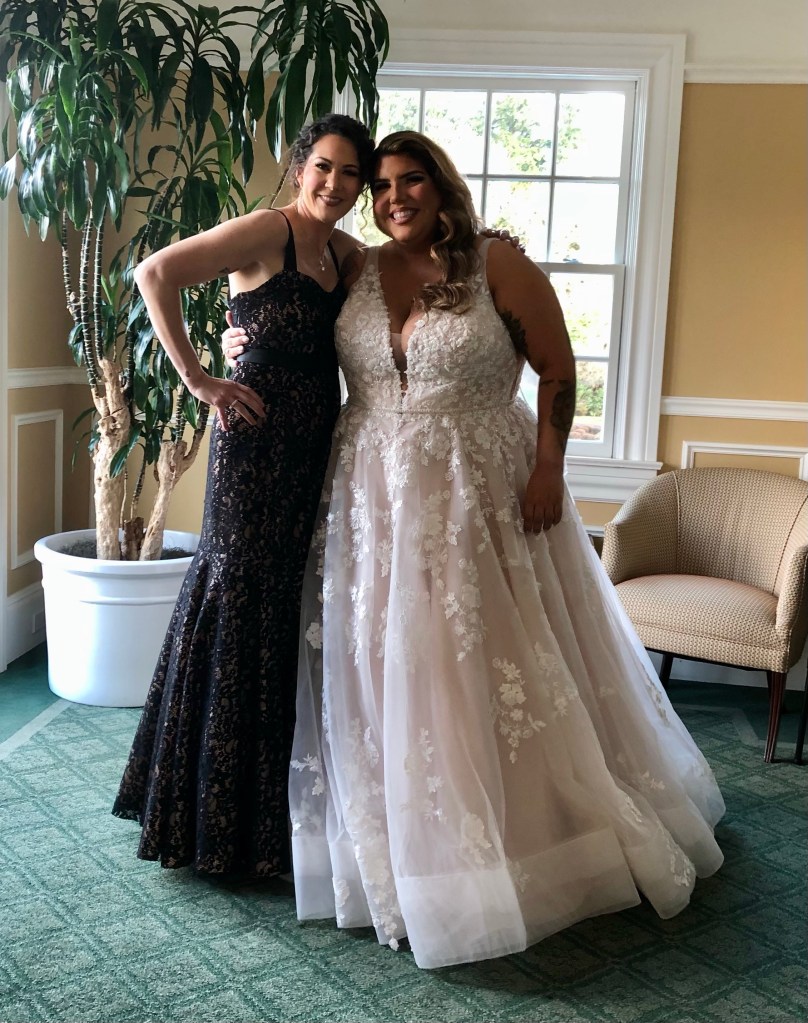
All dolled up and in her gown, Michel is absolutely STUNNING! She’s a natural beauty and does not need makeup of any kind, but boy, when she dresses up and gets all dolled up, WOW! Breathtakingly beautiful!
Stunning!Simply gorgeous!Michel and her best friend, the lovely bride Megan!
Another dream dress come true!! Onwards and Upwards!
This lovely creation all stemmed from a challenge. I belong to a professional sewing association, ASDP, that hosts an annual sewing challenge in conjunction with Threads Magazine.
For the 2022 Threads Challenge, we were to use a vintage pattern from the pattern archive at the University of Rhode Island as an inspiration.
I thought that this was quite fitting as both my father and I graduated from URI! My father graduated in 1954 and I was in the class of 1992. My parents met while my mother was in college at the University of Connecticut which was also in the 1950’s, so I thought I would choose a design that was popular during that era
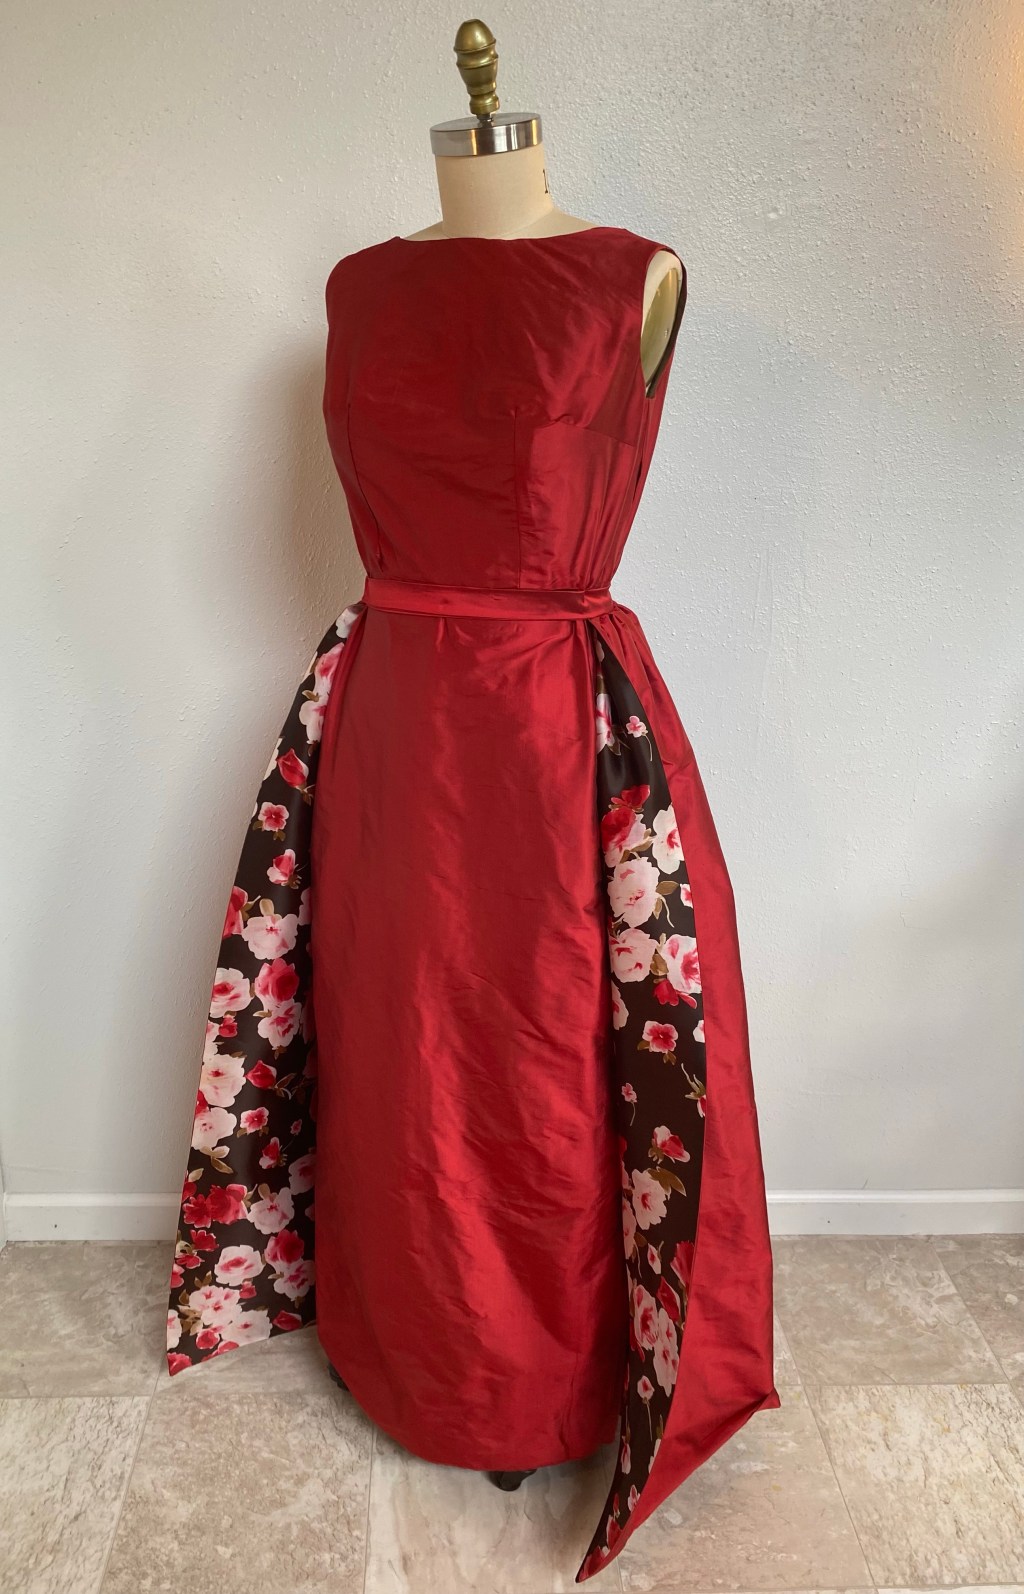
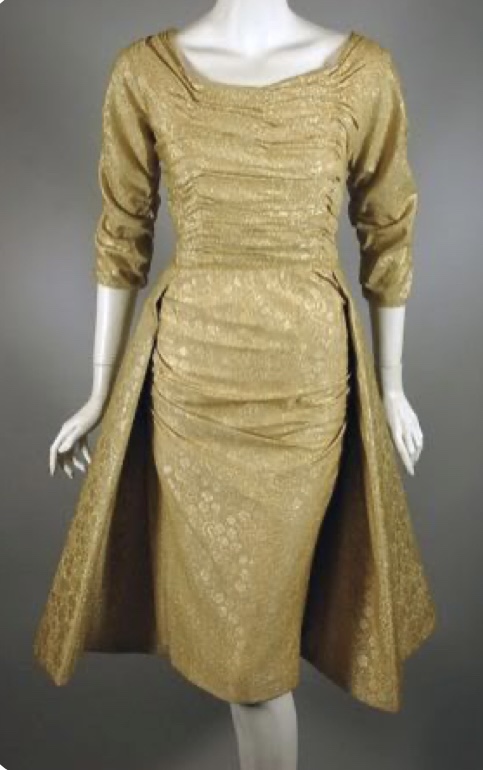
Evening Ball Gown 1955Dress with Overskirt
I also had this sewing pattern, the recently released version from McCalls, as well as the original pattern released in in 1955 from McCalls which I bought on eBay.
I could imagine that my mother would have worn a gown like this in her day as she was quite the stylish and elegant lady, so I kept her in mind and close to my heart as I planned out and sewed up this dress.
The original 1955 pattern release. I love the fashion illustration!McCalls re-release of the style from their Archive Collection
I ordered 9 yards of the silk dupioni from Mood.com to ensure I had enough for the sheath dress and the overskirt. Once the gorgeous material arrived, I went to my local favorite fabric store and purchased enough material to line the dress in silk habotai, and also line the overskirt, which is not part of the patter, but something I wanted to add to catch the eye when wearing this already eye-catching dress.
The materials and patterns
I got to work making a mock-up in muslin of the dress and asked for help with the fitting from my go-to expert Marla Kazell.
Once I was confident with the fit of the dress, I got to work cutting out the fabrics and the new version of the pattern, McCalls 7897
Ready to cut into this spendy silk!
I sewed the dress up without much issue, using the pattern instructions to follow, and making it fully lined. The pattern has you create a facing for the inside edges which I thought wasn’t good enough, and fully lining the dress would make for a nicer finish in my opinion.
The work in progress
For the overskirt, I just made the printed silk organza lining out of the same pattern pieces and hemmed it to meet the outer red material before attaching it to the waistband strip.
The pattern also has a cummerbund as part of the look, but I left that off as I wanted to have the overskirt easily removable for the showcase of the garment. I have enough leftover silk to make the cummerbund, so perhaps one day I will make that as well.
I submitted my garment into the challenge, along with photos of the finished garment, a description of the dress, and the story behind why I chose this style and pattern, to the ASDP Challenge committee. Here are some photos that I submitted to the committee:
Front of dress wit overskirtBack of dress with overskirt, and the lining peeping outThe dress and overskirt from the side-I love the volume!Front of the dress, with the overskirt reversed, showing off the lovely floral print!The sheath dress on it’s own, so sleek and elegant!
After several weeks, I got a notice that my submission had been chosen as a finalist in the challenge, and I was to send in or bring the dress along with me to the ASDP conference where all of the challenge finalists would be in the fashion show and the judges and audience would choose the winner. I was overjoyed to hear this news, and excited to share my make with fellow sewing enthusiasts that would be attending the conference in Baltimore, MD in October.
I packed the dress and overskirt in my suitcase, along with hand sewing needles, thread and a little sewing kit, and made it to the conference almost ready to submit my dress. I knew that I had to make some final sewing touches to the dress, and of course, left these to the very last minute! I still had to sew the lining down to the inside edges, at the shoulder and to the zipper, and hem the skirt lining. I did this all by hand, rushing through it in my hotel room at the very last minute, just in time to submit it to the contest committee for the final review. That, I believe, really hurt my chances of winning the challenge, as the judges of the challenge are expert seamstresses and would surely be examining my rushed and messy sewing up close.
The time came for the fashion show at the conference where dresses from past challenge winners, students and finalists from the 2022 challenge showcased their work to the audience of other conference attendees as well as anyone who wanted to attend the show. I modeled my dress, as I made it to fit myself, and got many ooh’s and ahhh’s on my completed look! I was next to last in the runway line up, standing proudly amongst some other amazing creations and works of art. I felt so honored to have been a finalist in the challenge, yet a little disappointed I didn’t win any of the challenge prizes for the work that I did.
I love my dress and am OK with not being the winner. I just wish I had snapped a photo of me wearing it or asked for a photo from the fashion show! There was a photographer there throughout the show, so I am sure I’ll get some photos of me in it eventually.
I put time and effort into my creation, and know that it wasn’t perfect, certainly not up to the standards of expert seamstresses or for the editors of a nationally published magazine such as Threads. Am I disappointed in myself? Yes, certainly, as I had the time to do a much better job with the finishings of the garment. However, I am very proud that I was chosen as a finalist, and have learned a great deal about the level of workmanship that needs to go into a project that would be chosen by a contest judge.
After the Threads challenge winner was chosen for her wonderful workmanship and design, they announced the theme of the 2023 Threads challenge for next year. This time, the challenge consists of designing a piece of outerwear that is inspired by a 2-dimensional piece of art. What an amazing challenge! Since I didn’t win this year’s challenge, I am eligible to enter the next one, so with that, I think I’ll go for it! Now, to find some inspiration and start planning what I can make…and DO IT! That’s the new challenge!
Have you ever wondered what it would be like to have a custom dress or outfit made just for you? Have you thought that just buying something off the rack or from a website is good enough and will do for the occasion, but deep down (or not even that deep) you wish you could wear something that fit you perfectly, was made well, is a flattering color on you, and was something you would be comfortable, confident and proud to wear to your event and beyond? Do you want a great dress, top, suit or outfit hanging in your wardrobe that you can reach for again and again and just know it works? If you said “yes!” to all of the above, I would love to be the one to make this dream come true for you!
So, what does this process look like, how does it all happen and how long would it take? It’s this going to cost me an arm and a leg?
For those questions, the answer is: it all depends.
First off, I am a one woman operation (at least for now I am) and only have so much time in a day. My goals for my Love, Stephanie custom sewing business include creating quality, timeless apparel for special clients who recognize the value in a well made custom garment. I use fine quality materials and construction methods, I don’t take on rush jobs, and I don’t take shortcuts. That being said, that is what takes the time to perfect the fit, using smart construction techniques, and all of the education and sewing skills that I have learned over the years that rolls into the lead time and cost of a custom made garment.
That’s me! Stephanie of Love, Stephanie
Sound intriguing so far? Great! Read on and I’ll walk you through what my typical process looks like from the perspective that includes the client experience and what to expect.
We begin with an initial meeting where I get to know you better, what your ideas and visions are for your custom garment, what your lifestyle is like, and what mood or purpose you’d like to portray through the garment you’ll be wearing.
Initial Client Consultation
From there, I build a plan and a timeline to achieve the finished garment before your deadline and get started sourcing fabrics and pattern options that go into making your garment.
Going over sketches and fabric ideas
I like to create sketches, a mood board, and gather any other ideas and components that go into the creative process of making a successful garment, and share these with you along the way.
After our initial consultation meeting, I gather up all the information and write up a contract that includes all of your contact information, the deadlines, our design concept agreement, project components, costs and payment schedule for you to read over and sign. This is an important step as I want to ensure both of us are in agreement over all of the details in case any questions or concerns should arise.
Then the fun begins! I’ll take all of the body measurements I need from you and get started making the garment.
Taking measurements Lots of measurements!
Using your measurements and a pattern, I cut out and sew up a simplified mock-up garment in muslin fabric to check fit, style preferences and to make sure you are happy with the basic silhouette before cutting into any fashion fabric. At times, an additional muslin, or part if it, needs to made and fitted again if there are a lot of changes that need a review before proceeding.
A mock-up fitting in muslinI check for any fit issues that need to be corrected, and make sure you are happy with the style lines and length
Meanwhile, the fashion fabric that you want, including any lining material, trim and notions needed, is confirmed and purchased. I aim to use the best quality fabric that is within your budget (not included in the cost of my labor) as I truly feel that the fabric makes all the difference in the look and wear of a garment. I prefer to work with natural fibers such as cotton, wool, silk and linen, but will consider good quality man made fabrics to sew with such as rayon and synthetic blends.
Fabric choices are important in the outcome of a beautiful garment Silk is my personal favorite!
Once the muslin is approved and the fabric is all here, I transfer any changes to the pattern, and start cutting!
The beautiful silk georgette is laid out and ready to cutAnd sewn (silk is notoriously difficult to sew)
Most times, I have one last fitting of the garment in the fashion fabric to double check the fit, pin the hem, and work out any last details before delivering the finished creation.
From concept to creation!Perfection!The final fitting!
And that’s it! Easy, right?
Well done! Cheers!
In a nutshell, that’s the process in creating a unique custom garment, made especially just for you! No matter what size or shape you are, it’s an exciting and rewarding experience like no other.
Want to give it a go? Reach out to me and come on by my place with your dream garment vision and we’ll make it happen!
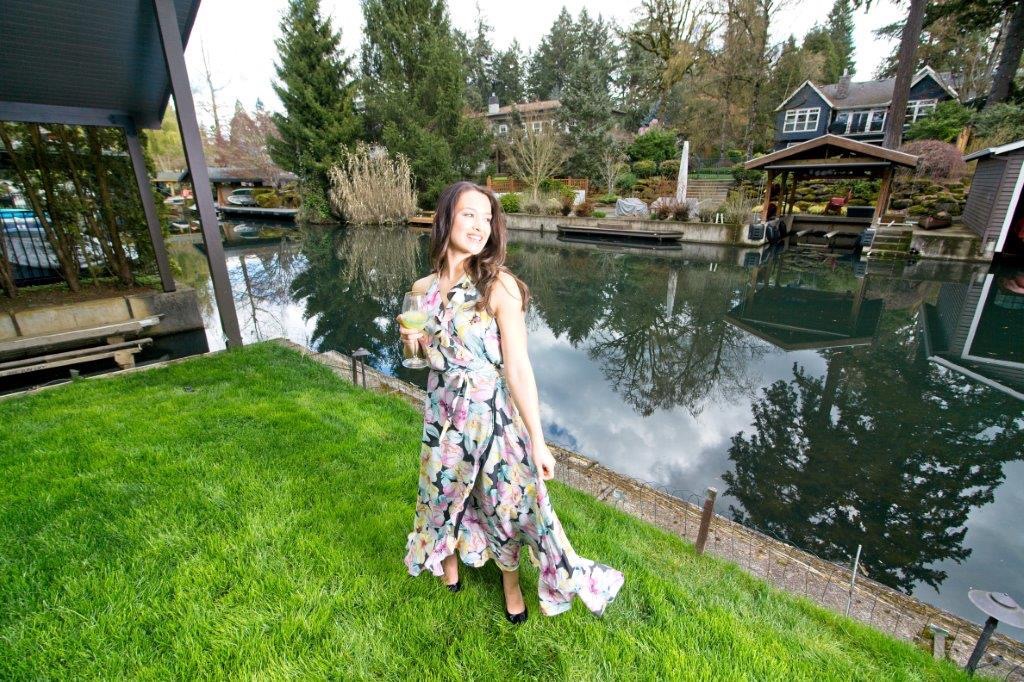
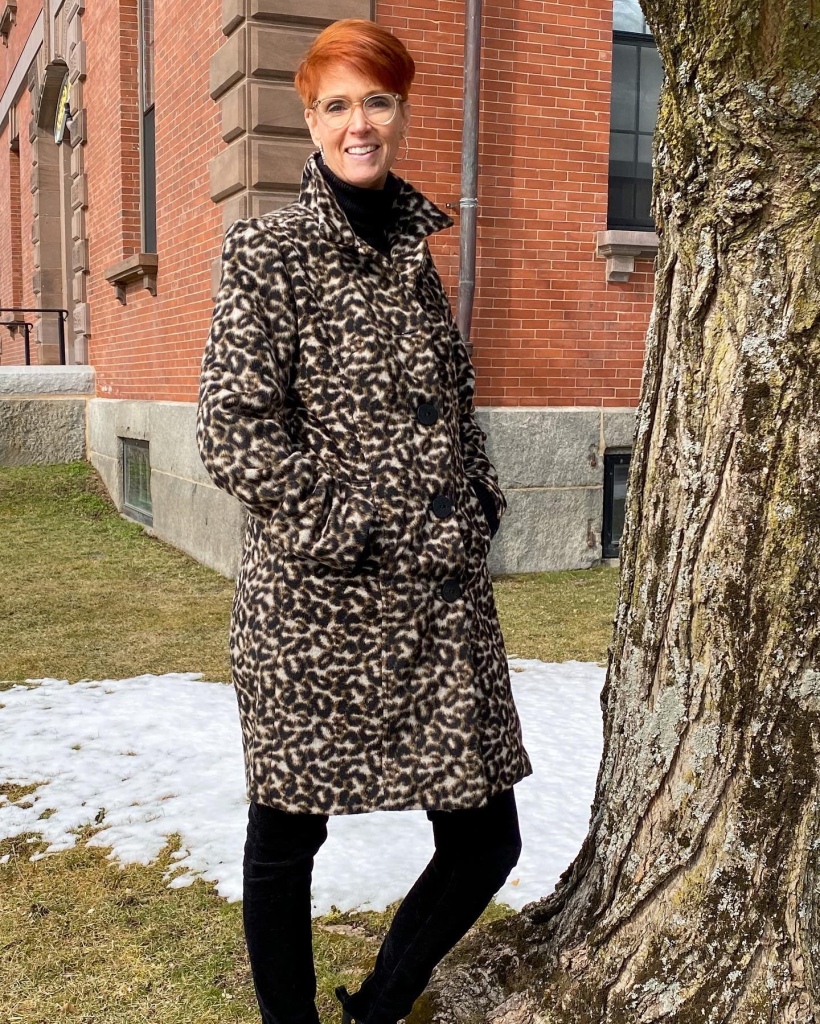
Suzanne demonstrates her Tall Drink of Style in her new Love, Stephanie coat!
Suzanne and I go way back, 37 odd years in fact. All the way back to freshman year in high school where we carpooled to school with our moms and a few other students living in Concord and Bedford who also attended our school Lawrence Academy in Groton, Massachusetts. It is a small, private college prep school on a beautiful campus where the classes were small and everybody knew each other.
Fast forward to modern times where we keep in touch with old friends and family through social media platforms like Facebook and Instagram. That is precisely how I’ve reconnected with Suzanne and many other friends from childhood, high school and college days.
Ever since I’ve been connected with Suzanne (she used to go by Suzy), she’s been a wonderful fan and always excited to see and comment on what I’m currently sewing. A few times she’s even commented like “I just love what you’re creating!” and “someday I love for you to make something for me!” which is such a wonderful and flattering comment to hear, and more and more, something I’d like to achieve full time. Custom clothes making for clients and even more, a fashion line of my own.
Well, one garment and one client at a time, I’m starting to see this dream come to life. So far in 2022 alone, I already have 8 clients that i have already, or am currently working on creating custom garments for, plus have several bridal and special occasion alteration projects, a re-fashioning project in the works, other special makes on the list. Unfortunately I have had to turn away several potential clients as I am simply too busy to take on more.
I’m also am working with an amazing business coach who is helping , me get organized, set goals, focus on my brand and core client profile, continuing education and skill development, plus I’m building a new website and branding refresh. I expect this is going to be a great year for my business and continuing growth on the horizon. So yay!
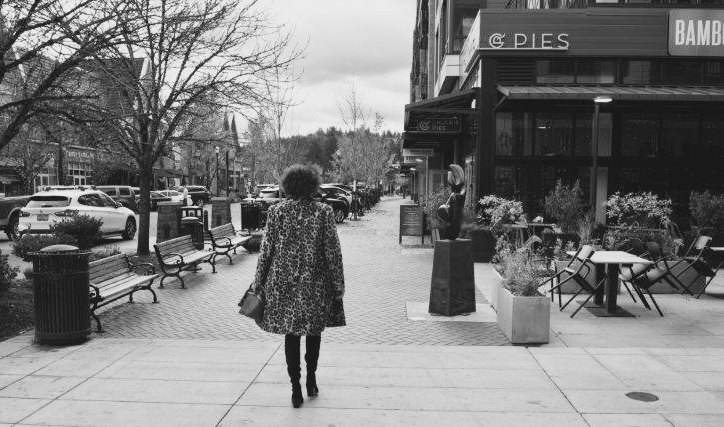
Back to her! Suzanne saw the lovely leopard coat I made for myself and that was the one for her! She reached out to me and asked if she could commission me to make one just like it for her. Of course I was delighted that she asked and jumped on the offer.
I got to work right away to plan out the process and set up a meeting to discuss all of the options and details that go into making a coat for someone other than myself. We started with a zoom meeting to talk and actually speak to each other after all these years. I made a PowerPoint presentation as I like to do for any new client, to help explain her pattern and fabric options, talk and demonstrate more about the details she would like, and my pricing levels that depend on the components, the time, and the level of difficulty. I also include my work process and a timeline with milestones and deadlines.
A screen shot of some of my PowerPoint slides
Suzanne loved the presentation and chose the style and fabrics right away, knowing she wanted a coat just like mine with just a few customizations.
My version of this amazing coat!
I sent her some fabric swatches in the mail so she could touch and feel the lovely and soft hand of the high quality materials I’d be using to make her coat. The only differences she wanted from my version was black silk lining and a slight different collar shape.
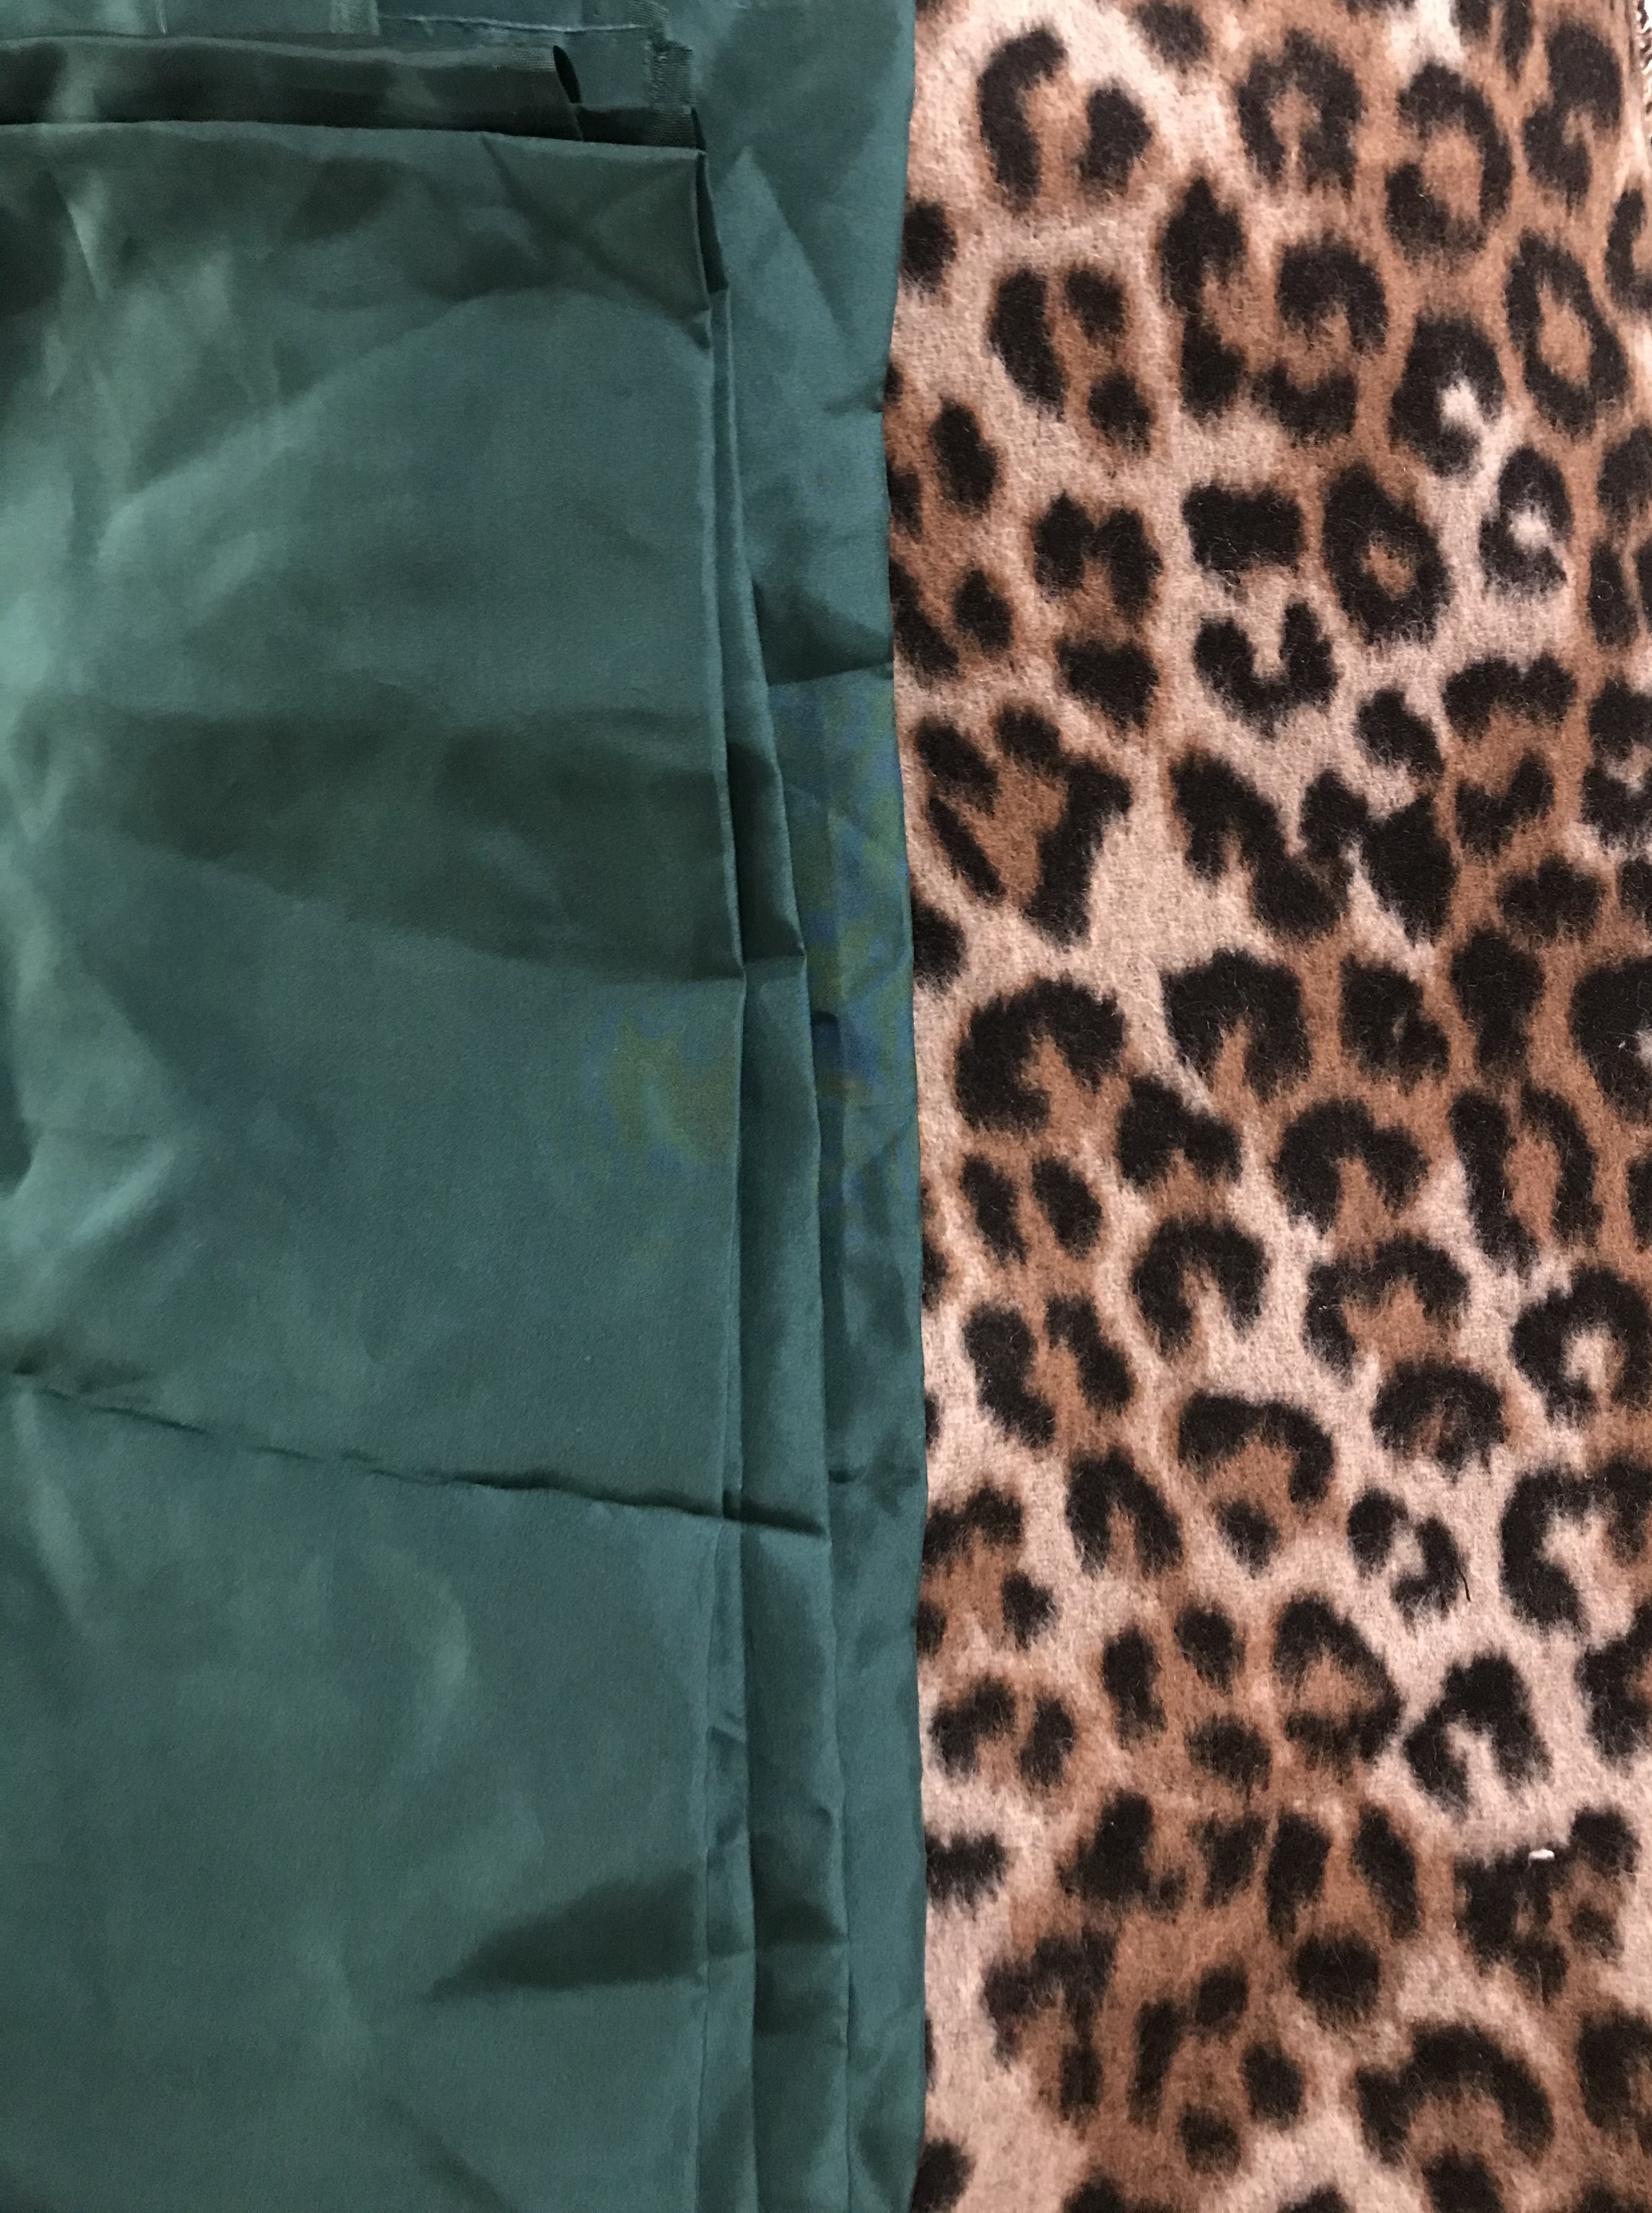
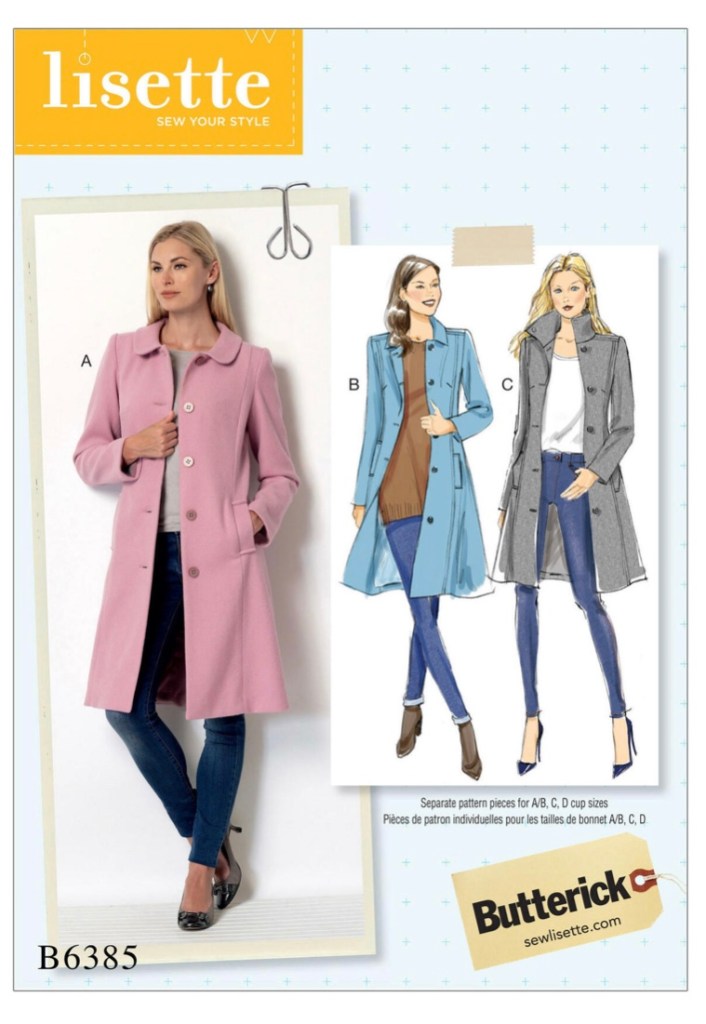
Butterick 6385 pattern The leopard print wool blend coating material
I also asked her to take body measurements according to a handy chart that I also sent over. We scheduled another Zoom meeting once she had the fabric swatches and measurements ready to confirm everything before I got started making a mock up in muslin for the fit and style review.
As soon as I was done sewing up the muslin of the coat, I mailed it to her and asked her to contact me as soon as she received it. She sent over some photos of her in the muslin which was great and a perfect prelude to our Zoom meeting which followed shortly after
So far, so good!Even just in muslin it looks great on her!
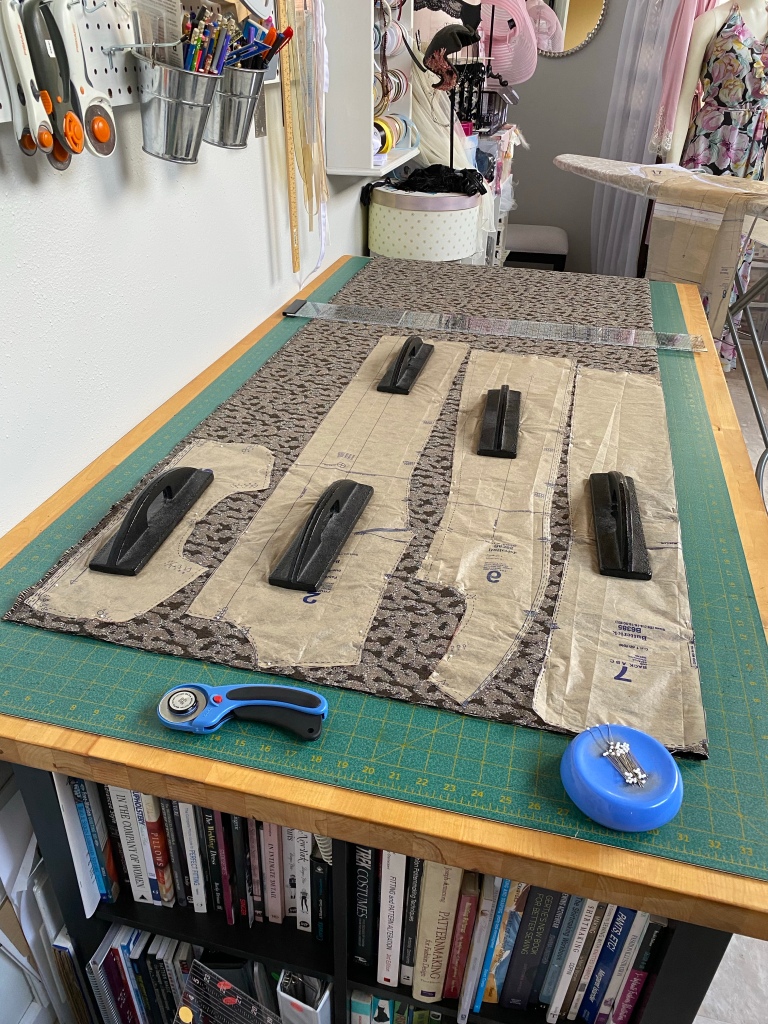
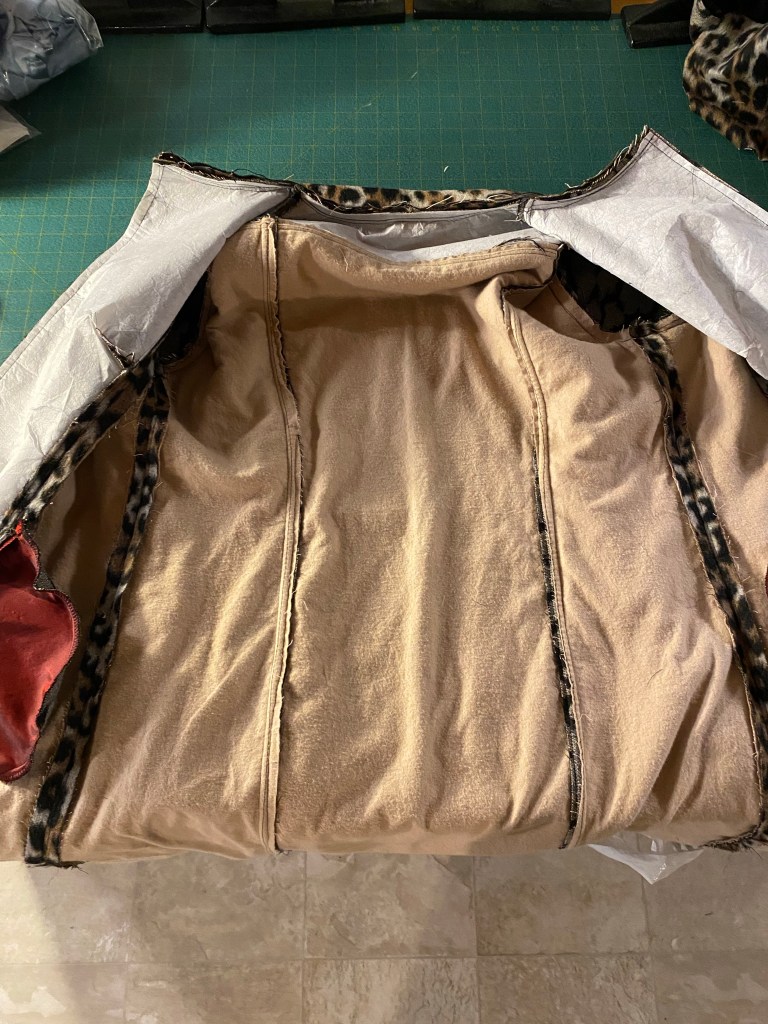
With just a few changes to make to the pattern after our Zoom meeting, I immediately got to work cutting out her coat in the fashion fabric. This honestly took the most time and careful organizing with precise cutting, carefully transferring the pattern markings such as the darts, notches and matching points, and also doing the same to the flannel underlining layer (which was going in between the fashion fabric and lining) for warmth and added “body” to the outer material, and also the silk lining. Time consuming to say the least, but this step is a really important part of making a successful garment.
The coat fabric, laid out right sides together, pattern pieces anchored down on grain and prepped to cut out
So, I sewed and I sewed (and I sewed some more!), all the while keeping her posted with my progress, trying hard to meet my deadline to get it to her in time to wear it this winter.
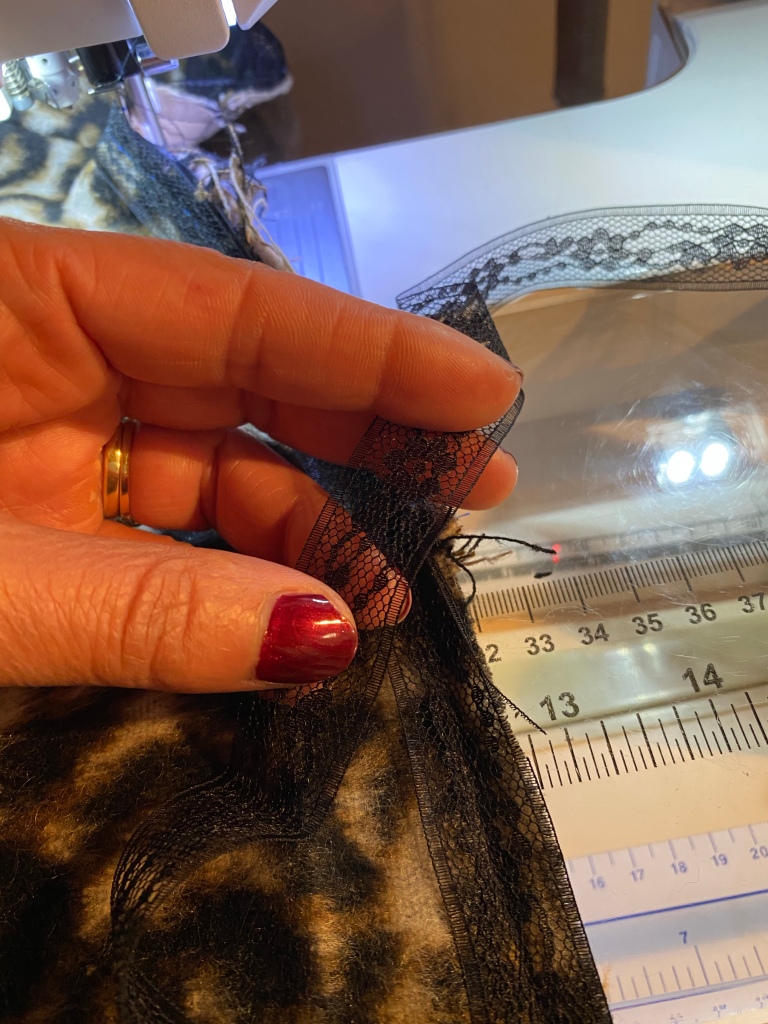
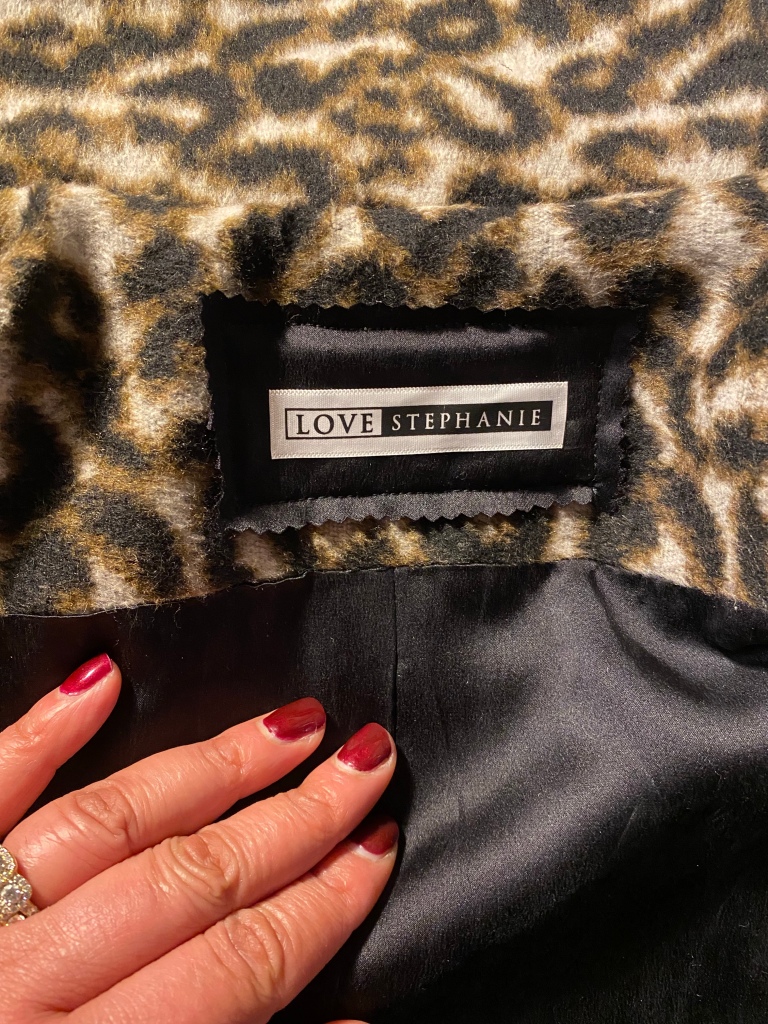
Installing lace hem tape as part of the finishingHand sewing the hem to the flannel underlining Of course, my Love, Stephanie label had to be beautiful and stand out!
After many long sewing hours and late nights hunkered down in front of my sewing machine and pressing table, I was so excited to finally finish the coat, pack it up, and ship ‘er out!
All packed up and ready to ship across the USA!
The coat arrived in perfect time for Suzanne to model for her new business launch of a fashion stylist in the Boston area appropriately named A Tall Drink of Style
I so happy for Suzanne and her new chapter in life, and I am incredibly flattered that she asked me to represent her style in a custom garment creation for her new business!
Now, that’s a tall drink of style!
Stay tuned for more great style and trend ideas from Suzanne, plus in collaboration with me, even more fashion and wardrobe ideas!
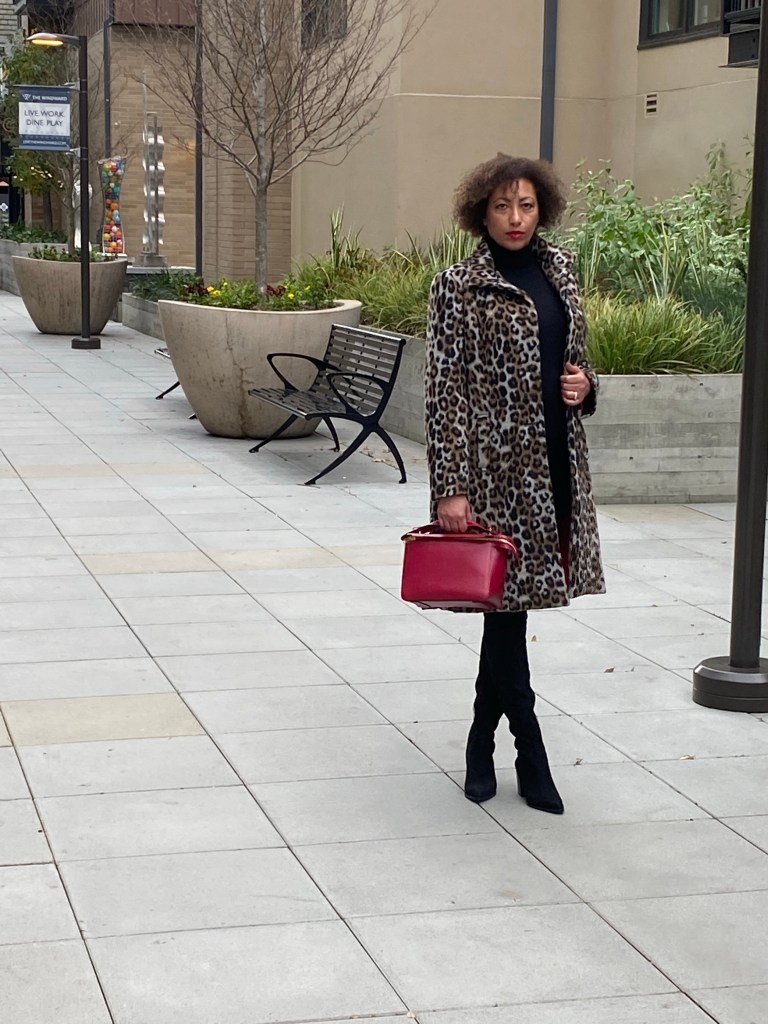
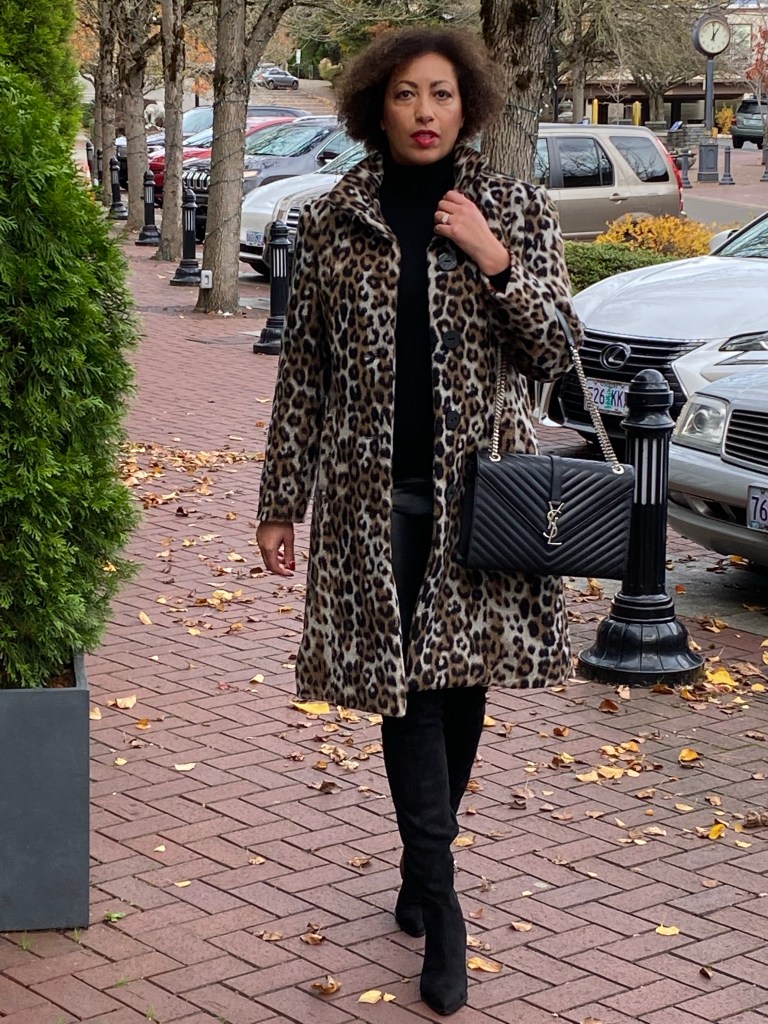
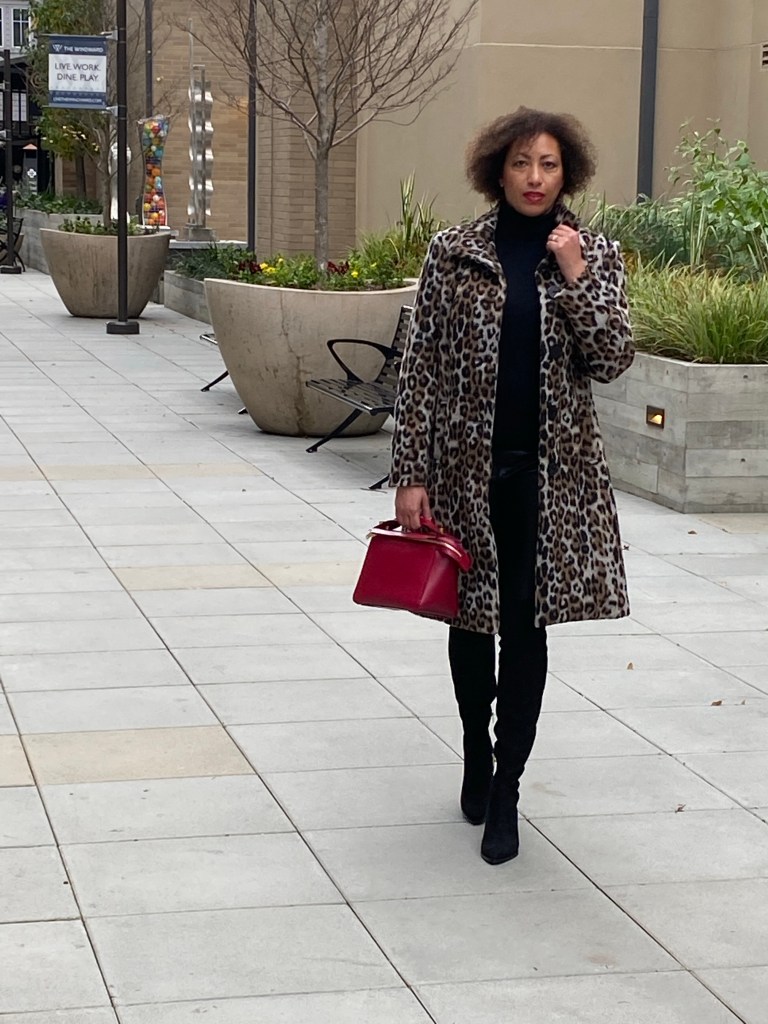
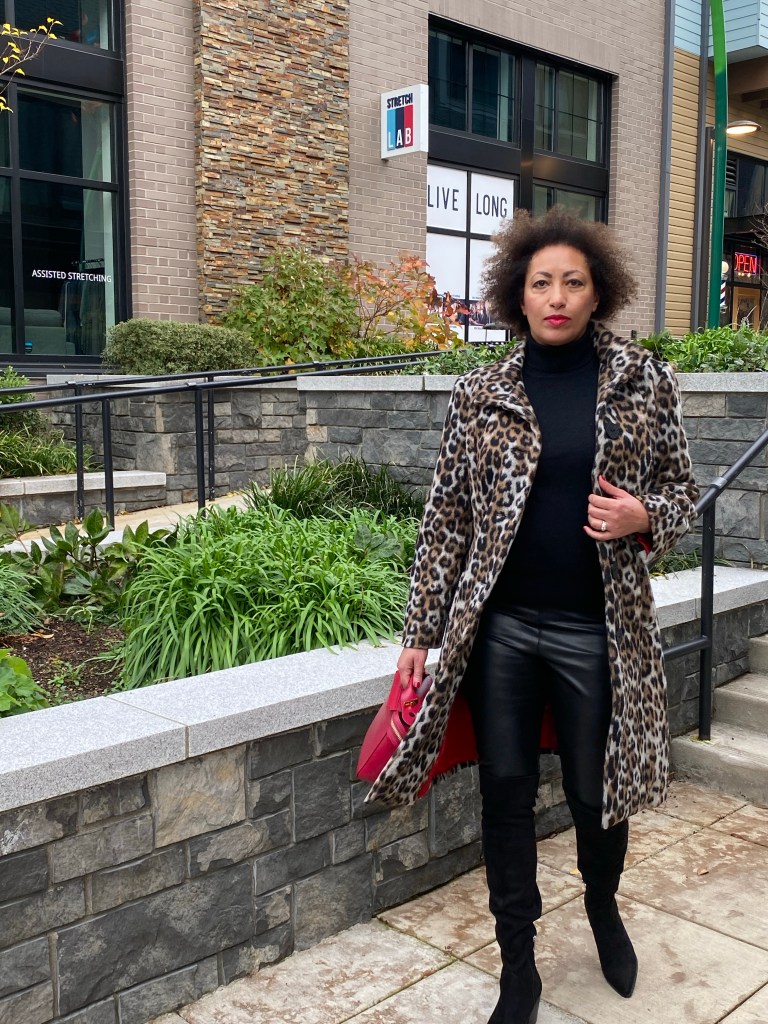
I had Dior in mind as I made this coat, with the yummy brushed wool fabric, the sumptuous silk satin lining, and the classic, tailored details, all brought me back to an era of glamor and sophistication of the 1940’s and ‘50’s.
Leopard print coat
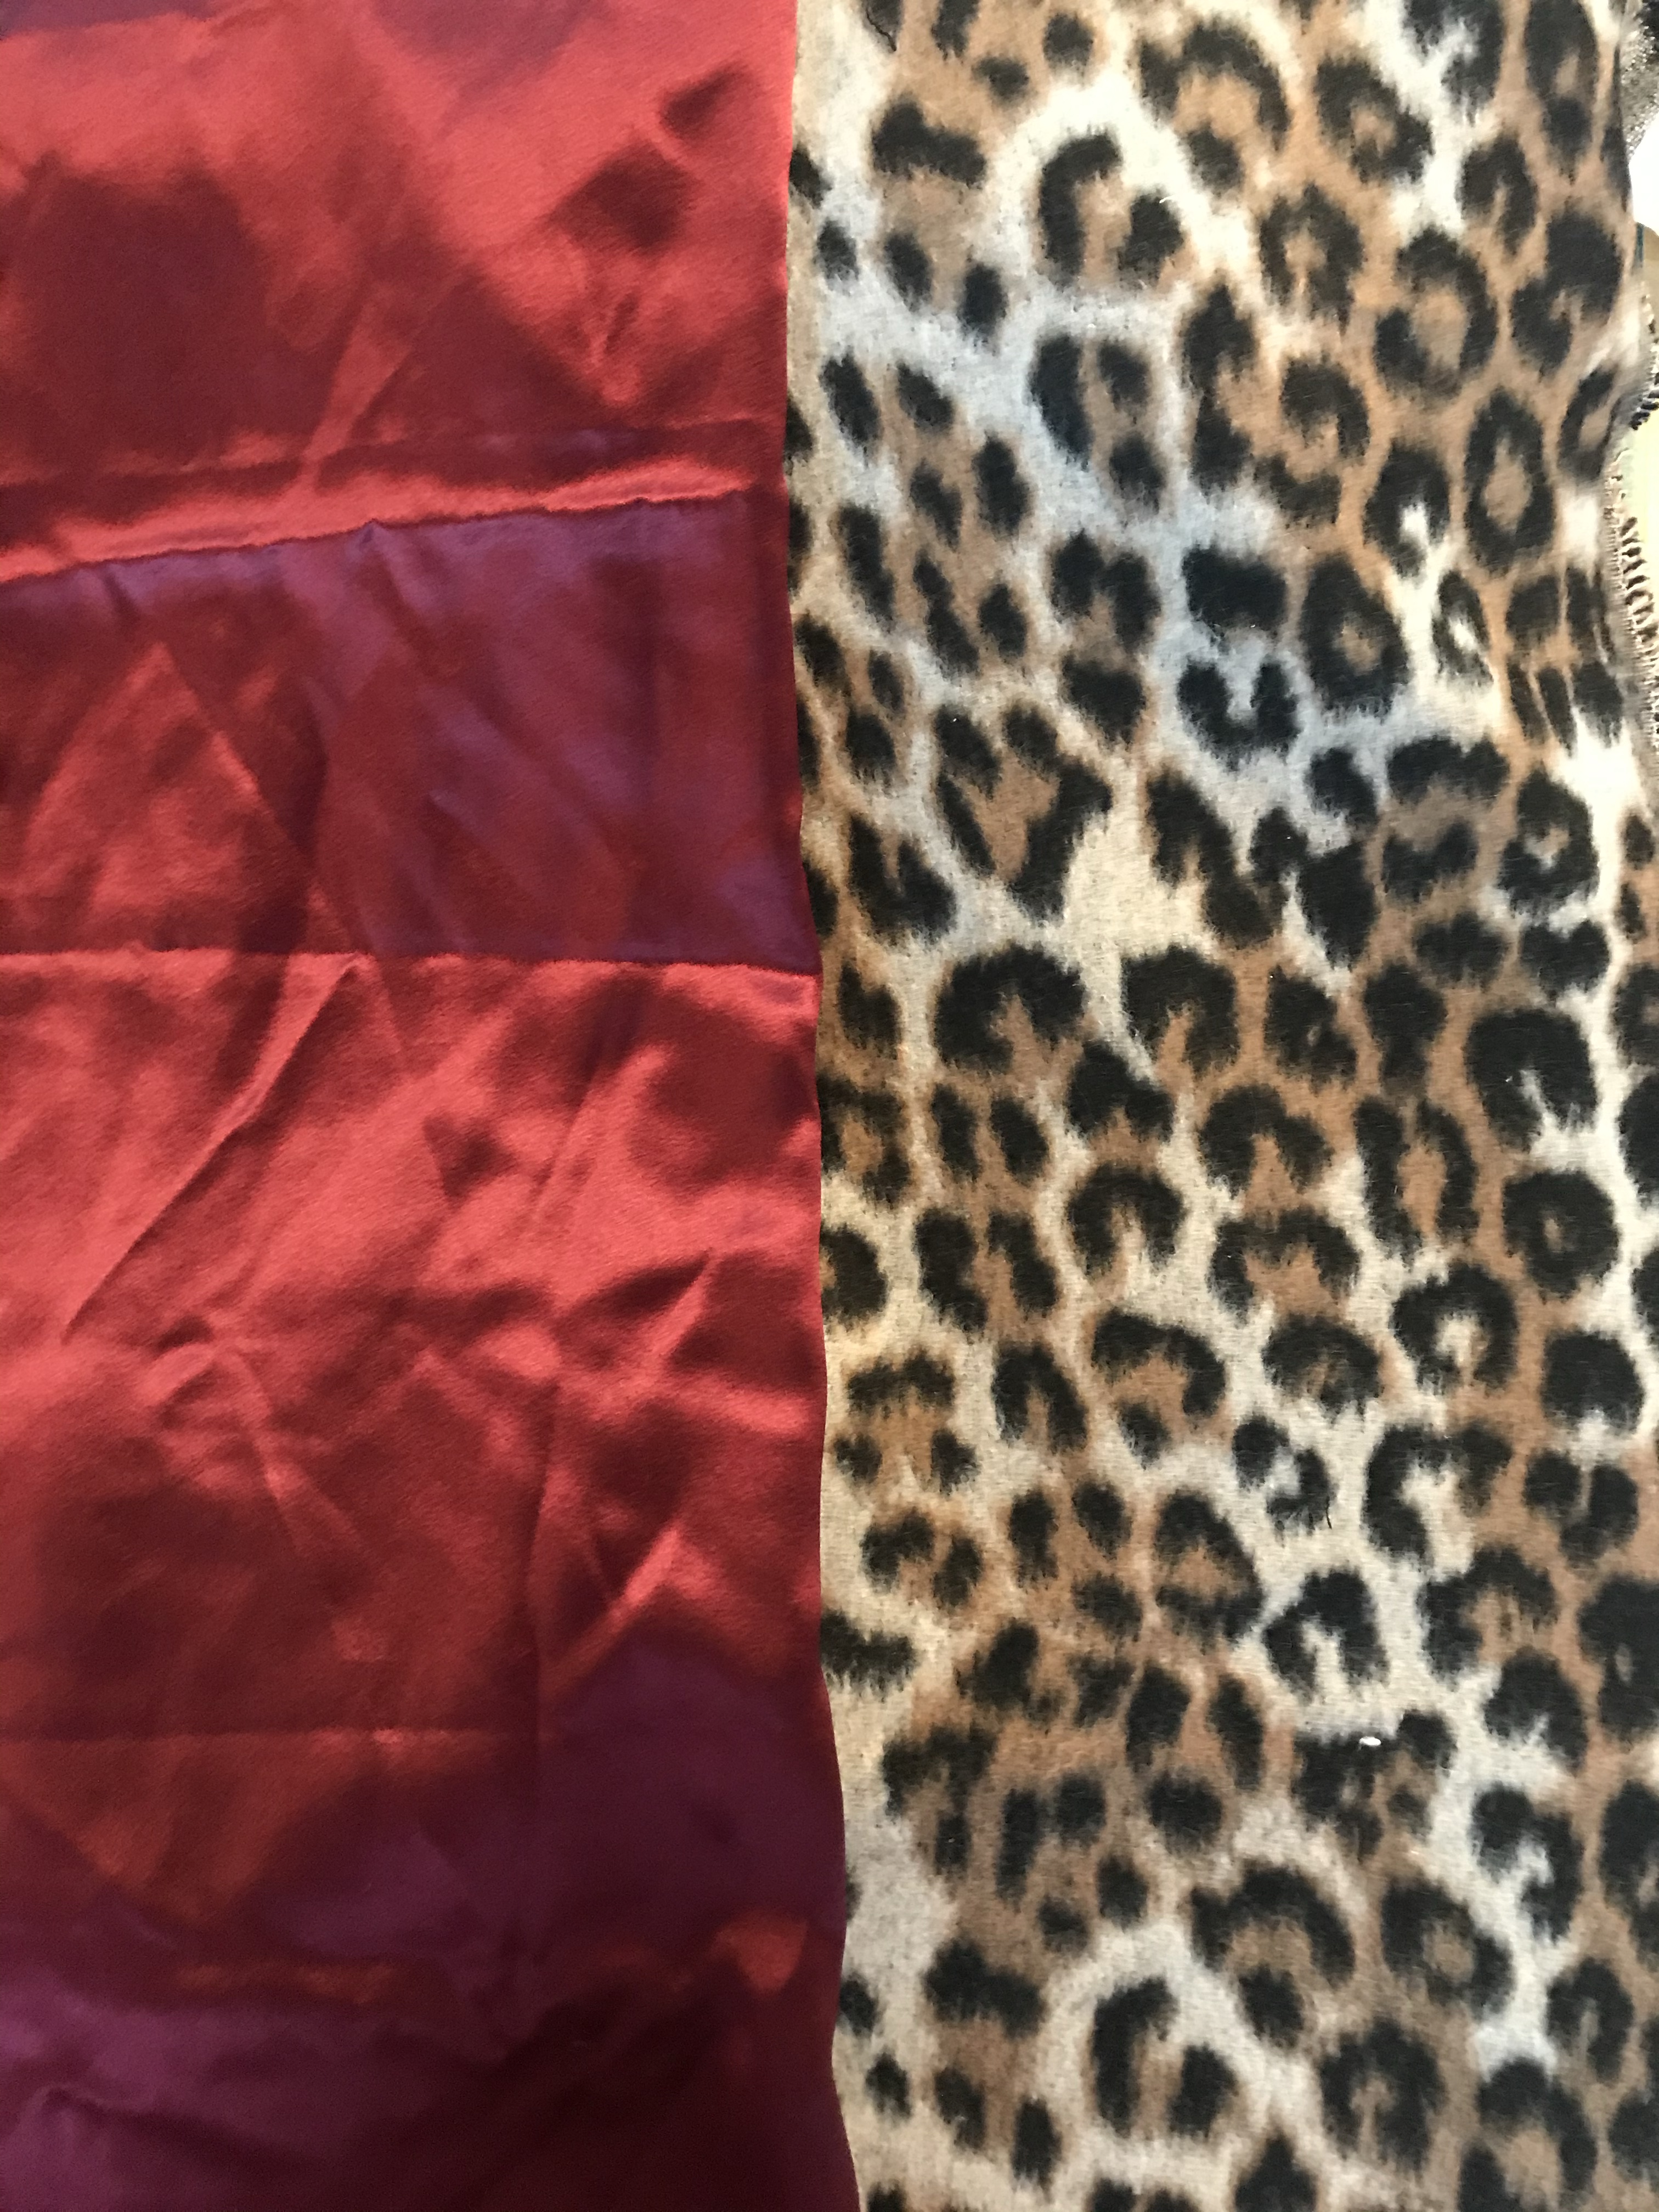
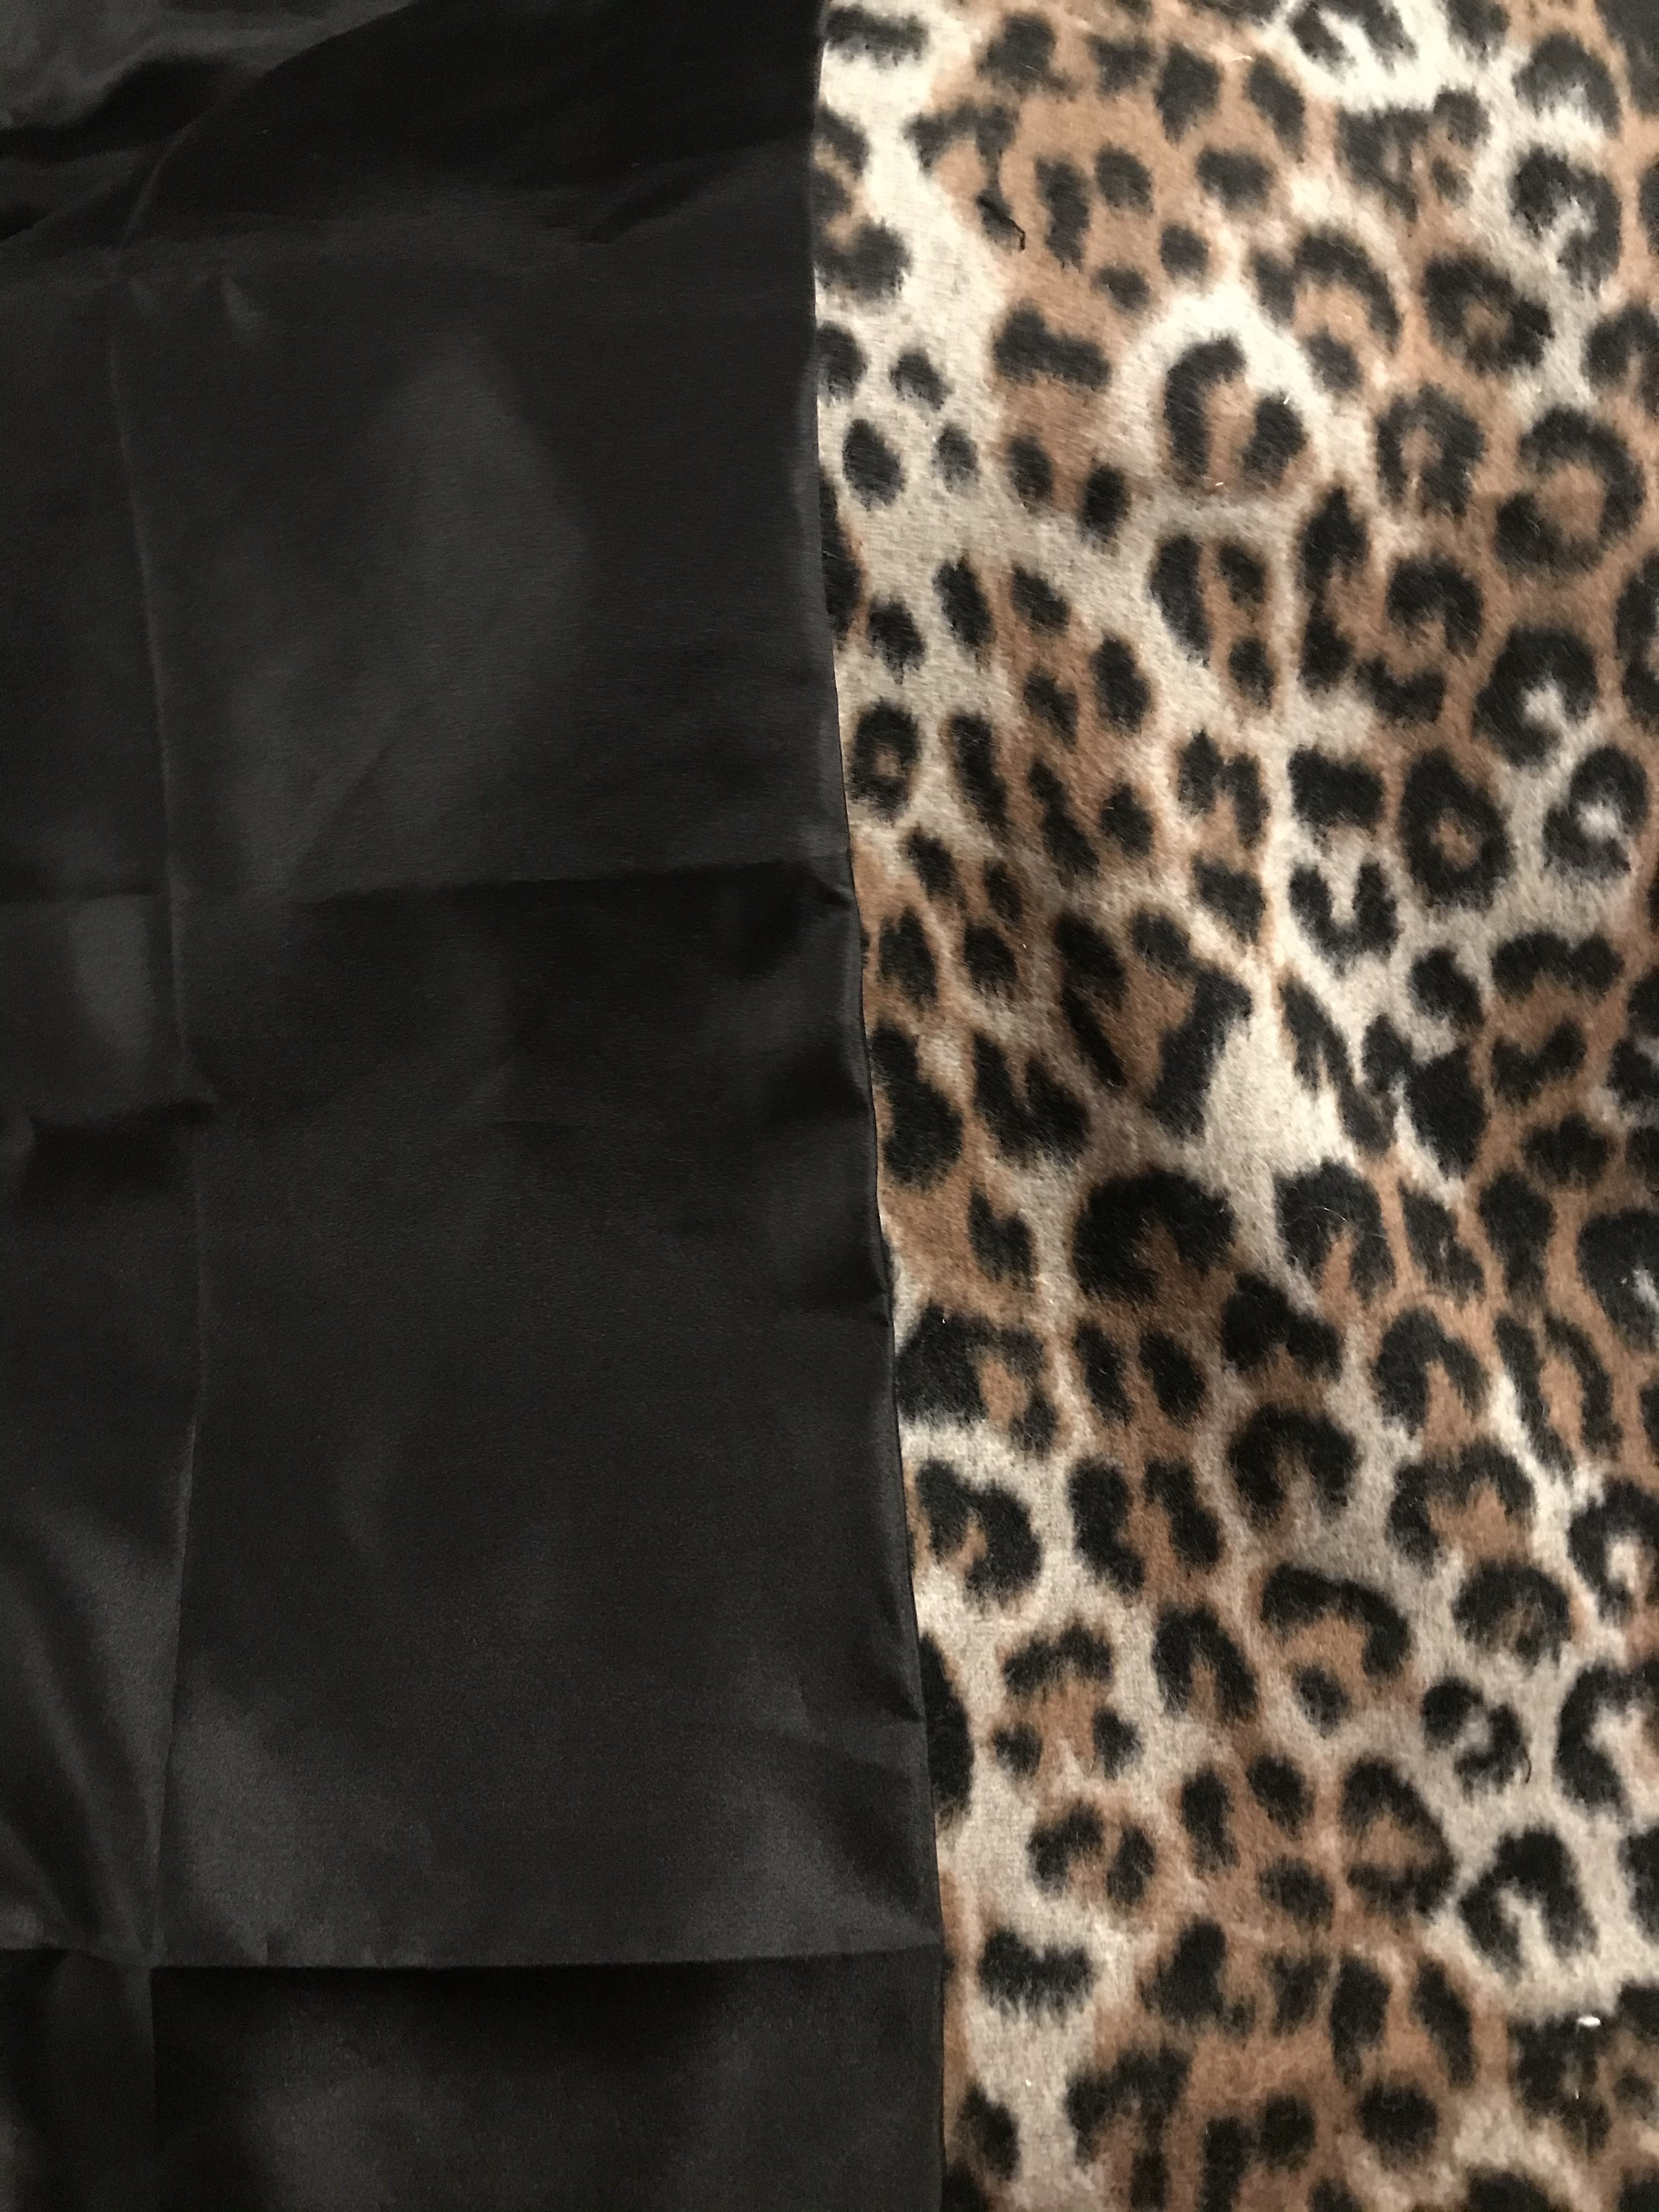
I initially started making this coat back in October 2020, taking the time to ask my friends on Instagram which lining color they liked with the print. I ultimately chose bright red as I thought it had the best “pop”, but any one of them would have been gorgeous!
My favorite lining options for my coat, all choices in silk:
Lining options I had in my fabric stash of solid silks
Well, as usual for me, I eagerly started working on sewing up this gorgeous coat using Butterick 6385 pattern buy cutting out the pattern tissue, tissue fitting myself to check fit, cutting out the fashion fabric, the lining and a flannel underlining for warmth. I even made a few of the first seams, including the pockets (which end up being way too small.
Note to self: next time, make the pockets bigger!
Butterick 6385 pattern from Lisette
I chose view C with the stand up collar and the rectangle pocket flap of view A.
I got to cutting out all the pattern pieces before I realized that there was a good chunk of fabric missing from the upper sleeve that would leave a huge gaping hole if I attempted to ignore it, and I didn’t have enough of the fabric left to cut the piece again. To boot, the fabric store where I got the fabric also didn’t have any of exactly the same fabric left in stock. Grrr!
So, with the air deflated out of my sewjo, I rolled up what I had done so far, and added the coat components and pattern to my “to be continued” pile and there it sat for a better part of a year. “Le Sigh”
As part of my new life goals that I have set for myself recently, at least my sewing life goals, I want to tackle my unfinished projects, finish them, and clear the decks (and my mind) to focus on new personal and client projects to work on. So, with autumn in the air and this project staring me in the face and making me feel guilty about wasting time and resources, I figured out how to fill in the missing chunk at the sleeve by using fabric glue (gasp!) and scraps from the cuttings which I always save, and got right back into making this coat
Sewing the lining, which I serged all of the edges when I originally cut out the pattern. Thank goodness I did because this silk stuff frays like a mofo
I sewed and sewed with newfound energy for this coat, staying up late and ignoring my hungry husband. He’d survive, but I couldn’t until this darn coat was DONE!
Here’s a shot of the coat just before installing the lining, showing the interior interfacing and underlining in camel flannel for warmth and extra stability to the fashion fabric
Flannel underlining and interfacing inside the coat just before adding the lining.
I skipped the shoulder pads and sleeve heads as I felt I really don’t need them, however that is one step that I probably should have done. Next time…
Setting in the lining and going the finishing touches on the coat, some by hand, was starting to turn the corner and approach the end. I took a good amount of time pressing and pinning this baby into submission, all which made it easier to sew and have professional looking results:
Hand sewing some parts always looks better (my sausage fingers would not agree)
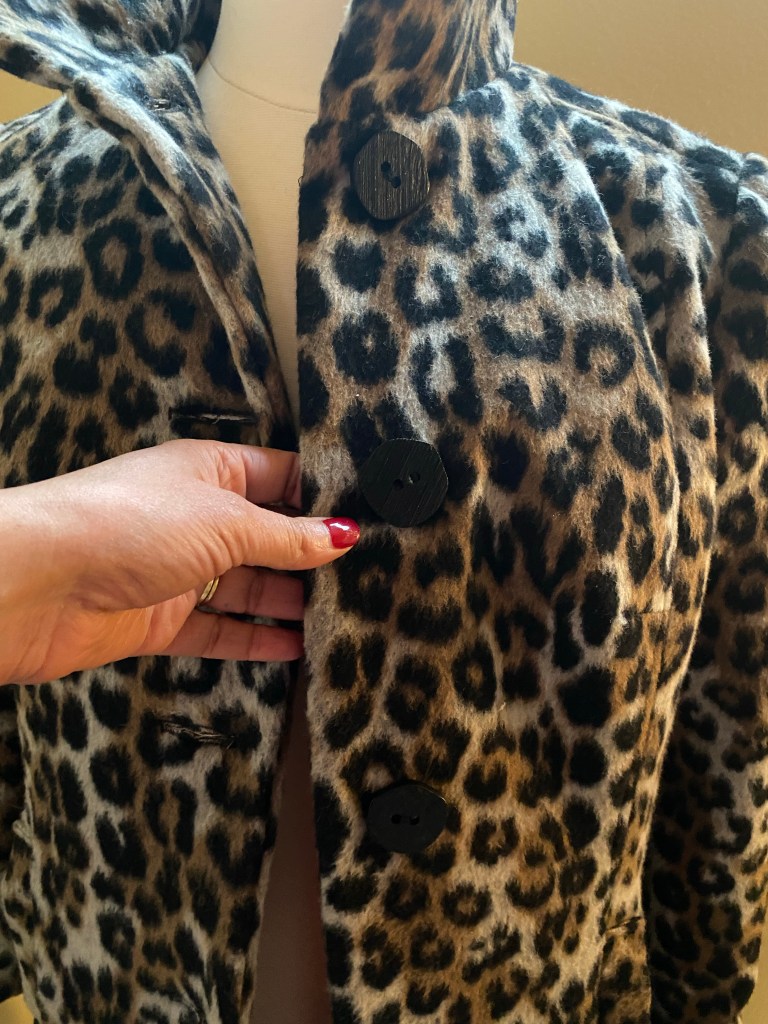
After finally finishing the coat, sewing buttonholes and buttons, I was finally DONE!
Aren’t those buttons cute? They kind of look like the spots on the leopard print!The red silk lining makes my heart happy!
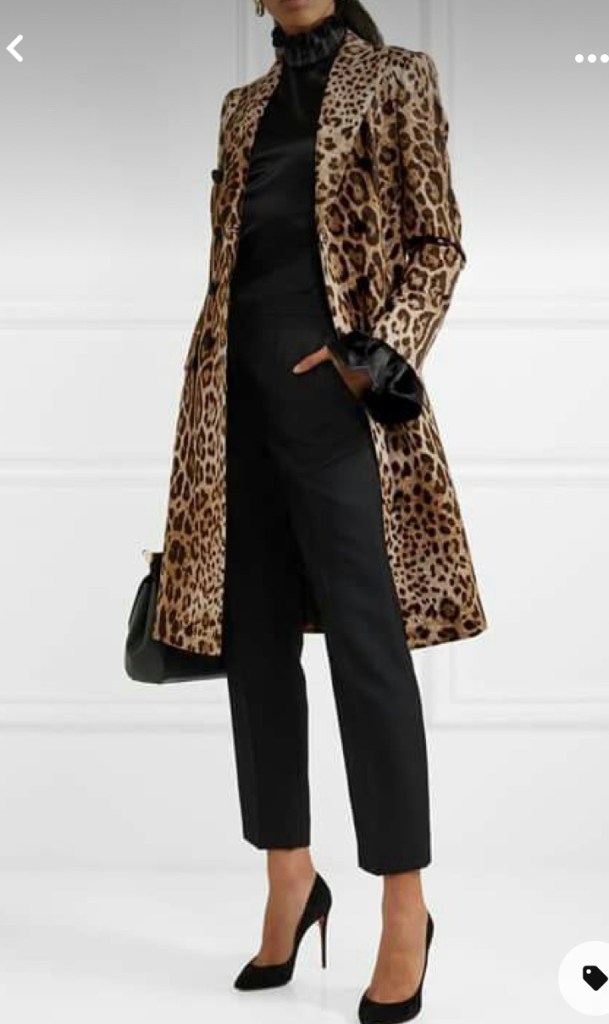
I knew that I wanted to take some great photos of this creation for sharing on social media, and have many examples and inspiration photos from my Pinterest page such as these images:
I asked my dear fashionista friend if I could borrow a few of her gorgeous designer handbags for the photos and she was so sweet and generous to lend me some of her favorites for a few days. I narrowed down the options to these three I’m accessorizing with the coat:
A gorgeous Loewe structured tote in camel A classic quilted Yves St Laurent chain handle bag in blackA stunning Sophie Holme red clutch
I’ll just shut up now and let Her speak for herself…
Aaaaand, scene….
Ok, I’m now ready, the decks are clear for takeoff…
This little gem took me months and months to make, but the actual sewing took only a few weeks to complete. My biggest weakness when it comes to sewing is starting a wonderful and exciting new project, then something else shiny (or someone who’s paying) comes along and I set it aside for far too long. This baby was exactly one of those scenarios.
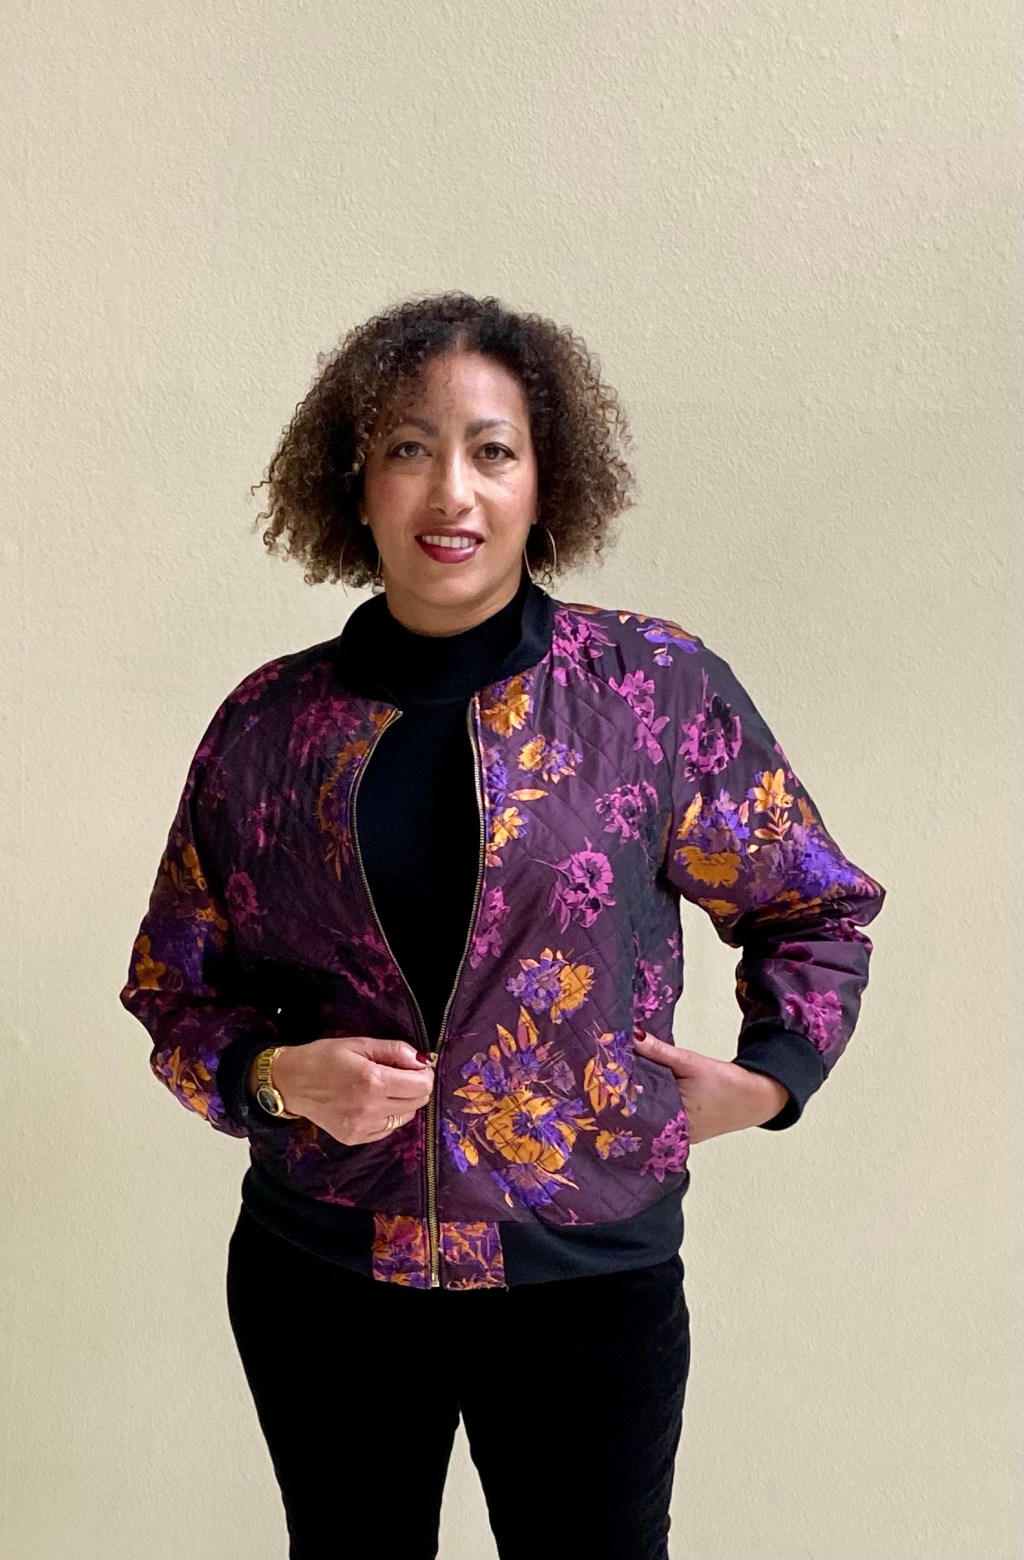
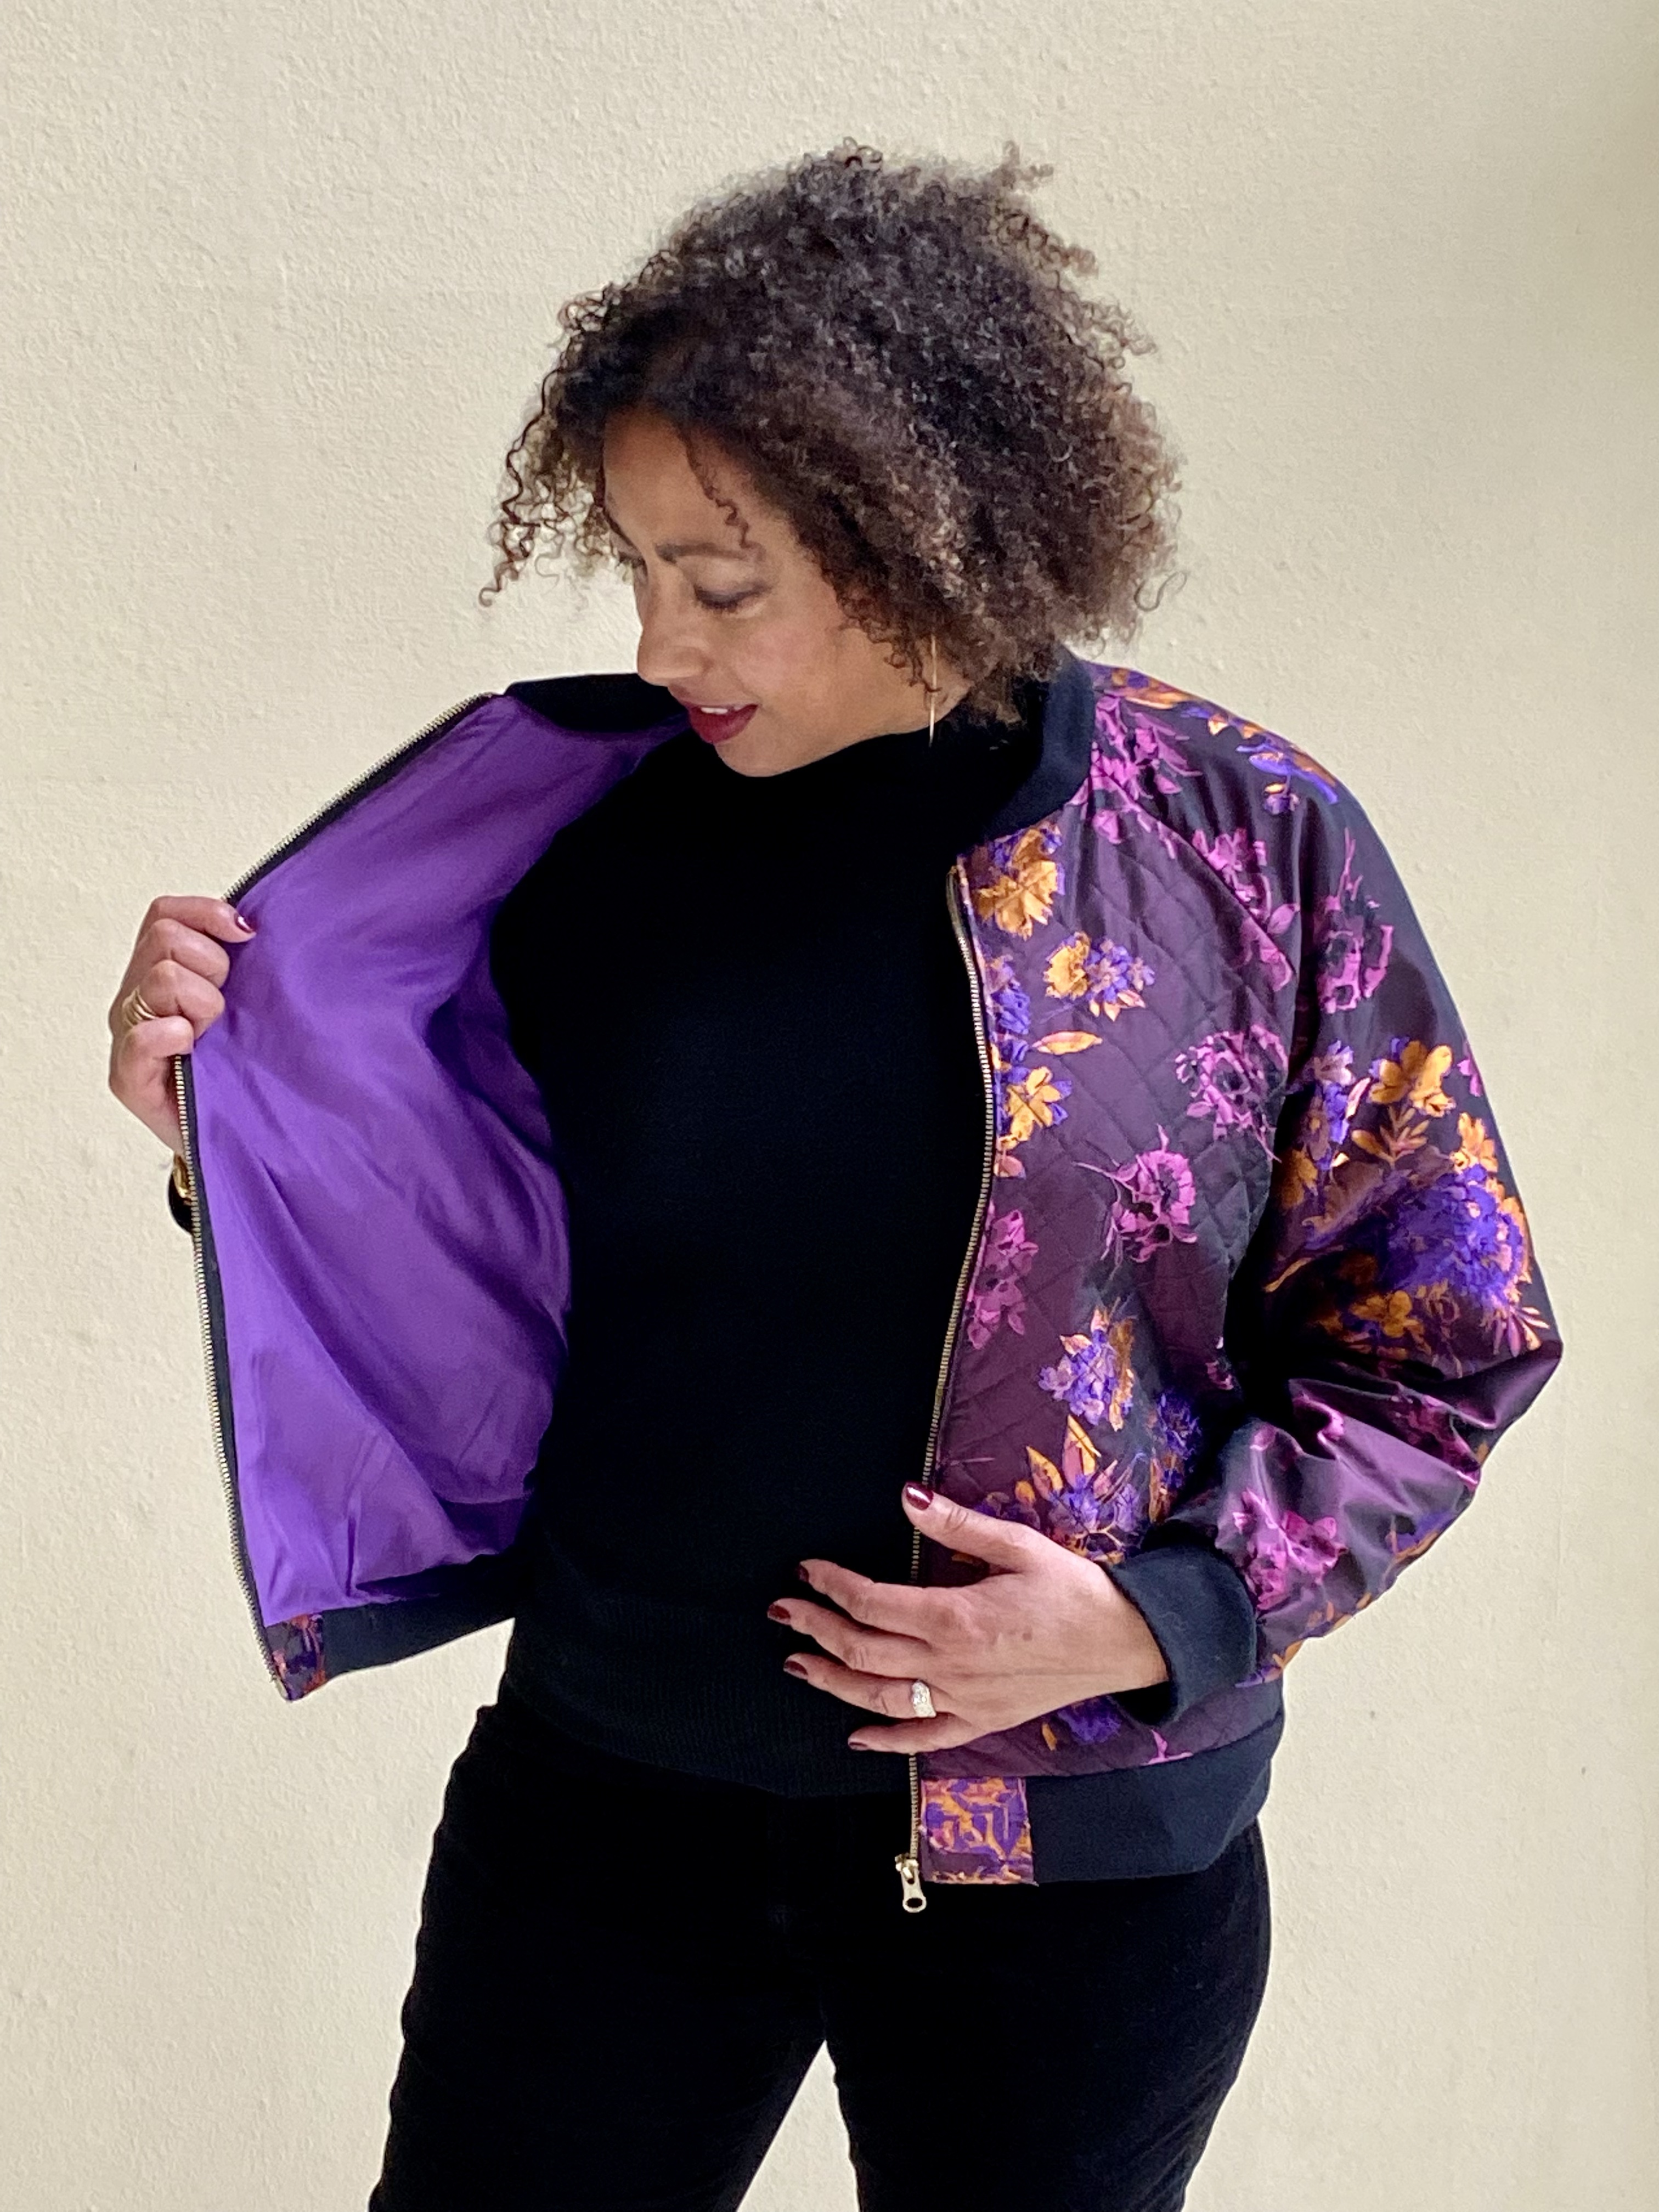
I love making jackets. They are a big part of my wardrobe and can be easy to sew. They are even easier to sew if you’ve made the same one before, as I did for this bomber jacket pattern. I used Simplicity 8418 pattern for the second time to create this beauty, and it is certainly not the last time.
Now, for the ingredients that make this recipe top notch, I used beautiful silk material, quality threads, and smart sewing techniques. The main fabric for this version I decided to finally use an end remnant of gorgeous silk jacquard labeled from Chanel that I won years ago in a fabric giveaway and was stashing for a special project. I also happened to have enough of a piece of silk lining-weight material in the perfect shade of purple to coordinate with the colors of the Chanel silk, also in my stash (If you don’t know me already, I have a very healthy stash of fabric in my possession).
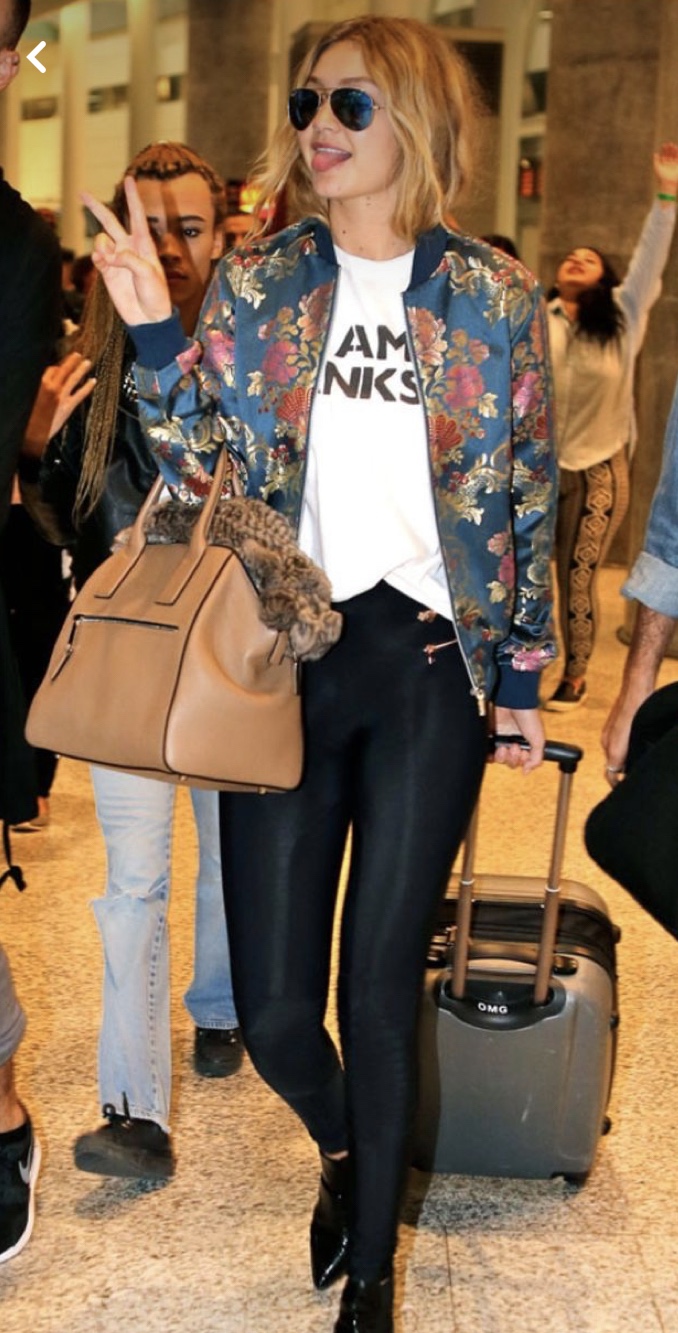
Of course, I also had Pinterest to add to the inspiration for this creation, which made the decision to cut into this beautiful material more bearable, because after all, you only life once and you can’t take it with you. Here are just a few of the bomber jackets that inspired me:
I got right to cutting out the pattern pieces from the main fabric and the lining, as well as the light weight batting I used to quilt the silk to. The last time I made this pattern, I quilted the entire lining and left the outer side as it were. This time, I wanted the quilting to be part of the texture of the outer garment.
Well, I quilted part of the back of the jacket, and that’s about the time when I got busy with other pressing projects, paying clients, and teaching others to sew, so the jacket partially made and the cut pattern pieces was gently laid aside on the “to be continued” pile. There it sat patiently for months.
Fast forward to October of 2021 when I was planning to attend a conference that involved the professional sewing guild that I belong to, Association of Sewing and Design Professionals or ASDP for short.https://sewingprofessionals.com/. I knew that I wanted to wear garments that I had made to the convention and had a long wish list that I had wanted to create, but for the sake of time, and to tackle my growing pile of UFO’s that stare at me when I’m in my sewing room, and seem to beg for me to just work on them just a little bit, I revisited the silk bomber project and decided it would be a fantastic option for the convention.
Hence, the sewjo for this project sparked a new light in me and I got right back into the groove of quilting this baby and getting it going in time for the convention. Whatever the motivation was, it worked and I pulled through and finished the jacket in time to wear it a couple of times even before having to pack it up and fly to Boise, Idaho for the sewing pro retreat.
Well, the convention was amazing and I got a ton of compliments on my jacket which I was proud (and perfectly comfortable) to wear. Now I call that a job well done and worth the wait!
Whenever I have been invited to an occasion, the first thing I think of is “what am I going to wear?”. The next thing I think of is “what can I sew for myself to wear” as I love to make clothing and I love wearing things that are unique and nobody else has in their closet. From there, I pull up my pattern stash archive, pay a visit to my fabric stash (or the fabric store if I really don’t have the appropriate fabric to work with) and get started planning and sewing my outfit.
For this occasion, I was invited to a wedding of a lovely bridal alterations client who had become a friend over our many dress fittings and consultations of her beautiful wedding gown. The major part of her dress that I altered was her complicated and intricate bustle of her train that I she dreamed up and I created for her. Originally, as I fiddled and fussed to get her train bustled just right at one of her fittings, I said to her “I’ll just hide in the bushes at your wedding venue, you give me the signal when you are ready, and I’ll sneak out and help you bustle, then disappear back into the bushes and let you be on your way to the reception”. She would have none of that and insisted that I attend the wedding as her guest, and enjoy the entire ceremony plus be ready to bustle…DEAL!
All of the ruffles and flounces in action!
So, being the alteration seamstress of honor at this wedding, I just had to have something special and handmade to wear! Not having all the time in the world to be sewing for myself with the very busy post-Covid wedding season upon us and other alterations and custom sewing client projects literally piling up in my sewing studio, I decided to make a dress that I have made before (a huge time and energy saver!) and use fabric that I had in my stash from Mill End Store in Portland, OR.
I pulled out this lovely pattern from Butterick that I had already cut out and made fit alterations to the pattern for a dress that I made a couple of years ago:
Butterick 6554 pattern
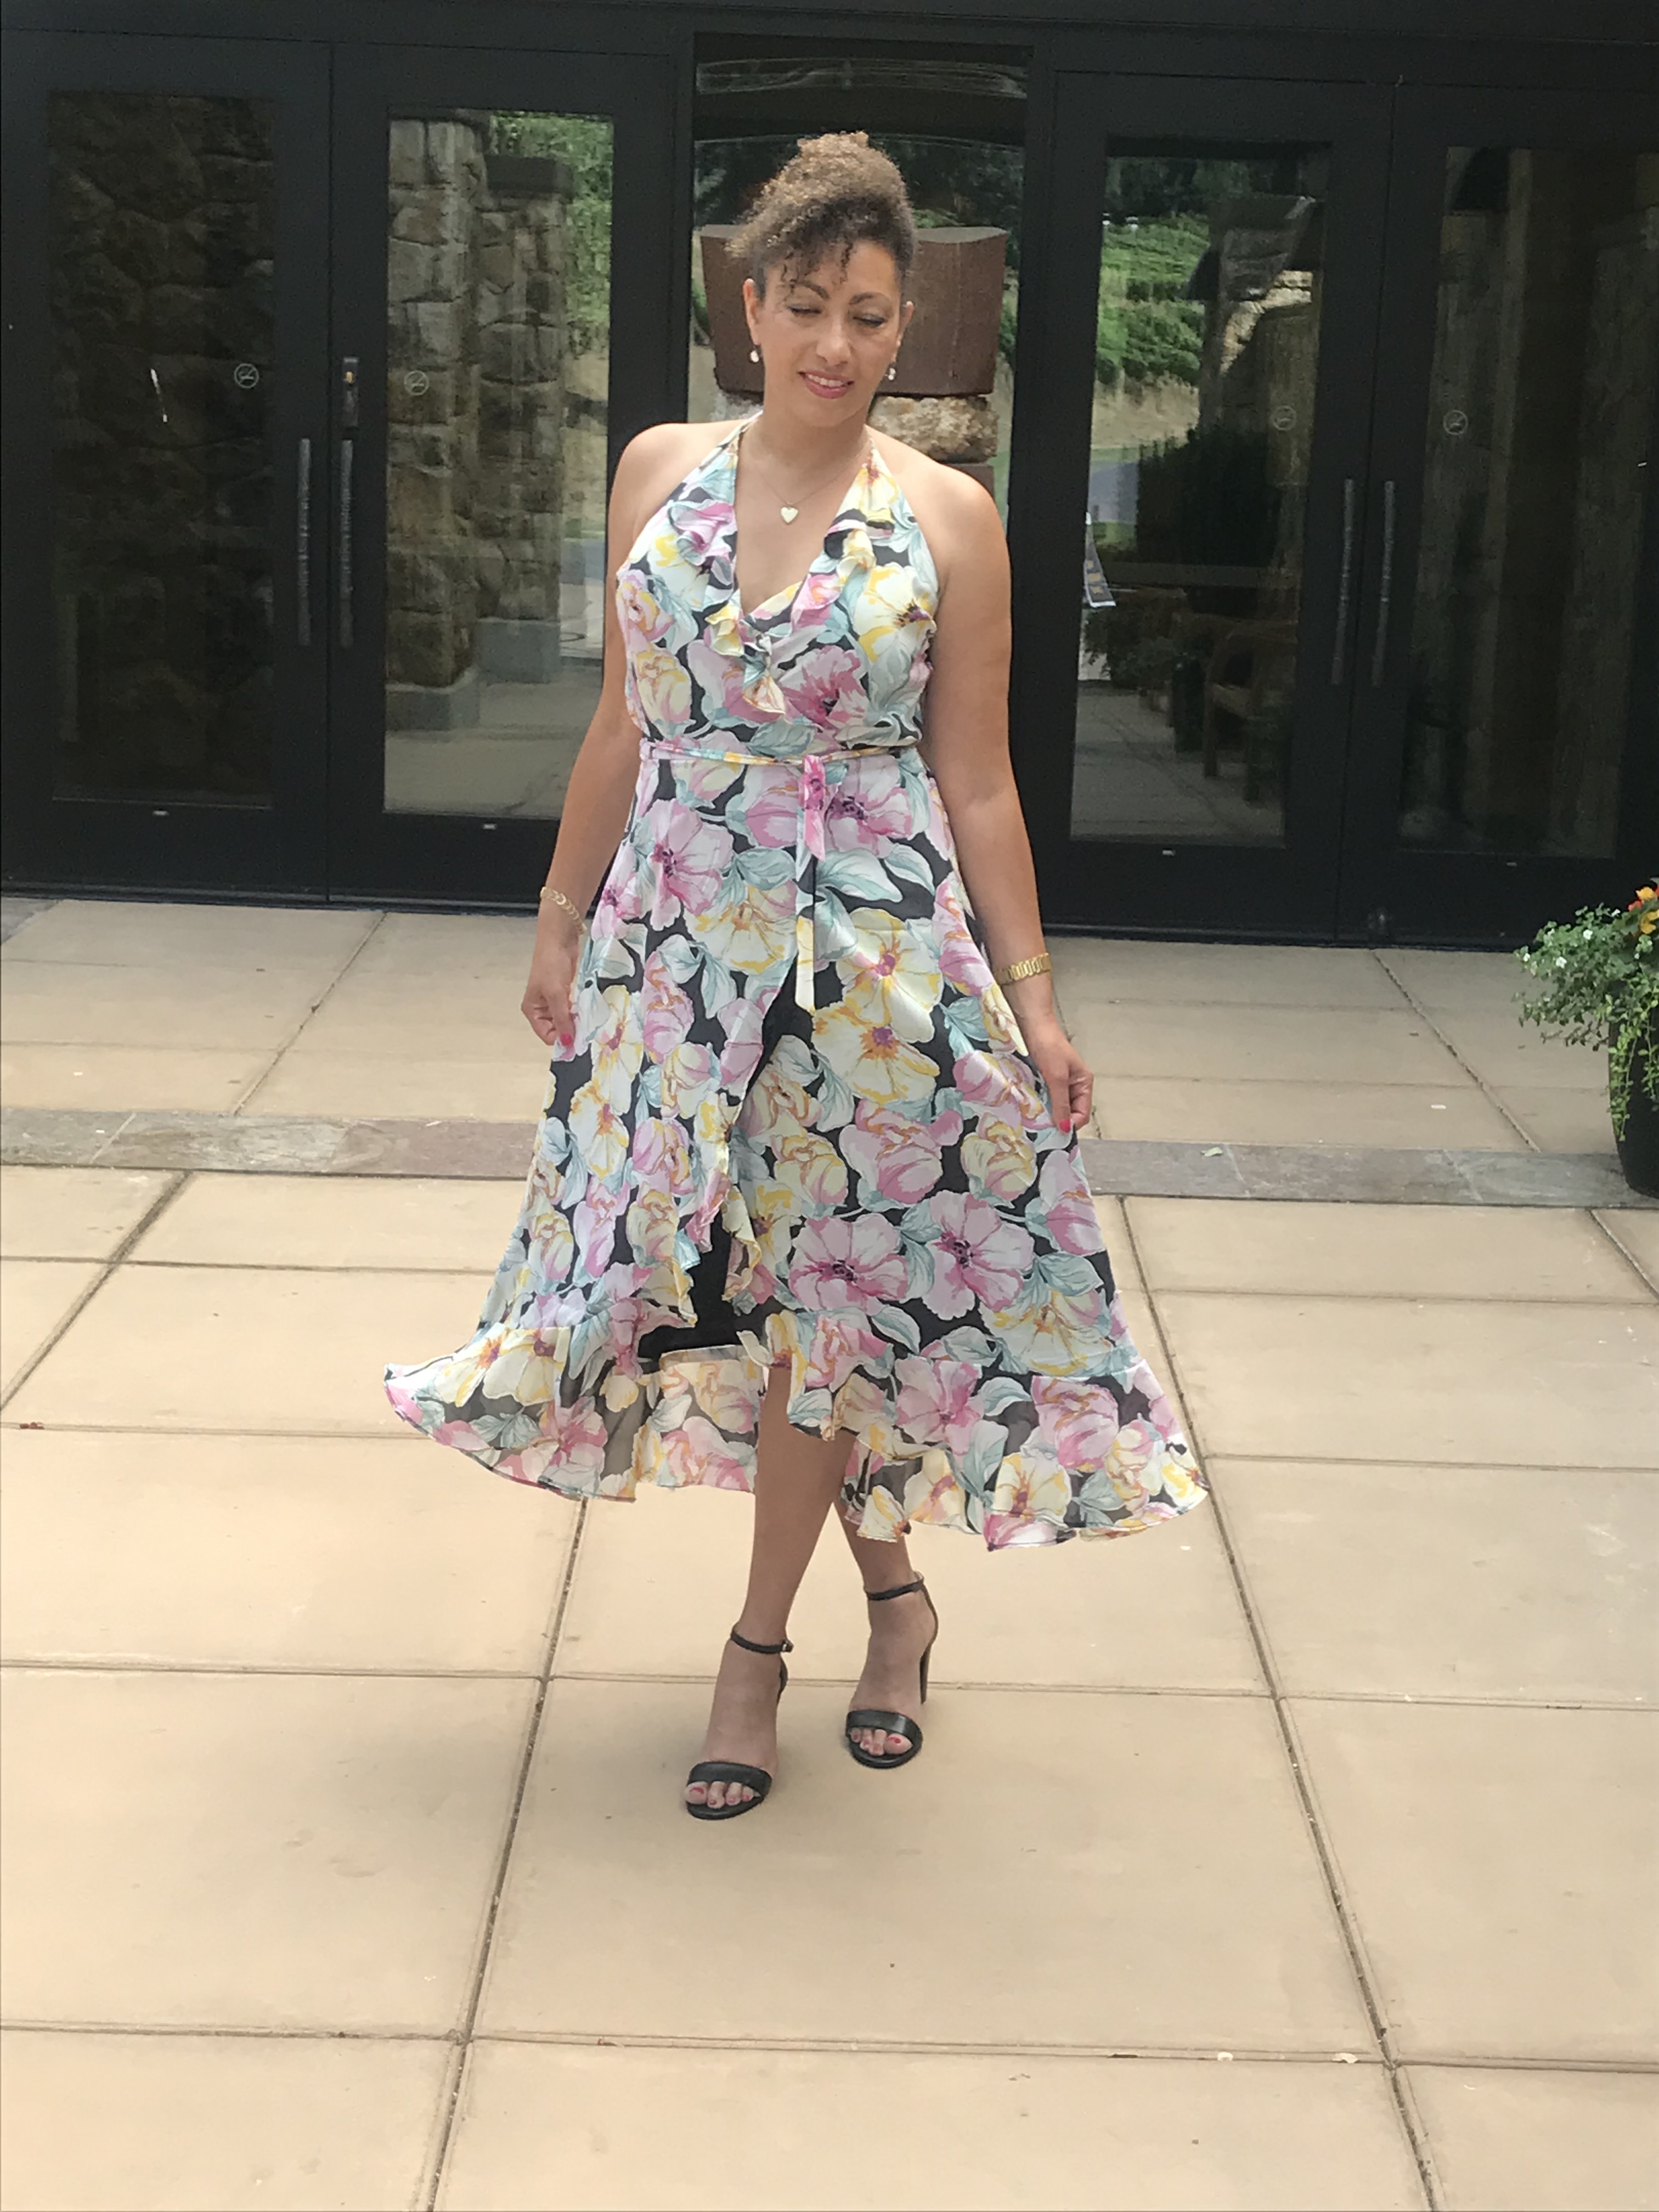
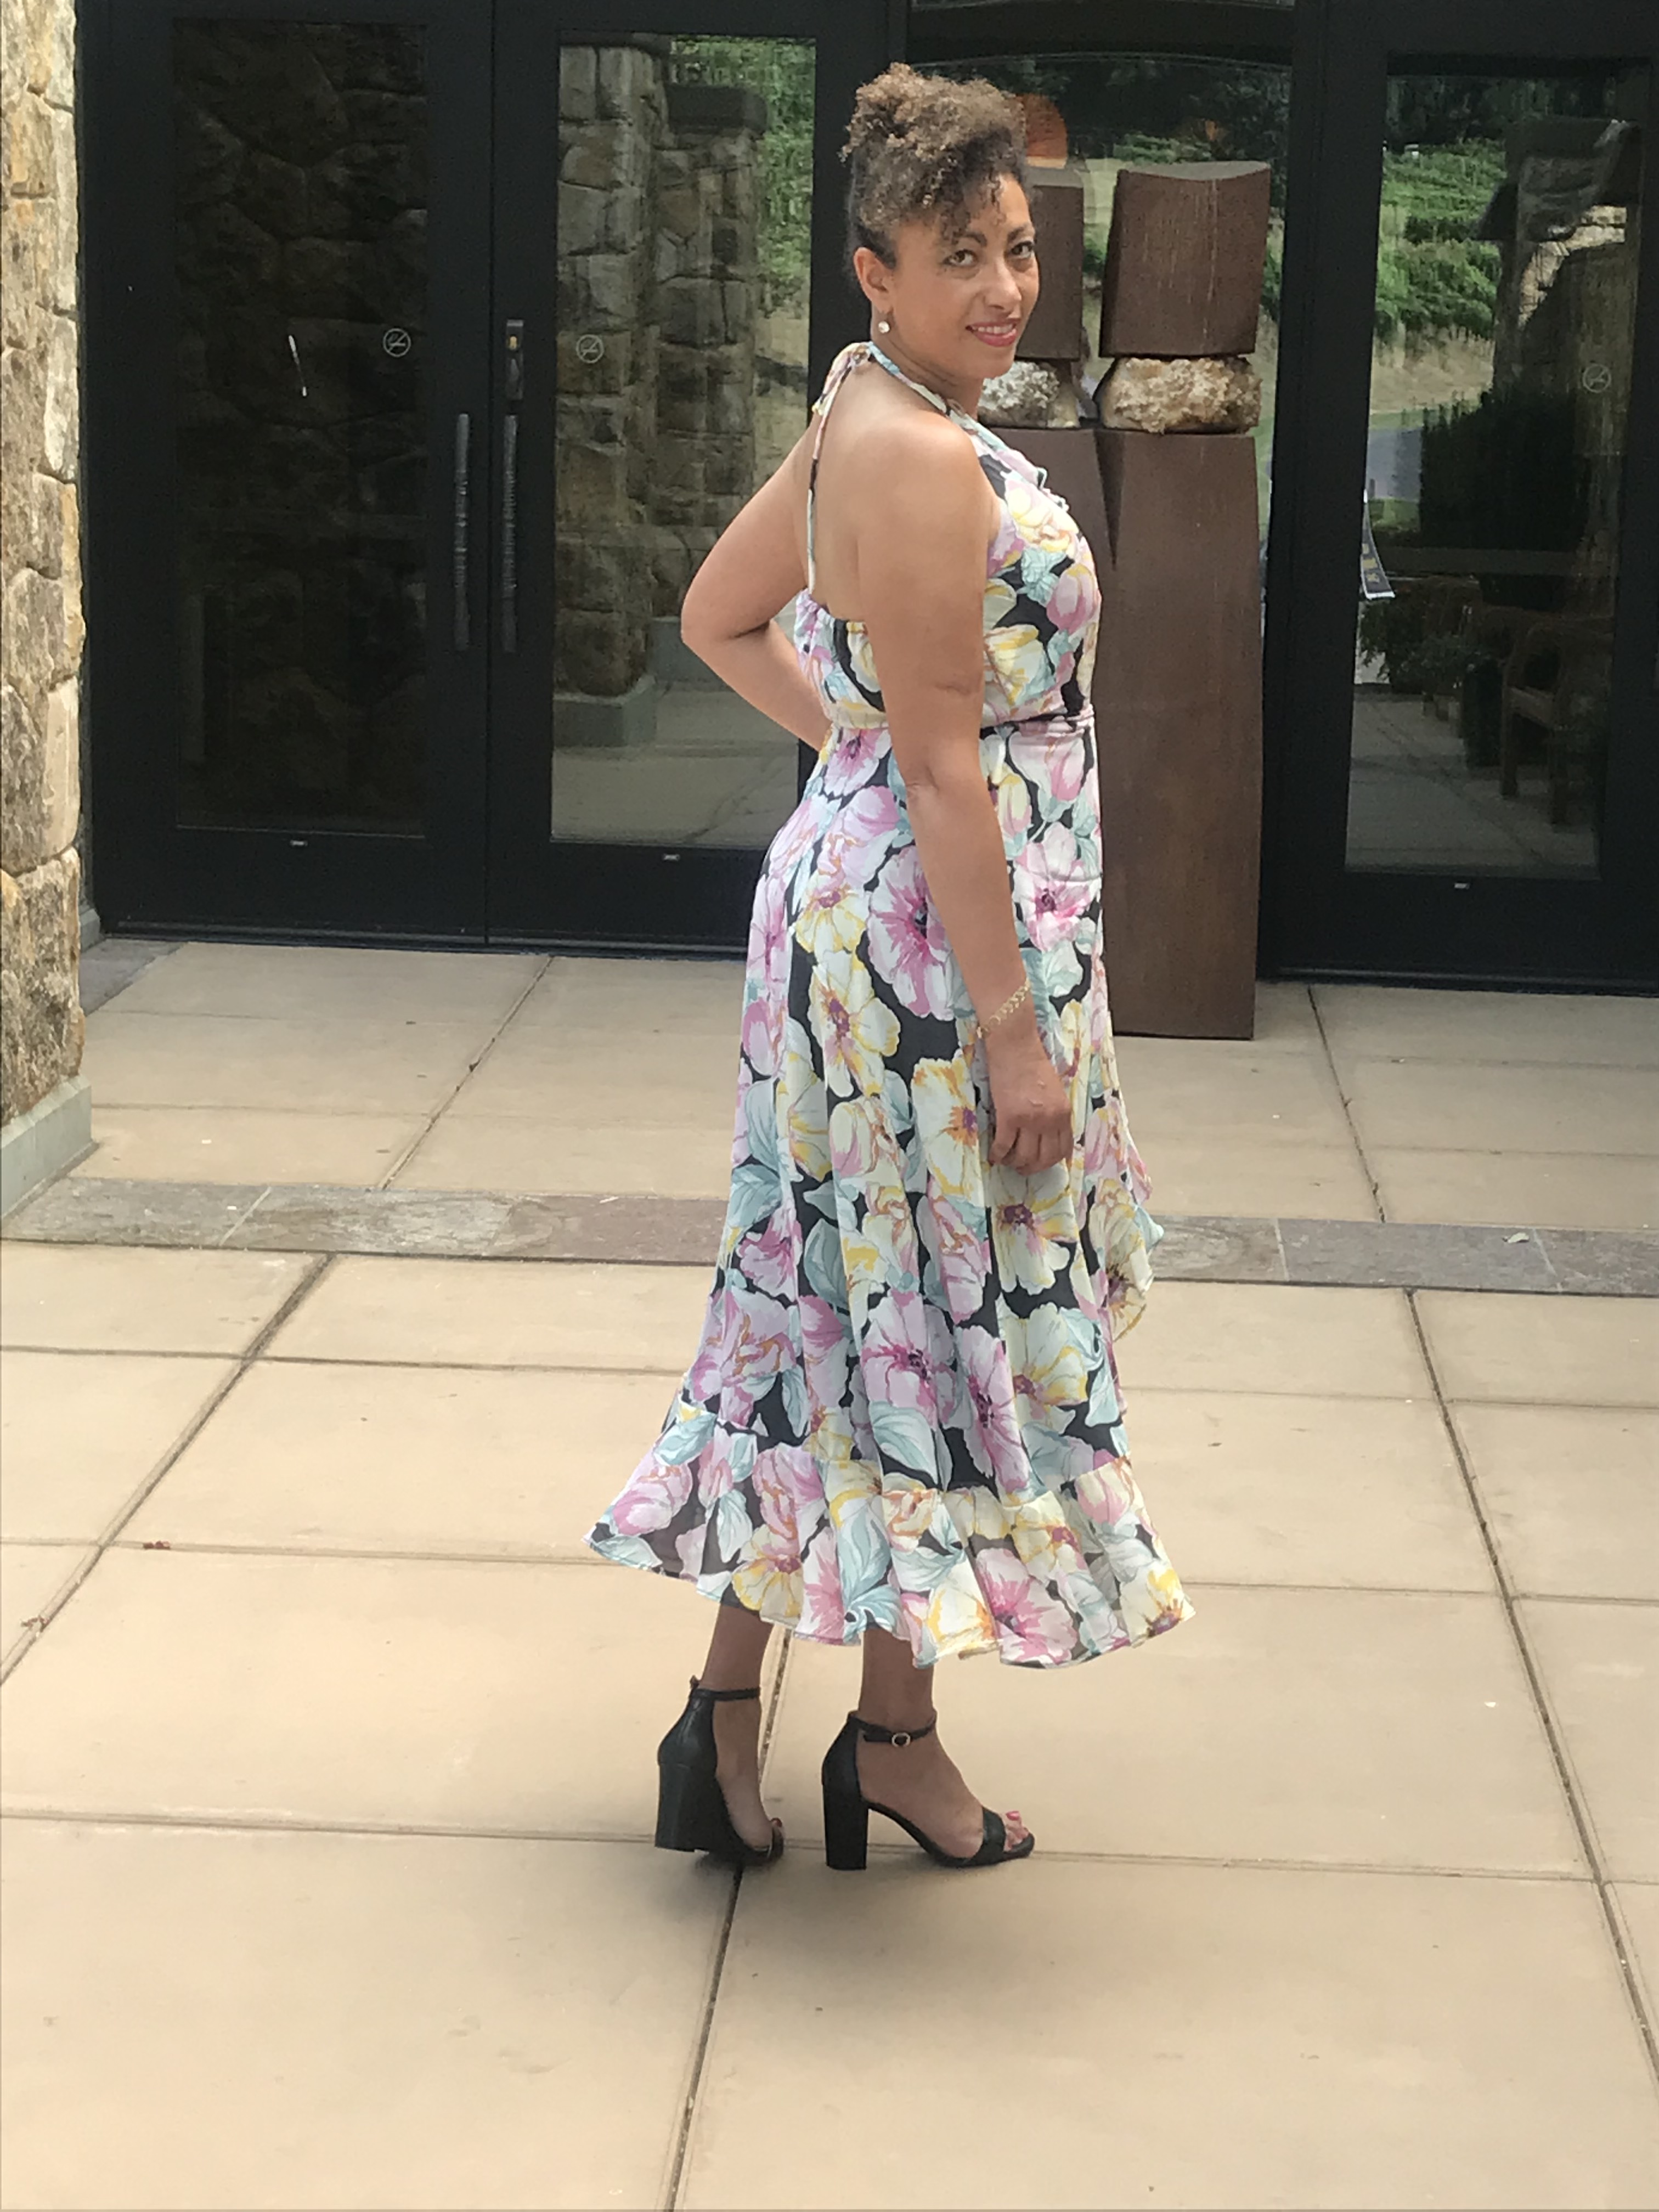
I made view C, the halter neck, ruffled and flounce dress that wraps and ties to the side.
This time around, I decided to fully line the dress (instead of using the bodice facing from the pattern), meaning I cut out the entire dress, the bodice and the skirt pieces, less the flounces, in both the outer, floral silk georgette fabric and the silk lining that I also had in my fabric stash. Cutting silk, especially sheer, floaty slippery silk, is NOT easy if you’ve ever tried. It slips all over the place and misbehaves in as many ways as it can, just to drive you nuts and practically give up before you even started. But, since it was SO pretty and soft, I did my best to battle it and tackle it into submission, knowing in the end it was going to be incredible and worth it all.
The silk draped so innocently on my dress form
Anchored down and ready to cut!
So the sewing begins!
Making a tiny hem to the ruffled edge
It all went pretty well and the fact that I had made it before, I knew what to expect from the pattern instructions.
The most difficult and time consuming part was making the narrow hem on the long outside edge of the flounce that would be attached at the bottom of the skirt. Check out this pattern piece that is over 110 inches long. Yikes!
After tackling that beast, the dress was nearly done and I could start to see the light at the end of the tunnel.
Having a major deadline to hit, and other clients banging down my door and begging me to help them with their last-minute bridal requests, I finished up my dress and just got ‘er done.
One last thing I added to the dress was lightweight foam bra cups sewn into the bodice lining as that sheer stuff certainly wasn’t going to hide my bits. Thank goodness I had some on hand in my supply stash and I was able to swiftly hand sew them into my dress, no problem! Confidence boosters for boobs-horray!
Bra cups sewn in saved any wardrobe malfunctions!
I just have to share the insides of the dress with the lovely silk lining!
Here I cheated and used my serger to attach the waist of the bodice to the skirt and hide the raw edges.
The skirt lining that ends just above the flounce
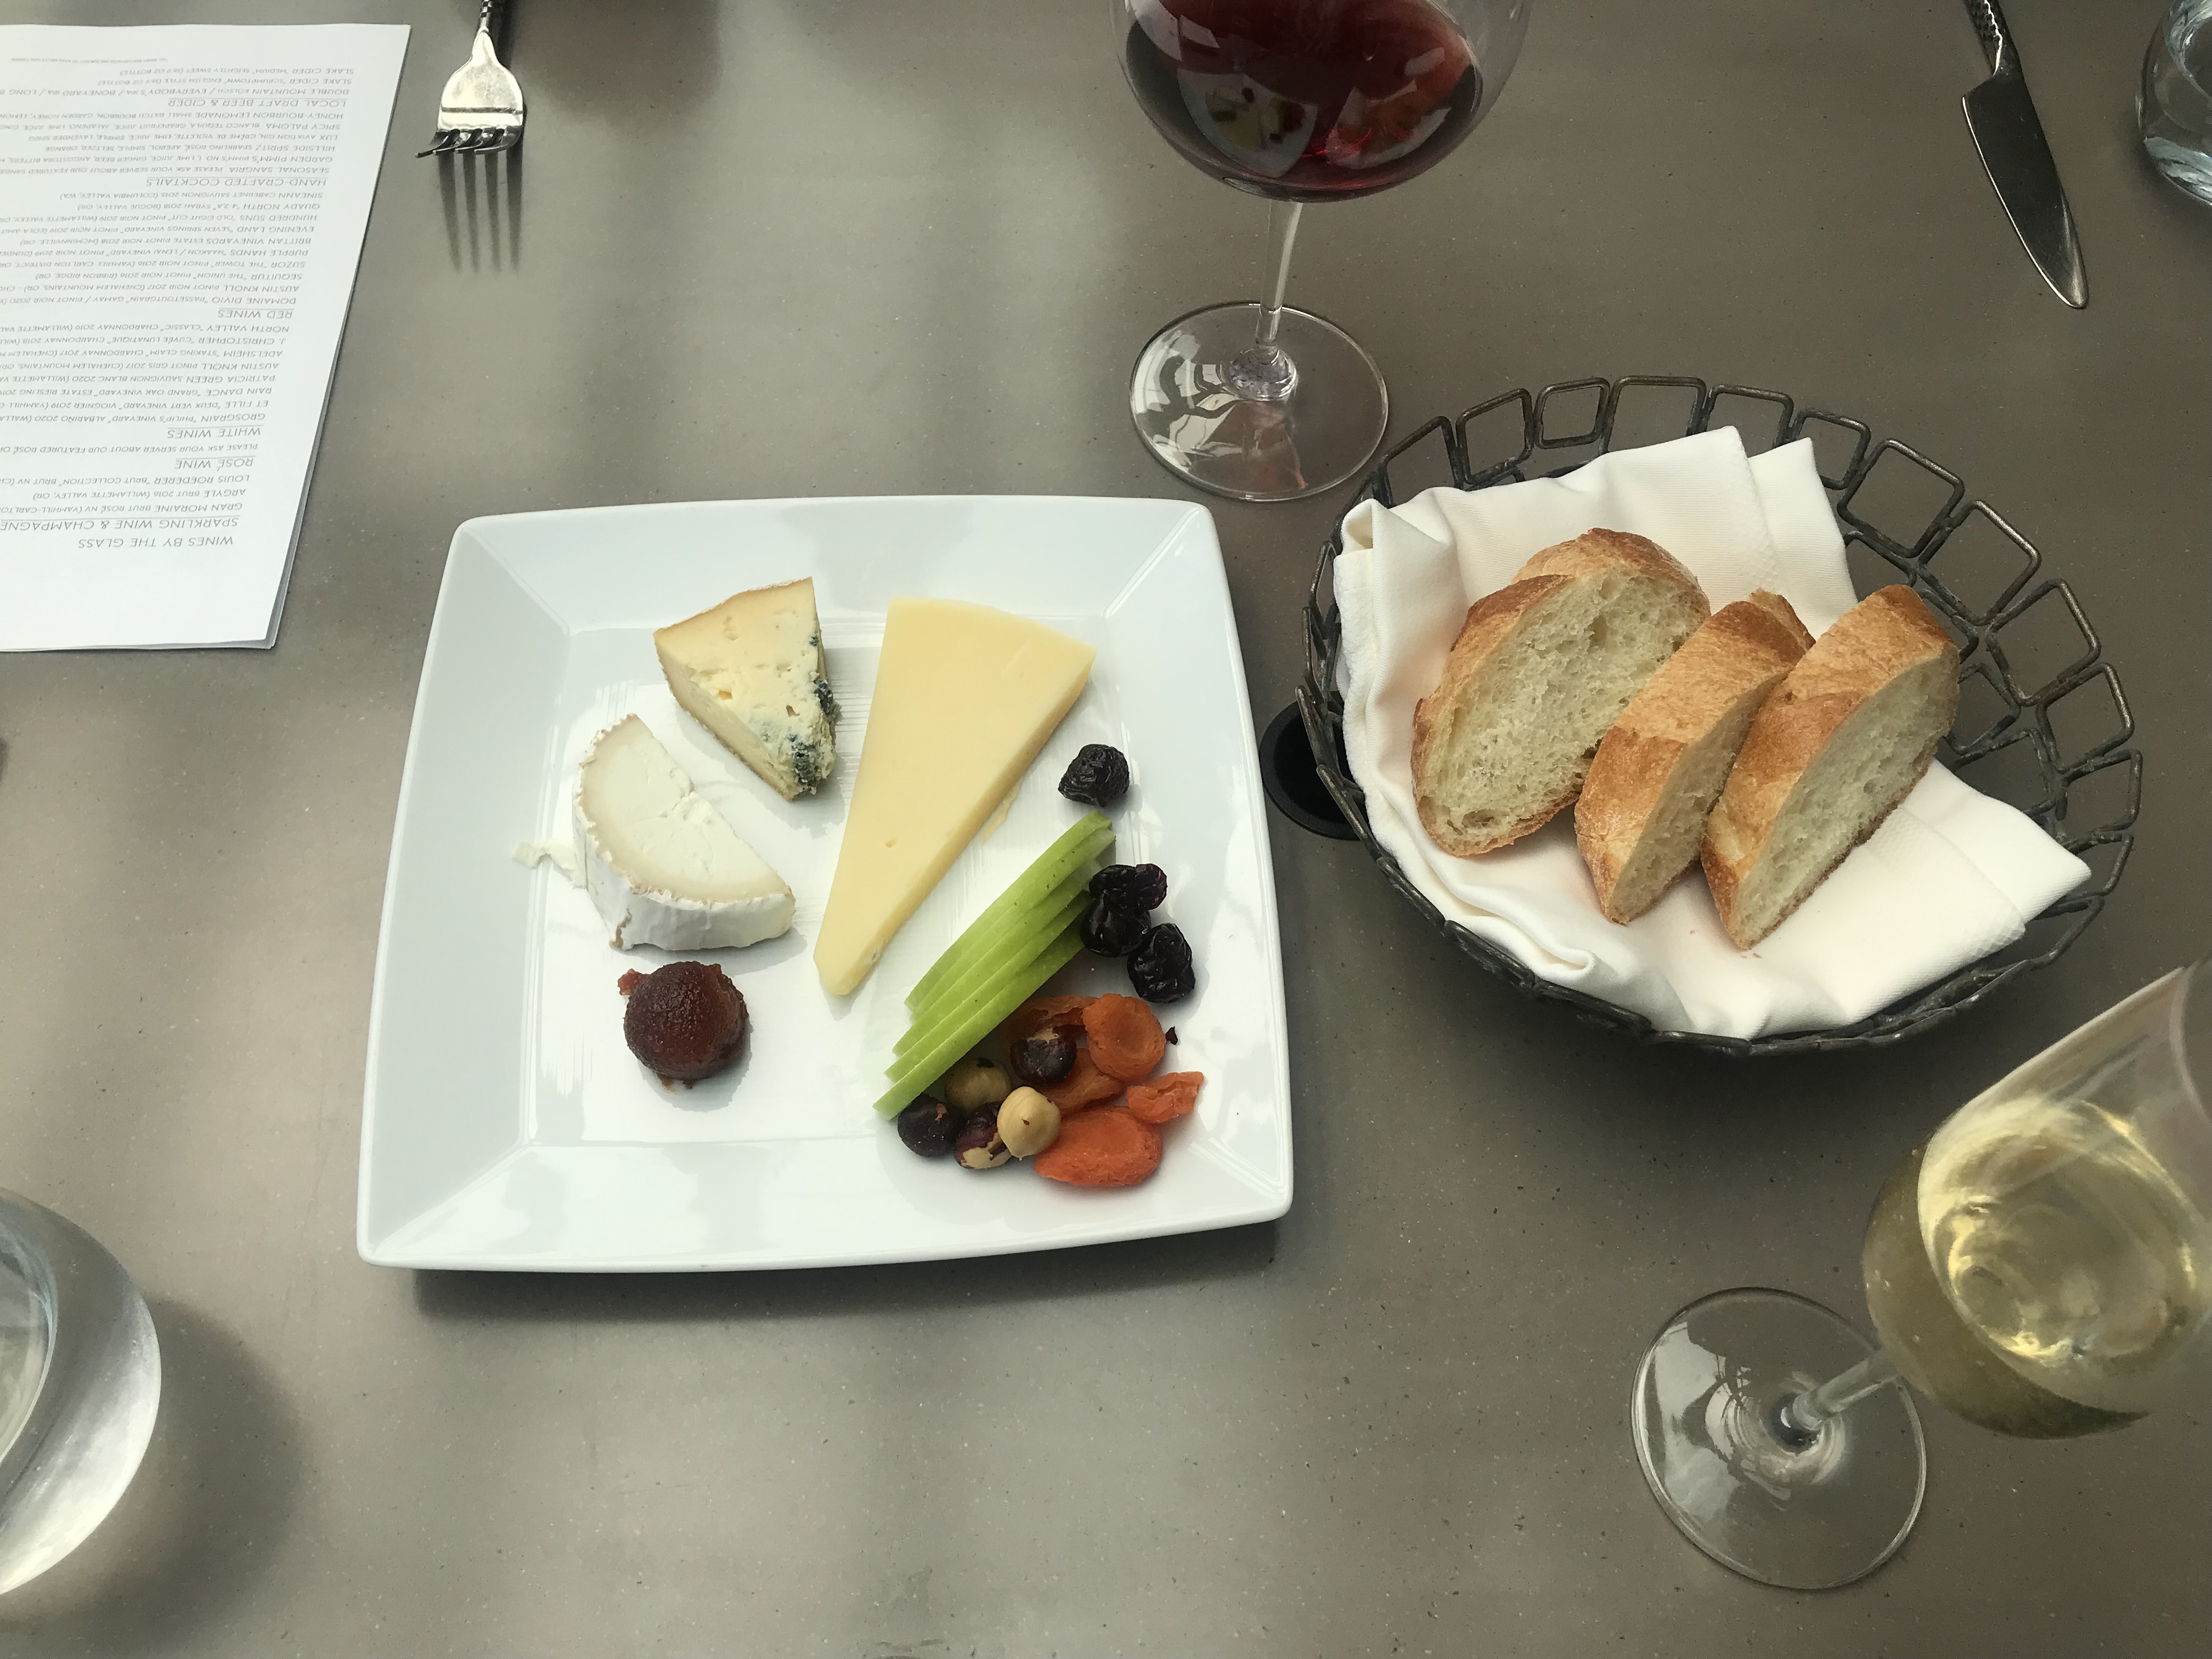
So off we went to the wedding, leaving enough time to stop at one of our favorite spots in the wine country of the Willamette Valley in Oregon, The Allison Inn and Spa, to snap some photos and have a glass of champagne and a light cheese plate before the wedding. Perfect!
Let’s go up there, that’s where the champagne is served!
The lovely snack we shared over a glass of wine and champagne!
Watch that breeze!
As much as I enjoy the entire process of making a new dress, it feels so good to be done with this one, wear it to a fun wedding (and not have to hide in the bushes!) and hang it up on my wardrobe for another occasion.
I was overjoyed to have been contacted by an acquaintance to create a custom wedding gown for her elegant and opulent wedding happening in October of 2019. Dione is a lovely boss-lady who has a bold sense of fashion and an arresting beauty, so of course, I was super excited to have the opportunity to create something unique for her wedding dress!
We started with ideas, concepts and visions of what she wanted for her gown.
She was going for BIG, BOLD and DRAMATIC!
She shared these images with me for her visions of the gown:
The High/Low hem and embellishments of this dress really caught her eye.She loved the embellishment details of this dress, and the volume of the ballgown
So I got to work right away coming up with concepts that I would be able to create and achieve with the skills that I had.
I made some fashion sketches and shared them with her:
And the fittings began!
I started with this McCalls 7720 sewing pattern for the shape of the bodice, and possibly the skirt too if I could get the fullness:
McCalls 7720 pattern
I ended up just using the bodice of the pattern and draping the skirt.
At first, she wanted to have a tulle underskirt to wear for the wedding ceremony, then take off the underskirt to reveal the underside of the hem and her fabulously shapely legs. Here is a raw version of the dress mocked up in muslin with a tulle skirt underneath for fullness:
I perfected the fit of the bodice easily on her slim torso, so that was easy. It was getting the skirt length, fit and drape just right that was the major challenge:
Here she is, in the dress, cut in the satin, pinned up to make the hemline as we wantedPlacing the motifs with the tulle underneathAnd with a couple of the fancy gold trim motif’s pinned to the front.And more trim…
At the next fitting, I had pinned the gold trim all around the skirt and we tried this on for fun (meanwhile, we were moving into a new house, was planning our own wedding, and I was making my own dress, so please excuse the chaos of my sewing room):
Nice, but we weren’t happy with the back length at all so I kinda had to start over.
OK so fast forward, I was starting to admire my work as I worked late into the night up in my new sewing loft. I had a bodice, a skirt, and it was starting to look like a real wedding gown.
Playing with the pleat formation
Once we had the shape decided, I started the tedious task of sewing on all of the gold trim on, one motif at a time, with this annoying, yet beautiful, gold metallic thread. I was married by now, so I could put the making of MY dress out of my head and focus on Di’s dress:
Then, it was on to sewing the lining to the outside of the dress, all by hand:
Can’t lie, this was tedious…
Finally, the dress was done and ready for the final fitting! (Again, please excuse the pile of junk shoved in the corner, I was BUSY!)
Get ready for chills up your spine….
Photo: Dina Chmut PhotographyI can’t…SO HOT!!! Photo: Dina Chmut PhotographySums it all up: BAD-ASS BEAUTY! Photo: Dina Chmut PhotographyWith her handsome groom Howard, LOVE! Photo: Dina Chmut PhotographyThose legs go on for miles! Photo: Dina Chmut PhotographyYESSS!!!! Photo: Dina Chmut Photography
We had a BLAST at the wedding! It was a a huge, black tie event, so of course I had to throw together another dress to wear to it as the official dressmaker to the bride!
I just threw this together in a few days to wear to the wedding, no biggie..Ready to go!We were honored to attend the grand affair!
What an honor it was to create such a special gown for Dione! She was a lot of fun to work with and so great to get to know better. I loved EVERY minute of the process (ok, maybe not the hand sewing part) and am delighted to have had the opportunity.
I usually don’t identify myself as being overly girly or feminine, but I’m finding myself drawn to flounces, ruffles, florals and other “girly” details in fashion lately. So, I figured, why not succumb to my femininity and make myself something floral, flouncy and flirty! (Yes, I am a total dork if you were wondering.)
Last summer, I came across this floral stretch denim fabric at Joann’s and really liked it, so I purchased a couple of yards of it, with the intention of making a little dress out of it:
We were planning a trip to Las Vegas in August 2017 and I thought this would be a great opportunity to sew a little strappy fitted dress for the trip, but then the trip was cancelled so this particular dress project was also cancelled, at least for the time being.
Fast forward to early Spring 2018. McCall’s Pattern Company released some really great patterns and for a couple of dollars, I picked up this one, and a few others, during one of Joann Fabrics pattern sales:
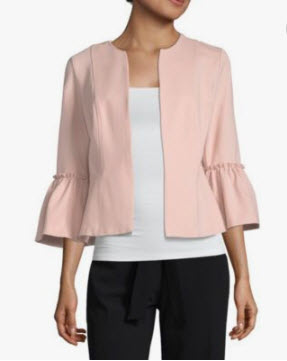
I’m not all that crazy about the ginormous sleeves on view B and C on this pattern, but I really like the little jacket shape and flounces of view A:
I thought I could make up a cute little spring jacket like this one I spotted on Pinterest:
This pattern, although trendy, could easily be made up in solid colors, prints, or with more of a classic look by just leaving off the flounces that are constructed separately and sewn to the outside along a marked stitching line.
One thing that I thought could improve the quality of the jacket in terms of construction and wear was a facing. Without a facing on the inside of this jacket, the lining would come all the way to the edges of the jacket and possibly show or peek out from the inside of the jacket. Upon doing some research of other sewists that have made this jacket, some of them had added a facing and were much happier with the result. So, I decided to take the time to do the same to mine.
I pulled up my online Craftsy sewing class Mastering Construction: Linings and Facings with instructor Sara Alm for a refresher on how to make facings and got to work adjusting my pattern.
Commercial break: I absolutely LOVE Craftsy and have learned so much from these great online classes! The classes offered are an invaluable tools for learning for creative-minded people.
I traced a 3″ facing from the jacket front and back pattern pieces, then also traced the lining (minus the facing area) from the same pattern pieces to create facings and a new lining pattern (adding seam allowances to each):
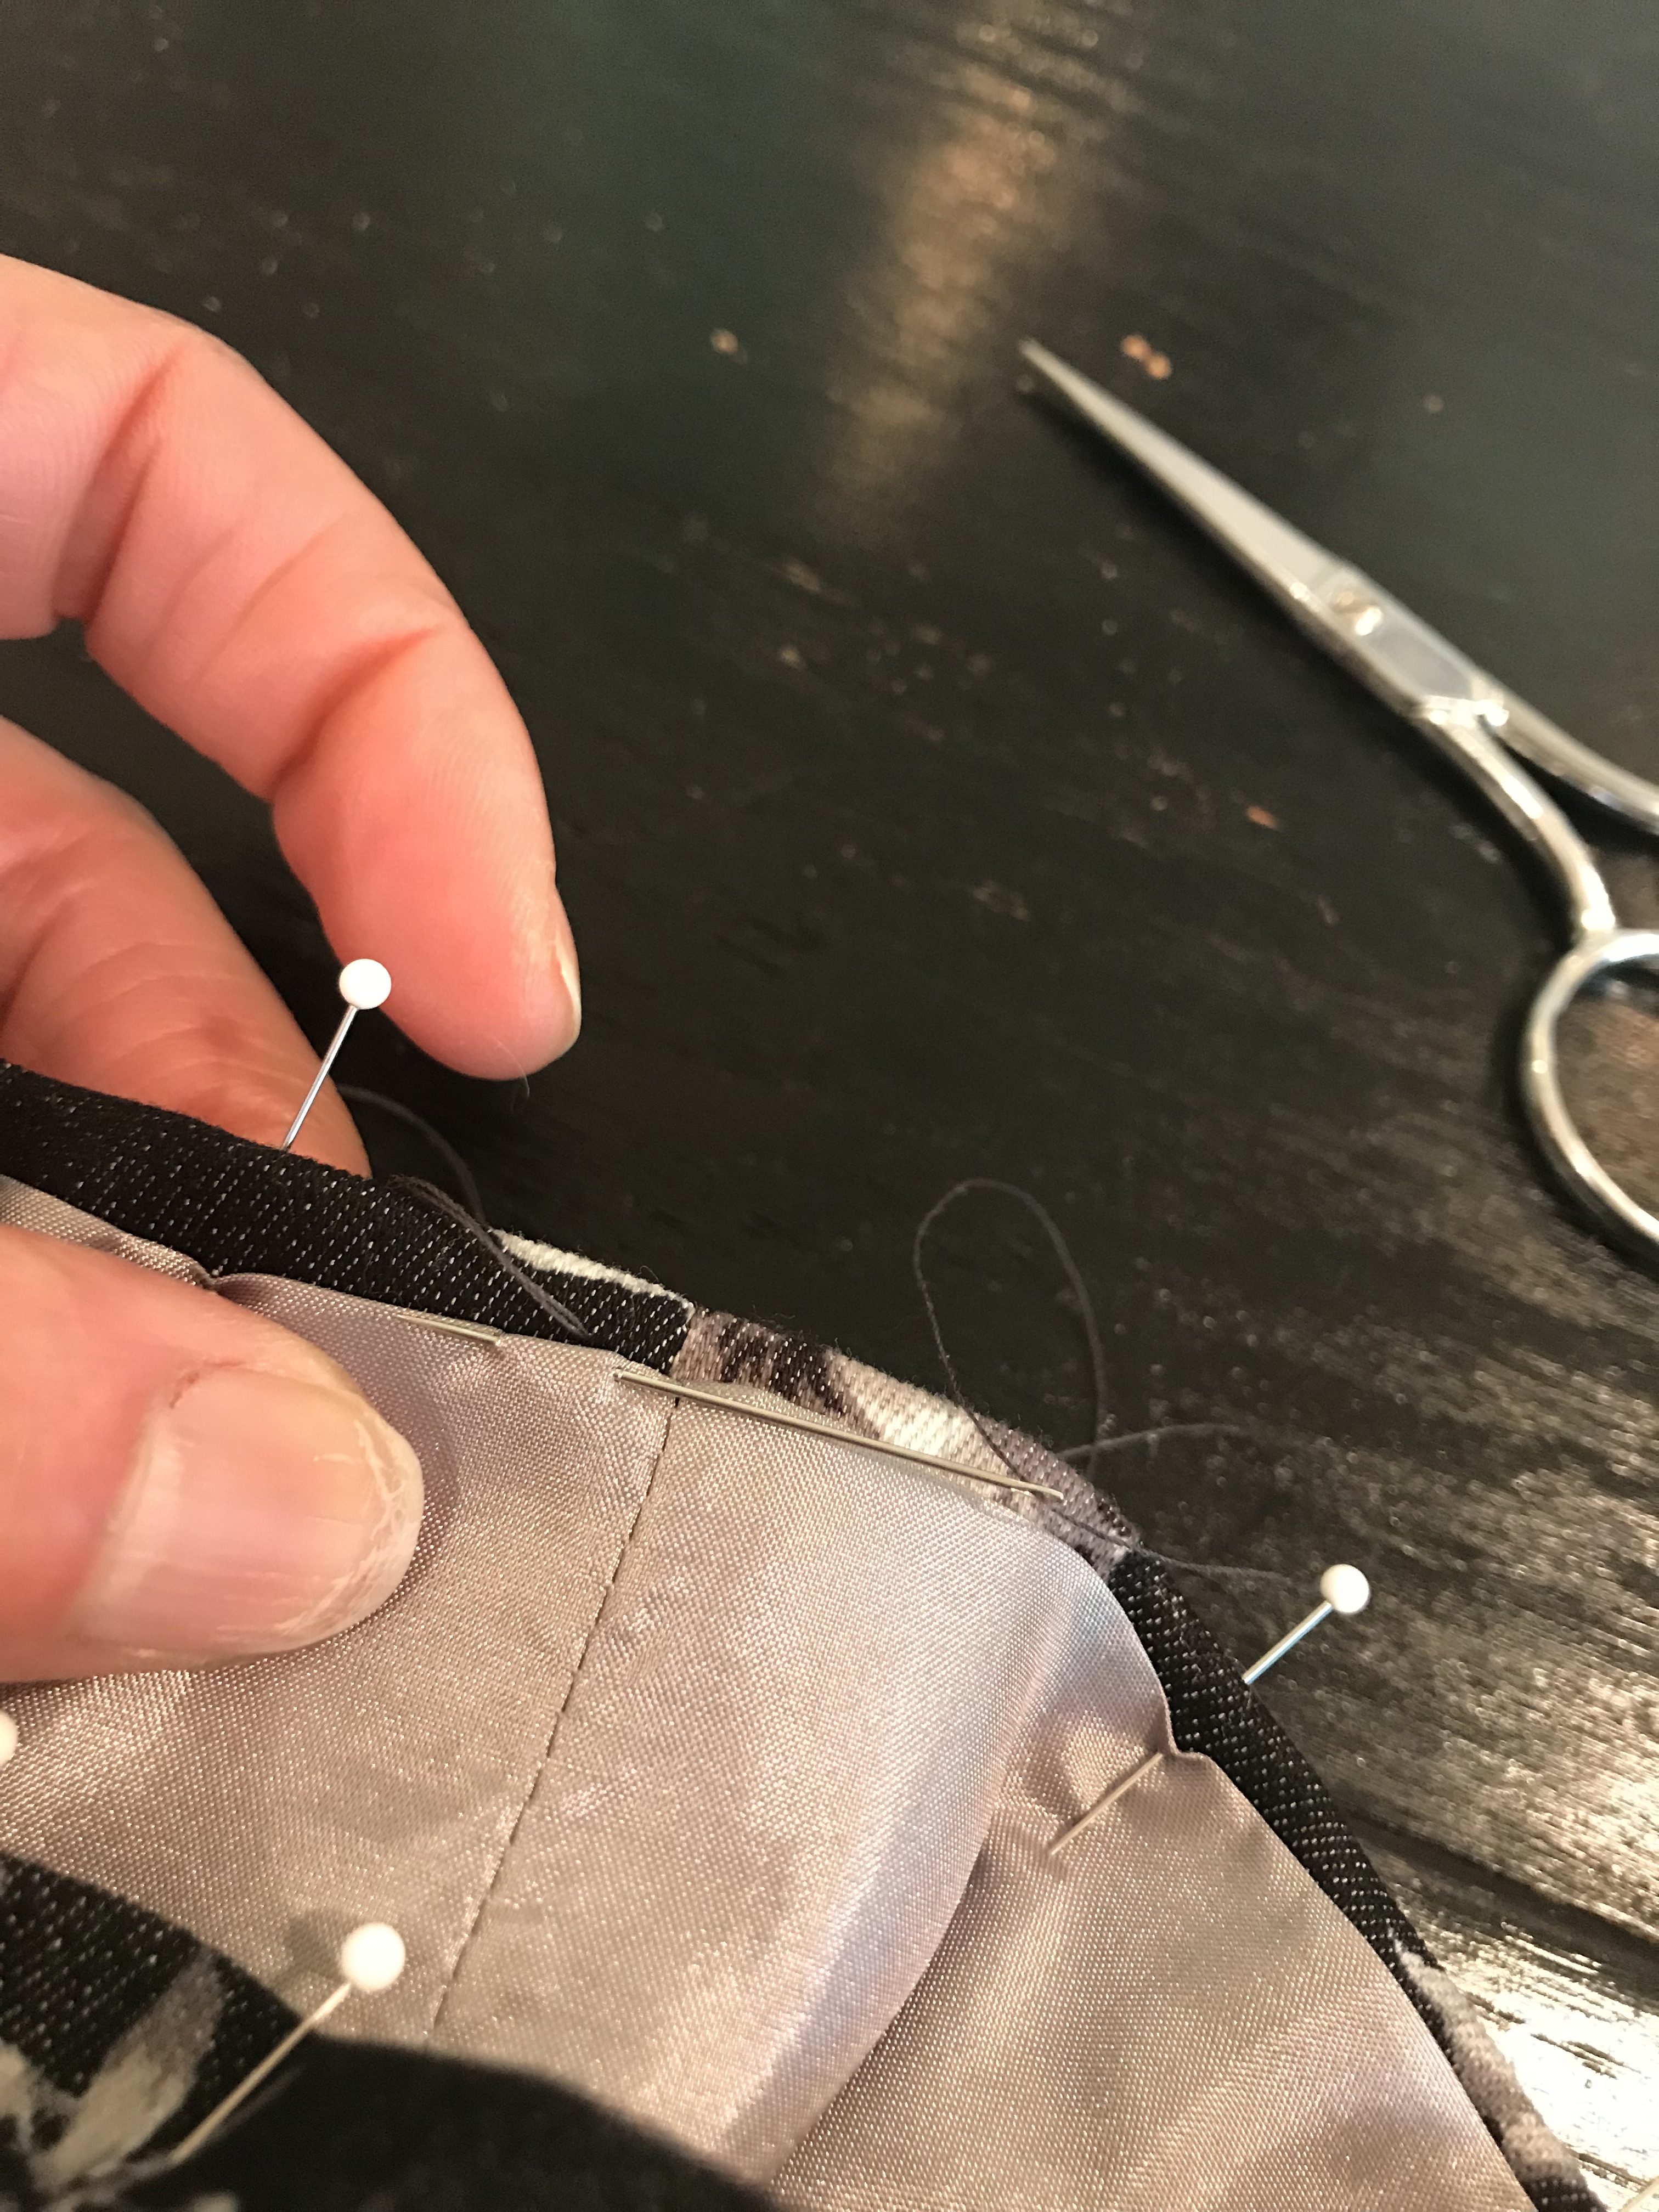
I then decided to add a little fun pop of color to this jacket that is ultimately just shades of grey and chalk white. I used packaged piping in bright fuchsia pink to sew between the lining and the facing. I see this type of detail in some ready-to-wear garments and knew it would be a relatively easy detail to add to the interior (I also learned how to do this by watching another one of my favorite Craftsy classes, Sew Like a Designer: Fashion Details):
Oh, and I also decided that I would like to have a pocket in this jacket, so I just traced off a rectangle (using a notebook that was handy and my clear grid ruler) and cut out two of these from the lining material, sewed them together leaving an opening to turn, turned it inside out, gave it a good press, then top stitched it to one of the front sides of the lining. I thought of doing a nice welt pocket here, but wasn’t in the mood to take the time to do that. Maybe next time!
It was exciting to see my jacket was really starting to come together! I love how the entire jacket is lined, including the underside of the sleeve and peplum flounces. Here is one sleeve getting pressed on my handy sleeve board after the flounce was gathered slightly and sewed to the outside of the sleeve:
The final touch of slip stitching by hand the sleeve lining to the sleeve at the hem:
All in all, this jacket was a fairly easy sewing project and only took a few evenings after work and Saturday morning to complete. I am so happy with it and glad that I chose to make this up, especially in a floral print.
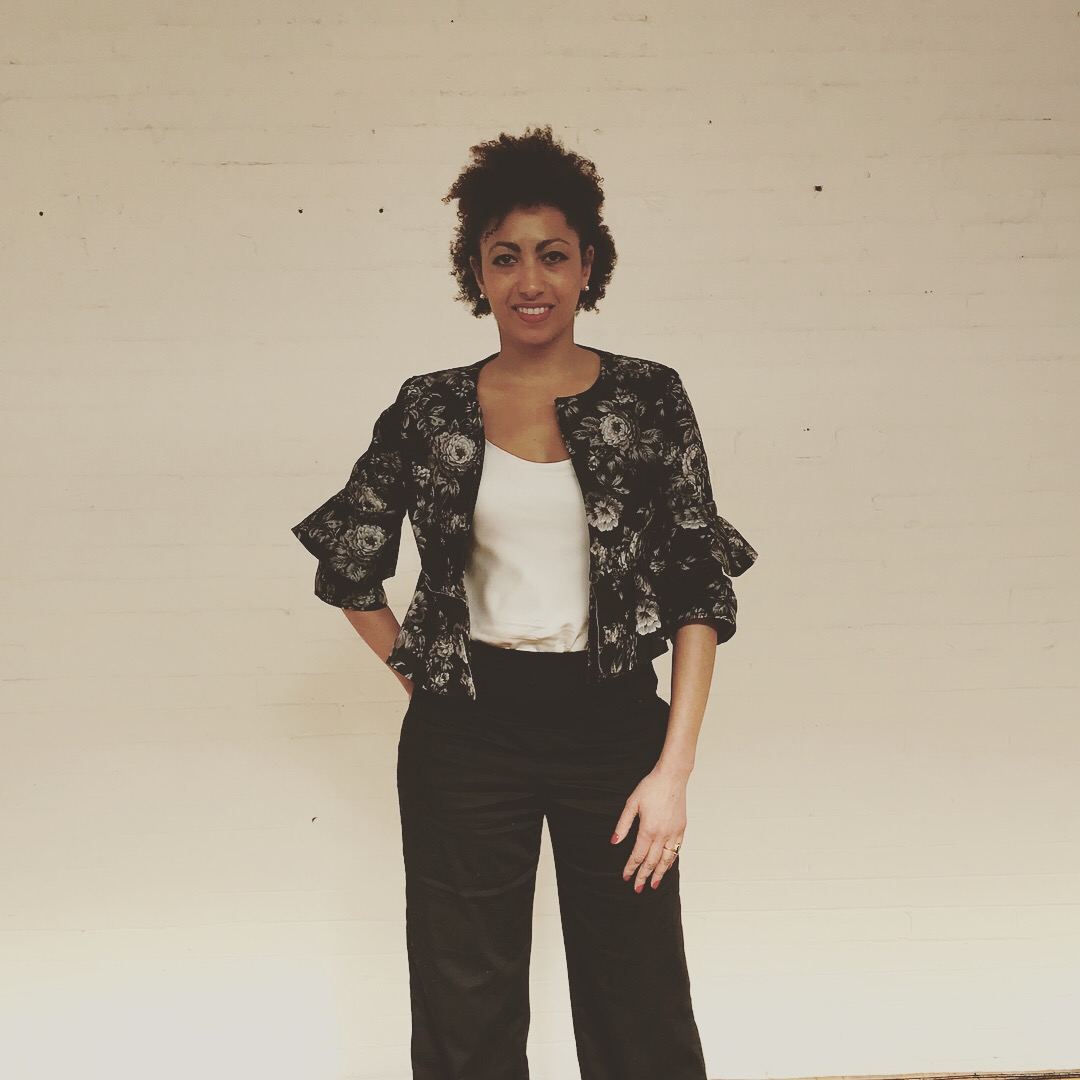
Front View
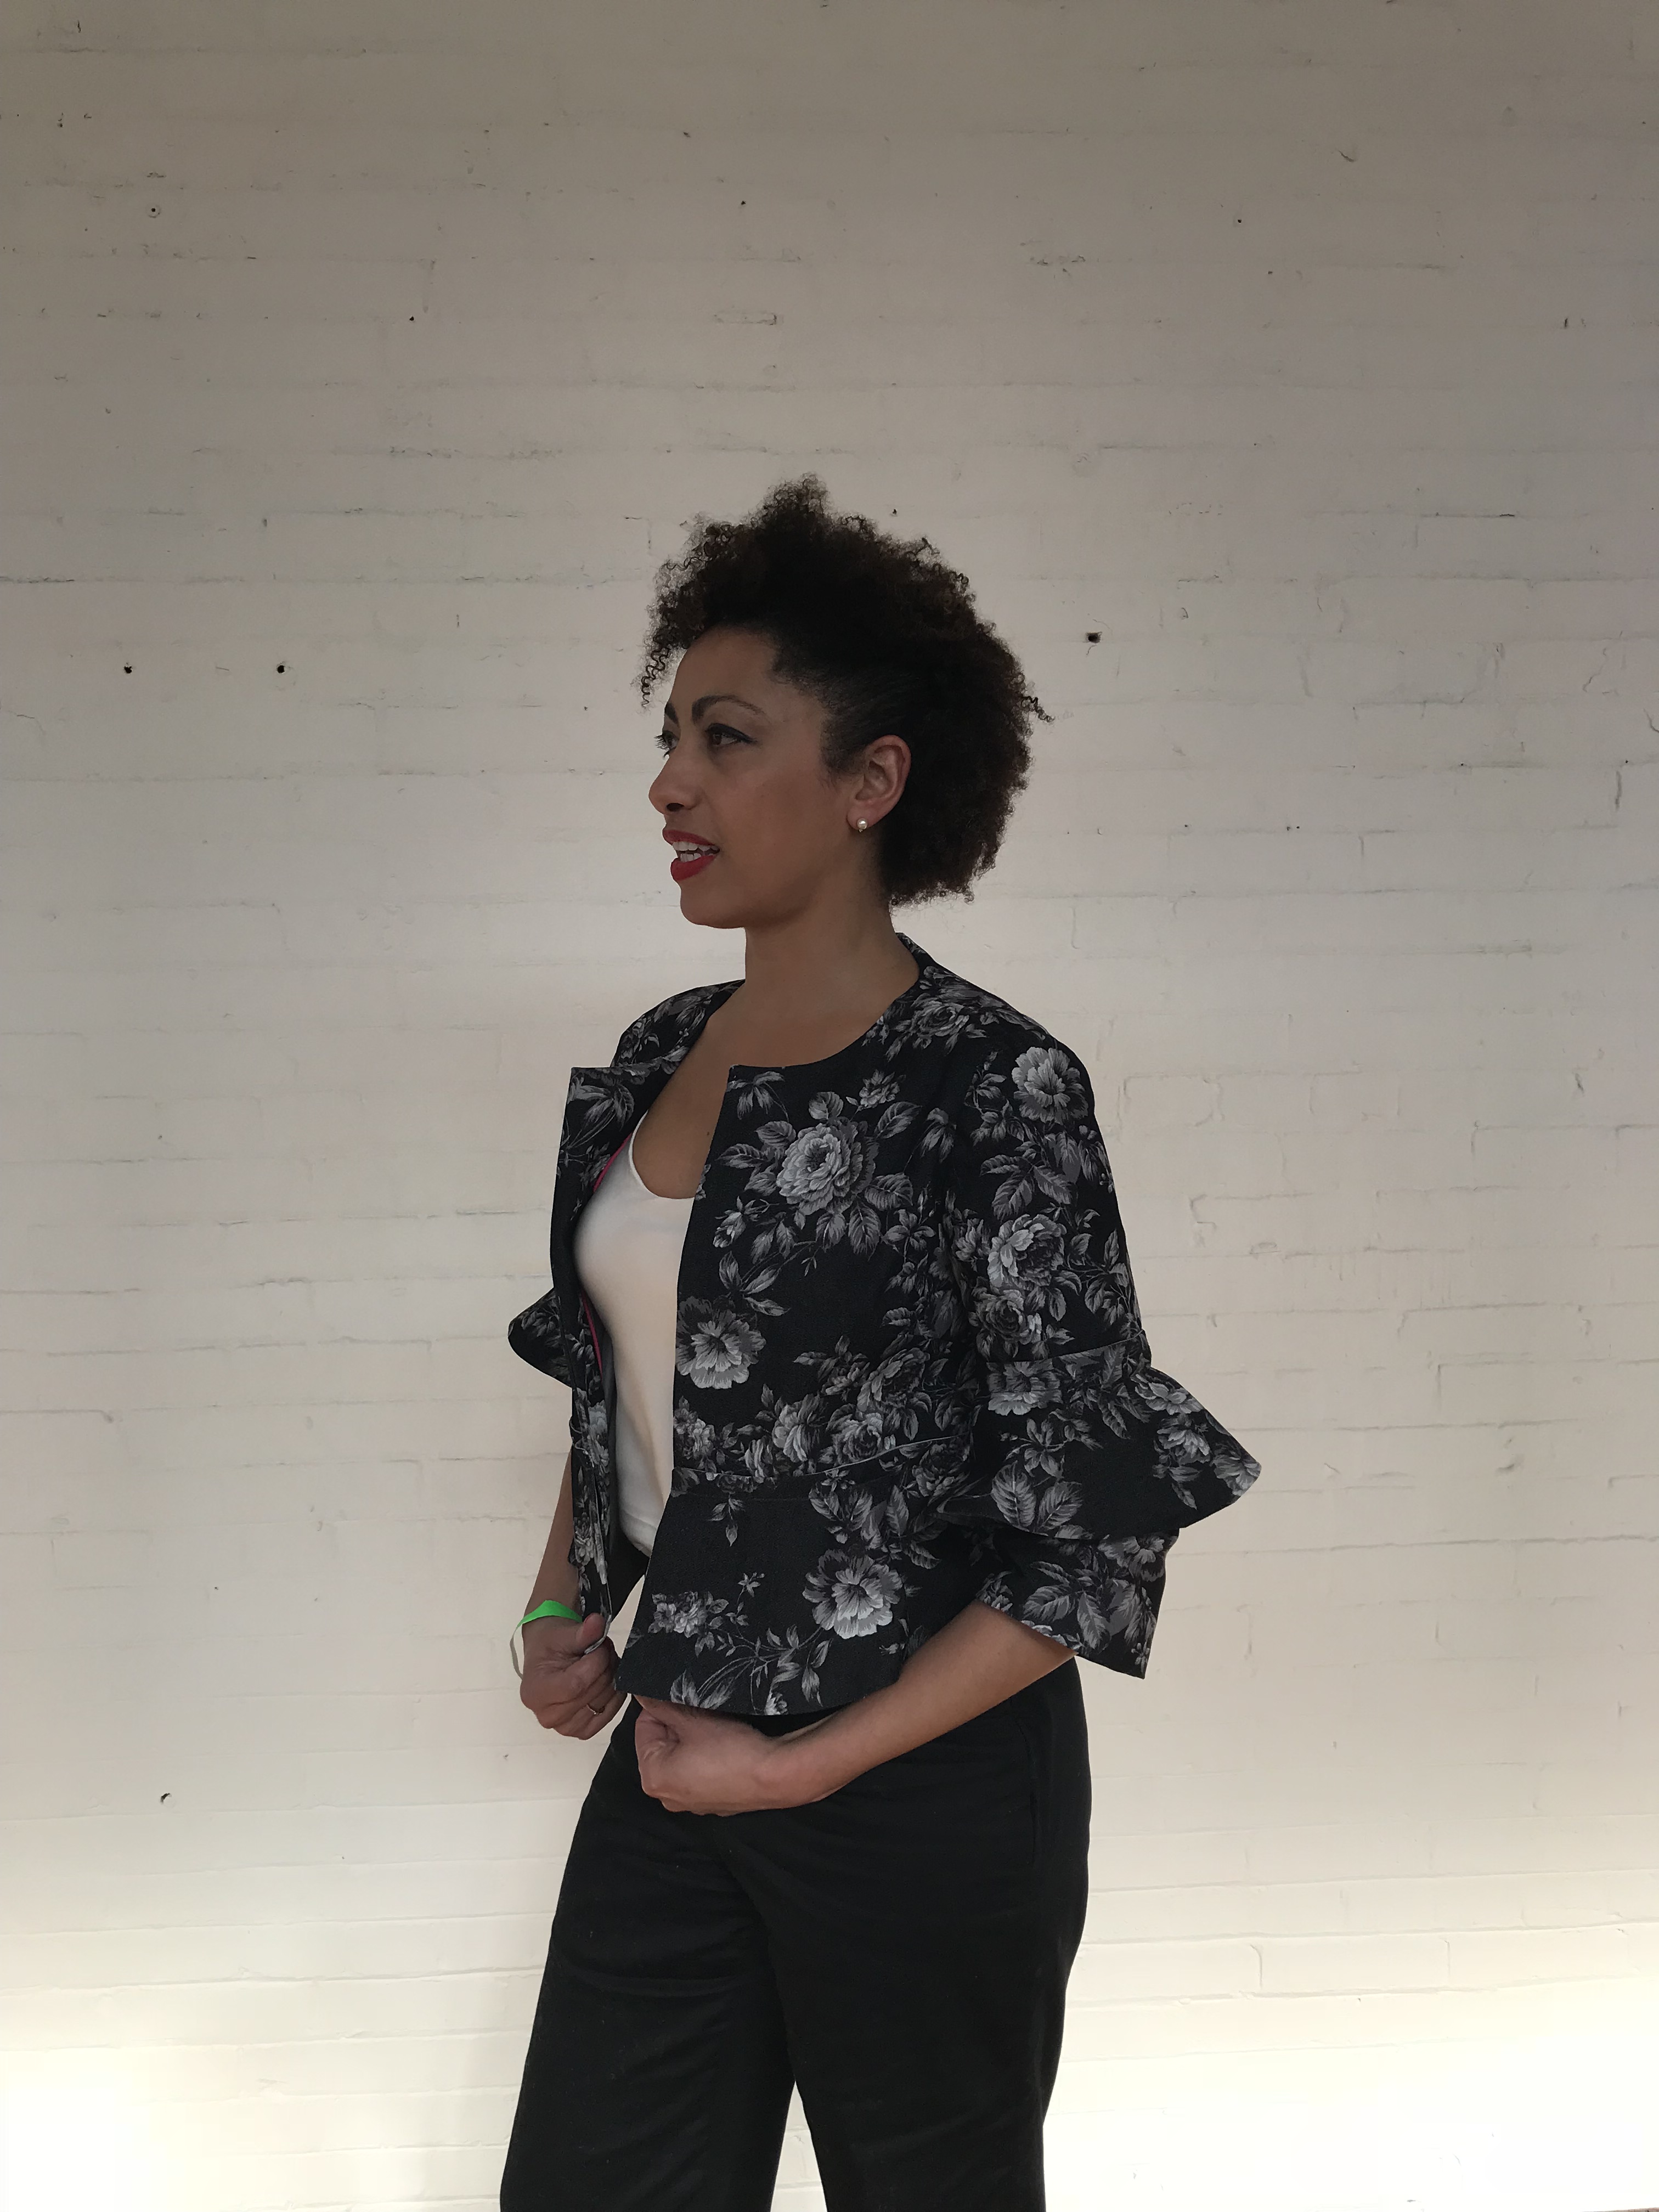
Back View
I got a kick out of showing off the lining, piping and little pocket that I added to the construction of this little gem:
And, of course, my Love, Stephanie label too:
I enjoyed wearing this out to a local fashion event, along with a silk camisole and black wide leg trousers, also items that I have sewn. I even received a couple of compliments on my jacket! Good times!