Author: Slmendes

  • Vintage Inspired Fancy Nancy Dress

    Vintage Inspired Fancy Nancy Dress

    My dear friend Nancy asked me if I would be willing to make her a dress to wear to a wedding she and her husband were going to in England. My reply was “Of course! I’d be delighted to!”. So the journey began!

    She wanted to use her wedding gown to remake into a dress to wear to the wedding. How special is that! Her gown was made of silk duppioni and there was plenty of it to work with. The only issue was that it had never been cleaned since her wedding (at least 12 years ago, maybe more) and had been stored with some stains on it. Of course we would need to dye it as well, and I have never dared to dye fabric before, let alone a keepsake wedding gown, so after some thought and debate, we decided to scrap the upcycled wedding dress idea and purchase new fabric. This would save time in the long run, plus spare the wedding gown in case I were to completely mess it up (what me, mess up? Never!).

    She loved the idea of wearing a girly dress; something fitted at the bodice and poufing out from the waist. We created a Pinterest board and shared ideas of wonderful dresses for inspiration.The dresses we swooned over were designer dresses in beautiful fabrics and feminine details such as pleats and tucks. And how wonderful it would be to also have pockets!

    Here are some of our favorites:


    So I searched and found a nice vintage pattern to use to make the dress. I found this Vogue pattern that was originally released in 1957 that she also loved:

    V2903_Dress_Pattern
    Vintage Vogue Pattern 2903 Envelope


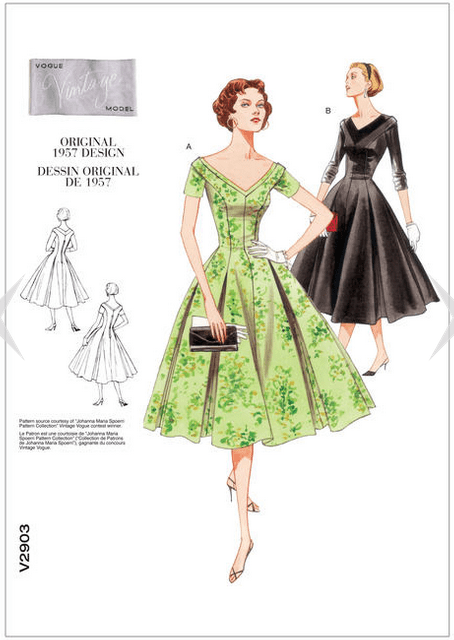
    It featured a wide, face flattering off shoulder v-neckline, a nipped in waist, and lovely pleated skirt. The dress did not, however, include instructions for a full lining, or side seam pockets, so I added those features on my own.

    With the pattern decided, let the fabric shopping begin! This was the fun part, as there are so many lovely fabrics out there that would be wonderful for this dress.

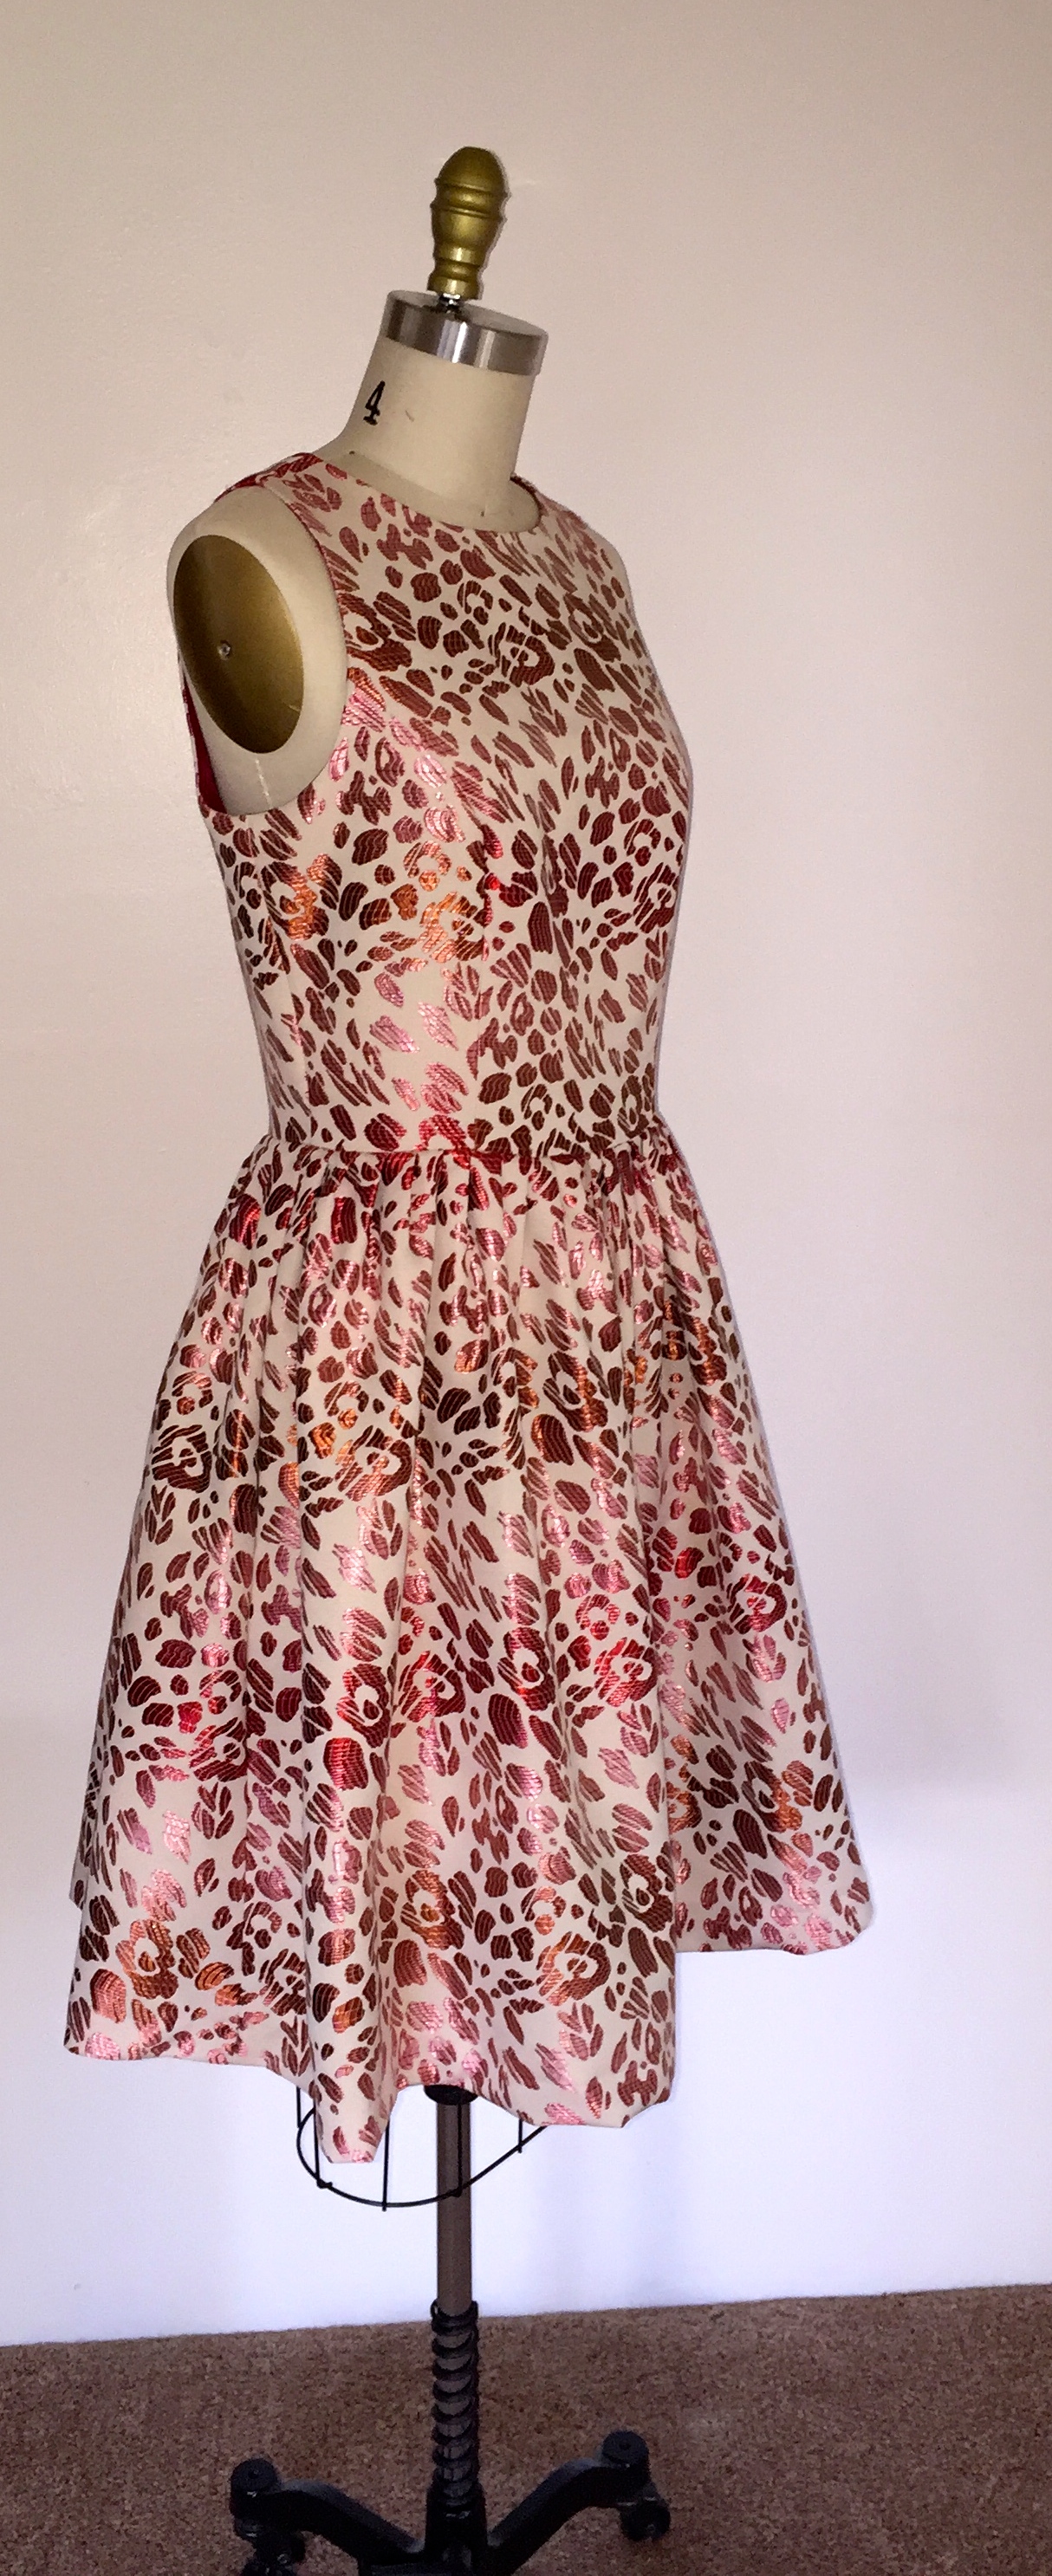
    After about 578 swatches ordered (slight exaggeration), she chose a beautiful gold floral silk jacquard by designer Carolina Herrera purchased from Mood Fabrics website:

    IMG_2947
    the magnificent silk jacquard Caroline Herrera fabric draped and pinned to my dress form

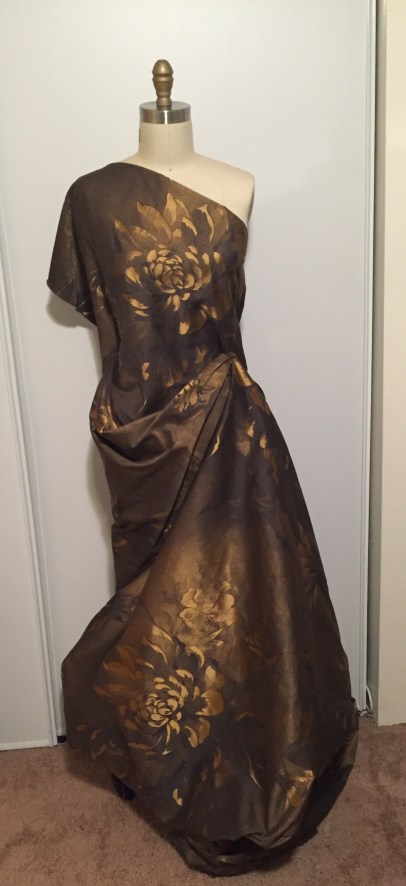
    This fabric is amazingly beautiful! The gold really shimmers and catches the light as it moves, and the background color changes from a brown, to a purply-taupe, to a navy blue.

    Once we had the main fabric, we headed out to Mill End Store in Milwaukie, Oregon to find a nice lining material. Together we chose a lovely navy silk twill to line the dress in. Later, as I was making the dress and installing the lining, I told her I almost like the lining as much as I like the dress! It really turned out beautifully and looked so luxurious.

    So, I hunkered down and got to making the fitting muslin toile for her. The fitting went well and she was already happy with the shape and style of the dress so far:


    As for the pattern fit, the list of changes I was to make were as follows:

    • no sleeve
    • take up at the shoulders
    • take in the bodice at the princess seam along bust line
    • take in at side seam of bodice
    • shorten entire hem length by 6″

    And design additions and changes to the pattern included:

    • cut the center front panel out of one piece, eliminating the center front seam so not to “interrupt” the beautiful pattern on the fabric
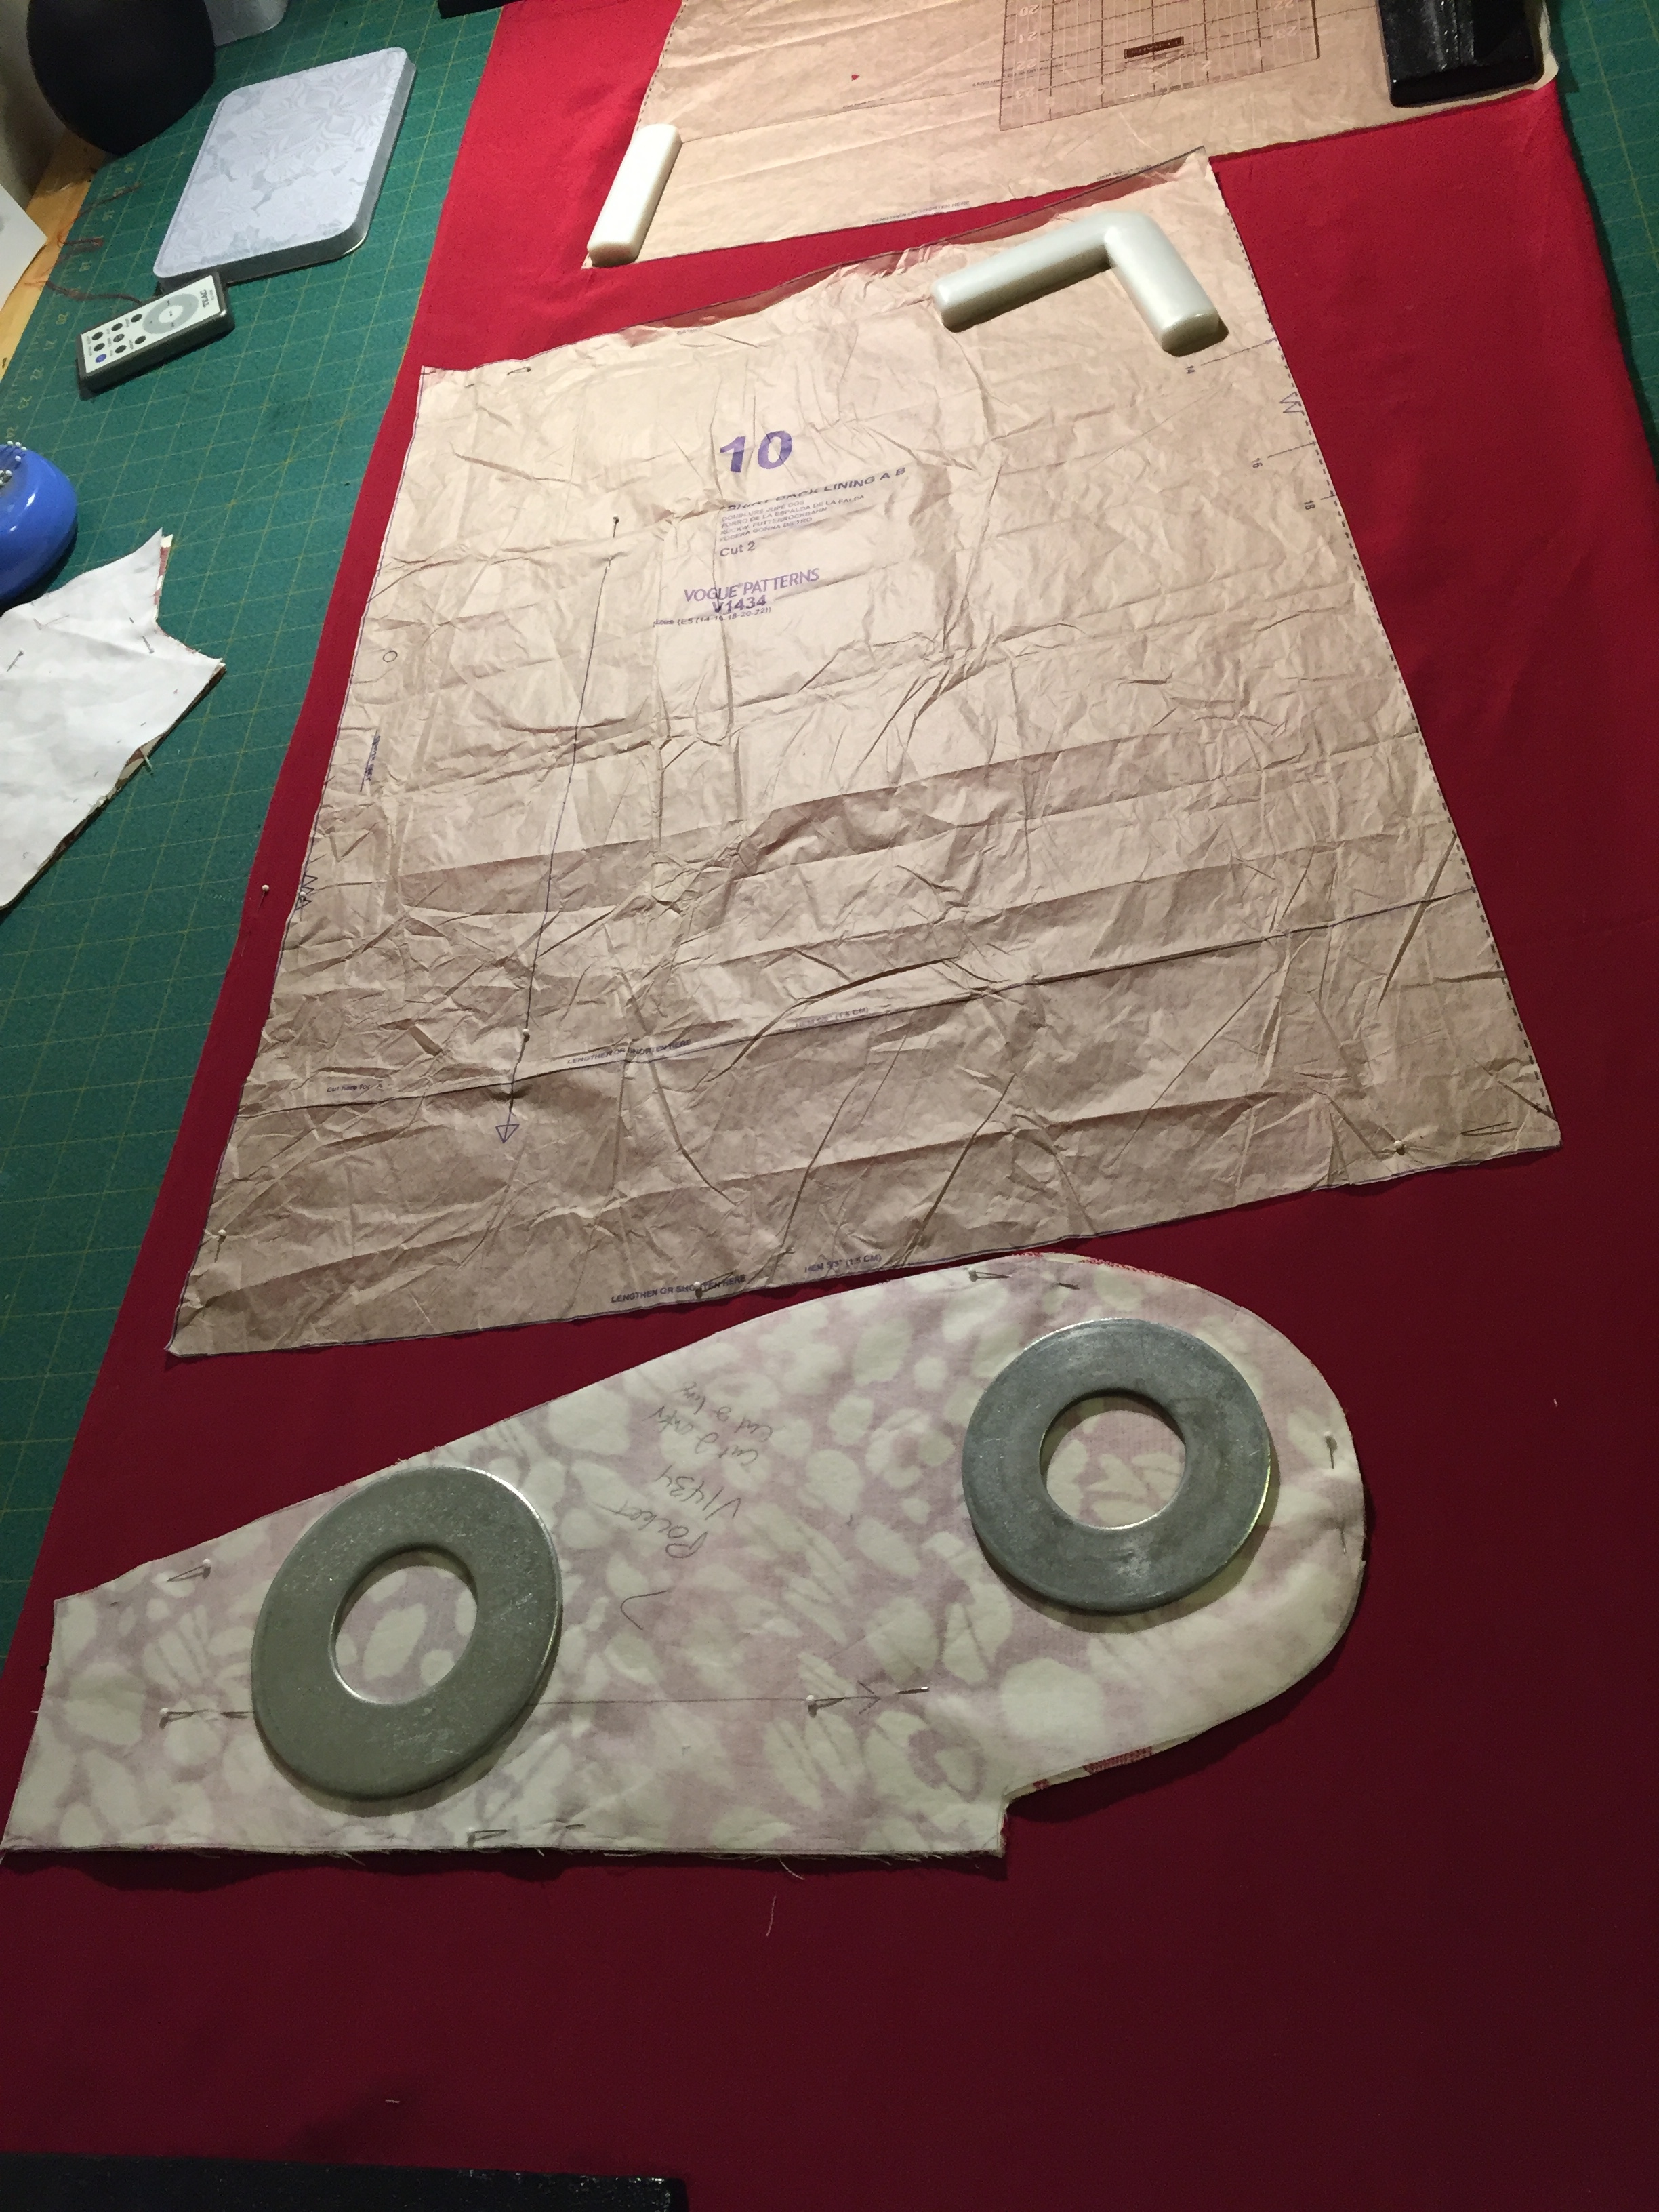
    • add side seam pockets
    • add full lining
    • take center back zipper all the way up to the top of the dress (the zip was originally designed to be centered within the dress for some reason)
    • add lingerie hooks at shoulder to secure bra straps


    After the muslin fitting, I got back to my sewing table, took apart the muslin dress, and transferred the changes to the original dress pattern pieces as needed and made a new center front pattern piece with no center seam. Then I got to cutting the dress out of the fabric.

    Sewing up the dress the second time around in the fashion fabric did go much faster than the first time out of the muslin, just because I knew what to expect when sewing, and had basically done it all before.

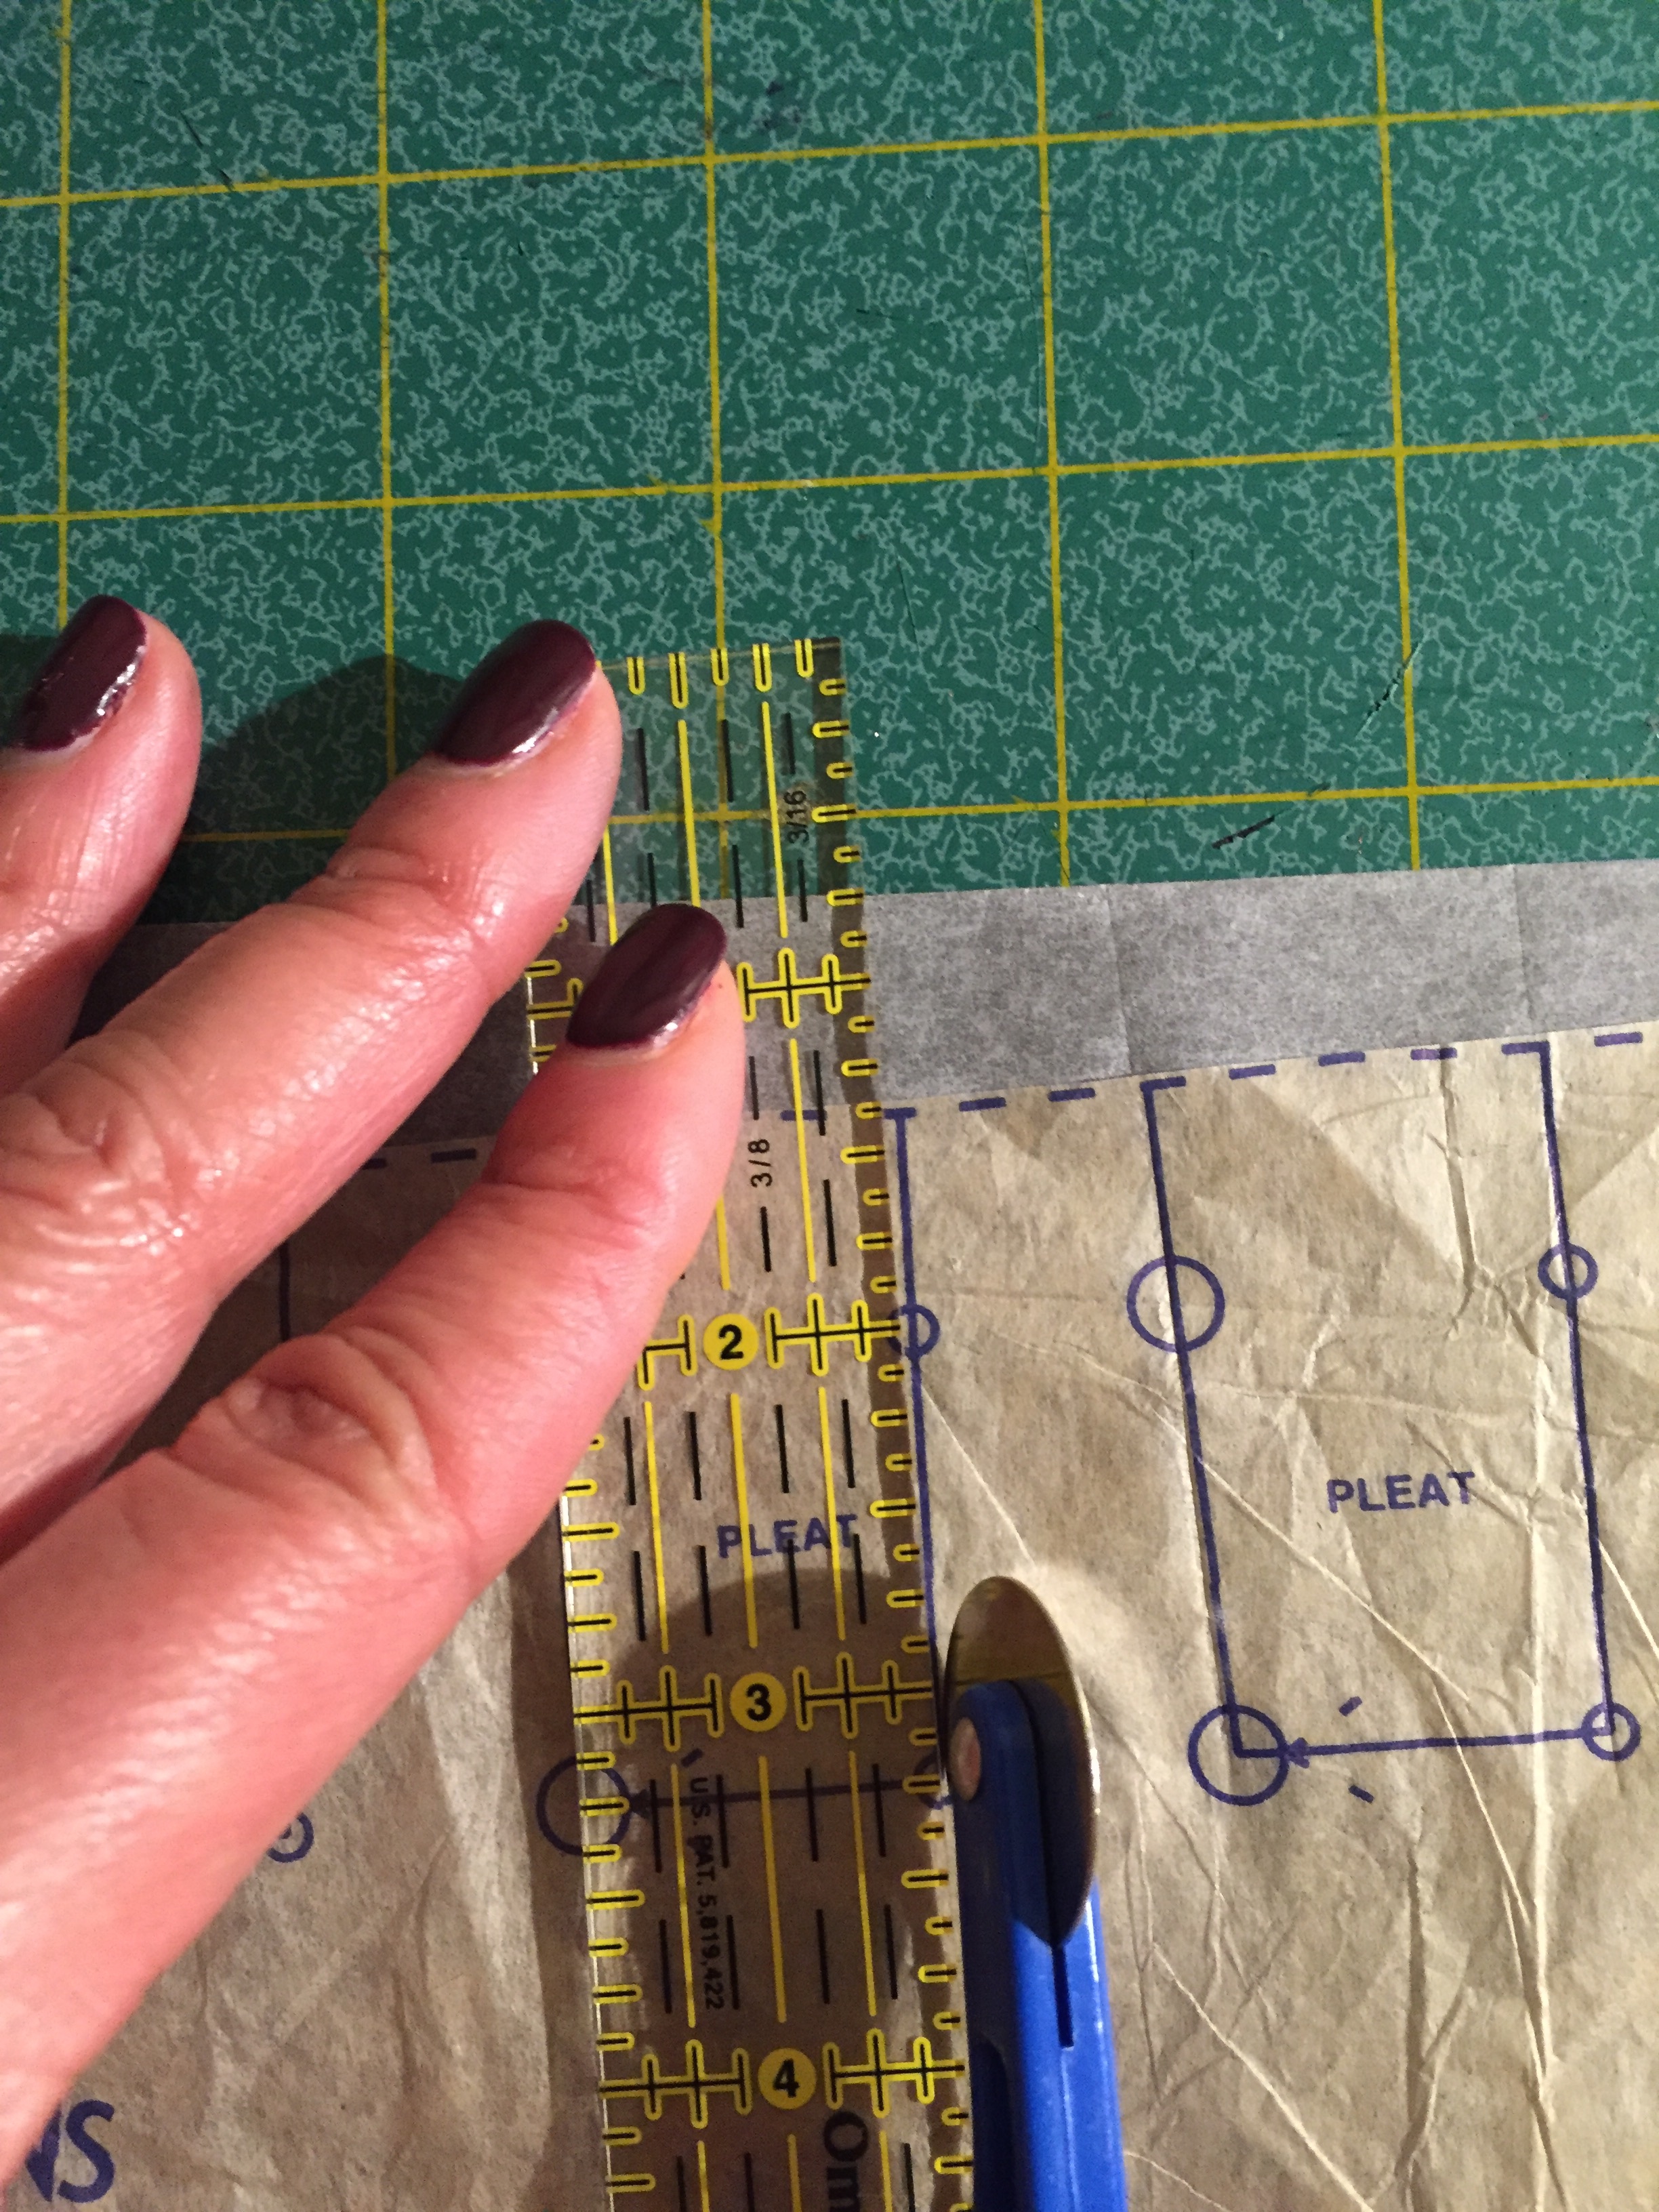
    This time, I made the lines and sewing markings for all of the pleats on the outside, the right side, of the fabric with chalked tracing paper so that is was much easier to find them when it was time to fold and sew the pleats down.

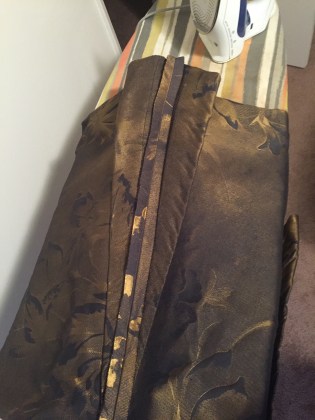
    Here is a photo of one of the pleats folded from both sides into the seam, basted down, then pressed:

    IMG_3136
    a pleat sewn and pressed


    Extending the zipper all the way to the top of the back of the dress made sense and was easy to change on the pattern. Here, I am hand basting in the zip in to the center back seam, using a bright teal silk thread, before I sew it in on the machine:

    IMG_3137
    center back zipper basted in

    Once I had the dress sewn up (for the most part), I scheduled another fitting with my friend. I wanted to make sure that everything was going well before I cut, sewed together and installed the lining.

    Everything looked great and fit well, needing only a few tweaks to fit around the bodice and the decision to add the yoke piece to the neckline:

    IMG_3144
    Fitting #2 in the dress

    It was time to cut the lovely silk lining!

    IMG_3316
    cutting out the navy silk lining


    I used the same pattern pieces as the dress, sewed it together in the same manner (minus the pockets), and sewed it to the neckline and armholes of the dress, under stitching as far as possible to keep the lining to the underside of the neck and arm openings.

    Finally, after hours of fitting, cutting, sewing, pressing and steaming, the dress was complete! I am very happy with the result of the dress,

    IMG_3388IMG_3386

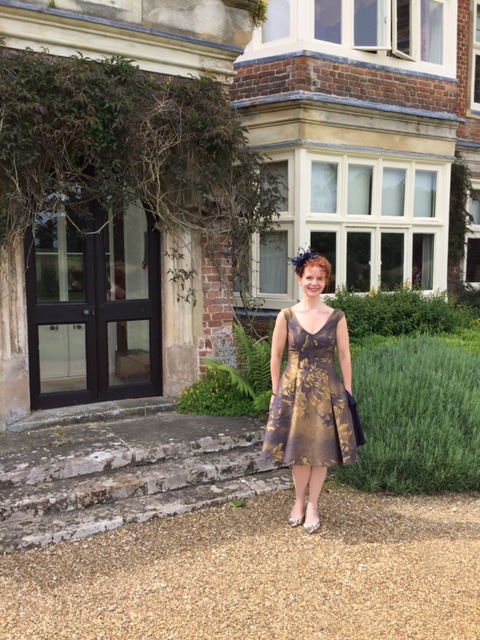
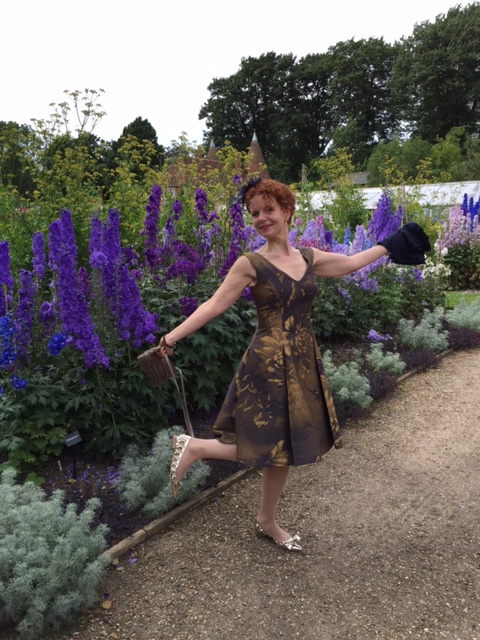
    and Nancy was just delighted to wear it to the wedding in England:

    image1

    Doesn’t she look fancy and marvelous wearing her new custom made silk frock, complete with wonderful gold shoes and a great feathery fascinator? I think so!

    image3
    Cheers!!!
  • Cross Bodice Jumpsuit

    Cross Bodice Jumpsuit

    I made up this pattern in my Advanced Pattern making class that I have been taking at Portland Fashion Institute as a part of my first collection for my label Love, Stephanie.


    FF_2016_STEPHANIE

    I got about 4 yards of a lovely silk twill-like material that had just the right amount of drape to it without being sheer or flimsy.

    I love how easy and free-flowing this jumpsuit looks and feels:

    FF_2016_STEPHANIE

    It was a fairly easy design to create. I made a cross bodice top with a back zipper opening, drafted a long sleeve with a wider sleeve hem, made a wide leg palazzo pant, and sewed them together at the waist and added elastic. I then whipped up a simple sash and tied it loosely at the waist Boom! Done!

    FF_2016_STEPHANIE


    I have been admiring the whole jumpsuit trend and have been saving up inspiration photos on Pinterest:

    Love it! I can now take what I have made and create different versions of it; narrower leg, sleeveless, halter top, all kinds of fun and fashionable looks. Sew exciting!!

    Thanks for stopping by and stay tuned for more custom designs from me!

    Love,

    Stephanie


  • Animal Print Brocade Holiday Party Dress

    Animal Print Brocade Holiday Party Dress

    I love this dress! I thought it would be too poofy and make me look bigger than I would like to look, but after wearing it, I was OK with the poof.


    V1434 in animal print brocade
    Vogue Pattern 1434 by Isaac Mizrahi in animal print brocade


    I used Vogue 1434 to make this dress. It’s a Vogue Patterns American Designer pattern designed by Isaac Mizrahi:

    V1434 Pattern Cover
    V1434 by Isaac Mizrahi Pattern Cover
    V1434 Line Drawings
    V1434 Pattern Envelope Back and Line Drawings

    I cut out this dress in a size 14, making a fitting muslin of the bodice first, which took some minor tweaking at the shoulders and bust princess seams, but the fit was pretty great overall. I cut it from a beautiful Italian animal print cotton blend brocade in metallic cream, rose and peach shades from Oscar de la Renta I ordered from Moodfabrics.com:

    Oscar de la Renta Cream/Wint/Rose/Peach Animal Italian Cotton Blended Brocade Fabric
    Oscar de la Renta Cream/Wint/Rose/Peach Animal Italian Cotton Blended Brocade Fabric
    Pattern Cutting the Brocade
    Pattern Cutting the Brocade

    I had a nice red silk crepe de chine fabric in my stash that was just barely enough yardage to fully line the dress:

    cranberry red silk crepe de chine for the lining
    cranberry red silk crepe de chine for the lining

    The dress was fairly easy to construct with a basic princess seam sleeveless bodice and full pleated skirt and deep pockets, lined by the same pattern pieces for the bodice and different patterned pieces for a gathered skirt lining.

    The most time consuming part was making the pleats.

    I traced the pleat placement using the handy pleating guide included in the pattern pieces:

    Pleat Guide Pattern Piece
    Pleat Guide Pattern Piece

    IMG_2090

    I found that this would have been helpful had all my pleat tracing work had actually shown up and stuck to the brocade fabric once it came time to sew them. Instead, I actually held the guide up to my fabric as I pinned each pleat in place, then carefully basted them down:


    Pinned and Sewing Pleats
    Pinned and Sewing Pleats

    This took the most time and attention, but it was worth the work!

    finished dress!
    finished dress!

    I love how the lining turned out, accept the fact that I didn’t take the time to make French seams on the skirt as the inside of the lining could show my mistake or if anyone looks at it throughly inside and out. Oh well, I might just pink the seam edges so they don’t fray.

    Mood Fabrics even sent a little label with the fabric that I sewed into my dress below my Love, Stephanie label. Oh, the little things make all the difference!

    Labels Pinned and ready to Hand Sew Into Lining of Bodice
    Labels Pinned and ready to Hand Sew Into Lining of Bodice


    Lining of Bodice with Labels
    Lining of Bodice with Labels
    this dress is fully lined in red silk crepe de chine
    this dress is fully lined in red silk crepe de chine

    This dress was a huge hit at the two little holiday parties I went to Saturday, and I plan to wear it to another party on Sunday! I even met a woman who wants to talk to me about making some custom dresses and apparel for her! Plus, friends of mine have been dying for me to make them something custom, and we have some really great project ideas in the works! So exciting!

    I was going for a dress inspired by these dresses I pinned on Pinterest:

    Eliza J dress at Nordstrom
    Eliza J dress at Nordstrom
    Lanvin Jaquard Dress
    Lanvin Jaquard Dress

    It is so very cool to be able to make my own clothes, and then wear them and “sell” my work to others!

    The Deep Pockets are Wonderful!
    The Deep Pockets are Wonderful!
    Love My New Dress!
    Love My New Dress!


    Merry Christmas, Happy Holidays and  and Happy New Year to ALL!!! MWAH!!

  • Colorblock Dress

    Colorblock Dress

    I busted out this dress, hopefully just in time to make the deadline for the Patternreview Colorblock Contest! If not, no biggie, just a prize gift certificate to my favorite online fabric store, Mood.

    There were a bunch of wonderful entries, so I might have come in about 5th place, maybe, with this little dress:

    DSCN0032

    DSCN0027

    I saw this dress pattern, Burda 6851:

    B6851

    on the Simplicity.com website, and thought it was perfect for a color blocked project (I believe my first!), and something I could easily interpret for my needs.

    Once I started researching the pattern online (Google, Yahoo Images), with only one other pattern review on Patternreview.com, I found that someone pinned on Pinterest this pattern as an, um, EXACT copy of a Donna Karan dress from her Fall 2015 line, so of course I was even more excited to make this dress!

    01984220243ea90c83e0c2469021f4fe

    This dress was a pretty simple sew. The hardest part was adding the zipper, which was instructed as an invisible zipper, but I chose a semi-exposed, plastic zipper with black trimmed zipper teeth, a black zipper pull, and a clear white plastic zipper tape, as my seemingly cool zipper alternative:

    IMG_2109

    Well, my cool zipper idea kind of backfired because the zipper is a tad too heavy and stiff for the ponte knit weight, and the ends of the zipper are super plastic-y and won’t behave with the top and bottom seams, thus leaving a bumpy, lumpy and scratchy interior of the zip area. Not great, but a good effort.

    DSCN0028

    Had I had the time, and sewing buddy to help, or an exact clone of myself to come in handy, I would have “pinched out” at the mid back of this dress to avoid that nasty bubble at the back. I also would have adjusted the underarm weirdness at the dolman sleeve “meeting”:

    DSCN0025

    As well as lost the trying-too-hard “deer in headlights” look on my face. Really Steph?

    DSCN0045

    DSCN0030

    Overall, it was a great dress to sew up in a few days. I may sew it again, I may not, but I really should be making my own patterns at this point, and making them unique.

    Oh well! I enjoy letting others do the pattern making (thank you Burda!), and doing the fabric and construction stuff for me, thus my love affair with commercial patterns!

    DSCN0035DSCN0036


    Tootles for now and see you soon!

    Happy Holidays!


  • Sequin Mesh Strapless Gown

    Sequin Mesh Strapless Gown

    I finished this dress in the nick of time to wear out to the Portland Fashion and Style Awards held at the Portland Art Museum last night.

    black sequin gown from Vogue 2237
    black sequin gown from Vogue 2237

    I love simplicity of this style and the slight train on the back of this gown:

    Back of gown
    Back of gown

    Credit must be given to Vogue Patterns for putting out this designer pattern number 2237 from Badgley Micshka. This was a wonderful pattern to sew as it went together fairly simply and was a good learning experience.

    V2237 Badgley Mischka gown and bolero

    I traced off the pattern on to Swedish tracing paper and made adjustments to the length of the bodice and the skirt. After measuring the pattern and comparing them to my body measurements, accounting for an additional 3″ high heel, I found that I needed to add 2″ to the bodice and 5″ to the skirt portion of the pattern.

    I then cut out and sewed up a muslin of the gown as well as the corset for fitting. My lovely friend helped me pin this dress and make notes on the muslin where to take in and let out.

    I found this lovely sequin mesh polyester material at Fabric Depot in Portland, Oregon and thought it had the perfect drape and sparkle for this project.

    I got a flesh colored Ambiance lining that matched the color of my skin to line the dress so that it appeared to be see-thru when wearing:

    The sequin mesh material was perfect to sew with as it is very soft and the sequins are as well. I was able to sew it without having to remove the sequins from the seam allowances with saved a bundle of time.

    I love the scalloped and fringe-like selvedge of the material and was hoping to trim it off and incorporate it into  the dress either at the hem or the top edge, but I ran out of time to do this. I suppose I can go back and add it at another time, or use it for another project. It is just too pretty to toss out!

    Here is the muslin and sequin fabric draped on my dress forms:

    draped and muslin V2237
    sequin fabric draped and muslin pinned to dress forms

    The pattern design includes a corset-like under structure that holds up the strapless gown that is sewn into the lining. I added 3 additional boning channels to this at the front and under the bust for added support.

    I used a heavier weight muslin for the structure part of the corset and the same lining as the gown to line it. Turned out really great!

    I did have to make several fitting adjustments to the outer part of the dress as at first the muslin needed to be let out, but then in the sequin material, which does have a lot more “give” than muslin, I had to take it back in. I had to make fitting adjustments a couple of times actually, in order to get the nice tight fit that a strapless gown requires in order to stay up. Thanks to my part time job doing bridal and special occasion gown fittings and alterations at David’s Bridal, I have learned a great deal about fitting gowns and this knowledge came in quite handy!

    IMG_1857

    After many hours of fitting and sewing this dress (and leaving off some steps as time was up!), I really love the outcome of the gown and was excited to wear it to the big event! I may go back and make adjustments to the “peaks” of the bodice so that they are a little pointier and less rounded at the top, and the lining drove me nuts all night as it was coming up over the edge of the dress and showing! At least the lining is flesh colored and it was not as noticeable, but I still was not happy with that.

    After looking at photos, maybe the bodice was a little too tight as my boobs looked kind of squished. I guess I didn’t realize that I can fake a pretty good cleavage in this kind of dress! Cool!

    I was rushing to finish in time (as usual) and sewing on the hook and eye at the back when I was supposed to be on my way to my friend’s house to get ready, but we made it in perfect timing, so it was  all good in the end.

    V2237 lining and label

    V2237b
    black sequin gown from Vogue 2237
    V2237d
    Back of gown

    Very good actually!

    V2237a


    And here I am wearing a little hat designed by ElizaBeth Rohloff. She was nominated at the Portland Fashion and Style Awards for Best Accessory Designer, but sadly didn’t win (this time!). It was fun to wear!

    V2237 and hat

    Off to the event! Bye!


  • Draped Back Jersey Dress

    Draped Back Jersey Dress

    I drafted and sewed up this loose fitting draped back dress using the guidance of this blogger Moldesdicasmoda:

    Back of draped back dress

    It was a fairly simple dress to sew, with just a front, back and back band piece to make.

    Pattern from the blogger Moldesdicasmoda.com
    Pattern from the blogger Moldesdicasmoda.com

    I lowered the front neckline, but I think I took a little too much off as it sits pretty low in front:

    Front neckline
    Front neckline

    I added a little stripy bralette from Free People underneath the top for interest under the drape:

    with Free People strappy bralette underneath
    with Free People strappy bralette underneath

    This is a super comfortable dress to wear as it is an essentially shapeless fit.

    Loose fitting dress, but still chic
    Loose fitting dress, but still chic

    I am quite happy with it overall, and it was a lot of fun to wear to a fashion show in town!

    Just throw on some heels and go!
    Just throw on some heels and go!
  • Printed Silk Palazzo Pants

    Printed Silk Palazzo Pants

    I’m in love with these pants! I made them in a wonderful, silk charmeuse with a big, bold swirly floral print I purchased at Mill End Store in Milwaukie, Oregon a few years ago. I originally bought this fabric to make a maxi dress, but decided that they would make great flowy pants instead.

    IMG_0233

    IMG_0234 IMG_0236

    I made these using New Look 6271 pattern:

    6271These were fast and easy to make. Using my serger to make the side, inseam and crotch seams made it go pretty fast.

    I added 3″ to the leg of the pant and another 2″ to the hem. I wanted these to be long and flowy and to have a deep enough hem to weigh down the drape. I think I ended up with 2″ for a hem.

    I let the pants hang for a day or two before I hemmed them so that they had time to relax and “grow” if they wanted to.

    Pants hanging before hemming
    Pants hanging before hemming

    IMG_0177

    I also made a couple of quick sketches just to practice and to get ideas of tops I could wear with these pants:

    Sketch 1

    Yup, that's me!
    Yup, that’s me!

    I love these pants and they are SO comfortable! It has to be a “skinny” day to wear these as they can really make the thighs, butt and waist look just as wide as the pants if you are not careful, or make sure to wear something form fitting on top to balance out the fullness of the pant.

    I was going for a summery, beachy look such as these images:

    e8bd023ec91fc43015fb0c72ac49c2f9

    ff4db1c7925a61155e3e982dbcd244db

    I will definitely be making more of these pants. Maybe out of linen, a soft cotton, rayon or silk again. I love them!

    Adios Amigos!

    IMG_0242

  • Denim Sheath Dress

    Denim Sheath Dress

    Denim dress Vogue 8995

    This dress was completed just in time to wear to the Pattern Review weekend retreat in Los Angeles back in April 2015. Here is a photo of me and Deepika Prakesh (who is amazing and hysterical!), the founder of PatternReview.com, at the group dinner that weekend.

    With Deepika at PatternReview weekend in LA
    With Deepika at PatternReview weekend in LA

    I met so many wonderful sewers and connected with them in a special way. Here is my new buddy Kristin that I also met on this weekend retreat:

    With Kristen G.
    With Kristen G. at PatternReview weekend in LA

    I used Vogue 8995 pattern to make this fitted sheath dress with interesting seams:

    V8995


    I’m always looking out to expand my creativity with commercial patterns. I really consider this denim dress sort of another muslin version, a draft, to see if I like the dress and want to “move forward” with it, creating other dresses from this as standard. So fun! And good sewing practice too!

    I really enjoyed making this dress. It took some time and planning, as I originally wanted to add metal studs to the shoulder yoke part of this dress, but then decided that would make it too limiting. I may go back and add the studs though and give it a bit of an edgy look. I did use a metal-look plastic exposed zipper for this dress to give it a little back interest. The dress looks actually kind of flat and the seams are not apparent in this dark fabric. perhaps some top stitching would have been a good idea for this to really help the cool seam lines “pop”. Next time….

    Seam detail of denim sheath dress
    Seam detail of denim sheath dress

    I made up a muslin and asked my good friend and fashion designer Rachael to help fit it for me. She was great! I definitely will be using her fitting help again in the future!

    The dress is made up of a dark wash stretch denim and a stretch silk lining. I serged the fabric edges of each cut out piece of the pattern for both the outer shell of the dress as well as the lining. I use my awesome Baby Lock Imagine serger to overlock and stitch seams as often as I can. It’s a beautiful machine!

    I will like to make up this pattern again, but making changes to the neckline, carving it out a bit so that it is not quite so high. Also, I will taper the skirt to more of a pencil skirt.

    The opportunity came up to have a photo shoot done at The Nines Hotel, a really lovely, luxury hotel in Portland, Oregon, and I grabbed it! An acquaintance of mine, Gina, has a photography business Afar Photography and wants to expand her portfolio, so asked me if I would like to have some of the clothes that I have made in the shoot. Heck YEA!!!!

    Here are some of the great shots she got of me in this dress:

    At The Nines Hotel in denim dress
    At The Nines Hotel in denim dress

    Denim dress on bench

    Denim close up against wall

    Back exposed zip of denim dress
    Exposed zip of denim dress

    Of course, I have a little bit of fashion inspiration for this sewing project:

    LBD sheath influenced by Audrey Hepburn
    LBD sheath influenced by Audrey Hepburn
    Red fitted sheath dress
    Red fitted sheath dress
    Versace sheath dress
    Versace sheath dress

    I love my new dress and thank my friends for helping me make this a great one!

    Denim dress in doorway
    Denim dress in doorway
  • Geometric Print Silk Blouson Dress

    Geometric Print Silk Blouson Dress

    So easy to just slip on with some cute shoes and jewelry.
    So easy to just slip on with some cute shoes and jewelry.

    I finished this dress just in time to wear to a local fashion show tonight. I love how easy and chic it is, and was a snap to make.

    IMG_0105

    I used Vogue 8915 pattern to make this dress. This is the third time I have made this pattern, and most likely not the last time.

    I used this lovely silk charmeuse in a geometric print that I had in my fabric stash from about 4 years ago, purchased at Josephine’s Dry Goods in Portland, OR. I love this print because it is different and artsy without being too crazy. I originally bought it for another Vogue pattern, but decided to not make that one as it is a little dated.

    It was a fast and easy pattern to cut out, just a front and back cut on the fold, the sash, and the pockets (I did not do pockets this time).

    Back view, Vogue 8915 pattern
    Back view, Vogue 8915 pattern

    This is my pattern layout:

    IMG_0098

    I, of course, have pinned some inspiration dresses on Pinterest for dresses like this:

    ac12cbe74adea19c108d01568ad9627c

    facfcbf56518999b102be968ceb33739

    11cc037550bcad8508ae4e1da56afe4e

    002025622501d9a2de49328008041e84

    I am excited to slip in this dress and wear it out, hopefully get some good photos of me in it, and maybe a client or two out of it (a sewing client, mind you!).

    Cheers!

    IMG_0106

  • Silk Crepe De Chine Tunic Blouse

    Silk Crepe De Chine Tunic Blouse

    I just finished this lovely silk crepe de chine tunic blouse in a beautiful shade of blue:

    Crepe de chine tunic blouse in colbalt blue
    Crepe de chine tunic blouse in colbalt blue

    This was not the fastest thing I have sewn, as I took my time making couture seams and hand sewn finishes, even self-fabric covered buttons. This fabric is so lovely to wear, but quite finicky, delicate and slippery to manage and to sew, that I had to take my time for each section of the construction process.

    IMG_0004

    features center back pleat detail
    features center back pleat detail

    I used New Look 6374 pattern, view A to make this top:

    Pattern cover for New Look 6374
    Pattern cover for New Look 6374

    I have seen this style of top all over the place in stores, in magazines, on people, so I have gathered up a few images of the look I was going for with this top:

    f692dd25db1593fc5aebb92cc9c78d64

    927ee992f124efe580e7ac674738226d

    a232bee681e4753b09a71cc35c42114a

    I look forward to wearing this new silk top, and most likely, I will be making it up again in other colors soon. Exciting!