I just finished sewing up this lovely top in silk georgette. It turned out gorgeous and so luxe to the touch. I can’t wait to wear it, but first, it is meant for a sample to showcase in an adorable little shop in Lake Oswego, Oregon, Nick and Figs, where I aspire to teach and instruct sewing this top in the near future.
The material is a silk georgette I bought at Mill End Store in Beaverton in a gorgeous shade of green:
the color of this fabric is more of a blue/green than this photo shows
This fabric was NOT easy to sew! It frays, it’s super slippery and figetey to work with. This fabric is lucky that I love it, otherwise, this would never be in my sewing room!
I used this new McCalls pattern 7411 to make this top:
I traced off onto separate pattern paper and cut out view C in size Small with no changes or adjustments to the pattern. The only thing I goofed up on was the side seam of the overlay. I is supposed to be split and longer in the back than the front as this line art shows:
I didn’t realize this and just cut the overlay straight across from the front to the back, so the seams match and are not split as shown. I’m fine with that, it’s just not as the pattern intended.
On one of my Pinterest boards, I had pinned some lovely tops in a similar look to keep in mind while making this top:
Looks great with white jeans
After settling in with the pattern cut and all my markings and notches were complete, things went fairly smoothly with sewing this top. Taking my time pinning each raw edge together and carefully sewing, I completed this top in a few days:
pinning the front necklinemaking a baby (hem)tiny hook and eye hand sewed to the back neck edge
The most difficult parts of sewing this double layer top was getting the part where the two layers of the back opening at the bottom of it to come together perfectly and have a smooth finish to it. I carefully went over this area twice so not to have a gaping hole here, then gave her a good press to make it smooth and ripple free. Sorry, no photo…
Also, figuring out the last part, sewing the two layers of the shoulder seams together was a little confusing and tricky, but after some careful thought and basting seams here, I figured it out by just imagining what it should look like when finished and sort of thinking backwards (if that makes any sense). Sorry again, no photo…it wasn’t a pretty sight anyway…
After all that, it turned out a lovely simple yet luxe top that I hope to sew again, next time along with eager students in my intermediate sewing class at a wonderful little local creative arts school.
OMG, why is it freezing in here? Oh, right, I’m wearing a COLD SHOULDER top! Duh!
Seriously, now, I love this trend. A loose-fitting top (or a tight one) with a little skin showing at the upper arm and shoulder. What a great way to show off one of the skinny and toned (read: bony) parts of my body and a perfect spot to dab on a light perfume or scented body lotion and invite a sweet kiss there from my Boo!
I set out to sew this top using a lovely silk chiffon by Suno I purchased a few years ago from Josephine’s Dry Goods in Portland, OR. It is a wonderfully soft, airy and flowy feel to it and has a colorful navy blue, mossy green and chartreuse brush stroke-like pattern to it (I love fabrics and clothing that mimic art in case you were wondering) that happens to go great with denim:
I felt that this silk was a tad too sheer to prance around in and not feel too exposed while wearing this top (that open shoulder was already so daring and risqué!), so I decided to add another layer of chiffon to the front and back of the top, a lining of a sort, leaving the sleeves just one layer. I used a nice tan silk chiffon I have had in my fabric stash since who-knows-when:
This tan layer was the perfect color and weight under the printed fabric as it looks similar to my skin tone and kept the integrity of the fashion fabric light and airy while providing the coverage desired.
I was going for a look like the following cold shoulder tops I have seen in stores and on Pinterest:
There are several commercial sewing patterns available now to sew and achieve this look, and I chose this one, B6457 from Butterick to try:
I chose view A with the V neck and the elastic sleeve hem to make.
The sleeve pattern piece was the most interesting to me. Of course, this is the most interesting part of the design of this top. Here it is shown flat as I was cutting it out of my fabric:
It was a relatively easy top to make, accept for the difficult fabric I chose to use (chiffon is quite delicate, shifty and frays when you simply look at it), and that V-neck band turned out to cause me a good deal frustration and time figuring out the exact placement of the sleeve and the point of the V. UGH!
I took my time for this area, using tailors tacks in fuchsia pink thread, basting by hand before sewing on the machine and trying my hardest to carefully match the points as needed:
After all the careful sewing work, I really, really love this top! It is great for the spring weather as it is light and colorful, and the sleeves give just the right amount of coverage (accept for my poor, bony, freezing cold shoulders, HA!).
I am not sure I will sew the same pattern again, but I do plan to make other variations on the “cold shoulder” trend in the near future because it is fun and flirty.
I love me some lingerie! I always have been drawn to the pretty laces, slippy fabrics and alluring nature of these somewhat “unmentionable” garments. I’ve even had dreams of owning my own little pretty lingerie boutique where I could buy and sell my favorite choice pieces to clients who share my admiration.
I got the opportunity to take a lingerie sewing class at Portland Fashion Institute a couple of years ago where I learned about the best seaming techniques, the specialty fabrics, and construction of various lingerie items such as bias cut slips and knickers, stretch lace undies and even an underwire bra. I need to dig into my UFO (unfinished objects) stash and pull out some of these gems and finish what I started (I’m notorious for UFO’s by the way).
I have also watched the Lingere Sewing on line class on Craftsy taught by Alison Smith. I just love to hear her soft British accent while soaking up some of her vast knowledge of sewing lingerie and other garment construction techniques. I do plan to make up a silk robe and little slip with lace trim that is part of this class. Maybe that’s next on my cutting table!
My good friend asked me recently if I might be able to “copy” a pair of her favorite undies, and I agreed, but first, I just had to try out this new sewing pattern from Simplicity that was released recently and she was to be my guinea pig.
She, of course, happily agreed to be my guinea pig and we got started taking her measurements and finding fabric and colors she would like. She decided that she could get more wear out of the racer back pattern, but didn’t care for the larger-than-necessary briefs that came with the pattern, so I found a much more modern and “younger”, if you will, panty pattern on Etsy from Ohhh Lulu Sews patterns to match the bra:
Cute, right? I thought these would suit her much better, so I purchased and downloaded the PDF of this pattern and got out my paper scissors and cut out the hipster version of these pretties.
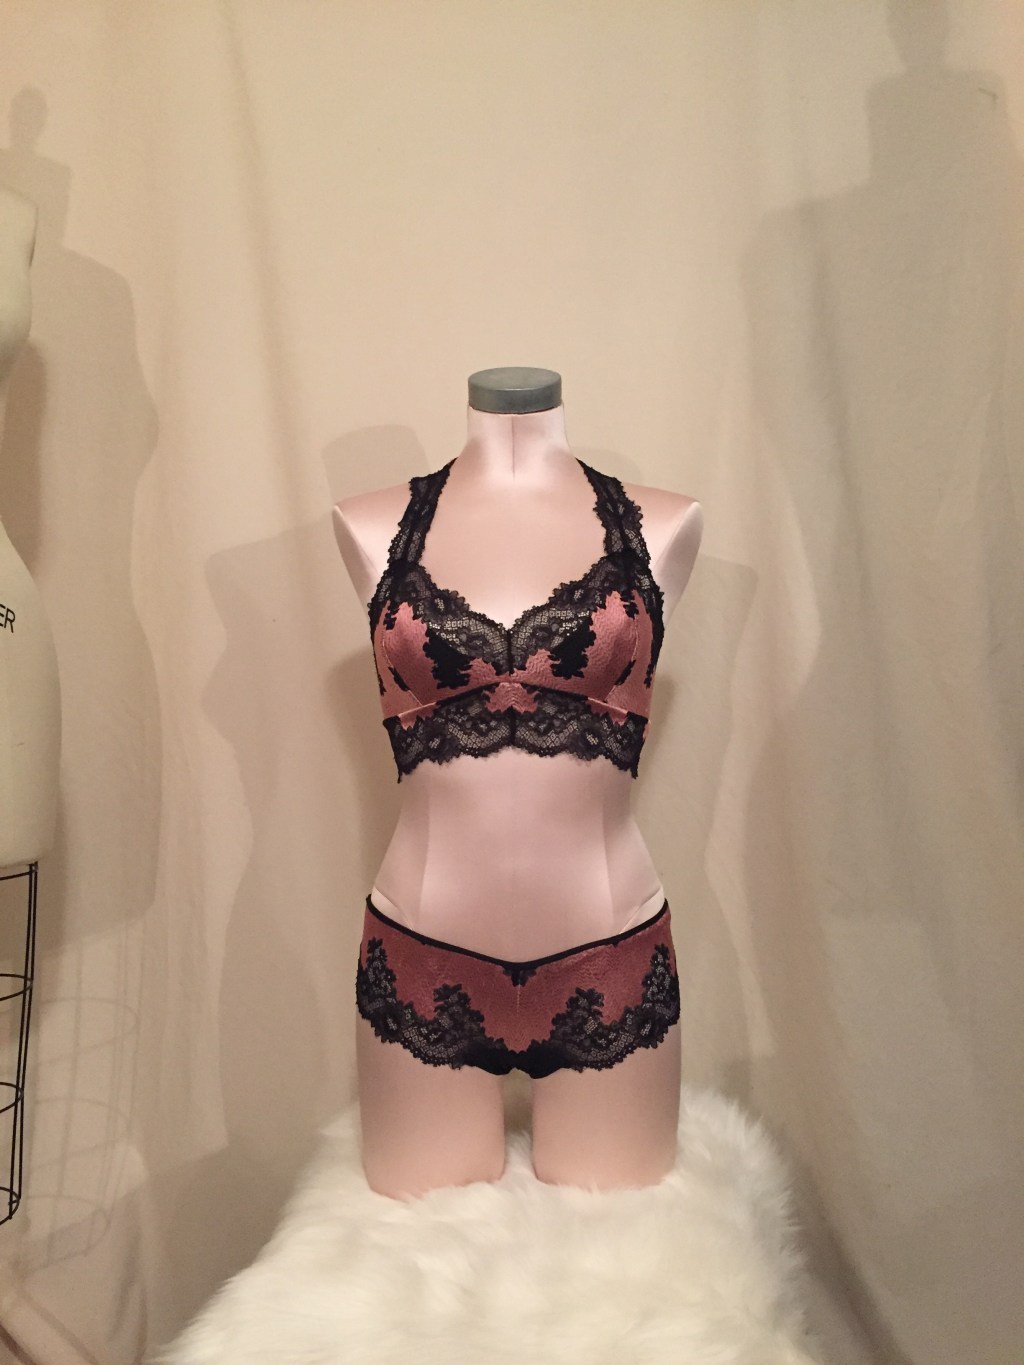
Rewind to a couple of months ago, I purchased a few yards this lovely double scalloped edge 8″ wide stretch lace from Tailor Made Shoppe also on Etsy as my friend likes to wear pink and also black:
After too much procrastination on starting this project (5 months), I realized that both her birthday and Valentine’s Day was rapidly approaching and my sewing to-do list was getting too long, so I got to cutting and sewing this set for my lovely friend as a gift to her (and her husband too!).
Matching and mirroring the scalloped edges of the pattern pieces proved to be the most tedious and time consuming part of this project. I copied all of the little pattern pieces as needed to best lay out the pattern on the fabric along the lace edges in the most efficient manner:
Sewing up the bra didn’t take too long, two nights after work was sufficient time to sew and serge the seams. I was falling in love with the bra more and more as I constructed it, dreaming of making it up in different colors, and maybe changing up some of the design of it.
Sewing up the panties was even faster. In just a couple of hours, I had cut out and sewn up a cute little panty!
As I dressed my new Pink Lady body form, I realized that I need to go back and fix the elastic placement at the left back neck top edge of the bra so that the pattern of the lace mirrors that of the right side as you can see in this photo, but that should be an easy fix.
Also, I am not 100% happy with all of the pink part of the panty and not as much lace showing here. I have enough of the fabric to give it another shot, plus sewing these was so fast and easy, so I might go ahead and do that.
But, all in all, for my first little set of bra and knickers for a “client” turned out pretty darn nice I think! I am super excited to give them to her and force her to show me how it looks (I don’t think she will have any problem at all showing off her fantastic figure to all who will admire!). I also can’t hardly wait to sew up more lingerie as I just get such a thrill out of making such pretty things!
Voila!
Happy Valentine’s Day and Happy Birthday my dear friend!
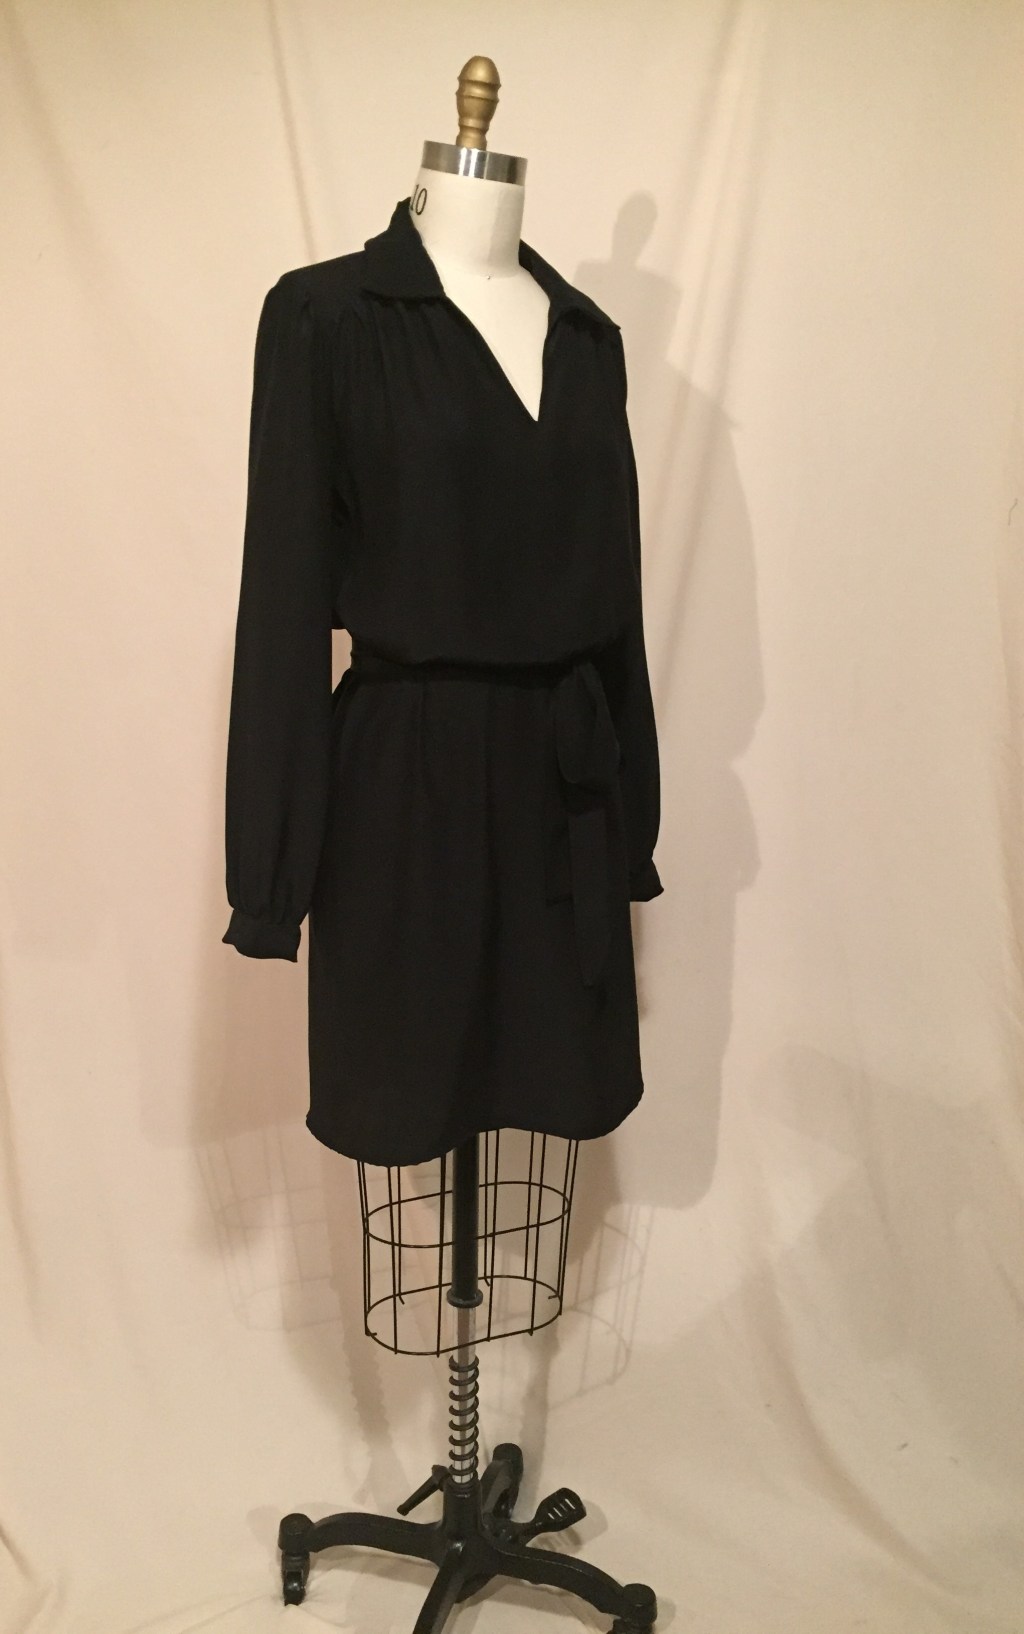
While in New York recently for a quick trip to see friends and visit a couple of museum exhibits I wanted to see at FIT and The Met (amazing, by the way), I stopped into Mood Fabrics and picked up a few treasures. One of these was a lovely, lustrous, drapey and smooth black silk charmeuse of which I purchased 4 yards:
I thought how lovely this would be (and feel!) as a shirtdress that I have had on my sewing “wish list” for some time. The yardage would be enough for the dress, as well as leftovers for a little top or a luxe lining of another garment.
I decided to use Vogue 8847 pattern again for the shirtdress as it was simple, elegant, and had no buttons or plackets to deal with:
I used this pattern previously for my printed silk crepe de chine version of this pattern and have really enjoyed that dress. I decided that I wanted a collar for this time around, so I made up what is essentially view B with a few tweaks to the hem and the sleeve length:
I used silk organza for interfacing the front facing and the collar.
silk organza interfacing the silk charmeuse
The yoke facing was the perfect spot to add my little Love, Stephanie label, plus a tag from Mood that they kindly send along whenever you order fabric from them:
Pinterest is of course a great resource for finding ideas and inspiration for what I would like to sew. Here are a few shirtdresses that I have pinned for inspiration for this dress:
I really like how this dress turned out as it is quite comfortable, and has a clean, chic and classic look. It can be dressed up or down depending on accessories and shoes.
It’s another happy to complete sewing this and get to wear my new LB shirtdress!
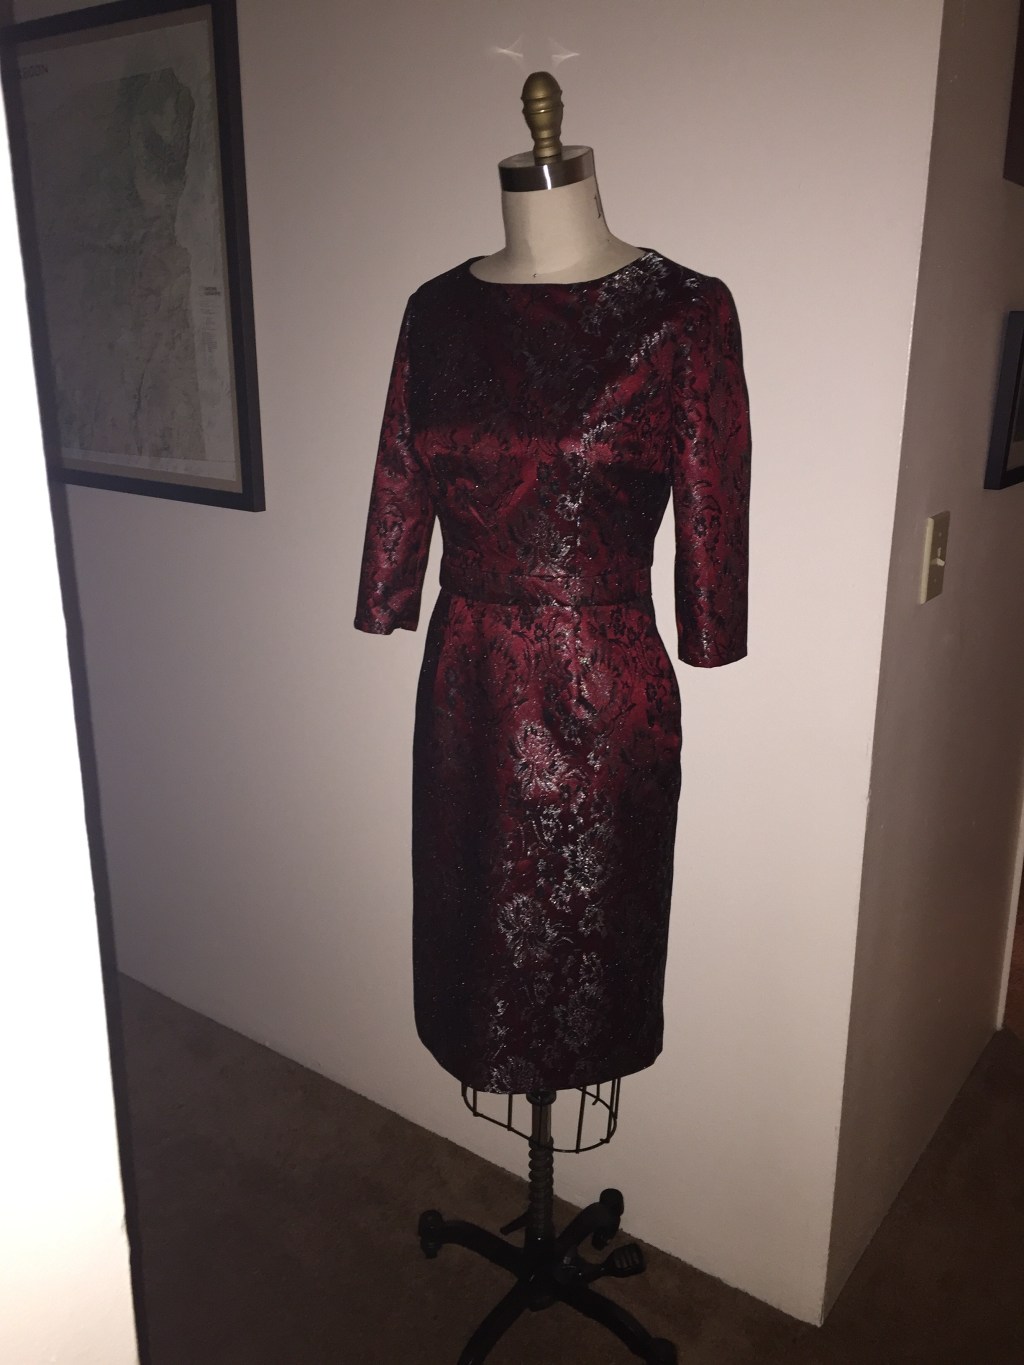
The holiday party invitations started to come in, so I thought, “I need a new party dress!”. So, I rummaged through my fabric stash, flipped through my pattern stash, and consulted my Pinterest idea boards for inspiration, and came up with the idea to make this lovely little dress!
The fabric is a lovely cranberry red, black and metallic silver floral brocade I purchased a few years ago at Mill End Store in Portland, OR. I also had some nice black silk habotai on hand which I keep in stock for lining my nicer garments.
Metallic Brocade Material
I used McCalls pattern 6893 to make the dress, modifying the 3/4 sleeve boatneck darted bodice and straight skirt view (the sort of silly looking black and pink one at the bottom of the envelope) to eliminate the ruffle at the hem and lengthening the skirt 6 inches. Instead of making the bustier under the overlay of the top, I just cut the top, the midriff and the skirt all out of my fashion fabric as well as the lining.
I appreciate how McCalls puts out these “Create it!” patterns as they encourage the sewer to me imaginative with the pattern design and not just make the garment straight out of the pattern envelope just as shown. Why not mix it up, use the bodice of one pattern and the skirt of another, experiment with different fabrics and make your own creation! Love that.
I actually wouldn’t mind using this pattern again to make another version of it such as the halter neck bodice, the flared skirt, long or short, and I like the overlay effect with the strapless boustier underneath. So many possibilities!
So, before I started to cut into the fabric, I sat down for a moment and drew up an illustration in my Fashionary (another love of mine) just to get a better idea of what the finished dress would look like. I thought it looked pretty darn good:
This being done, I set off to cut and sew! I managed to whip up this number in one day (granted, I was snowed in and didn’t leave the house for 24 hours), which I think was pretty impressive!
I didn’t bother to make a toile this time (tisk-tisk!). I got away with it by taking careful measurements of the pattern and comparing them to my body measurements. The pattern was pretty spot on in terms of fit, so I just went for it. But before I did, I did add to the seam allowances of the skirt, making them 1″ (increasing them by 3/8″ as I cut out the pattern) just in case. Turned out the fit was just fine.
I enjoyed the process, although I took shortcuts along the way. Here I am using a wavy rotary cutter and my pinking shears to trim the seam allowances and finish the raw edges:
And inserting the invisible zipper was a breeze using my handy invisible zipper foot:
Sewing the invisible zip into the back of the dress
All in all, it turned out a great little vintage inspired shift dress! Sure, I wish I had take the time to find a really cool vintage pattern to make to really show off the fabric with pleats, tucks or an interesting drape, but I will use this pattern as a template since it fit so well to make design changes to in the future.
I will try to get a photo of me wearing the dress at one of these parties if I am able to!
As soon as I got the invitation to a Halloween party, I was so excited for it and started planning what to make. I absolutely LOVE making costumes and love the idea of becoming a character for a day!
The party theme was going to be a spooky dark dungeon, and I thought Maleficent would be perfect. I immediately got to work on her choosing a pattern to use, what materials I would need, and of course, her accessories to complete the look.
Starting with inspiration, I searched for images of Maleficent on Pinterest and found some great ones:
I knew that I wouldn’t have time to actually make the horned headdress and her scepter, so I ordered those on Amazon. I got the raven at a Halloween shop, and my darling Diablo was perfectly behaved the entire night!
It happened to also be pattern sale time at Jo-Ann Fabrics (luckily this happens pretty often!) and I had a 40% off coupon as well, so I headed to the store and purchased this McCalls pattern #6818 and 6 yards of black satin and lining for her costume:
McCalls 6818
I received her horns and sceptor pretty quickly and was delighted with them both!
Headdress, pattern and fabric ready to get started!My fashion sketch, just for fun!
As I cut out the pattern pieces, I decided on what modifications and adjustments I would make to the pattern to suit the costume. I thought that her skirt part of the coat would need to be fully enclosed (not the open front as on the pattern) and the collar would really be the focal point. I also wanted pockets in the coat dress so that I wouldn’t have to worry about carrying around a purse.
I also wanted the jacket to close up in the center front, so I added an invisible zipper here instead of the hook and eye closure as the pattern had.
So, I used the back pattern piece of the skirt as the front as well instead of making a new pattern piece. I added 3 inches to the skirt length to be sure it was floor length on me, and added pockets to the side seams of the skirt as well as an interior pocket inside the bodice lining.
I had some leftover faux fur and some faux leather from another project that I used for the collar which was perfect! I used the faux leather for the under collar and the fur for the upper collar. I spotted some beautiful feathers at Mill End Store in Beaverton, so picked those up, along with super stiff interfacing, to add to the drama of her collar.
For her dramatic medieval sleeves, I chose a black stretch velvet (the cheapest velvet I could find!) to line them. That was probably one of the most difficult parts of this to sew just because of the slippery satin and the nature of the velvet to sew together. But, with careful pinning and slow sewing, I got through it.
In the end, after hours of cutting out, fitting and sewing, I really love how my costume turned out! I love the dramatic collar, the bell sleeves, and the little corset lace-up on the back. Plus, the pockets were the perfect little convenience to stash my cell phone, ID and lipstick 🙂
Diablo was a perfectly behaved companion
Beware of the darkness…
I’ll be wearing this costume for years to come, and hope to add to it with a long cape, some gloves, maybe even wings!
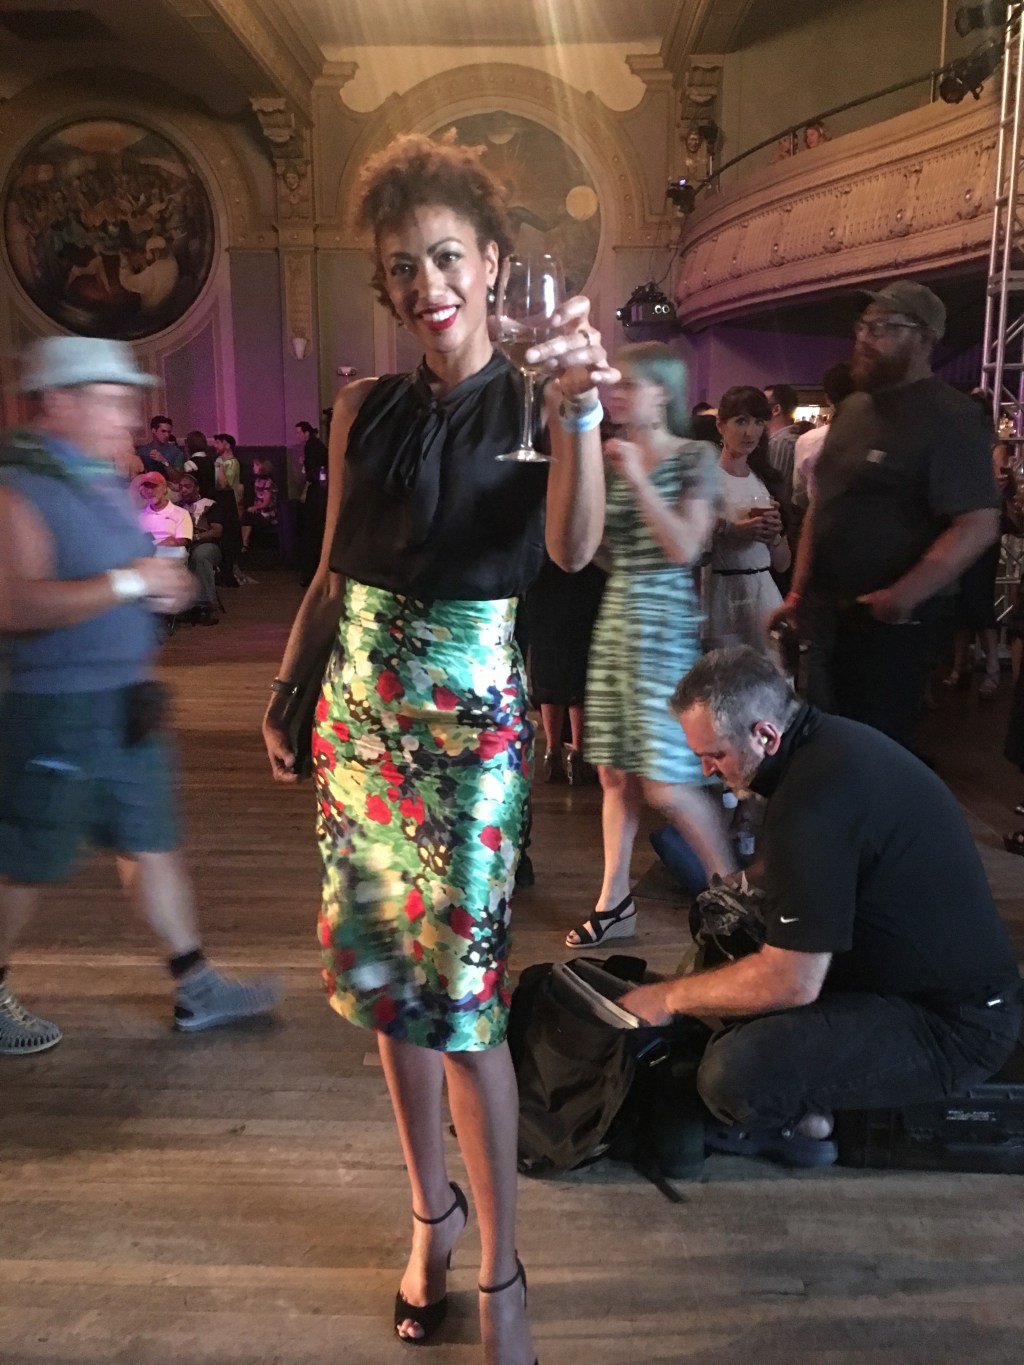
It’s fashion show time again here in the great city of Portland, Oregon, and that means time to bust out the best wardrobe to wear! For the occasion, I finally got around to make up this pencil skirt that I have been wanting to sew for some time now:
Cheers to my new skirt!
The fabric is the showcase for this project. It’s silk twill from the late designer Oscar de la Renta that I purchased from Mood Fabrics online. I’ve had this beautiful (and spendy) fabric in my stash for two years, and was overdue for it’s time to be made into something wonderful.
Oscar de la Renta Silk Twill
I have been saving some pins on my skirt inspiration board on Pinterest in hopes to make up a simple, yet wonderful, pencil skirt in a floral fabric:
Burda Pattern 7124 was my choice to make up this skirt as I love the slim fit and the high waist of view B:
Burda Pattern 7124
The pattern was a little bit of a challenge to read and interpret the instructions, as well as keep all the pattern pieces of the waistband and waist yoke of the fashion fabric, the lining, and the interfacing straight, marked and in order, but other than that, it was a fairly easy pattern to work with. I added two inches to the hem while cutting it out in order for the finished length to hit just below my knee.
Here is my pattern all laid out on the silk (after making up a muslin mock-up of course) and ready to cut:
Pattern layout moments before cutting
I chose this pattern also because of the nice walking slit and the full lining. I felt that this skirt in this special fabric deserved those features!
I used some black silk habotai that I had in my leftover scraps from another project to line the skirt and that worked out beautifully.
Hand sewing the interior facing and lining to the zipper
I really love the finished result of this skirt and will wear it a lot.
Interior of the skirtlove how the back yoke pieces create the high waistFront of the skirt
I have about a yard of fabric left over from this project, and may make up a matching top at some point to make this into a two-piece dress outfit. Or, if somebody comes along and would like me to make them a custom skirt or dress from the remaining yardage, let’s talk!
It’s been HOT here in Portland, in the 90’s the past few days, and I’ve been only wanting to wear dresses and skirts to try to beat the heat.
On my sewing to-do list have been fun, lightweight and easy to wear skirts. As an inspiration, I’ve seen cute printed a-line or pleated skirts that are fast and easy to sew, and even easier to wear. Here are some of my inspirations:
Black floral skirt, leather top in combination with stylish necklace create universal elegant look.
I had some nice black and white Ikat printed medium weight cotton fabric in my stash,
plus black Bemberg rayon lining material which I usually have on hand or left over from another project, so I decided to make up a cute little pleated skirt for myself using New Look 6873 pattern which I have had forever in my pattern stash:
New Look 6873 pattern illustrations
Well, the pattern sizing turned out to be pretty terrible and I spent most of my time fitting, ripping out stitches, and re-sewing this skirt. It was HUGE! I followed the size chart and cut the size that matched closest to my measurements. I had to take out about 2 inches at each side seam of the skirt and the waistband in order for the skirt to even come close to fitting my waist. It was almost as if I had forgotten to sew a couple of pleats it was so big!
After fitting it and re-sewing, the skirt took about twice as long as it could have to make. Plus, I added a lining to this using the pattern pieces of view C, the A line skirt with no pleats. so that added some additional time, but totally worth it.
All said and done, I probably won’t sew this pattern again. I really should be drafting my own patterns at this point anyway. I thought it would be a time saver to use a commercial pattern where the pattern work was done for me, but that was not the case here.
Oh well, now I have a cute little skirt in a great print and I am happy!
My dear friend Nancy asked me if I would be willing to make her a dress to wear to a wedding she and her husband were going to in England. My reply was “Of course! I’d be delighted to!”. So the journey began!
She wanted to use her wedding gown to remake into a dress to wear to the wedding. How special is that! Her gown was made of silk duppioni and there was plenty of it to work with. The only issue was that it had never been cleaned since her wedding (at least 12 years ago, maybe more) and had been stored with some stains on it. Of course we would need to dye it as well, and I have never dared to dye fabric before, let alone a keepsake wedding gown, so after some thought and debate, we decided to scrap the upcycled wedding dress idea and purchase new fabric. This would save time in the long run, plus spare the wedding gown in case I were to completely mess it up (what me, mess up? Never!).
She loved the idea of wearing a girly dress; something fitted at the bodice and poufing out from the waist. We created a Pinterest board and shared ideas of wonderful dresses for inspiration.The dresses we swooned over were designer dresses in beautiful fabrics and feminine details such as pleats and tucks. And how wonderful it would be to also have pockets!
Here are some of our favorites:
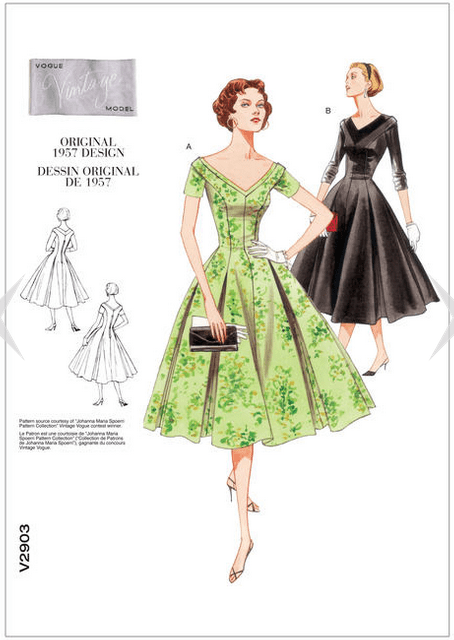
So I searched and found a nice vintage pattern to use to make the dress. I found this Vogue pattern that was originally released in 1957 that she also loved:
Vintage Vogue Pattern 2903 Envelope
It featured a wide, face flattering off shoulder v-neckline, a nipped in waist, and lovely pleated skirt. The dress did not, however, include instructions for a full lining, or side seam pockets, so I added those features on my own.
With the pattern decided, let the fabric shopping begin! This was the fun part, as there are so many lovely fabrics out there that would be wonderful for this dress.
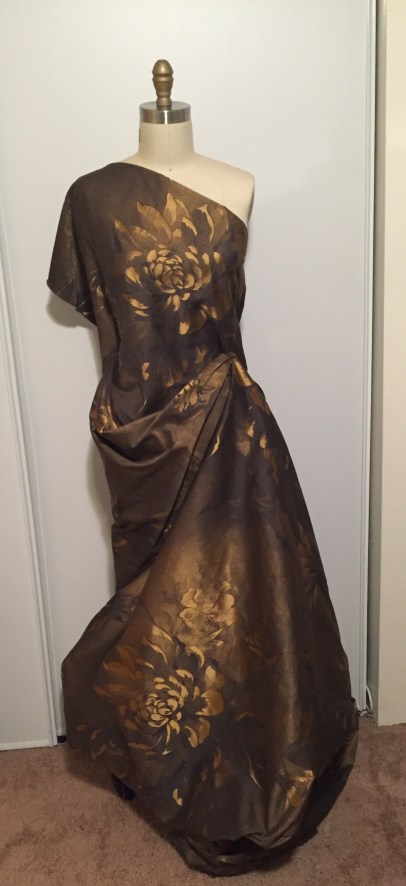
After about 578 swatches ordered (slight exaggeration), she chose a beautiful gold floral silk jacquard by designer Carolina Herrera purchased from Mood Fabrics website:
the magnificent silk jacquard Caroline Herrera fabric draped and pinned to my dress form
This fabric is amazingly beautiful! The gold really shimmers and catches the light as it moves, and the background color changes from a brown, to a purply-taupe, to a navy blue.
Once we had the main fabric, we headed out to Mill End Store in Milwaukie, Oregon to find a nice lining material. Together we chose a lovely navy silk twill to line the dress in. Later, as I was making the dress and installing the lining, I told her I almost like the lining as much as I like the dress! It really turned out beautifully and looked so luxurious.
So, I hunkered down and got to making the fitting muslin toile for her. The fitting went well and she was already happy with the shape and style of the dress so far:
As for the pattern fit, the list of changes I was to make were as follows:
no sleeve
take up at the shoulders
take in the bodice at the princess seam along bust line
take in at side seam of bodice
shorten entire hem length by 6″
And design additions and changes to the pattern included:
cut the center front panel out of one piece, eliminating the center front seam so not to “interrupt” the beautiful pattern on the fabric
add side seam pockets
add full lining
take center back zipper all the way up to the top of the dress (the zip was originally designed to be centered within the dress for some reason)
add lingerie hooks at shoulder to secure bra straps
After the muslin fitting, I got back to my sewing table, took apart the muslin dress, and transferred the changes to the original dress pattern pieces as needed and made a new center front pattern piece with no center seam. Then I got to cutting the dress out of the fabric.
Sewing up the dress the second time around in the fashion fabric did go much faster than the first time out of the muslin, just because I knew what to expect when sewing, and had basically done it all before.
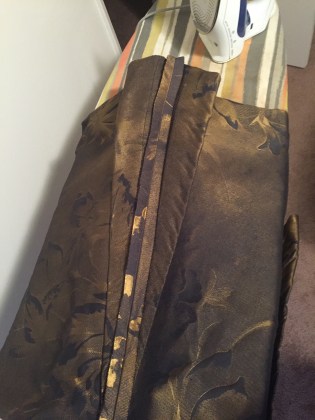
This time, I made the lines and sewing markings for all of the pleats on the outside, the right side, of the fabric with chalked tracing paper so that is was much easier to find them when it was time to fold and sew the pleats down.
Here is a photo of one of the pleats folded from both sides into the seam, basted down, then pressed:
a pleat sewn and pressed
Extending the zipper all the way to the top of the back of the dress made sense and was easy to change on the pattern. Here, I am hand basting in the zip in to the center back seam, using a bright teal silk thread, before I sew it in on the machine:
center back zipper basted in
Once I had the dress sewn up (for the most part), I scheduled another fitting with my friend. I wanted to make sure that everything was going well before I cut, sewed together and installed the lining.
Everything looked great and fit well, needing only a few tweaks to fit around the bodice and the decision to add the yoke piece to the neckline:
Fitting #2 in the dress
It was time to cut the lovely silk lining!
cutting out the navy silk lining
I used the same pattern pieces as the dress, sewed it together in the same manner (minus the pockets), and sewed it to the neckline and armholes of the dress, under stitching as far as possible to keep the lining to the underside of the neck and arm openings.
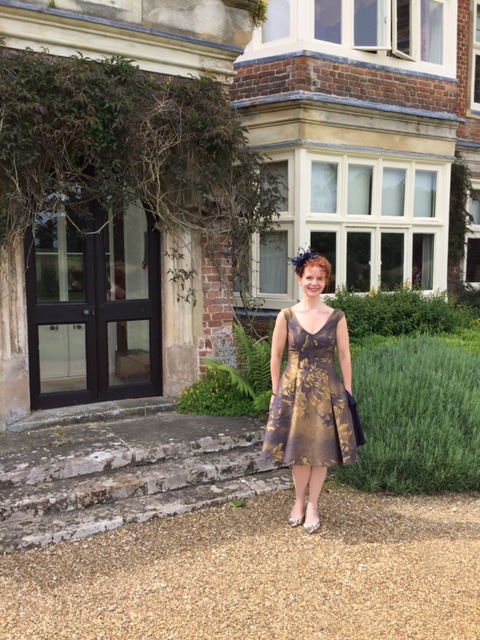
Finally, after hours of fitting, cutting, sewing, pressing and steaming, the dress was complete! I am very happy with the result of the dress,
and Nancy was just delighted to wear it to the wedding in England:
Doesn’t she look fancy and marvelous wearing her new custom made silk frock, complete with wonderful gold shoes and a great feathery fascinator? I think so!
I made up this pattern in my Advanced Pattern making class that I have been taking at Portland Fashion Institute as a part of my first collection for my label Love, Stephanie.
I got about 4 yards of a lovely silk twill-like material that had just the right amount of drape to it without being sheer or flimsy.
I love how easy and free-flowing this jumpsuit looks and feels:
It was a fairly easy design to create. I made a cross bodice top with a back zipper opening, drafted a long sleeve with a wider sleeve hem, made a wide leg palazzo pant, and sewed them together at the waist and added elastic. I then whipped up a simple sash and tied it loosely at the waist Boom! Done!
I have been admiring the whole jumpsuit trend and have been saving up inspiration photos on Pinterest:
fashion blog for professional women new york city street style work wear
Jumpsuit with leather sash
Love it! I can now take what I have made and create different versions of it; narrower leg, sleeveless, halter top, all kinds of fun and fashionable looks. Sew exciting!!
Thanks for stopping by and stay tuned for more custom designs from me!


 I didn’t realize this and just cut the overlay straight across from the front to the back, so the seams match and are not split as shown. I’m fine with that, it’s just not as the pattern intended.


 I chose view A with the V neck and the elastic sleeve hem to make.