I’ve always wanted to own a bomber jacket. There is something cool and so easy about them, for all sexes and ages. I suppose that are a combination of an aviator jacket and a varsity jacket, and are seen everywhere in fashion nowadays.
The opportunity and time to make one for myself when we decided against dressing up and going out for Halloween this year as we had made previous plans for a double date with another couple the one good night for going out on the town. That disappointed me a bit as I was looking forward to making us costumes and going to a party or event, however, left me with some time (and fabric money) to make something else instead. So I chose a bomber jacket!
I picked up this sewing pattern a couple of months ago and started finding information online about the pattern and who had sewn it:
I learned that many sewists had really enjoyed making this pattern and it had rave reviews on PatternReview.com.
Some had even taken gone one step further and made the jacket reversible! I thought, if they could do that, why couldn’t I? So I went for it and made it happen!
I gathered up what materials I wanted to make the jacket out of, including the cotton camouflage print fabric and the flannel-backed satin for the two sides of the fabric and lining, the 2-way metal zipper (I ended up using a different zipper than the one shown in the photo below), and the gold metallic thread of which I planned to quilt the satin lining:
I got to work cutting out the two sides as I knew the quilting would be the most time-consuming and wanted to get to it as soon as possible. I spent a good amount of time making chalk lines of the quilting pattern I wanted on the jacket front and back pieces of the satin side before sewing it to the batting and creating the quilting pattern:
The quilting was somewhat of a slow and careful sewing process. My sewing machine didn’t get along so well with the metallic thread (yes, I used the right kind of needle and tension on my machine!) and caused some technical difficulties, but with some patience and rethreading the machine many times, we eventually got through it together.
I decided to leave the sleeves of the satin sides smooth and un-quilted to avoid any “you look so, um, puffy today” comments when wearing the jacket with the satin side out. I think that was a great decision plus a huge time saver.
Sewing the rest of the jacket was pretty much a breeze, including the two-piece raglan sleeves, the pockets and even the ribbed knit collar, waistband and cuffs:
the front pieces sewn to the back
The sleeves sewn to the front and back
I basted the zipper in by hand before machine sewing it in for the most control of this “touchy” bit of the process:
Then, sewn by machine:
Before long, I was on the home stretch doing my final top stitching using my edge stitching foot (one of my favorite machine feet!) on the front opening edge of the jacket and she was about done!
I was thinking that I would like to add some cool embroidered patches to my bomber jacket, but didn’t come across any ones I liked in time, so I figured I could always add some and sew them on by hand if I come across any the I like in the future. Meanwhile, I LOVE my new bomber jacket and am so excited to wear it, and inside out!
THE BOMB!
PS and disclaimer: this post has no affiliation with the crazy-ass bomber who was just arrested for mailing bombs to prominent Trump critics! Just say’n…
I just love a great watercolor painting, how the colors softly flow into each other, creating emotion with how they blend together to evoke a mood.
Speaking of Mood, the renown fabric store in New York, Los Angeles, and online at MoodFabrics.com, the store where the Project Runway design contestants run around like chickens with their heads cut off trying to find fabric, trim, notions and inspiration (and hopefully a lucky Swatch sighting), all within a ridiculous 30 minutes, is running a series of contests using their fabrics. I thought how fun it would be, and also a challenge for me, to order some silk and whip up something for their MoodMadeSilk18 contest by the deadline of today, April 30th, 2018.
I went ahead and ordered 2 yards of this gorgeous watercolor floral silk chiffon and was even happier when it arrived!
Isn’t it SO pretty?!
I gave it a gentle wash and laid it flat to dry, then got to smoothing it all out perfectly on grain and ready to be cut:
I thought this would be a perfect fabric for this pattern view A from McCall’s that I had recently acquired from their new Spring ’18 collection:
Pinterest is one of my favorite resources to find inspiration and ideas for sewing (also for cooking, art and other ideas). I found a couple of flouncy cold shoulder tops and pinned them for inspiration and thought, “I could make something like that, easy!”
So, I proceeded to do just that!
By taking measurements of the flat pattern and comparing them to my own body measurements, I knew that the torso would need to be lengthened in order to not feel too short on me when done, so I altered the pattern and added one inch to the front and back pieces using the “slash and spread” method (sorry, that sounds kinda dirty) before cutting the top out of fabric:
With the top only being a few pattern pieces, it went together fairly quickly, not including the pain-in-the-assery of working with silk chiffon, of course. For one thing, I had to carefully mark the wrong sides of the fabric as I went along so that I didn’t sew them incorrectly:
Plus, make French seams on most seams since the fabric is so sheer and frays like a beeotch:
sewing seam part #2 of a French seam
I decided that the fabric of the top was SO sheer that I would feel indecent prancing around in this with all of my “stuff” showing underneath, so I ran out and bought enough additional silk chiffon in a deep navy to layer under the print to create some opacity:
The top took me a little over a week to completely cut out and sew in my free time, so that was not too bad. I love the flounce and halter neck, and the fabric most of all on this top.
As for pattern changes, I left off the elastic at the waist, and didn’t add the zipper as the pattern suggests as I think that would be too much weight for this super delicate and sheer material. I also skipped the facing and sewed the lining in it’s place for a much better finish to the edge and to combat some of the sheerness.
Detail of the French seam made on the flounce piece
I am not 100% sold on this pattern as I feel the fit is a tad “off” and the cold shoulder is really, really cold showing so much skin. It is way too big in the underarm as it turns out and shows off a good deal of side boob here. Making a dart here to take up some space is not going to work on the finished top (note to self: make more pattern alterations in this area, and maybe try a muslin too, before cutting into spendy materials like this, silly girl Steph!) so for now, I think I’ll make up a coordinating bra or a panel on the side to avoid any wardrobe malfunctions…
Don’t look now, but your side boob is showing…
I finished the top just in time to throw it on, slap on some makeup, do something to tame (or tease?) my crazy hair, and have my sweet and patient man snap some photos of me to post on my Instagram with the hashtag #MoodMadeSilk18 to enter the contest by the deadline. I would love to win the $100 gift card to Mood as the winning prize, but there are some other amazing garments that sewists have made with silk from Mood for this contest, so I wouldn’t be upset if I didn’t win. Just making stuff and challenging myself is fun for me!
I usually don’t identify myself as being overly girly or feminine, but I’m finding myself drawn to flounces, ruffles, florals and other “girly” details in fashion lately. So, I figured, why not succumb to my femininity and make myself something floral, flouncy and flirty! (Yes, I am a total dork if you were wondering.)
Last summer, I came across this floral stretch denim fabric at Joann’s and really liked it, so I purchased a couple of yards of it, with the intention of making a little dress out of it:
We were planning a trip to Las Vegas in August 2017 and I thought this would be a great opportunity to sew a little strappy fitted dress for the trip, but then the trip was cancelled so this particular dress project was also cancelled, at least for the time being.
Fast forward to early Spring 2018. McCall’s Pattern Company released some really great patterns and for a couple of dollars, I picked up this one, and a few others, during one of Joann Fabrics pattern sales:
I’m not all that crazy about the ginormous sleeves on view B and C on this pattern, but I really like the little jacket shape and flounces of view A:
I thought I could make up a cute little spring jacket like this one I spotted on Pinterest:
This pattern, although trendy, could easily be made up in solid colors, prints, or with more of a classic look by just leaving off the flounces that are constructed separately and sewn to the outside along a marked stitching line.
One thing that I thought could improve the quality of the jacket in terms of construction and wear was a facing. Without a facing on the inside of this jacket, the lining would come all the way to the edges of the jacket and possibly show or peek out from the inside of the jacket. Upon doing some research of other sewists that have made this jacket, some of them had added a facing and were much happier with the result. So, I decided to take the time to do the same to mine.
I pulled up my online Craftsy sewing class Mastering Construction: Linings and Facings with instructor Sara Alm for a refresher on how to make facings and got to work adjusting my pattern.
Commercial break: I absolutely LOVE Craftsy and have learned so much from these great online classes! The classes offered are an invaluable tools for learning for creative-minded people.
I traced a 3″ facing from the jacket front and back pattern pieces, then also traced the lining (minus the facing area) from the same pattern pieces to create facings and a new lining pattern (adding seam allowances to each):
I then decided to add a little fun pop of color to this jacket that is ultimately just shades of grey and chalk white. I used packaged piping in bright fuchsia pink to sew between the lining and the facing. I see this type of detail in some ready-to-wear garments and knew it would be a relatively easy detail to add to the interior (I also learned how to do this by watching another one of my favorite Craftsy classes, Sew Like a Designer: Fashion Details):
Oh, and I also decided that I would like to have a pocket in this jacket, so I just traced off a rectangle (using a notebook that was handy and my clear grid ruler) and cut out two of these from the lining material, sewed them together leaving an opening to turn, turned it inside out, gave it a good press, then top stitched it to one of the front sides of the lining. I thought of doing a nice welt pocket here, but wasn’t in the mood to take the time to do that. Maybe next time!
It was exciting to see my jacket was really starting to come together! I love how the entire jacket is lined, including the underside of the sleeve and peplum flounces. Here is one sleeve getting pressed on my handy sleeve board after the flounce was gathered slightly and sewed to the outside of the sleeve:
The final touch of slip stitching by hand the sleeve lining to the sleeve at the hem:
All in all, this jacket was a fairly easy sewing project and only took a few evenings after work and Saturday morning to complete. I am so happy with it and glad that I chose to make this up, especially in a floral print.
Front View
Back View
I got a kick out of showing off the lining, piping and little pocket that I added to the construction of this little gem:
And, of course, my Love, Stephanie label too:
I enjoyed wearing this out to a local fashion event, along with a silk camisole and black wide leg trousers, also items that I have sewn. I even received a couple of compliments on my jacket! Good times!
I was SO honored and excited to have been asked by a friendly acquaintance of mine to custom make his fiance’s wedding gown. We are friends on Facebook and had seen and admired some of the garments that I sew and post on my Love, Stephanie page.
I gleefully met up with the bride-to-be Terri and we started to plan the project right away as we only had three months until the wedding.
She wanted a vintage style look, and had an original idea of 1935’s-era inspired separates of a gown, an over-blouse and a long-line jacket all in silk. It was a beautiful and wonderful look that she showed me, an actual Vogue Pattern that I happened to also have in my pattern library-how about that!
After mulling over this idea for a few days, we decided that this pattern would be a lot of pieces for me to make, take up quite a lot of fabric, and that we really didn’t have enough time to make it all work.
Idea # 2 was the perfect vision! It combined a vintage look, simplicity, and I knew it was absolutely do-able in the time that we had. I just love this look!
Plus, when she said she wanted a solid color, I rejoiced because those chevron stripes meeting perfectly down the center front of this dress in insanely slippery silk charmeuse-yikes!!!
I got started researching a decent sewing pattern to base her dress off of in order to make the whole process a little easier and not have to make a pattern from scratch. I found this Simplicity pattern which is a vintage one, but from 1972:
The dress had the V-Neckline with the center front seam and angled seams under the bust and a floor length semi-flared skirt. I would lower the neckline, turn the bust darts into gathers, and make a new sleeve to resemble design lines of the inspiration gown as closely as I could.
She wanted the dress to be in a beautiful color, one that was vibrant, memorable and looked great on her warm brown skin tone. She ordered this gorgeous and lustrous silk charmeuse in a color called Citronelle from NY Designer Fabrics:
Of course, I took a few minutes to sketch out the vision of the dress, adding to it over the time and finishing it off with the look that she executed for her wedding day:
Meanwhile, I got started modifying the pattern and creating a muslin. I chose to make the first muslin out if an inexpensive polyester satin to mimic the silk, but I really should have made the first mock-up out of actual muslin and saved the satin for mockup # 2, but oh well, they both served their purposes:
Fitting #1: we worked out a good deal of fitting and design adjustments to the gown.
I added to the sides where she need more room, lowered the neckline, and checked to see if she liked the sleeve.
Then back to flat pattern adjustments and cutting muslin #2:
She was actively loosing weight, so now the dress was TOO big! But, that’s just fine, better to have more to work with than a too-tight fit. We wanted drop the under-bust seam a little more and obviously take in more fabric in the back. Overall, the 2nd fitting went really well, I knew what I needed to do next and it was looking good and she was starting to really get excited about her gown!
We had two more fittings before the final delivery. The next was in the dress sewn up most of the way in the actual silk fabric with the changes from the last fitting, but before the zipper was put in, before the hem was cut and sewn, and with generous seam allowances on the sides and back just in case we needed more room. The last fitting, the dress was done, but she wanted to take in the sides a tad more, and there were a few seam tweakings to perfect the dress.
I added finishing touches to the dress using a beige silk lining for the bodice and sleeves:
As an added little luxe touch, I sewed in satin ribbon hanging loops at the top of the sleeves so that the dress did not just slip off the hanger when stored:
A little satin ribbon sewn into the seam makes a great hanging loop that just falls into the dress invisibly when worn.
I made a tiny narrow hem to finish off the dress:
Making the narrow hem, almost done!
Here is the dress, all complete, steamed and ready to roll, hanging in my sewing room (not the best hanger-appeal on this dress: it really needs a body and boobs to fill it out to perfection in my opinion):
The wedding day was upon us! I was nervous about the dress and hoped and prayed that she was happy and loved her gown. It turned out to be really lovely and it looked so beautiful on her! The silk was just SO lustrous and flowed beautifully as she walked and danced with her new husband.
Success!!
I had the idea to make him a little matching pocket square out of scraps of her dress fabric which she was delighted to give to him during the ceremony. So cute!
I am so in love with their love and simply honored to have such a big part of their wedding ceremony. Thank you Terri and David! Congratulations!!!!
Starting late summer, I asked my boyfriend to start thinking about what he would like to be for Halloween. Call me crazy, but I love Halloween and the process of planning and making costumes, and these things take a lot of time, money and effort to get together.
He shared my excitement about the idea and thought that he would like to be something that went along with the whole Halloween theme: darkness, evil spirits, mystery, haunting, horror. Being a vampire was perfect! Plus, we wanted to do a couples themed costume, so I thought it would be perfect for me to have the opportunity to make an outfit for myself that depicted Victorian era vampires as in movies and TV such as Bram Stoker’s Dracula, Interview With a Vampire or one of our favorite TV series, Penny Dreadful.
So, I happily got to work planning our costumes. We thought about what outfits would be appropriate for the characters and what accessories and makeup that we would like to add.
Luckily, the big 4 sewing pattern companies bank on people like me who like to not only sew their own clothing and home decor, but also who like to create their own custom costumes and not succumb to the mass-produced, cheaply made store bought Halloween costumes out there. These pattern companies have done a great job building hundreds of choices for patterns for costumes for men, women, kids and even pets! All kids of characters to make ranging from TV and movie favorites, period costumes and accessories, superheros and classic Halloween favorites. I pick up these kinds of patterns when they are on sale for $0.99 or $1.99 at Joann’s just in case I think I will ever want to sew them for myself or someone else. They are actually quite exciting to read through, can be somewhat complicated, and I learn valuable sewing techniques from them (I know, call me a geek, I’m totally OK with that!).
I looked through the costume sewing patterns that I have on hand and collected over the years, or ones that I might need to buy, what fabrics that I had in my stash that would work for the costumes.
I chose to use these patterns for Count Dracula as the cape had a nice, wide collar and a lining, and the vest had nice options to look like the proper gentleman that he wanted to portray:
I decided that I was going to take the time to make this lovely Victorian Steam-Punk-esque ensemble consisting of a bolero jacket, a corset, over skirt and long walking skirt:
Plus, I wanted to make a hat or hair accessory to top it all off. I ran out of time before the Halloween event and party that we were going to to complete the hat, but it is so pretty and I know that I will wear with this costume or others in the future, so I will finish it eventually:
After we settled on the sewing patterns to use, I rummaged through my fabric stash to see if I had anything that I could use for these costumes. All I could find that I had enough of in my stash was enough fabric for linings and some interfacing. The rest of the yardage would have to be purchased new.
The Count’s Cape:
Tom’s costume was first in line. We headed out together to Fabric Depot with a 40% off coupon and the patterns in hand to look for fabrics. He chose a lovely black satin for the outside of the cape and a gorgeous deep burgundy for the lining. Also, we found a very nice silver paisley brocade for his vest. We waited on buying the velvet for the collar of the jacket as I had some velvet in mind for the collar of my little bolero that I had seen at Jo-Ann Fabrics.
For the cape, we weren’t wanting the pointy edges of the bottom as the pattern came, so I created a smoothly curved hem using my curved ruler.
Cape pattern as it was originally drafted. The hem is silly I think, or at least not appropriate for Dracula!
For the most part, I used my serger to sew together the long, straight seams of the cape. As many steps in sewing costumes, I tend to take short cuts and not spend the time doing couture finishes or do any hand sewing where the machines can do all the work. I figure why put in too much time if the costume is only going to be worn a few times and construction is not a priority.
Serging the cape together.
Here is the collar under way:
Dracula’s collar with stiff interfacing applied
and sewing the cape to the collar:
I also sewed in a little hanging chain between the collar and cape body for ease of hanging the cape later:
Hand sewing on the frog closure of the cape.
Once the cape was complete, I got started his vest.
The Count’s Vest:
He chose a nice grey brocade fabric for the vest, and I had black velvet to use on my outfit for the collar. I had scraps of lining material on hand to line the vest, so we were good to go.
Paisley brocade for his vest
I don’t have any other photos of the vest in progress (you’d probably get bored anyway), but all went quite well and smoothly with the vest and it’s a relatively quick garment to make.
Voila!
Now, on to my outfit!
The Countess’ Outfit:
First came my bolero jacket. I found enough of this lovely red, black and silver paisley brocade fabric at Joann’s Fabrics (using a 50% off coupon-woo hoo!) to make the jacket and over skirt. I just love these colors together, and it looked great with the black velvet, black lace, the red silk dupioni for the corset, black soutache and beaded trim and the coordinating black skirt.
I threw together a mini mood board and illustration just for fun:
Let the sewing begin!
The Bolero Jacket:
Basting stitches in a bright contrasting thread for ease of removal later
Here are some of the cutting out, sewing and adding trim details to the jacket:
The sleeve of the jacket has a gathered puffy sleeve, but I felt it was a tad limp on it’s own, so I found some stiff tulle in my scrap bin and made a little sleeve head to insert into the sleeves and make them “puffier”. I had seen this technique in my Susan Khalje Bridal Couture sewing book, so I pulled that out and found the section on creating this type of effect for a sleeve. It was a very easy addition to make and just gave that extra support to the sleeve puff as seen in the photo below:
Next came the collar facing and lining. I used a nice bemberg rayon lining that I had as a scrap in by scrap bin, and a lovely black velvet that I also got at Joann’s (also with a coupon, never shop there without one!). I really loved how this was coming together!
The outer jacket, with lace and soutache trim added, and the lining and facing ready to be sewed together.She’s just about complete, just the beaded trim at the hem of the jacket to be carefully sewn on as pinned.The final touch: sewing on the beaded trim.
The Corset:
I had some beautiful bright lipstick red silk dupioni that I had in my fabric stash from several years ago, originally meant for a Valentine’s Day dress that never materialized, but was perfect for my costume corset, so why not use it!
I started out measuring the pattern to ensure a good fit with the corset, and I was good to go with the pattern size 12. I’ve made a proper corset before in a great class at Portland Fashion Institute a few years back, and considered just using the pattern from the class, however I felt that the corset that came with this pattern was easier with no busk closure and very little, if any, hand sewing (again, Halloween costume making short cuts).
Cutting out was fast and easy:
and sewing the entire thing was pretty easy, considering I used ridgeline for the corset boning which can be just sewn right into and through to the fabric, saving lots of time of making boning channels and such.
This type of boning I am not actually crazy about as it is pretty sharp at the ends and I didn’t take the time to make any tips on the end to prevent the poke through on the corset (ouwie!). Next corset will have to be done much more carefully.
Once the corset was complete, it was time to start on the one piece I have never made before: the over skirt.
The Overskirt:
Made by creating a smaller lining and creating pleats and tucks on the back of the skirt.
This bustled-effect overskirt was one item that I have never made before, but it was quite fun and interesting, yet time-consuming, to create. It consists of 4 layers of fabric; the outer, fashion fabric, two layers of tulle that creates the stiffer, pouffy effect, and a lining for the back of the skirt, and just the outer layer and lining for the front, draped piece. The outer layer and the two tulle layers of the back of the skirt are cut from the same pattern pieces, and the lining is a smaller piece that fits to the other layers once all the pleating and tucking have been done.
After the tedious basting, tacking up, pleating and sewing, the pouf of the back of the skirt is complete and ready to be attached to the lining, and then the front is attached to the back, then the waistband is sewn to both.
The smaller lining of the back of the skirt pinned to the tucked and pleated overskirt, ready to sew right sides together.
Additional tacking is done to the layers of the skirt to form the pickups of the overskirt
After many hours of sewing, the overskirt (my favorite part of this outfit by the way!) was complete and I could move on to the final piece of my outfit.
The bolero and matching overskirt
The Walking Skirt:
This was perhaps one of the easier parts of the outfit, although it consumed a great deal of fabric, the seams are straightforward and there are not a lot of pattern pieces to deal with. The skirt is fully lined and has an optional trim design on the bottom. I considered adding side seam pockets to this skirt, but decided not to for time sake. I did add 5 inches to the length for my height however.
I sewed the seams of this skirt mostly on my serger which was great. I basted the braided trim on by hand before machine sewing it on to ensure the placement was as I desired. I would have added more trim, and might do so at another time, but after shopping at two of the Joann Fabrics stores in my area, they were sold out of this soutache trim (as with many other items at this busy sewing time of year).
I love the length and slight train of this skirt and wish I could wear these kind of elegant clothes more often. Alas, with modern day lifestyles and fashions, this is just not going to happen. I suppose that is what costumes are for!
So finally, our costumes were complete. I didn’t get to finish the hat which was kind of sad, however I did have a feathered headband thing that I made for another costume a few years ago that worked just right for a hair accessory. Completing the looks with fangs, makeup, a wig and my new cute Victorian-esqe booties, we were ready to go!
Overall, these were really fun and exciting costumes to create, and I also learned a good deal about clothing construction and my own capabilities. We had a great time wearing them out to two different Halloween events and got tons of compliments on our outfits, so that is what I consider slam dunk sewing!
I am lucky enough to have made some wonderful friends at work. Friends who are smart, fun, sweet, supportive and interested in happenings of life outside of the workplace. Alyssa is one of these friends.
When Alyssa got engaged to the love of her life Connor, we all were, of course, delighted and so happy for her! We threw a bridal shower for her at work which was super fun, and sent her off to enjoy her wedding day and honeymoon in Hawaii.
Several months before the wedding, as one usually does, Alyssa purchased a beautiful wedding dress that fit her perfectly, but needed to be hemmed. Guess who she asked to alter her special dress for her? Yours Truly!
She came over to my apartment for the first fitting already bearing gifts. She made me this wonderful box to use as a platform for alteration clients to step up on while pinning a hem. She even painted it with my Love, Stephanie logo on it. It is perfect and I love it! So sweet!
As she was trying on her dress, she thought it would be really nice to add a little “sumpn’, sumpn’” to it for two reasons: one to add her own twist and flair to the dress, and two to add extra support to the little skinny straps so that they don’t cut into her shoulder so with all the weight of the beaded bodice and full skirt of the dress.
Hemming the skirt was part 1 of the alteration which was the easy part:
It was a pretty even cut around the three layers of the skirt. The tulle outer layer was just cut off, and the two under layers I used a baby hem. (Wedding) cake!
I thought I could take what I cut off the hem of the skirt lining and use the fabric to make skinny straps. We played with some ribbon I had laying around and came up with a nice criss cross strappy design for the back of the dress. Here we I just pinned the ribbon in the pattern that we liked for the straps:
I cut strips out of the scraps of the hem, and sewed long skinny tubes out of the strips, then sewed in by hand the straps to the front of the bodice.
At the back side of the dress, I sewed in tiny clear snaps to the inside of the dress and the the mate to the snap near the end of the strap.
I needed her once again to try on the dress and make the straps exactly the right length across her back so that they were long enough to go across her back, but didn’t sag when worn.
Before the straps
After the straps
Fast forward to the Big Day. Everything went smoothly, the straps held up, and the bride was radiant in her beautiful customized dress. Yay!!!
Congratulations Alyssa and Connor! May you have the rest of your lives together filled with love and happiness!
I just love a strapless dress! For some reason, the style just looks so elegant and flattering (if the fit is absolutely perfect: not too tight, never too loose) on a special occasion dress, or even a summer day dress. Something about showing off the neck, décolletage, shoulders, arms and upper back I find so alluring while daring and sensual on a woman.
I started making this dress over a year ago in hopes to wear to a garden wedding. The fabric, “Shimmering Pink Floral Polyester Twill” which I believe is from Oscar de la Renta, I acquired from Mood Designer Fabrics back in 2015 and have been holding onto for the perfect dress. It’s time has come!
As I was nearly done with it, I decided that it was a little too “young” looking on me and not quite as a sophisticated a look I was going for the occasion I was attending. So, with two days to spare, I set it aside for the wedding and whipped up a quick floral silk maxi dress (which turned out to be perfect) instead.
Meanwhile, about a year later, I managed to finish the floral dress (less a finished hem) and I just love the result and am just getting around to blogging about it:
I began this dress with the fabric, a pattern and a vision:
As you might notice from my sketch, I envisioned this dress with a horizontal sheer inset panel in the skirt made of organza. I also was planning to add black piping within the seams of the bodice to add texture and dimension, but neither of these design features made it into the dress.
I love these designer dresses with the pretty floral prints, fit & flare silhouette, flirty strapless bodice, and best of all, pockets!
Here is an image of a lovely skirt by Donna Karan from which I was thinking of borrowing the sheer inset design detail:
I used this dress pattern 7082 View A from McCalls to create this dress:
McCalls 7082
I started this dress the “proper” way with a fitting muslin so I wouldn’t risk totally messing this dress up by just cutting out the pattern, and assuming all would fit right out of the package, like I have done too many times before. I did want to make the best use out of my pretty fabric after all the work and time that is put into projects such as this, so making a muslin version first just made sense.
The fit was pretty good in muslin. I needed to take in the back. Actually, now that I look at it more carefully and have had more sewing and fitting education and experience in the past year, I should have taken some length out horizontally in the back as I can see bunching and wrinkling here where it should lay smoothly across my back:
I then started cutting out and constructing the dress in the printed fabric as well as the wonderful bright pink lining after transferring the changes back to the pattern:
The rest of the construction went pretty smoothly. Making the bodice:
The boned bodice lining:
and the skirt, adding fun and handy pockets to the pattern (because I can!):
The inside of this dress makes me happy with the bright pink satin lining and the cute black and white polka dot ribbon I added to the side seams of the bodice to serve as hanging loops:
Here she is, the entire outer dress sewn together, ready for the lining to be set in:
The inside of this little gem looks almost as good as the outside!
I just love my little dress and hope for an occasion to wear it, or sell it off to one lucky lady who would enjoy this one of a kind sweet little dress! Any takers out there?
I bought this lovely coral pink silk crepe de chine from NY Fashion Center Fabrics online as I just love the quality of their silks and the color was SO yummy!
I was not sure what I was going to make with this fabric when I bought it, but I knew that I wanted to make a fun, pretty top for summer.
Once I got my sewing mo-jo going, I decided a good match with this fabric could be this cute ruffled cold shoulder pattern from New Look that I had in my pattern stash since early spring:
I know, it’s super trendy, we see this cold shoulder trend everywhere, however, I really like it (in most cases, when it is not super cheap-y looking or just a whimpy little peek a boo shoulder). I don’t want to disappoint anyone, so here are just a few inspirational photos I have gathered of this popular trend:
Pretty, right?
So, I set forth cutting this baby out from this pattern using my lovely fabric.
Things were going along pretty well, cutting out carefully and sewing it in parts in between other projects and life happenings.
Here I am sewing a ruffle to the side seam:
I didn’t realize that this top was lined when I was looking at the back of the envelope and the fabric yardage and type needed for best results. It is quite nice that it is lined, but added a little more work and time to this project that I was not expecting. Luckily, I had a nice tan light weight silk remnant on hand that was perfect for the lining. Here I am examining the outer layer and lining of this top:
I added the ruffle incorrectly, sewing it all the way down to the side of the top instead of leaving it free under the arm to form the “cold shoulder” affect, so I had to carefully unpick the seams and re-sew. It actually didn’t look too bad just sewn down to the side as a tank top, but I really wanted the cold shoulder look, so I took a deep breath, took a seat and got comfortable with my seam ripper.
Here, I pinned the top to my dress form with her little arm attachment thing-y to just see how it was laying before adding the shoulder straps:
I had some major issues with the shoulder straps. The instructions are not helpful for this part and I think the illustrations are incorrect. I sewed it as best I could, but ended up having to unpick most of it, pin it in place and re-sew it so that it made sense and laid flat against the neck. Not fun.
Making the hem is usually my favorite part of most projects because it means I am almost done! This was an easy one with just a double turned under top stitched hem for both the outer and lining layers:
I love how the top turned out, although it is quite large and low at the side under the arm (pretty peek-a boo bra opportunity!) and I should have really made some sort of test muslin. Despite all of the hick-ups with this pattern, I’ll be wearing this top very soon as now summer is pretty much over. I hope to post some good photos of me wearing my new top as long as my hair cooperates, and I don’t look like an old lady trying to look young and hip in it. We’ll see…
Wonderful opportunities can arise out of a last-minute dilemma, which is exactly what happened between my lovely friend (and former co-worker) and myself.
Since she got engaged to an incredibly sweet and very handsome man, we have been chatting and getting excited about all the details of the plans of their small and intimate wedding day. She shared photos of what kind of dress she wanted, how she wanted everything to be very intimate, small, simple, non-traditional and unique, and just a beautiful day to celebrate their love and life together. We even threw out the idea and possibility of me making the dress for her, which I would have (and maybe should have) been delighted to do!
She decided to her dream wedding dress designed and made by a local bridal dressmaker. It was to be a relatively simple gown with a high/low hem, lined in a subtly contrasting color, fit perfectly to her slender and fit figure. They took measurements and sketched out her vision, and then the anticipation set in.
Well, at the fitting just prior to the delivery of the dress, the designer managed to produce a dress that was ill-fitting and too short at the bodice, far too short at the hemline and the neckline she desired all wrong. Plus, the designer had the confidence to make the pattern and the final gown out of many yards silk without making any sort of test garment for her to try on to approve the design and fit. Even I know better than to do something like that!
So, of course, the poor bride was very upset and disappointed, and only had a few weeks until her wedding day and NO dress!
In comes Yours Truly to save the day!
We met right away and discussed Plan B. She liked the idea of doing bridal separates and had a fancy 2-piece wedding gown on rush order from David’s Bridal, but wanted a different top than what came with the skirt.
She was going for a look such as this:
or this:
What she needed from me was the simple little silky tank top in the perfect shade of blue.
I got to work right away as we only had about 12 days to her wedding day to get it right. I sent her to Mill End fabric store to the bridal department to find the perfect fabric in the color that she wanted. She brought me this beautiful, good quality polyester charmeuse in a soft pale slate blue and plenty of yardage to make the top just in case…
I went to the internet to find a tank top pattern that had the neckline and shoulder strap shape and size that she desired to start with. I found a nice, simple one at the pattern store on Burdastyle.com that would fit the bill, with a few tweaks of course:
Tank pattern 08/2011 #104
To make the top more to her liking, I revised the shape of the neckline slightly, took in the sides to make it a little more fitted, and fully lined the top. Easy changes to make to make it to her liking, so I got to work making these alterations to the pattern and cutting the top and lining out of the same material, using the non-shiny side of the fabric as the right side as she preferred (and so did I).
It was an easy sew, making the darts first, then the side seams, then sewing the neckline and armholes of the outer and lining together, sewing the shoulders and finally the hem.
I think it turned out pretty nice!
We had a few days before the Big Day to have time to try on the top and make sure it would be OK and go well with the skirt. She decided she wanted a little more taken in at the sides and several inches hemmed from the bottom, but otherwise was delighted with it, which made me so happy! I made the changes that night, gave it a nice steaming with my great garment steamer, and she picked up the top the next afternoon.
She sent me this photo with glee that the flowers she chose would look perfect with the color of the top:
The wedding day was a beautiful day, and she was a radiant bride in her top and gorgeous skirt! He made a very handsome groom, and the tie that he chose on his own to wear, without knowing what she was planning to wear, happened to match perfectly to her top. It was all meant to be!
I am so happy for this wonderful and handsome couple, and was delighted to have been able to help her save her bridal outfit and have a small, yet important, part in their wedding day.
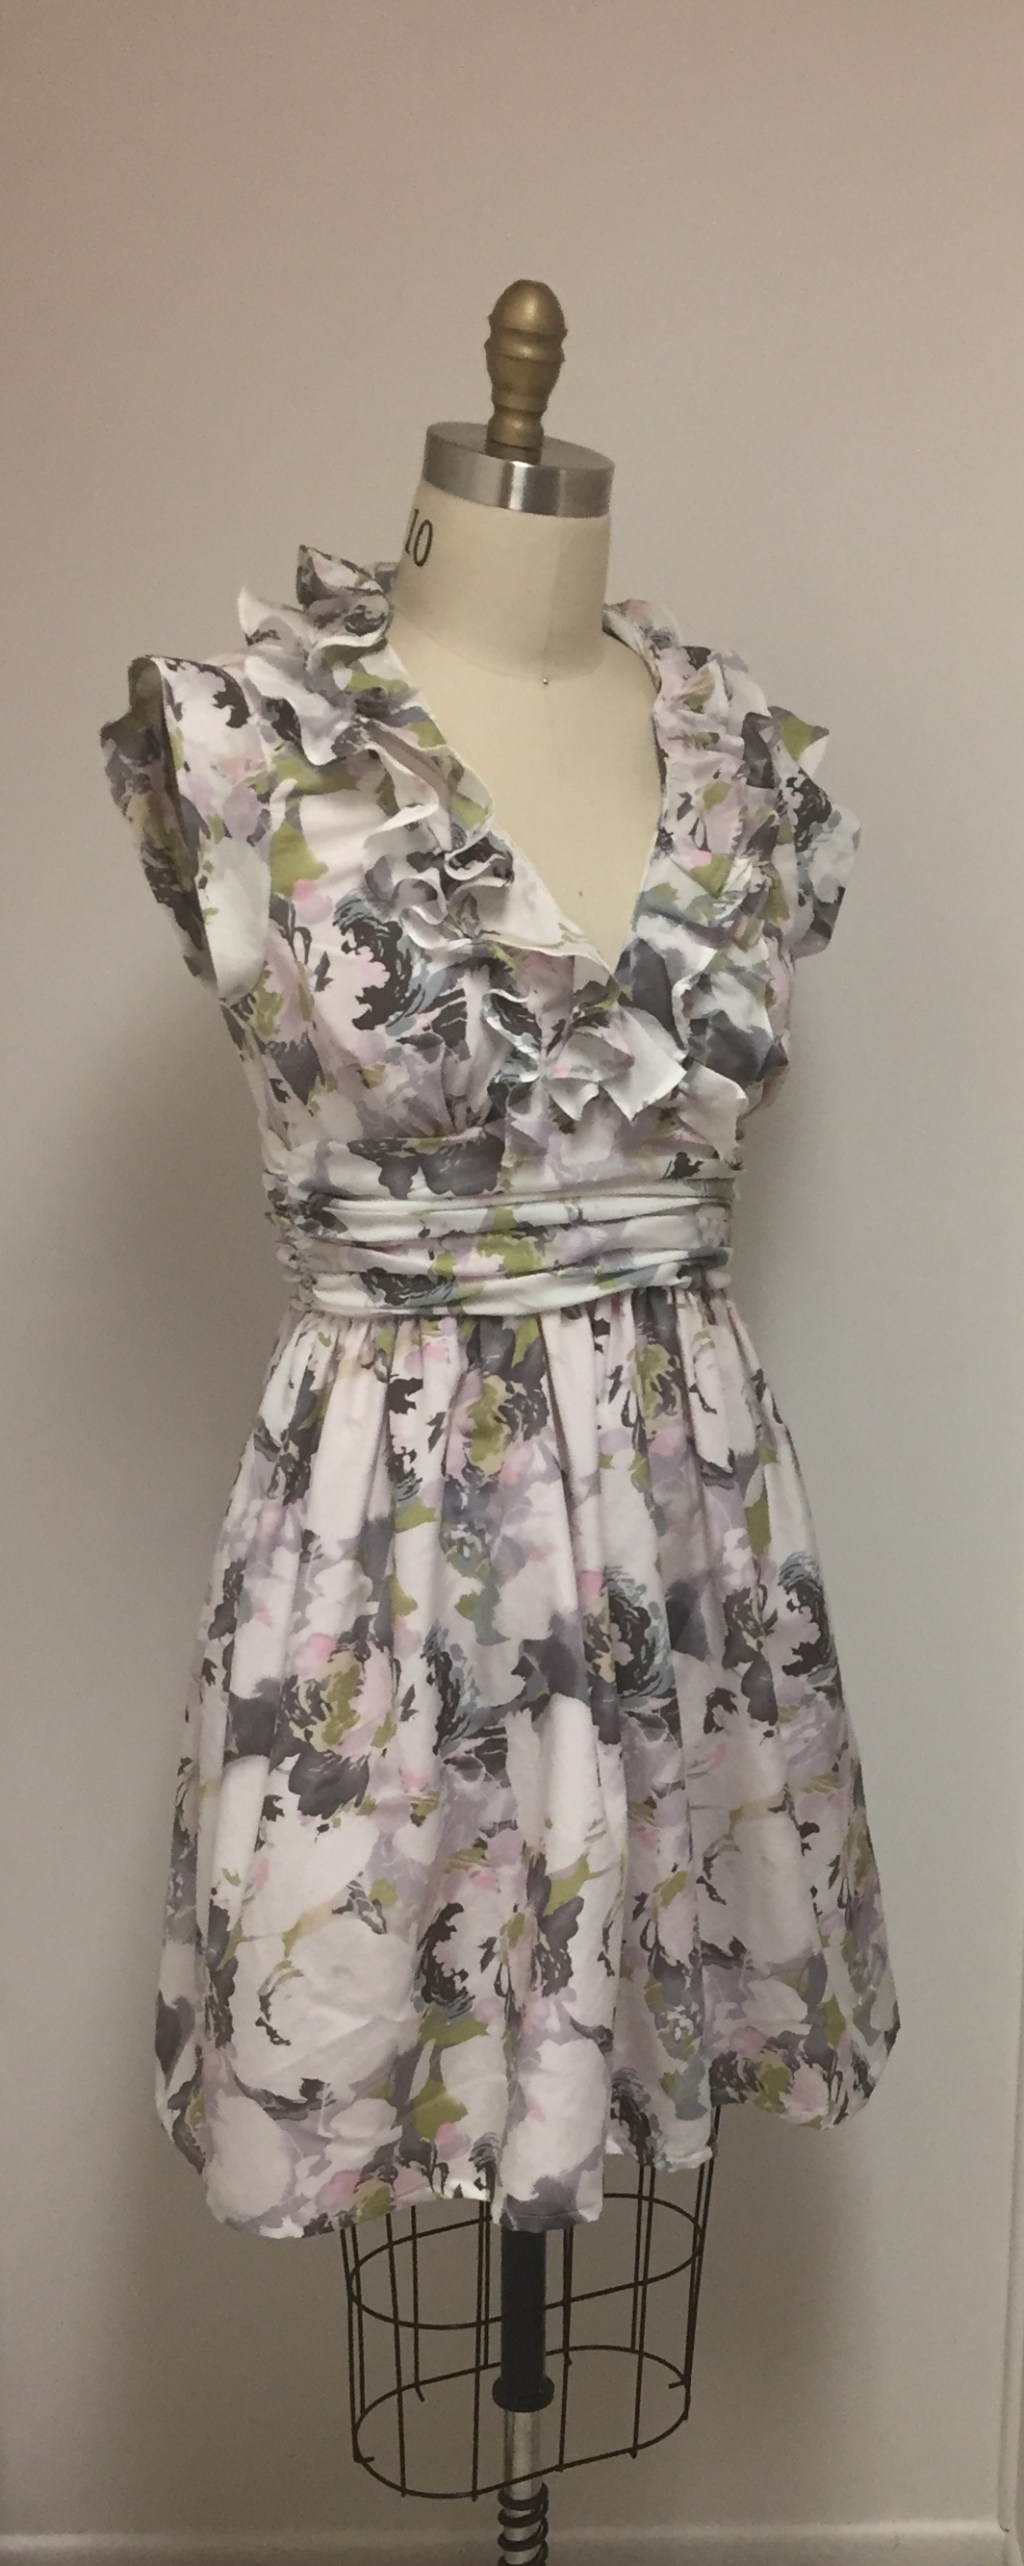
I’ve finally finished this dress and I am really excited about it!
I purchased the beautiful floral print silk and cotton blend voile at Josephine’s Dry Goods and the pink silk habotai lining at Mill End Store back in April, as well as the McCall’s 7537 sewing pattern around the same time. I gently laundered the fabric and cut out the pattern fairly shortly after that, and that is saying a lot because many of my desired projects sit and wait patiently their turn in the sewing queue.
I eagerly got started on this dress as I had a special event for which I wanted to make this that occurred back in June. However, by the time the date rolled around for the event I was not even close to being done in time for the event, plus it poured buckets that day and I would have been miserable (not to mention way overdressed!) if I had worn it, so it wasn’t meant to be quite yet.
Usually, I don’t take too much time sewing up trendy garments, but something about ruffles just calls to my inner femininity and I felt that the pattern silhouette it was classic enough that the trend would stick around for at least a little while, so I went for it.
Here are some of my ruffle inspiration looks that I find to be quite appealing, super feminine and flattering:
As with most dresses or garments that carry the details at the top and near the neckline, this pattern took the most time and attention to make at the bodice and gathered waist band. This pattern is labeled “Advanced” on the envelope and I can agree with that rating as there are quite a few pattern pieces and more advanced sewing and construction details.
Looking at the pattern envelope, it is a little more difficult to see all these pretty details with the print of the dress she is wearing:
However, the line drawing shows these details clearly:
I was immediately drawn to the feminine and girly silhouette of this dress! I love the sort of boho-chic, gypsy vibe this dress gives off. I think it would be amazing (although a total beeotch to sew) in a floaty silk chiffon, with or without the sleeves, made with all couture seams and construction (of course) and I believe would turn out a high end boutique-worthy frock.
So, I took to making this dress the best I could with the spendy fabric and luxe lining. I used French seams where ever I could, and took the time to sew by hand where needed.
It took many hours to carefully pin and sew the two separate ruffles, each ruffle consisting of three pattern pieces to be sewn together first and then hemmed with a micro-mini curved hem before attaching to the neckline:
Then, a lined facing was attached over the two tiers of ruffles and slip stitched by hand to the inside of the facing. I don’t have a photo of this in process, but it took a great deal of time and ended up kind of bulky, uneven and wavy with all of those layers. I skipped the elastic loops and lace up ties since there was NO WAY I could get these tiny loops made from elastic thread to sew down. I then edge stitched around the inner edge go the neckline to try to tame the ruffles and keep them from sticking up too much.
I read other sewing reviews about this on my favorite go-to sewing website Pattern Review that claimed that the neckline on this pattern was a pain to work with, which I do agree with, and very low cut, but I find the neckline to be OK and not reveal too much boobage.
Next came the gathered midriff. This was not too tough to do, just getting the gathers even between the top and bottom of the midriff was the only real challenge. As a finishing touch, I’ll make tiny invisible tack stitches on these gathers in various spots to keep them from poofing out or shifting around. This is a little trick I learned while working in alterations at a bridal shop where many dresses and gowns had this technique done on gathered areas of midriffs and necklines.
I thought I might make the long gathered sleeves of this dress, lengthening them to wrist length to suit my liking, but then as the summer days in Oregon reached temperatures in the 100 degree range a few weeks ago, I couldn’t bare the thought of a long sleeve and decided to cut the little cap sleeves from view C of the pattern:
Here is the bodice before and after I sewed on the sleeve:
The pattern directions have you just sew the sleeve to the armhole and press it towards the bodice, but I felt that this left a raw edge here that could potentially show and fray when worn (or hanging on a pretty hanger in a fancy boutique!), so I serged over the armhole and sleeve seam after sewing it and plan to tack it down at the under arm seam to keep in under control. I usually don’t like to serge seams and take shortcuts when I am making a dress as “couture” as possible, so if I were to make this pattern again in the future, I would most likely make a French or some other finished seam here.
Before the serger:
Sewing the skirt and skirt lining was a breeze. I used French seams for the side seams of both, then attached the two at the top and part of the side where the zipper opening was. Attaching it to the bodice while gathering it to fit proved to be a tedious task, but I got through it carefully and slowly as not to have any uneven gathers or puckers here.
Next, I slip stitched the midriff facing (or lining, whatever you want to call it) over the skirt seam by hand. I usually really enjoy this step in making a dress, whether with ot without a waistline band, as it really finishes off the inside of the dress, and is usually near the end of the process. Here is the facing pressed under and pinned in to place ready to hand stitch in place:
Putting in the side zipper was a little tricky since the seam doesn’t open all the way (the zip opening begins a couple of inches down from the armhole and extends through the midriff into the skirt), so it is a little difficult to maneuver the zipper in. The inside of the zip opening doesn’t look very pretty, so I might go back over this covering it with a binding to finish the edge and prevent stray threads from getting caught in the zipper teeth. I think I have enough of the lining material to make self binding over the zipper tape, that would be nice!
I hemmed the dress and lining just doing a fold and turn hem, nothing too crazy. Possibly an invisible hem would have been a little better for the outer skirt, but I don’t have my better sewing machine with the blind stitch foot and setting with me just yet (I’m in the process of moving and currently just have my “travel” machine at home with me), so I just made do with the turned under hem as shown here on the lining:
A few things I wish I had done differently with this dress is to 1) make in seam pockets. That would have been great, and an easy add. And 2) I should have taken the time to make a muslin mock up, even if it was just the bodice and midriff, as I feel that it is a little short in the torso length for me, and slightly too tight. We will see how it wears and how comfortable it is. Otherwise, the dress is great and very pretty!
I really enjoy how this dress turned out after all, but am not 100% sure if it is a great fit (whoops, I skipped the muslin mock up and just compared my measurements to the pattern measurements), or of it’s a great look for me. It may end up becoming a one of a kind Love, Stephanie for sale garment, so prepare to possibly place your bids Kids!


 Ahh, sweet, sweet love!